SAP SuccessFactors has some exciting new features for your Compensation & Variable Pay Solutions. They can be found in detail here (S-User ID required). Filter on Solutions for Compensation to review all of the latest changes. Under the Description for each, you can click on ‘See More’ to see screenshots and detailed information.
As a reminder, preview release will be October 16 and production will be released November 20th.
After reviewing all the changes, we narrowed the list down to the Highlights for H2 2020Compensation & Variable Pay & Reward and Recognition:
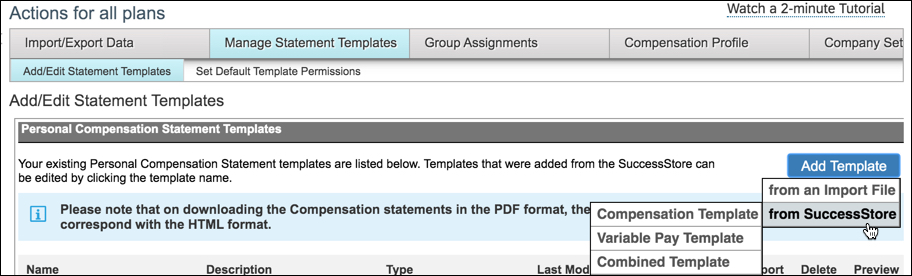
1. New Layouts for Statement Templates
Additional flexibility has been added for standard compensation statements
The new layouts are available for Compensation, Variable Pay, and Combined statement templates to support right-to-left (RTL) compliance. Previously, Compensation fields were always displayed to the right of text section in statements. This will allow for a more custom look and feel to better suit your needs.
The new statement template layout increases usability and improves user experience with Compensation statements. See my earlier blog post for other tips on optimizing standard statements.
After selecting template from SuccessStore, you will now you have the flexibility to display Compensation fields to the right, left, or below the text section of statements.
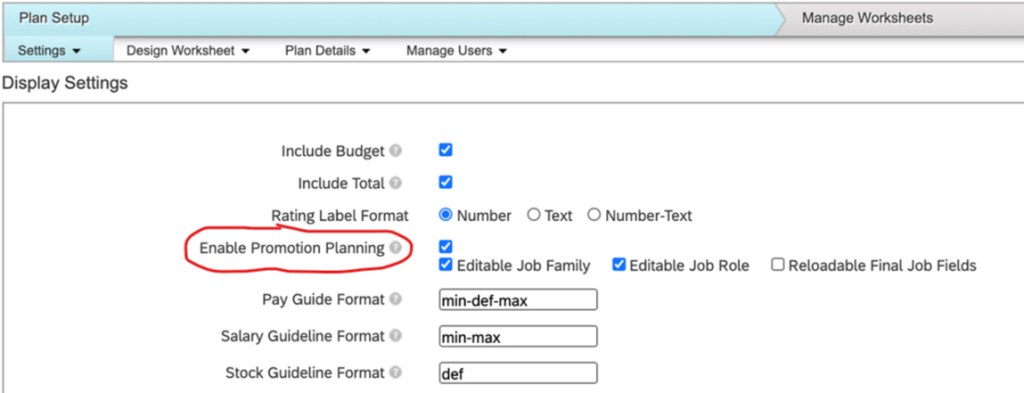
2. Promotion Planning and Job Selector Within Compensation Template
You can now enable promotion planning and job selector functionality at the compensation template level.
When you select Enable Promotion Planning, the system displays three parameters related to job selector functionality: Enable Promotion Planning, Editable Job Family, Editable Job Role, and Reloadable Final Job Fields.
End users can Enable Promotion Planning directly in the template instead of the XML
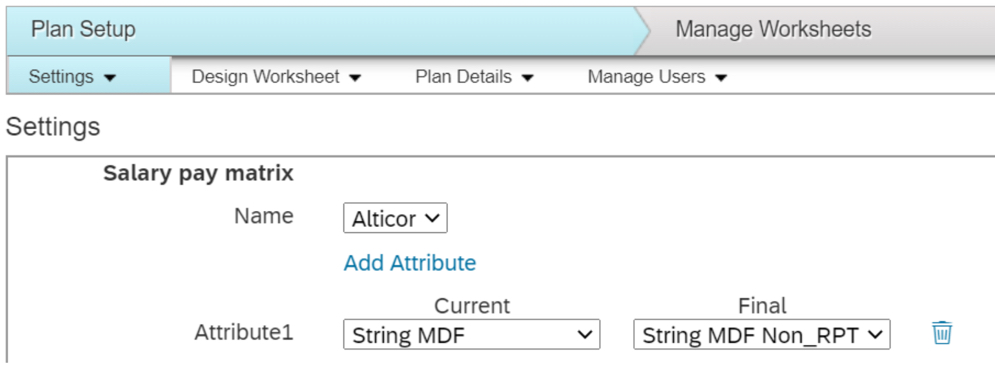
3. Configuration of Calculated Pay Range on the Basis of Post-Promotion Information
A new setting has been added to allow you to directly maintain the post promotion fields to be used when calculating the final pay range for a promoted employee. In most cases, the final pay range is based on post-promotion information.
Post Promotion attribute to be used to determine final pay range can be defined in Settings
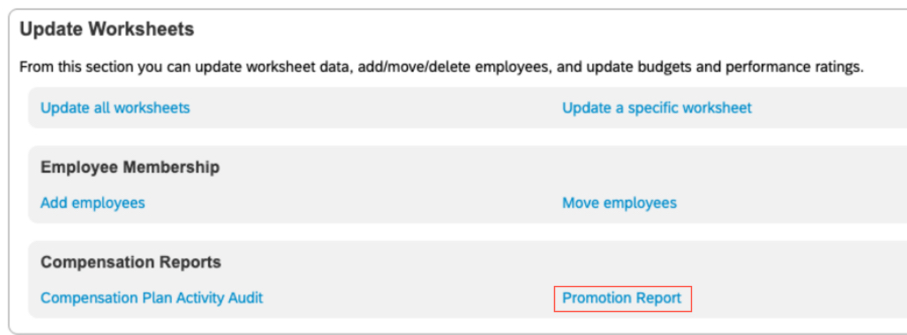
4. Promotion Data Available in Compensation Report
New functionality was created to allow users to create worksheet reports containing promotion-based information for employees. The system exports data from Employee Central for EC-enabled templates and from job selector fields within compensation for worksheets that aren’t EC-enabled.
Previously you would have to manually go employee-by-employee through your worksheets to review promotion information, which can be time consuming for large groups of employees.
Click here for details on the Role-Based Permissions that are needed for this report.
Promotion report can be found under Admin Center –> Compensation –> select template –> Manage Worksheets
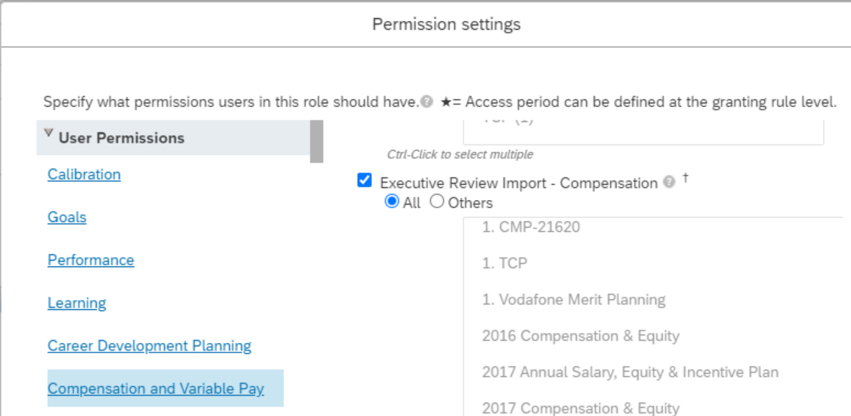
5. Role-Based Permission to Control Import of Executive Review Information
You can now use Role-Based Permissions (RBP) to control who can import data into Executive Review. You can allow access to every template or specify individual templates to which the RBP applies.
Previously when you enabled compensation excel offline edit, all users with Executive Review access would have seen the Import button.
You can now control who has access to Import into Executive Review and which templates they can do this for
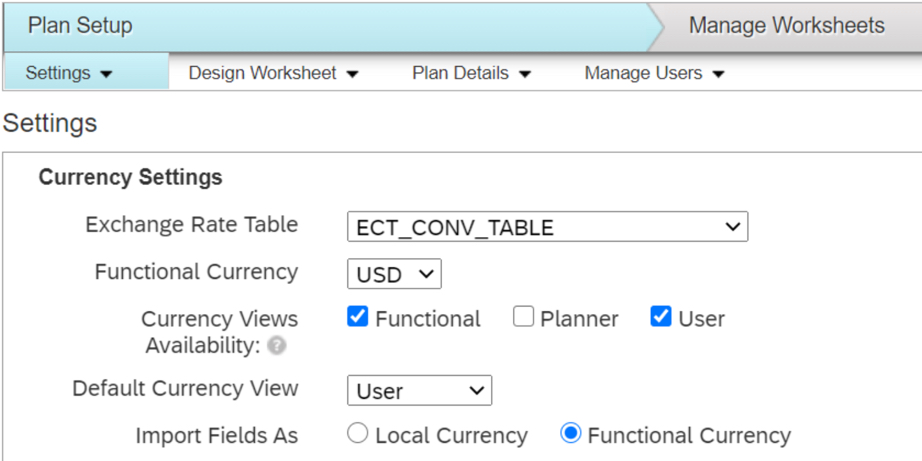
6. Currency Views Availability Field Added to Compensation Plans
Users can now select which currency views are available per template.
This functionality was previously only available for Variable Pay plans and Total Compensation plans.
Currency Views allow users to toggle between Functional, Planner, or User (Local) Currency
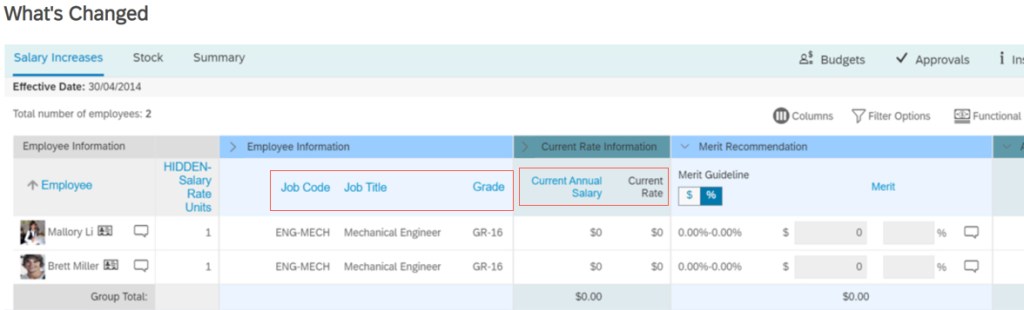
7. Configure Compensation Worksheets to Display Multiple Columns for Collapsed Groups
Users can now configure the system to display multiple columns for a collapsed group on a compensation worksheet.
This allows greater flexibility when setting up the worksheet and can allow for better look and feel for end users while saving real estate.
In the example above, several columns appear in the collapsed groups instead of just one
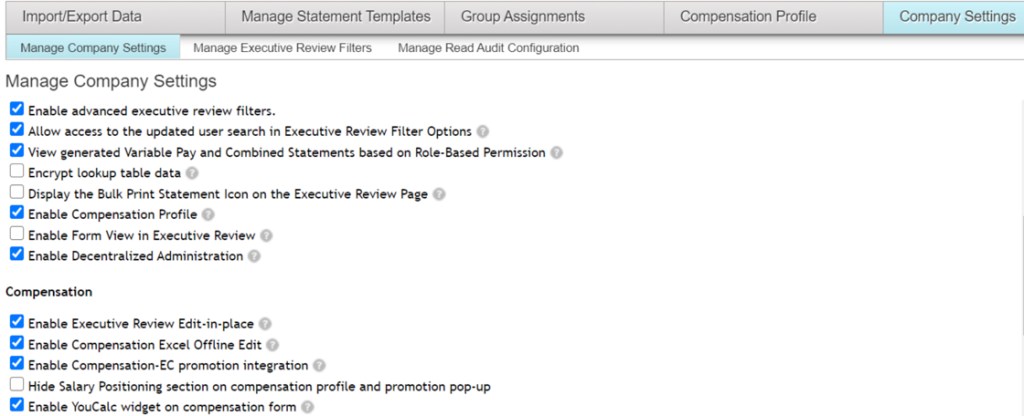
8. Compensation Provisioning Settings Available on Company Settings Page
You can now configure fields on the Display Settings and Settings pages that you previously needed to set by modifying through the XML file.
Enable YouCalc widget on compensation form
Enable Compensation Profile
Enable Form View in Executive Review
Enable Decentralized Administration
Additional company settings added for compensation administrators to access
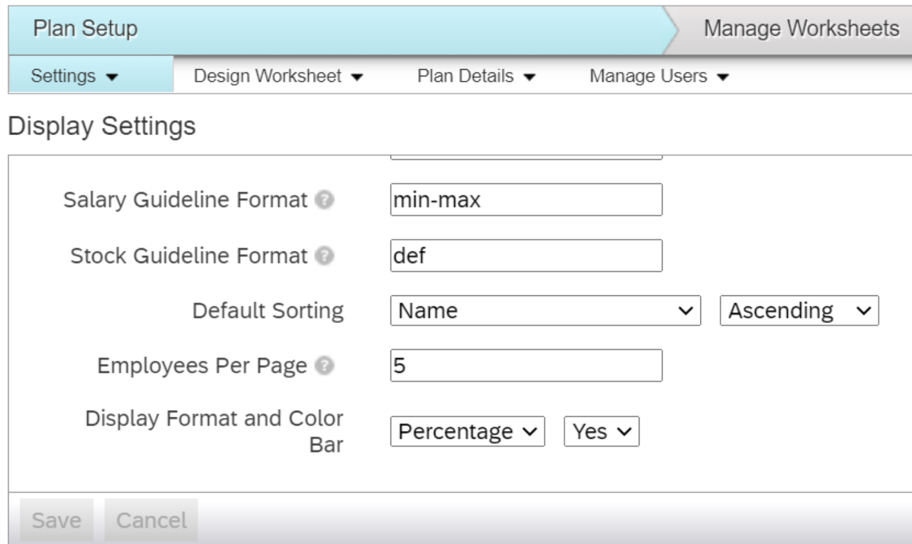
9. XML Attributes for Compensation Added to Display Settings Page
You can now configure fields on the Company Settings page that you previously needed to set by modifying through Provisioning.
Default Sorting
Employees Per Page (now up to 100 employees per page)
Display Format and Color Bar (Compa-Ratio)
Additional settings added for compensation administrators to access
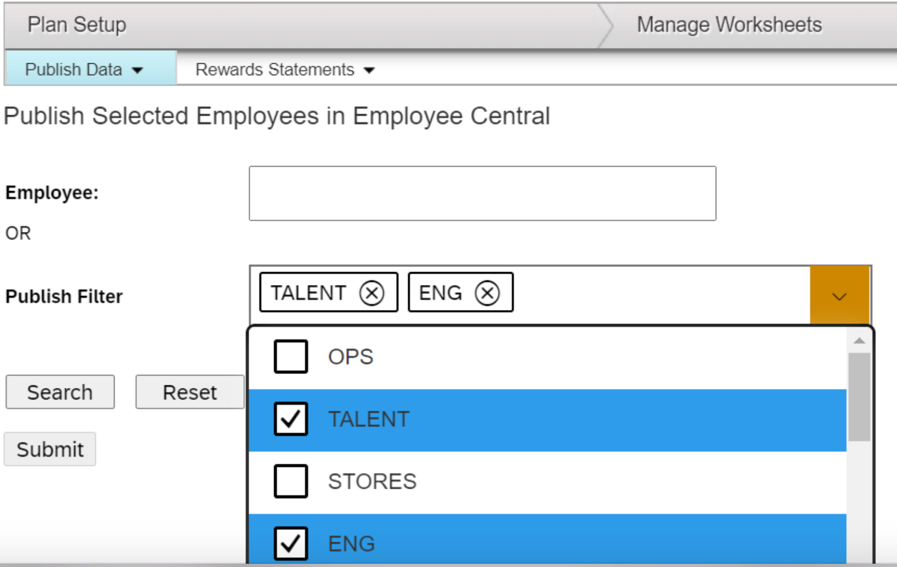
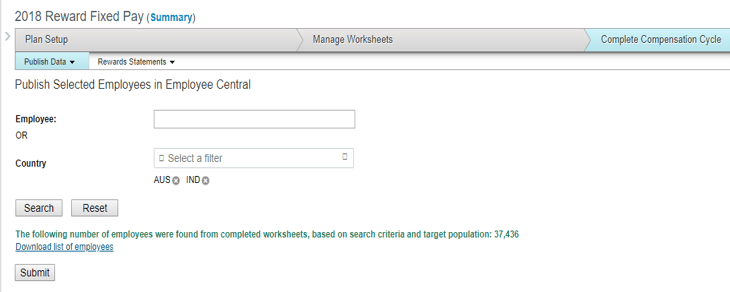
10. Multi-Select Filtering Supported Within Compensation When Publishing Employees in Employee Central
You can select multiple filtering reportable fields when using the Publishing Selected Employees in Employee Central functionality.
This allows for increases flexibility when publishing data back to EC.
Multiple fields can now be selected to publish by
See this great article for useful information on how to prepare for a SAP SuccessFactors Regular Release.
As of October 9, 2020, SAP has released their documentation for the H2 2020 release. You can view the full set of documentation in the What’s New Viewer here. As a reminder, preview release will be October 16 and production will be released November 20th. For full details on the release cycle, check out the SAP SuccessFactors official product updates blog here. For tips on how to manage a release, check out or blog here. For your convenience, we’ve summarized the highlights of what’s new for 2020 within Calibration below!
With the H2 2020 release, there are additional features introduced for the latest version of Calibration. There are new universal and admin opt-in features along with five universal updates. We will review the updates starting with what’s new.
New Admin Opt-in Features
There are three admin opt-in features that provide additional access to employee information to make better decisions when calibrating ratings along with some enhanced admin functionality.
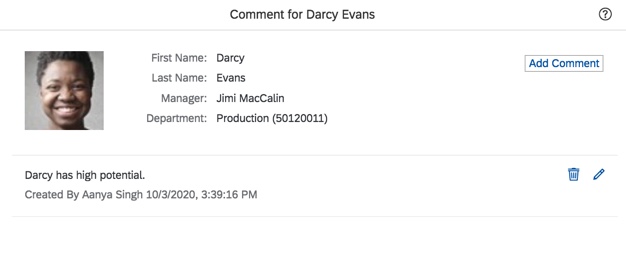
Access to Comments from Other Calibration Sessions
Currently within a calibration session, reviewers have access to subject’s comments on the session detail page. Based on the calibration role permissions, the reviewers may add, edit, delete or view comments. An example of the current functionality is shown below.
Current Subject Comment
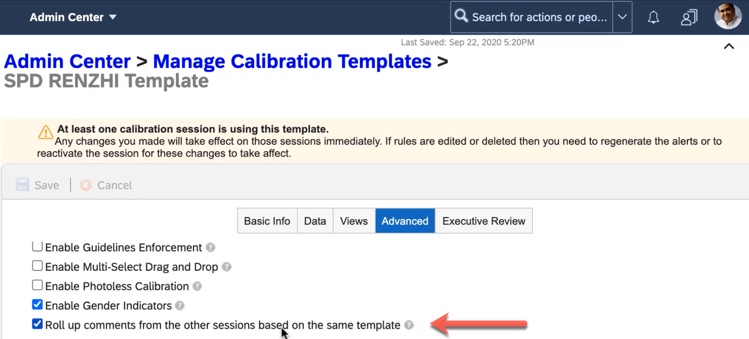
With the new release, it is possible to reference comments from prior sessions. Seeing comments from prior sessions gives the session reviewers a more complete picture of subjects in order to make more objectively.
This option is set in the Advanced tab of “Manage Calibration Templates” as seen in the example below. Enabling “Roll up comments from the other sessions based on the same template” will give calibration reviewers access to comments from prior sessions.
Roll up Comments Setting
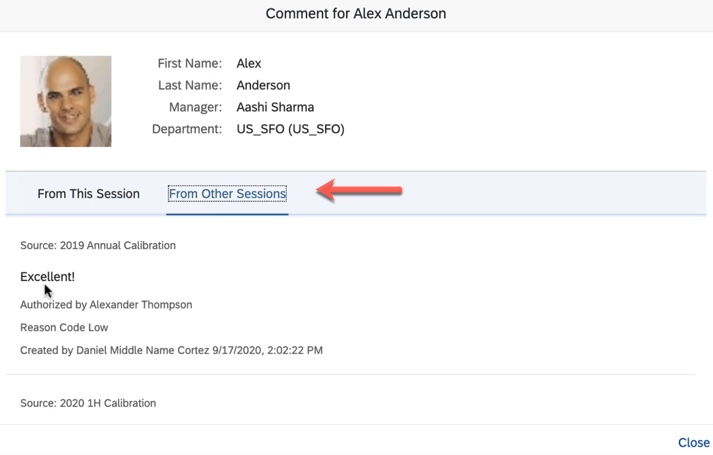
As seen in the example below, when adding or viewing subject comments during a session, the comment dialog box will now contain two tabs: “From This Session” and “From Other Sessions“. Comments for the current session may be added, edited, deleted or viewed. Other session comments are view only.
.
Prior Sessions Comments
However, comments from prior sessions will only display in the new tab if the other sessions use the same calibration template.
Replace Facilitator that becomes Inactive
There is a new setting that will be available in “Manage Calibration Settings”. Enabling “Choose a user to replace a calibration session’s only facilitator who has been inactive” will allow a new facilitator to replace the sole facilitator of a session who becomes inactive. Once a replacement facilitator is identified and the inactive user is purged, the facilitator is automatically replaced for the session.
Omit “Too New to Rate” from Rating Options using Employee Profile
On the Global Settings tab within “Manage Calibration Settings“, there is a new option that may be enabled. “Remove ‘Too New to Rate’ from rating options for the rating types from People Profile data” will omit “Too New to Rate” as an rating option when selecting Employee Profile as the data source for ratings. This will be apparent on the Data tab within “Manage Calibration Templates” when Employee Profile is selected as the data source for ratings to be calibrated. With this setting, “Too New to Rate” will not be displayed as a rating option.
New Admin Opt-in Feature
Odata API for Session Comments
A new OData API entity called “CalibrationSubjectComment” is now available so comments are exposed for interfacing. A query can be used to get a single comment made for a calibration subject using comment ID or to get all comments made in a calibration session. An example of the URI for getting all session comments is shown below.
We will now review the four universal features found in the latest release.
Access to Subject Comments
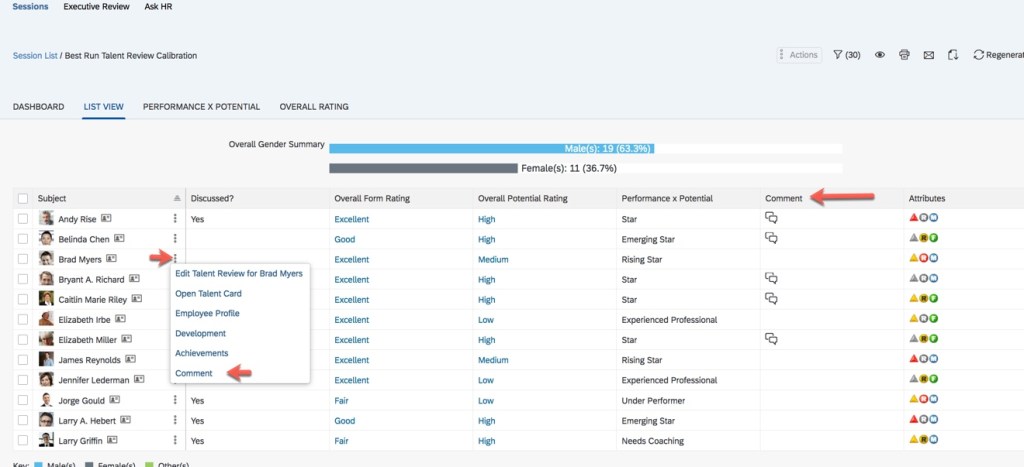
Currently, there is a comments column in the List View of a calibration session as seen below. If a comments icon appears for a subject, the reviewer would click on the icon and would be able to see existing comments. If the session reviewer also has “Write” permission, they could also add a comment. The vertical dots menu for each subject would be used to get to the link to add a comment as shown below.
Current Comment Column in List View
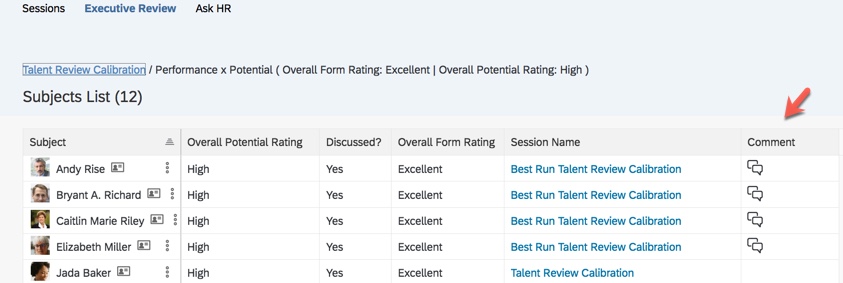
The comments column appears in the Subjects List for Executive Review as seen below.
Current Comment Column in Subjects List View
In both views, the column would contain a comment icon if there was a comment for the subject.
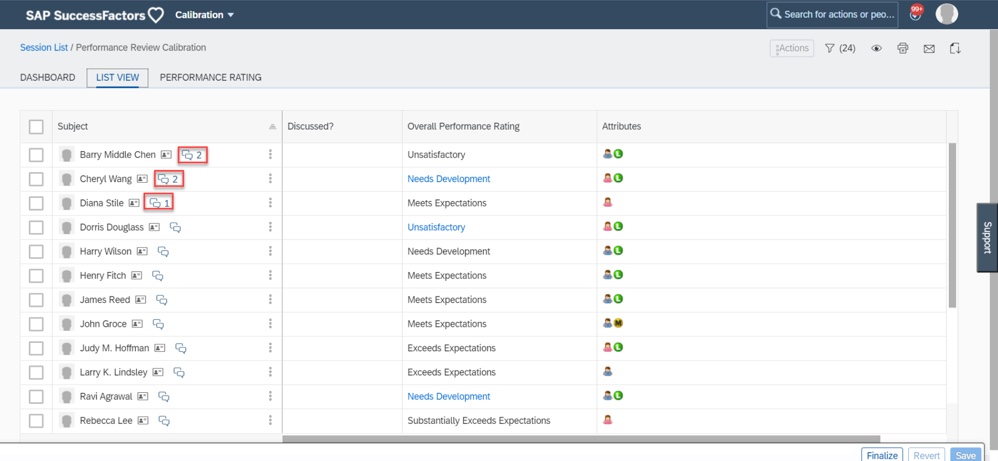
In the latest release, it will be easier to view and add comments. The comments column which houses a comment bubble will no longer be used in the List view of a calibration session or in the Subjects List within Executive Review. An example of the new comment feature is shown below.
New Comments
In the new release, the comment icon will appear with the subject name along with the comment count regardless of a user having any comments. If comments exist for a subject there will be a number count next to the icon. To add or view a comment, click the comment icon.
The Calibration History block on People Profile will display the comment icon with the comment count for each subject as well.
Autocomplete Search of Universal People Search
The Calibration module has adopted autocomplete search. This allows the admin in the “Manage Calibration Sessions” page and calibration users in the session list page and session details page to use the autocomplete search of the Universal People Search.
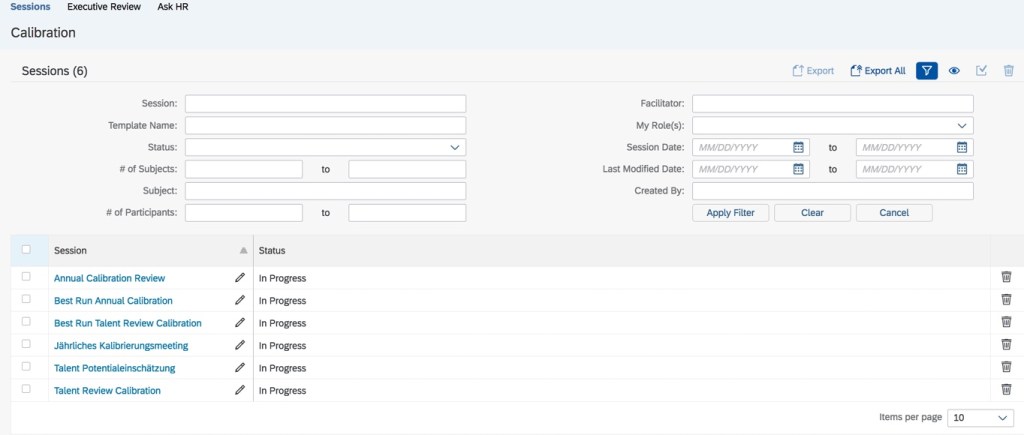
The current calibration sessions list page search options are seen below.
Current Calibration Session List Search Options
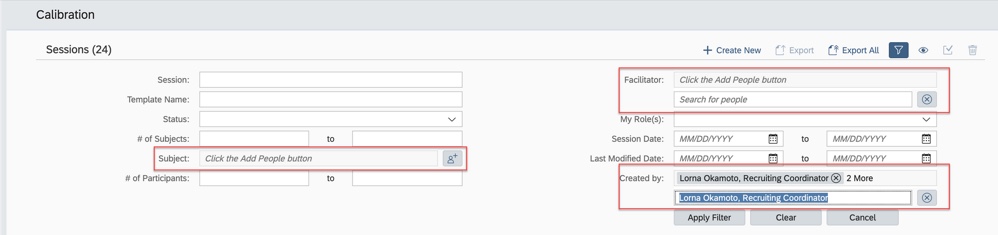
With the new release, there will be an “Add People” icon which enables the autocomplete search of Universal People Search. An example is shown below.
Search Options
Start typing to search for a name in the module search box. The system predicts names you are searching for. All matches will display as separate entries to choose from.
Enhanced Experience using Matrix Grid Views
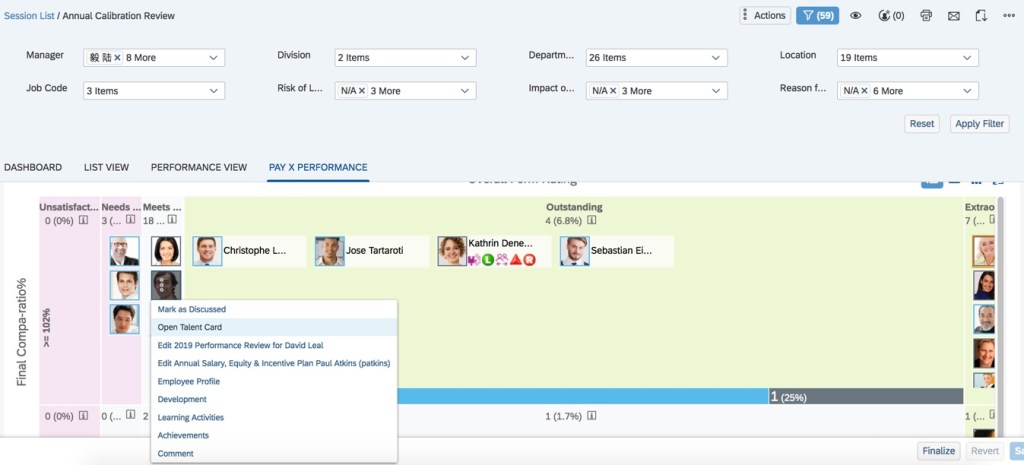
The current matrix grid view within a calibration session is shown below. To see the talent card of a subject in a zoomed out cell, the “more” icon for a subject would need to be clicked and then “Open Talent Card” selected.
Current Zoomed Out Matrix Grid View
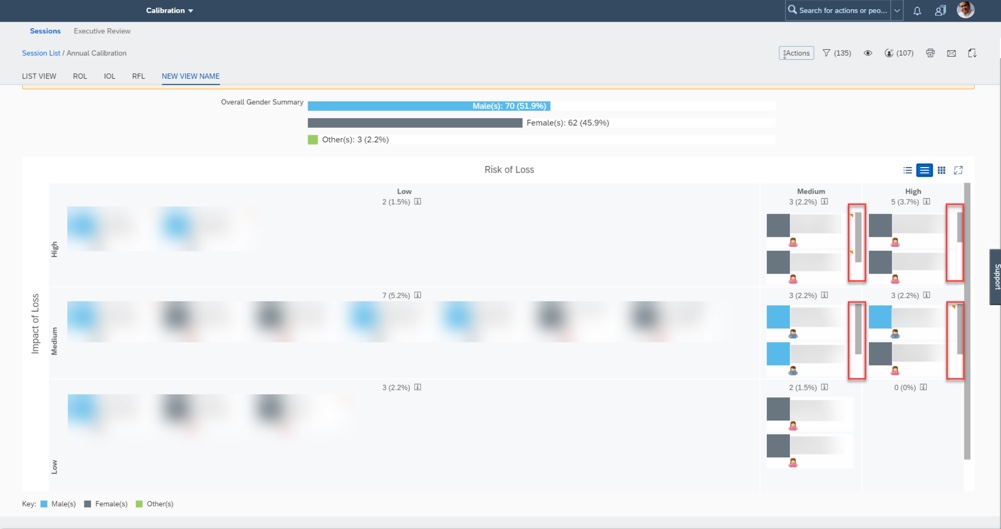
Available in full-screen and normal modes in the new release, the cards will be visible in zoomed out cells. There will be a scroll bar when a cell is too small to see all of the people cards. This feature makes it easier to compare subjects in zoomed in and out cells. An example of the new functionality is shown below.
New Zoomed Out Matrix View
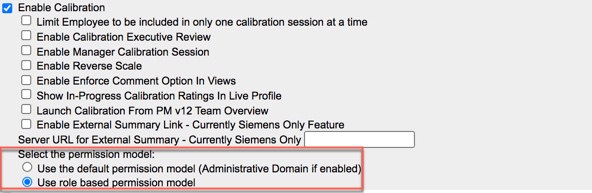
Select Permission Model Obsolete
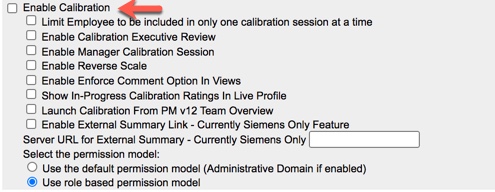
Within provisioning, in the “Enable Calibration” section of Company Settings, the option to select the permission model will no longer exist.
Current Permission Model Options
Now that all customers are using role-based permissions, the default permission model option is no longer viable so this selection will no longer appear.
Calculated Rating from Customized Weighted Rating Section in Bin View
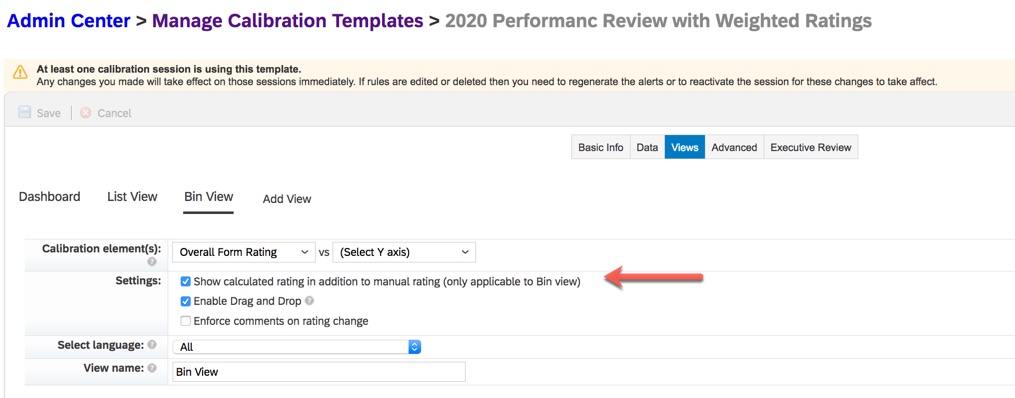
There is a another feature available when a calibration template is based on a performance form template that contains a Customized Weighted Rating section. Currently, when the data source for a calibration template is a performance form template with this summary section, either the manual or the calculated rating can be calibrated. However, the calculated rating cannot be displayed in the Bin view of a calibration session.
With the latest release, the calculated rating from the Customized Weighted Rating section may display in the Bin view if this calculated rating comes form a PM form and the “Show calculated rating in addition to manual rating (only applicable to Bin view)” setting is enabled. An example is displayed below.
Show Calculated Rating in Bin View
Wrap Up
The latest release improves managing calibration sessions for the admin and improves the calibration reviewer experience.
Do you need help managing your SuccessFactors Release cycles? Email info@worklogix.com to see how we can help!
As of October 9, 2020, SAP has released their documentation for the H2 2020 release. You can view the full set of documentation in the What’s New Viewer here. As a reminder, preview release will be October 16 and production will be released November 20th. For full details on the release cycle, check out the SAP SuccessFactors official product updates blog here. For tips on how to manage a release, check out or blog here. For your convenience, we’ve summarized the highlights of what’s new for 2020 within Continuous Performance Management below!
The latest version of Continuous Performance Management (CPM) was restricted in the H1 2020 release and now will be generally available. The H2 2020 release builds on the redesign of the user interface for CPM that began this year.
There are four new admin opt-ins, two universal updates and one admin opt-in update available when using the latest version of CPM. We will start by reviewing what’s new.
New Admin Opt-ins
Latest Version of Continuous Performance Management using Upgrade Center
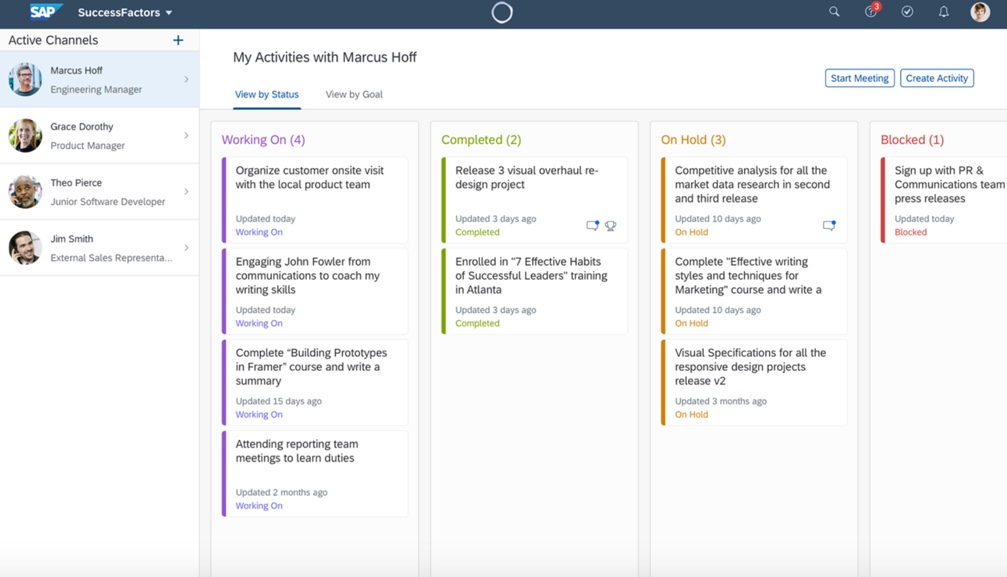
The upgrade to the latest version of CPM must be done as an admin opt-in using Upgrade Center. There are some features are automatically applied when upgrading:
Activities View- which uses a Kanban board for activity management.
Meeting View – to manage conversations.
Achievements View – with a new layout that shows activities linked to achievements.
Ability to link activities to development goals as well performance goals.
Activities must be used to create achievements.
When upgrading to the latest version, all current CPM users are impacted. It is worth noting if you are contemplating the move to the latest version of CPM, once the latest version is enabled, you can’t go back.
Once the upgrade to the latest version of CPM is completed, there are some additional admin opt-in features that may be enabled.
“Discussion Topics” replaces “Other Topics“. Any existing content within “Other Topics” gets converted to “Discussion Topics“.
There is also a new feature called “Meeting Notes“.
Multiple roles is a new permission based feature which allows users to have 1:1 meetings with anyone in their organization.
“Enable Activity-Feedback Linking ” to link activities and activities tagged as achievements to feedback.
Use of the latest version of Continuous Feedback.
“Disable Deleting Feedback” is a carryover from the prior version that is now available in the latest release which prevents a user from deleting any existing feedback.
Several features are no longer available with the latest version of CPM:
Achievement Feedback
Achievement Linking to Goals
Achievement Linking to Development Goals
Coaching
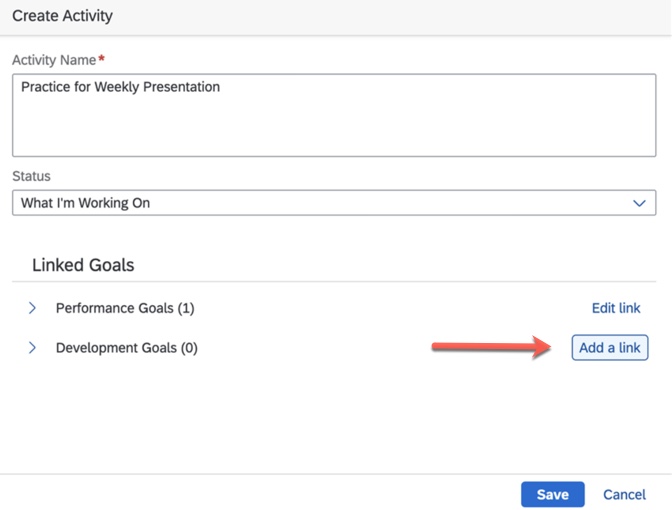
Link Activities to Development Goals in Continuous Performance Management
Another new admin opt-in available for CPM is the ability to link an activity to a development goal. In the H1 2020 release of the latest version of CPM, only performance goals could be linked to activities. An example of creating an activity and linking to a development goal is shown below.
Link Activity to Development Goal
Some additional functionality is available as well:
In addition to viewing activities by status and by goal, the Activities view will now have a tab for development goals.
When viewing an activity in the Activity Details view, the development goal linked to the activity will display.
Linked development goals will display in the Meeting view and in the Meeting History page.
Linked development goals in the Activities Kanban board may have name and details edited.
Goal linkage may be changed in the Activities Details page.
Integration with the Career Development Plan and the Development Goals section of a Performance Management form when an activity is tagged as an achievement to a development goal.
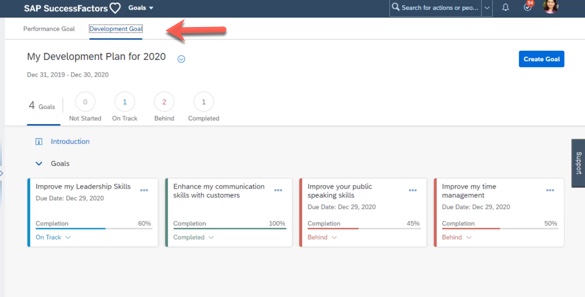
Goal Management
If you are using the latest version of Goal Management, Development will no appear in the navigation menu. Instead, performance goals and development goals are housed together within Goals with a tab for each. An example is shown below.
Access to Development Goals via Goals
The integration between Goals and CPM allows users to create and view activities within Goal Management. As it already functions for goals, it will now be possible to create and view activities in the Development Goal view.
Multiple Role Support for Continuous Performance Management
The final new admin opt-in feature allows roles beyond the manager/employee hierarchical relationship to use CPM. Currently CPM is limited to the view between a manager and their direct reports. The new Multiple Roles feature allows a user to invite someone else to share a CPM view which contains access to the Achievement, Activity, and Discussion Topic views.
This feature involves a concept called “Channels”. A user invites another user to a channel which contains the CPM Activity view and a Meeting view. An example is shown below.
CPM Channels
This feature enables users to have ongoing conversations with those they work with but are outside the traditional employee/manager roles. Users can view achievements and drilldown into individual activities. The Multiple Roles option needs to be enabled in CPM configuration view to use this.
Admin Opt-in Updates
Latest Version of Continuous Feedback for Continuous Performance Management
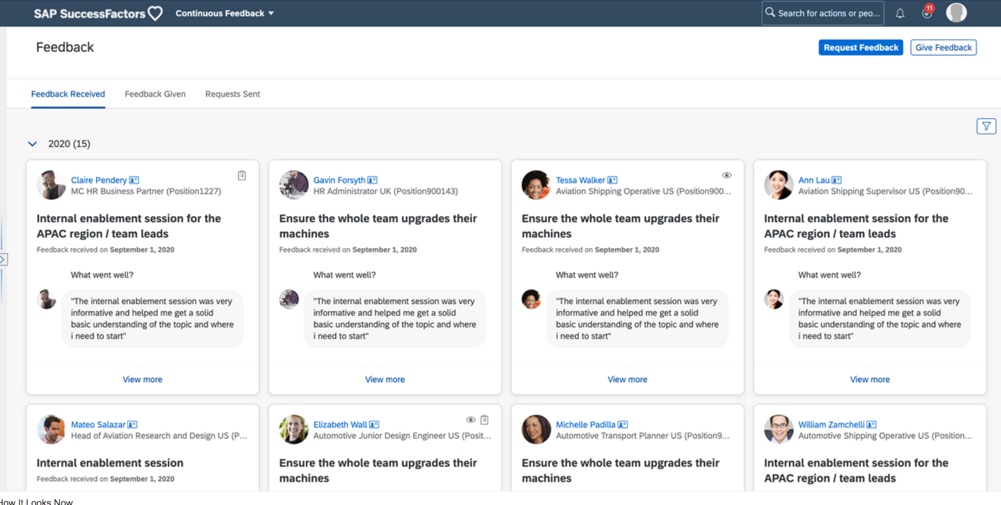
There is an improved process to request and provide feedback when using the latest version of CPM. Continuous Feedback is not housed within CPM but instead is found in the navigation menu. An example is shown below.
Continuous Feedback
There are tabs for feedback received, feedback given, and feedback requests sent. There are also buttons to ask for feedback and to give feedback.
New is the use of a topic and questions when requesting and giving feedback. Feedback is more targeted and based on questions asked of the feedback provider. Users could select from standard provided questions, admin created questions or allows users to write their own questions.
An example is requesting feedback is shown below.
Crafting Feedback Questions
This flexibility enables users to get constructive feedback on specific topics rather than receiving generic feedback.
Feedback details may also be viewed. An example is shown below.
Feedback Details
Filtering of feedback has also been enhanced. Feedback may be filtered by linked activities, shared feedback or feedback by date range. An example is seen below.
Filter Feedback
Universal Updates
There is two universal updates for latest version of CPM that relates to feedback.
CPM Feedback Data in Goal Plans
Feedback from CPM is now available to display in the performance and development goals plans. The CPM achievements column for a goal currently shows the count of achievements tied to a goal. With the latest version of CPM, achievement related feedback will also display. In the CPM achievements column, clicking on the count will now display the feedback topic title along the topic title and three sets of questions/answers from the Achievements tab.
CPM Feedback Data in Performance Management Forms
The CPM achievements column in the performance and development goal sections of a PM form currently shows the count of achievements tied to a goal. With the latest version of CPM, achievement related feedback will also display. In the CPM achievements column for a goal, clicking on the count will now display the feedback topic title along with the three related feedback question/answers.
Wrap Up
We have now seen what new features you can look forward to utilizing with the latest version of CPM.
Not surprisingly for Onboarding, most of the feature enhancements revolve around compliance. The biggest news is the release of compliance forms for the USA (I-9, E-Verify, W-4. SWF and standard forms). There were some customers in the USA hesitant to jump into Onboarding 2.0 until this happened. In addition, you can also create custom compliance forms if any happen to be missing for you country. Problem solved!
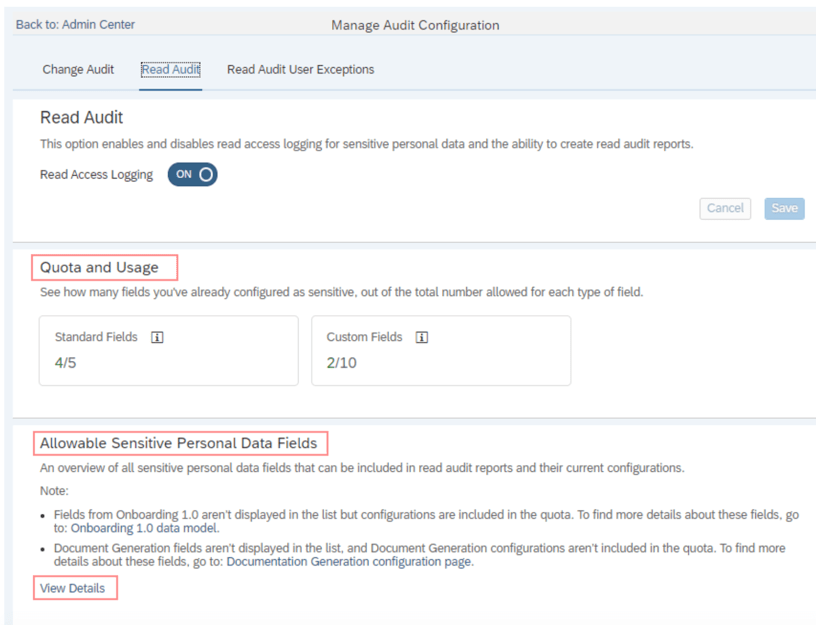
Onboarding is also now included in the platform-wide features of Data Purge, Read Audit, Change Audit, and Information Report. There was a major overhaul of the Read Audit report screen to assign specific fields as sensitive across most modules (see below screenshot), and onboarding is included in this. You can use the new screen to pick which fields you deem are sensitive instead of the system only assuming ethnicity, minority, and ssn are sensitive.
New Read Audit Configuration Screen Where you can choose which fields are sensitive
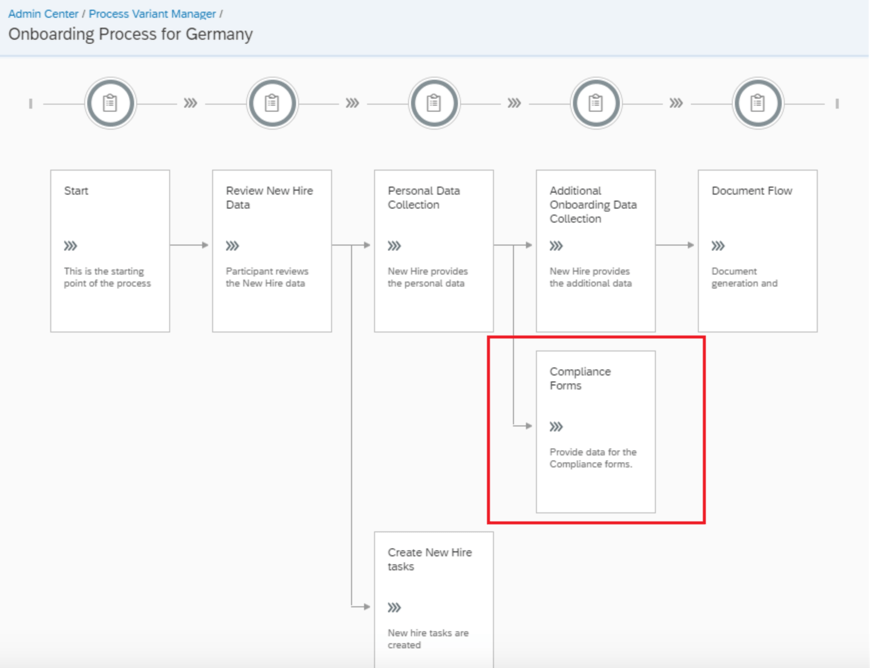
Additionally, there’s a ton of features to organize and enhance compliance usability. There’s now a way to add a compliance step to your standard workflow for the onboarding process (see below). Compliance forms can also now be categorized based on document type. Email notifications can also now be sent based on compliance-related events.
Adding a compliance step to the Process Variant Manager
SAP has also added reporting on compliance in People Analytics that allows you to query on the status of compliance forms.
Business Rules
Business Rules continue to expand their usefulness in Onboarding as well. You can now directly edit the event reason in onboarding using a business rule (before you had to make a custom recruiting field for event reason).
Another neat new feature is the ability to customize the user id and employee id formats that get generated automatically. This is accomplished using a business rule and will allow administrators to organize the ids to follow helpful conventions rather than just being entirely up to the system.
Business rules can also be tied to email events for additional categories as well now too (Suite Mapping Error, Nudge Assignment, and Manage Assets Upload Categories). Attachments can also be added to email notifications as well.
All in all, there’s 16 items being changed/enhanced in this release for Onboarding and we didn’t cover every detail here. For more information, check out the What’s New Viewer here.
As of October 9, 2020, SAP has released their documentation for the H2 2020 release. You can view the full set of documentation in the What’s New Viewer here. As a reminder, preview release will be October 16 and production will be released November 20th. For full details on the release cycle, check out the SAP SuccessFactors official product updates blog here. For tips on how to manage a release, check out or blog here. For your convenience, we’ve summarized the highlights of what’s new for 2020 within Succession and Development below!
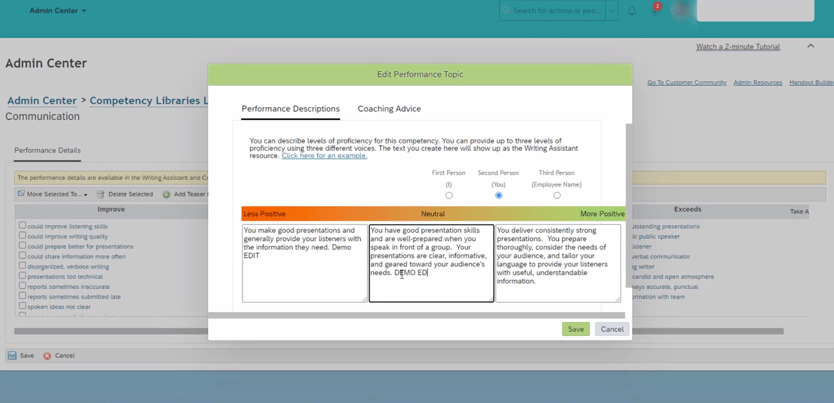
Writing Assistant and Coaching Advisor for Job Profile Builder
The biggest news for these modules we’ve seen is that the Job Profile builder now supports the Writing Assistant and Coaching Advisor (see below). This was a big gap that is finally being closed. We had some customers who wanted to use both the Job profile builder and the Writing Assistant and Coaching Advisor. This required creating all of the content for the Coaching Advisor and Writing Assistant in the legacy competency library config screens and then switching on the Job Profile builder and hoping everything got converted OK. If there was a mistake somewhere or something you wanted to add to the Coaching Advisor or Writing assistant…well then there wasn’t a way to fix it without turning off the Job Profile builder. Now this gap is closed and a profile job profile builder compatible maintenance screen for the Writing Assistant and Coaching Advisor exists. Woohoo!
Writing Assistant
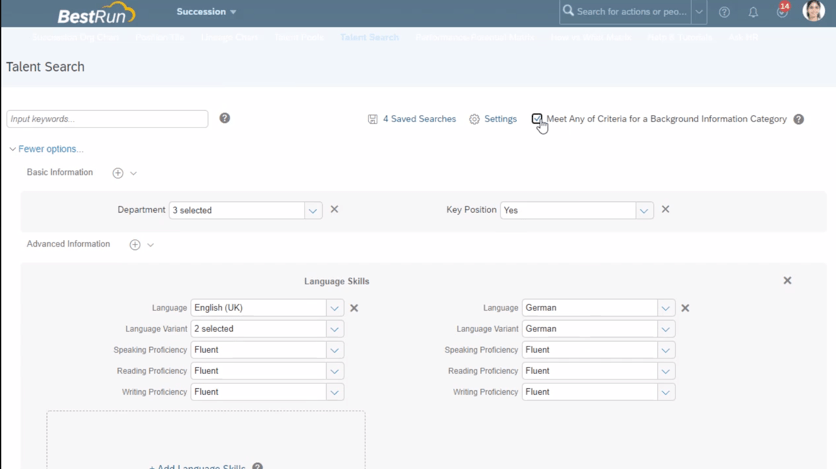
Talent Search
Another significant enhancement we’ve seen is to the talent search. Now at the top of the screen there’s a checkbox to toggle between AND/OR logic when searching for background information (see below). We are wondering how this compliments / replaces the “Make All Criteria Optional” button that already existed under the settings menu. You can also add up to 6 criteria within each background element. There’s also a new competency picker in the talent search. The export feature was also enhanced to allow you to reorder and choose which fields can be exported. More fields can also be exported now under Advanced Information and Ratings & Competencies.
Talent Search Showing New Check Box for Before and After
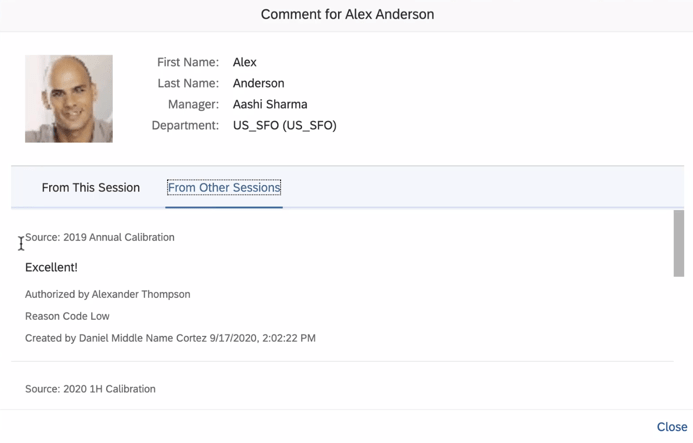
Calibration
Calibration sessions got a neat enhancement where you can now view comments from other calibration sessions so long as they use the same template (see below)! We can see this becoming very useful to organizations that manage multiple sessions across large organizations. This was also enhanced in the Odata API where a new object, “CaibrationSubjectComment”, is available so that these comments are exposed for interfacing.
Calibration Comments Between Sessions
In addition, you can also use autocomplete when searching for people in calibration. Also, if you are attempting to purge a user who happens to be the only facilitator for a session you can now replace the user with an active user and then continue with the purge.
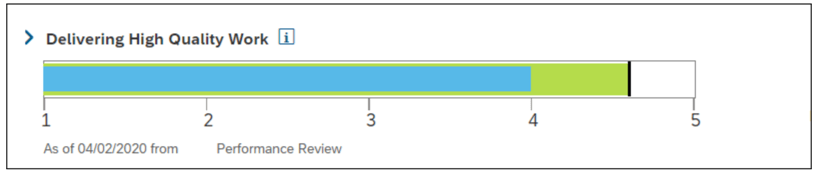
Career Worksheets and Career Explorer
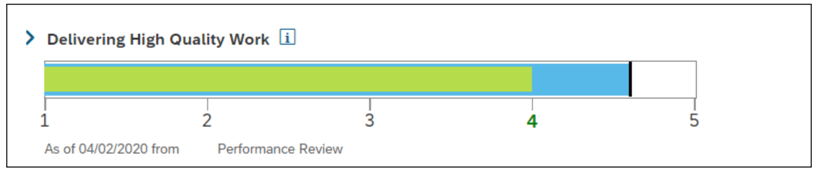
Within Career Worksheets and the Career explorer we’ve seen some nice usability improvements. For example, the ability to remove recommended roles in the career explorer. Users can now remove a recommendation if they no longer wish to see it. This is a nice feature that can help encourage employees to keep looking for other roles instead of just constantly throwing something irrelevant at them. Aside from this, the career worksheet also got a security enhancement where the worksheet is only viewable if the employee is in the user’s target population. The progress bar also swapped colors as shown below. The bars will also show up now for not applicable / too new to rate competencies (they were hidden before).
Before:
After:
But that’s not all!
Development templates and Continuous Performance Management also got another integration point. Now when a user
Matrix views (9-box) also got visual /usability updates. For example, you can now remove the “Too New to Rate” option. You can also view the people cards for employees even when you are zoomed out of their box. You can also select reporting levels in the Matrix Grid Report.
You can now also hide contingent workers in the Succession Org Chart. The “Add Successor” icon also appears now even when there is no successor exists.
Talent pool nominations can also now be approved or rejected. Nomination history for talent pools is also available via the Odata API and People Analytics Stories.
All in all, there’s over 25 items being changed/enhanced in this release and we didn’t cover every detail here. For more information, check out the What’s New Viewer here.
Lately, in a variety of customer engagements for various SAP SuccessFactors modules, I’ve had to bring up the topic of the Job Profile Builder. As a relatively new feature that touches every module, it’s really no wonder! But there’s still a lot of customers who aren’t quite familiar with it. This blog should give you an understanding of what the Job Profile builder is, why you would want to use it, and an overview of what it takes to go about setting it up.
What is the Job Profile Builder?
The Job Profile Builder is an important SuccessFactors Platform feature that enables customers to build and organize a catalog of well-formed jobs. So what exactly is a “job”? If you are familiar with position management in HRIS systems, you’ll know to traditionally think of positions as a seat. One person sites in one seat (I know there’s some exceptions, but let’t not get complicated here). Jobs are an abstraction above positions. So where there might be a Maintenance Tech I position who services a building in San Francisco, there’s also a Maintenance Tech I position in Seattle that does the same thing but is a unique instantiation of a position from the San Francisco position. The job describes the common tasks, required skills, education, & competencies, etc. for these positions. If you’d like an idea of what kinds of information companies associate with a job regardless of the system they use, Mercer has a great article here.
What Benefit Does it Provide?
Quite a few benefits are to be had with a well maintained job catalog. From a business process perspective, it will help you categorize and regulate your positions. For example, standardizing pay bands, required competency levels, government classifications, etc. On the Successfactors side, the Job Profile Builder integrates across all modules and can greatly reduce redundant data entry while helping facilitate the business process benefits. The following integrations are available with the job profile builder:
Employee Central: Direct association with positions in Position Management
Performance Management: Automatic Assignment of Competencies
Succession Management: Successor suggestions based on competency assessments
Compensation: Derive compa-ratio based on link with job grade
Recruiting: Automatic population of job posting description from job profile
Workforce Analytics: Planning based on required job Competencies
LMS: Assigning learning content based on job
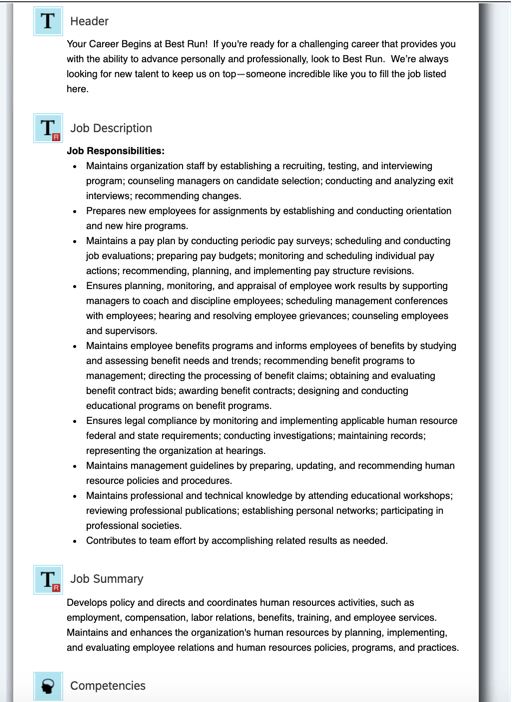
In the example screenshot below, we can see how the recruiting integration automatically pulls the job description from the job profile for internal and external requisition postings. This can save your recruiters a great amount of time having to re-type job descriptions for each posting.
Example Job Profile Integration with Recruiting
How does Job Profile Builder work?
There are 3 major components and corresponding configuration screens of the Job Profile builder:
Job Profile Content: Define the options (e.g. drop-downs) that show on the profile. For example what skills or competencies or education types will exist in the system that can be placed on a profile. An example of configuring what degree types will exist for selection in creating a job profile in the system is shown below. There’s also a lot of helpful pre-built content from SAP available for download from the SuccessStore that pops up as you build your content. For more info, see the link here: https://help.sap.com/viewer/70097a1a469d47a0ae08809e4a240f98/2005/en-US/99856fa2c4944001ab5991e92c9454eb.html
Managing Job Profile Content
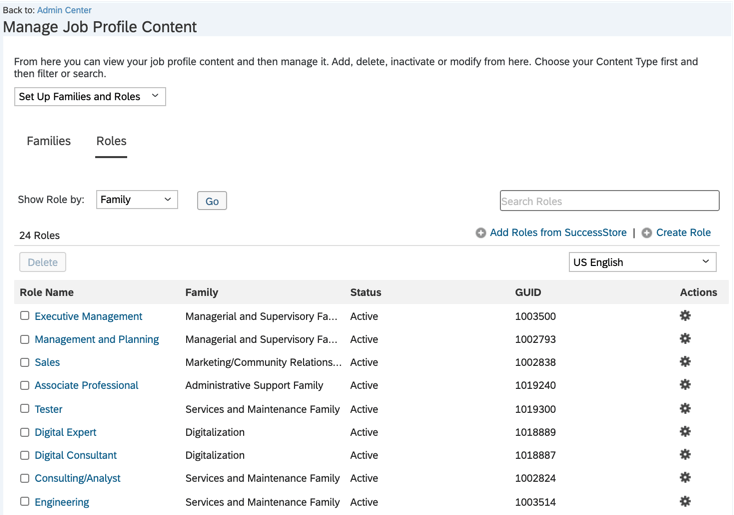
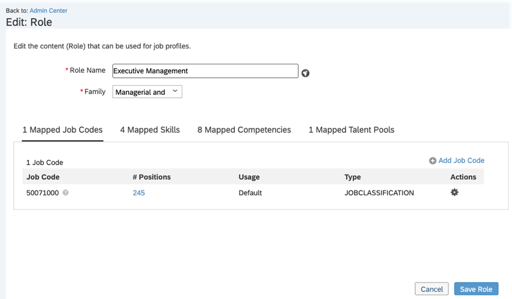
Job Roles: Roles are what you build the profile around. They represent a specific set of skills, competencies, description, etc. Roles can be associated with job codes which in turn associate to positions. Job roles can also be grouped into similar categories called Job Families. You setup the Job roles within the Job Profile Content screen. See the example below. For more info, see the link here: https://help.sap.com/viewer/70097a1a469d47a0ae08809e4a240f98/2005/en-US/aa2d3d5b1027403bbcffa8b29f70196d.html
Setting up Job Roles
This still doesn’t tell us what the Job profile is….well, when you create a Job Profile you are associating it to a specific Job Role and filling in a specific template with the specific content relevant for that role. So to answer the question of what is a Job Profile?–It is the marriage of these 3 components. You can see in the screenshot below where a specific template is being filled in with the content we have setup in the system to define a particular role.
The Manage Job Profile Screen: Editing the Content on Your Specific Job Profile
How does the Job Profile Integrate with Employee Central Position Management?
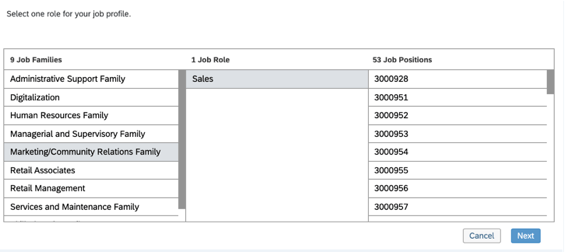
You will notice when you start creating a Job Profile, there’s a screen asking you to associate the profile with a Job Role:
Example screenshot showing organization of Job Families to Roles and Positions when creating a Job Profile
When you edit roles, the system will ask you to map Job Codes. Those Job codes sit between the job Role and the Positions. Thus while there’s a 1:1 relationship between the Profile and the Role, there can be many codes associated to a role. Since there’s many codes across many positions, thus there are many positions that can be associated to one job role and profile.
This provides us with many benefits! For example, whenever you create a requisition from a position with an associated Job Profile, the requisition will automatically pull in the Job Profile as well and activate this integration seamlessly!
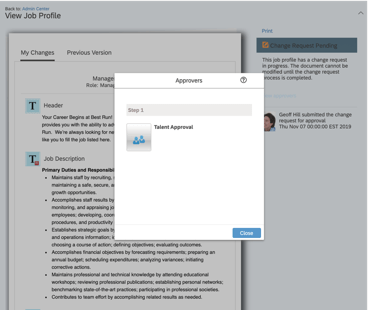
Furthermore, the Job Profile builder can utilize Employee Central workflows as well! This can be beneficial as you manage you job catalog as a variety of resources all using the profiles across the modules may want to make edits. In the screenshot below we can see when one of these interested parties modifies the Job Profile it will trigger a workflow.
Screenshot of Job Profile Builder Edits Triggering Workflow
Conclusion
Hopefully you now have a good understanding of the Job Profile Builder and are excited to start using it! Setting up a job catalog can be a tremendous undertaking, but hopefully now that you understand how the tool works, it can make the task a little easier. If you have an existing job catalog you’d like to import, there are also import screens available for you. As I mentioned before, there’s also a lot of helpful pre-built content available from the SuccessStore.
For more information about the Job Profile Builder and other talent management modules in SAP SuccessFactors, check out our book here!
Do you need help with integrating or setting up the Job Profile Builder? Contact us at: info@worklogix.com
Calibration is a process used to appraise employee performance in a fair and consistent manner. Managers meet in calibration sessions to discuss employee performance and achieve agreement on performance ratings. At the onset of a calibration session, the definition of each performance rating can be agreed upon to enable a common language to use when discussing and evaluating performance. The intent is to help eliminate any potential manager bias when discussing employee performance and finalizing ratings.
SAP SuccessFactors Calibration provides a framework to objectively evaluate employee performance. This tool provides HR and senior managers the means to impartially review and adjust performance ratings across teams, departments and the organization. A calibration session provides a visual presentation of employee data from multiple sources in multiple views. Evaluating ratings in several formats with different filters may help to find areas of bias.
Calibration may be a standalone process or part of a performance review process, a talent review process, or a compensation review process.
Information used within Calibration may be sourced from Performance Management, People Profile, Compensation, or Succession data. Within Performance Management, overall performance, potential, competency, and goal ratings may be calibrated. The Succession related metrics that may be calibrated are Risk of Loss,Impact of Loss and Reason for Leaving. Compensation ratios may be evaluated using the salary, bonus, stock and variable pay components of a compensation template. Overall potential, performance, competency, objective and two custom ratings may be calibrated from the talent profile section of People Profile. Upon completion of a calibration session, ratings are updated in the original source.
We will focus on calibration based on ratings from a performance form template.
Basic Configuration of Calibration
There are several steps to perform before we are ready to run a calibration session:
Enable Calibration in Provisioning
Configure Succession Data Model
Set role-based permission for Calibration access
Configure data source template
Enable calibration related e-mail notifications
Configure Calibration Template
Configure Calibration Settings
Assign users to Executive Review role
Configure Calibration History Portlet in People Profile
In this blog we will cover the steps to configure Calibration in Provisioning. The steps to configure Calibration in your instance will be covered in the next blog, “Configuring SAP SuccessFactors Calibration Part II – Instance Set Up”.
Enable Calibration in Provisioning
First we must enable Calibration in Provisioning. Within Company Settings, search for “Calibration” to find the section called Enable Calibration. Once found, click the checkbox as seen below.
Enable Calibration
Additional settings under Enable Calibration may be enabled here. If you plan on using Executive Review, which summarizes calibration activity across sessions, enable this feature here. We will need this feature enabled when creating the calibration template.
If you are going to permit managers to create their own calibration session, click the checkbox for “Enable Manager Calibration Session”. We will need this feature when configuring the calibration settings.
The other features may be set in the instance directly via Manage Calibration Settings and will then reflect as enabled in Provisioning. We will be discussing these features in the next blog, so we can leave the rest unchecked here.
There is also a radio button within Enable Calibration used to identify the permission model used. The default permission model is legacy permissions but you should be using Role-Based Permissions (RBP). Make sure “Use role based permission model”is selected.
Use Role-based permission model
Save the settings in this section of Company Settings before moving on to the next set of features to enable.
Calibration Reporting Permission
There are no standard reports or dashboards for calibration. Any calibration reporting will need to be done using ad hoc reports. If you wish to make calibration data available for reporting, go to the Analytics and Dashboard Tabs & Misc Reporting section of Company Settings.
“Additional Adhoc Sub domain Schemas Configuration” and “Enable INCLUDE STARTING FROM USER in people pill” will need to have the following enabled:
Calibration
Calibration Org Chart Coverage
Calibration Activity
After saving the settings, back out of Company Settings and we will continue with additional configuration set up.
Configuring Calibration in the Succession Data Model
There are elements in the Succession Data Model that can be used for calibration. We will need to update the data model to ensure these elements are configured. Export the data model in order to make updates.
Open the file using an XML editor. Here we will be updating the following:
Rating elements
Display options
Filter options
Calibration History Portlet
We will look at each of these.
Rating Elements
The ratings that can be calibrated are based on the available ratings configured in your system. While setting up Calibration in your instance, you identify the data source of the ratings. Earlier we had mentioned that ratings may come from performance form templates. You may calibrate ratings from an existing performance form template or you may decide to create a new performance form template in order to utilize additional rating types such as overall competency, overall goal and overall potential.
In either case, the data model must contain the rating elements that you wish to calibrate. Most likely these already are already in the data model but you will need to verify this. The rating elements are:
sysOverallObjective
sysOverallCompetency
sysOverallPerformance
sysOverallPotential
sysOverallCustom01
sysOverallCustom02
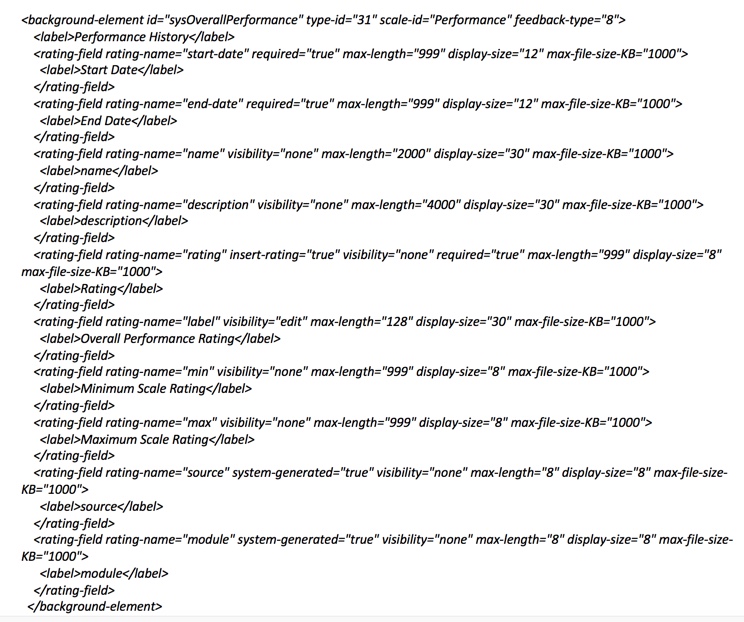
A code segment seen below displays an example of the overall performance rating background element.
sysOverallPerformance Background Element
Make sure all of the rating types that you wish to calibrate are included in your data model.
Additional Elements to Calibrate
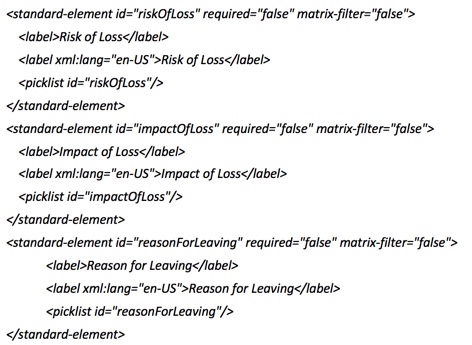
There are three standard elements that may display in some of the views in a calibration session. If you are using SAP SuccessFactors Succession, these most likely are in used for Talent Flags and Matrix Grid reports.
riskOfLoss
impactOfLoss
reasonForLeaving
A code sample of the flags is shown below:
Talent Flags in Data Model
Display Options
Calibration sessions can display data in many views. In Part II of this series, you will learn how to create these views. There is a display option feature that is particularly useful for the List view tab. Here the data is displayed in a table with a row for each employee being calibrated. If there are several columns for this table, there could be a lot of back and forth scrolling. With the display option feature, some columns may be hidden. There is an icon for display options that enables users to add or remove certain columns from the view. Some are hardcoded and will always show up as display options in a calibration session:
First Name
Last Name
Count
Quickcard (if enabled in the calibration template)
The Quick Card display option may be enabled when configuring the Calibration template which we will discuss in Part II.
When clicking on the display options icon within the calibration session, any of these fields may be deselected and those columns will no longer display on the view.
There are some icons that may be added as a display option fields. Any display option fields defined for Succession in the Matrix Grid Classifier tool in Provisioning or the flags be set in Matrix Grid Report Icon Reconfiguration may also be used as display options in a calibration session. In the list view, any of these icons selected would appear in a new column called “Attributes”. Bin and matrix views the icons appear underneath an employee’s name. Having these icons readily visible for each employee may be useful when comparing employees.
Filter Options
Filter Options are used in a calibration session to narrow the list of the employees that display. If there are a large number of subjects, this is a way to view a smaller group that meet the filter criteria. It may be more manageable to view subsets of employees during the session.
Within a calibration session, the standard fields that are available as filter options are:
Manager
Division
Department
Location
Jobcode
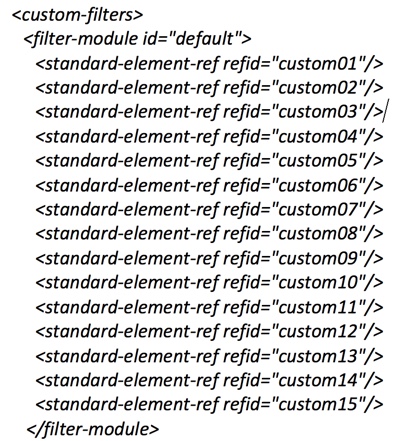
These will always appear as filter fields for a calibration session. If Risk of Loss, Impact of Loss and Reason for Leaving are also in your data model, these fields will also be filter fields. The 15 custom fields that may be defined in the data model may also be added as filter options. To set this up, the custom fields must be part of the default filter in the data model as shown below in the code segment sample.
Adding the custom fields as default filters
These custom fields may also be used in as filters in calibration. Module specific filters are defined within <custom-filters>. Identify the calibration module filters by adding this tag:
<filter-module-id=”calibration”>
Include the custom elements that you wish to use as calibration filters. This should be placed after the default filter as shown below:
Calibration Filters
There is one additional calibration specific element that may be added to the data model. We will look at this next.
Calibration History Portlet
Calibration data may appear in People Profile when the Calibration History Portlet is configured. This portlet provides a snapshot of calibration session data along with ratings. The background element for the portlet must be added to the data model. A code segment sample is shown below.
<background-element id="calibrationHistoryPortlet" type-id="138"> <label>Calibration History Portlet</label></background-element>
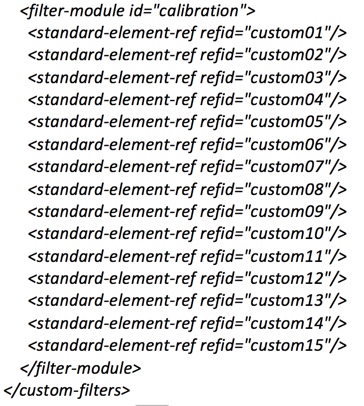
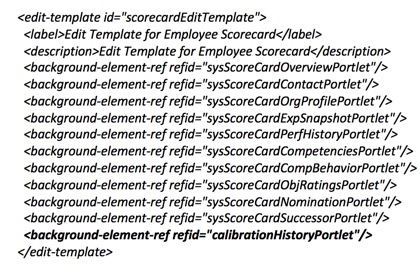
If you also wish to use the portlet in the Employee Scorecard, the portlet must be added under the view-template “employeeScorecard”. A code segment sample is shown below.
Adding Calibration History Portlet to Scorecard
After making the data model updates, save and import the data model.
Congratulations! Calibration is now enabled and you are ready to set up Calibration in your instance. Coming soon will be my blog, Configuring SAP SuccessFactors Calibration Part II – Instance Set Up to learn how.
For more information about Calibration and other talent management modules in SAP SuccessFactors, check out our book here!
Do you need help setting up your Calibration implementation? Contact us at: info@worklogix.com
SAP SuccessFactors Employee Central has come out with several enhancements and features for 1H 2020. All of the latest enhancements can be found here (S-User ID required). Scroll down to the ‘What’s New Viewer’ to review the changes.
Filter on Solutions for Employee Central to review all the latest changes. Under Description, click on ‘See More’ to see screenshots and detailed information.
This post will be highlighting some of the top enhancements & features:
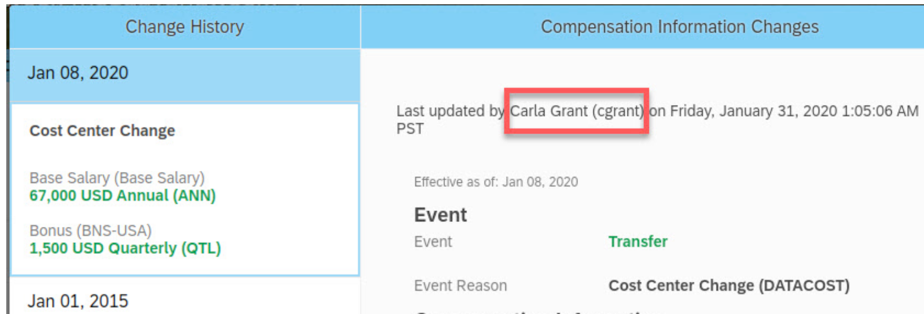
Show Full Name in History Pages
Users previously had difficulty finding out who made the change solely by their user name in the History page. But now SuccessFactors has made it easy for users by showing the full name of the person who made the change along with the user name in the “Last modified” field of the “History section” for the below pages:
Job Information
Job Relationships
Compensation Information
Personal Information
Dependents
Addresses
Synchronize Data from Work Order to Job Information
Manual steps has been reduced – Yes!! Manual steps are no longer required in updating the job information of contingent workers when there is a change in their work order.
Now Synchronization is automatic between the work order and job information for the common data of contingent workers. This can be achieved by creating a business rule while adding a new work order or modifying an existing work order.
Detailed Information can be found here: Click Here
Check Tool for Contingent Workforce Management
New checks have been created to help users identify and resolve potential configuration and data issues with the contingent workforce management application.
To save time and effort, a few checks have been added to highlight issues related to application configuration and contingent worker data along with resolution tips to help users resolve them by themselves.
Detailed Information can be found here: Click Here
Export and Import of Corporate Data Model Information
The Corporate Data Model can be now be imported and exported from the Admin center. Users can incorporate their changes in the exported XML and import them back in from the Admin Center.
This includes Country or Region-Specific Corporate Data Model. This removes the need to do the Import/Export of the CDM on the provisioning side.
Detailed information can be found here: Click Here
Rule Contexts During Import
Now while importing a data model, the original values of the rule contexts will be preserved. Previously when users imported a data model by default, all rule contexts were reset to Yes.
Detailed information can be found here: Click Here
Accept or Reject Auto Delegation Requests
SuccessFactors has now offered the chance to users whether they wish to accept or reject delegation request. Users can now respond to auto delegation requests on a new tab called “Delegation Requests for Me”. Workflows are delegated to them only when they have chosen to accept the request.
Detailed information can be found here: Click Here
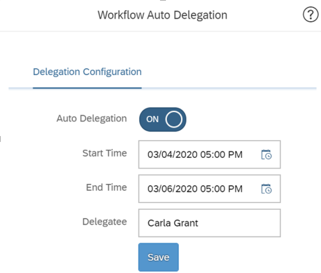
Specify Start Time and End Time of Auto Delegation
Delegators will now be able to choose a period for the auto-delegate to remain effective. Users have the option to choose the start date and end date when they configure the delegation.
During the specified period, the workflows will be triggered automatically for the delegates to approve. When the “end date” has been reached, the auto delegation feature will turn off automatically and hence no manual work is required to turn it off.
Customizable Key Details on the My Workflow Requests Page
An enhancement has been made to include the custom key details for workflows in the “My Workflow Requests (Advanced To-do)” page.
Now workflow decisions can be made by seeing the summary without having to open the workflow detail page for position workflows.
Detailed information can be found here: Click Here
Time Sheet Custom Fields are now supported for the iOS and Android Mobile Apps
The SAP SuccessFactors Mobile apps now support the following Time Sheet custom fields: Date, Boolean, Number, Decimal, and String.
This feature creates better alignment between the iOS and Android Mobile apps and the web application.
New Rehire Event Reason for Replication of Employee Master Data
A new event reason has been created that supports the scenario where an employee is rehired after termination. Job information records will be extracted from the rehire date with PSEUDO_REHIRE event reason.
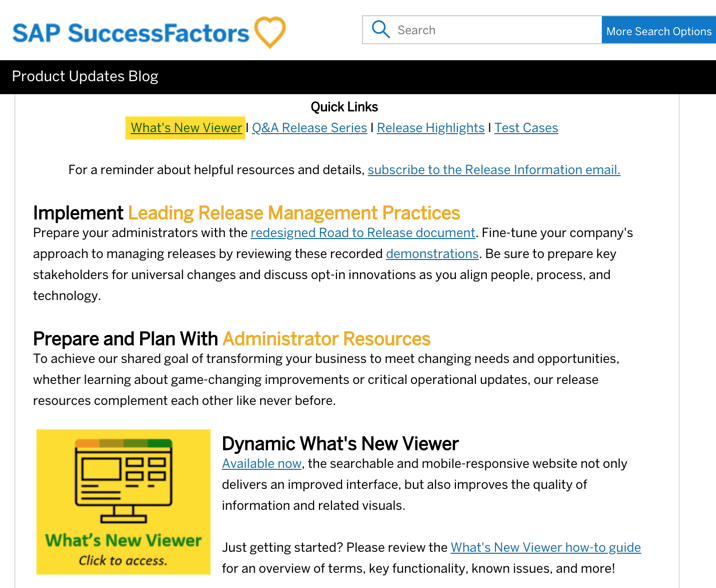
Starting in 2020, SAP changed the release schedule to every 6 months. All of the latest enhancements can be found here (S-User ID required). Scroll down to the What’s New Viewer to review the changes.
Click on the What’s New Viewer to review the latest changes
Filter on Solutions for Compensation, Variable Pay, and Reward and Recognition to review all the latest changes. Under Description, you can click on ‘See More’ to see screenshots and detailed information.
After reviewing all the changes, we narrowed the list down to the Highlights for H1 2020Compensation & Variable Pay & Reward and Recognition:
1. Import and Export non-EC Eligibility Rules
Administrators now have the ability to Export and Import Eligibility rules
Admins can export the rules as a .csv file and then import the file as needed into other templates
This process will save time and improve accuracy during configuration
Import and Export buttons now appear for Eligibility Rules
2. Enhanced Display Criteria for Bulk Download Icon
Users can now view the icon for bulk download only if a statement was generated for an employee from the recently filtered list of Executive Review
Previously, the icon was displayed even if statements weren’t generated from the filtered list which caused confusion
Enable the Display Bulk Print Statement Icon on Executive Review Page option
Bulk download icon only displays if statements are generated for filtered list
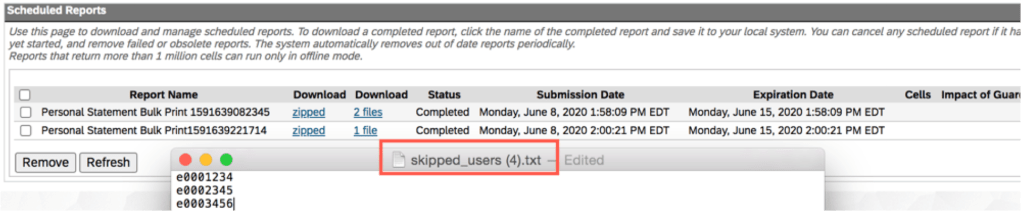
3. View a List of Employees Excluded from Statement Download
Using log files, users can now identify employees who are excluded during the bulk download process from Executive Review
Log file will show a list containing the username and user ID of all excluded employees
Log file shows list of employees excluded during the bulk download process
4. Publish by User for Variable Pay and Total Compensation Plan Templates
Administrators can now publish specific employees or groups of employees to Employee Central in Variable Pay and Total Compensation Plan templates
Prior to this release, this feature was only available for compensation templates
Publish by Employee is now available for Variable Pay and Total Compensation Plans
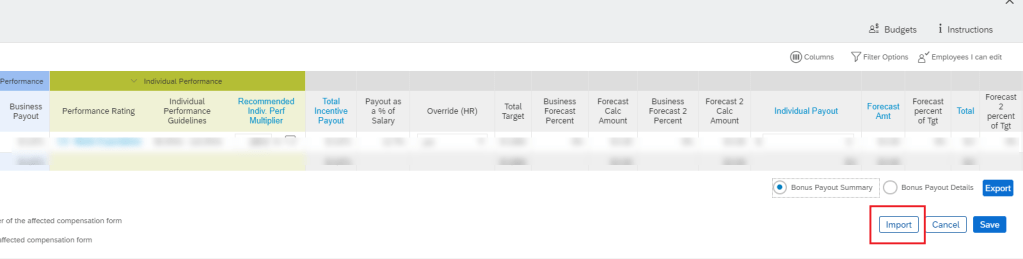
5. Use Bonus Payout Summary Reports Offline
Users can now modify editable fields in the exported file while offline from Executive Review. The modified exported file can then be reimported to update the fields with new changes.
Permissions must be set to allow for edit and export access to Executive Review
Enable the setting for Offline Edit Access for variable pay worksheets
Import functionality now exists for Bonus Payout Summary
6. Expanded Pay Range Matching for Promoted Employees
Users can now define a new finalAttribute field that the system uses when calculating the final pay range.
This will avoid the issue of miscalculated post-promotion pay ranges in EC-enabled compensation templates caused when the system continues to incorrectly use pre-promotion classification and pay grade information
In previous versions, the system incorrectly calculated pay range on the basis of pre-promotion information
finalAttribute field can be defined for proper calculation of pay ranges
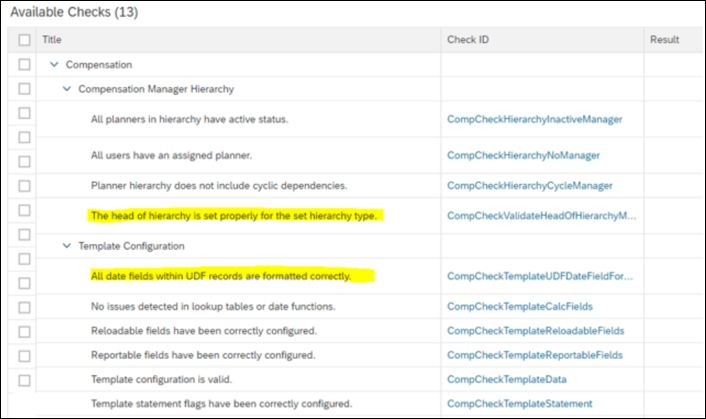
7. Hierarchy and Date Validations for Check Tool
Check Tool now has two new validations:
Review the Manager ID of each head of hierarchy in the compensation plan
Ensure that all date fields within UDF are formatted correctly
Additional useful validations added to Check Tool
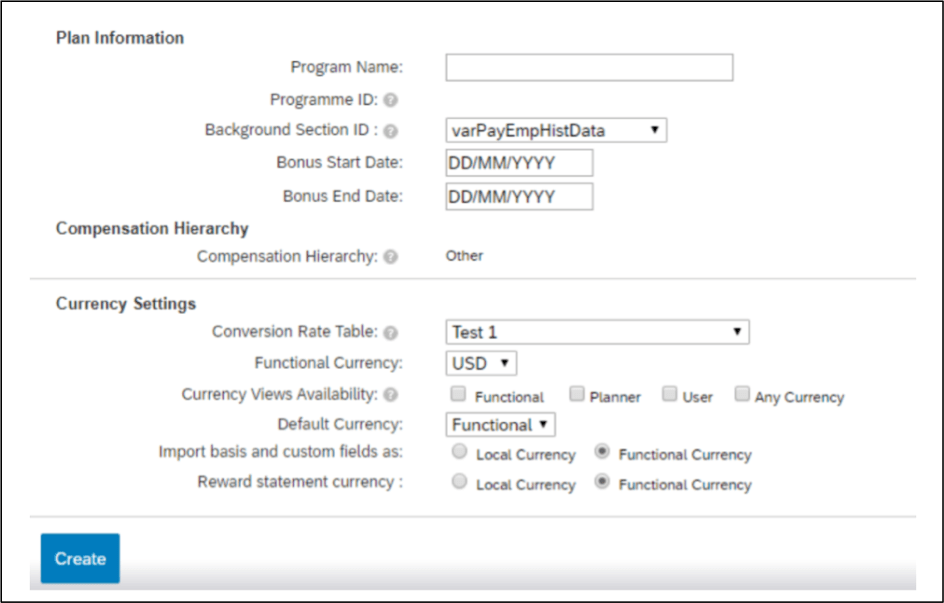
8. Default Currency View in Compensation, Variable Pay, and Total Compensation Plans
Users can now set the currency that the system uses as default when compensation, variable pay, and total compensation plans are launched.
In previous versions, this was handled in the XML
Users can set Default Currency under Currency Settings
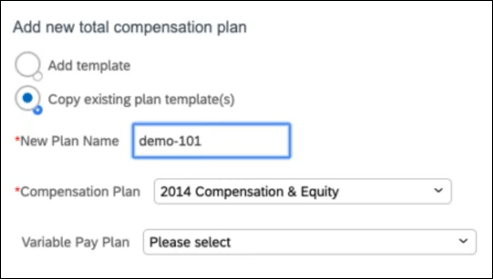
9. Expanded Flexibility in Total Compensation Plans
While creating total compensation plans by copying existing templates, users now have the option to create a plan by selecting an existing Compensation template without also selecting a Variable Pay plan template.
This is useful as not all customers are using variable pay
Total Compensation Plans can be created without having to select variable pay template
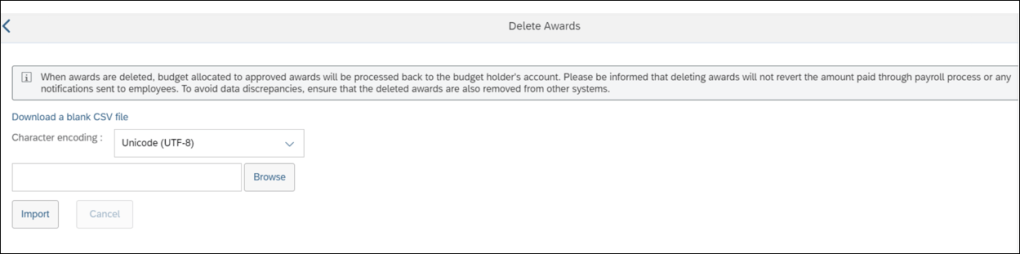
10. Delete Awards
Users can now delete awards, irrespective of their status using the award IDs.
Awards that are no longer used can be permanently deleted from the system
Users now have the ability to delete awards
See this great article for useful information on how to prepare for a SAP SuccessFactors Regular Release.
Starting in 2020, SAP SuccessFactors has changed its release schedule from every quarter to biannually. With this change, the releases will be larger with an additional preview week. Here we will focus on what’s new and what has changed in Calibration.
There is one new feature for Calibration along with four enhancements. Let’s start with what’s new!
Customized Weighted Ratings now used in Calibration
There is a new universal feature that allows ratings from the Customized Weighted Rating summary section of performance form template to be used in Calibration. Prior releases of Calibration could only use ratings from the Overall Performance, Overall Potential, Overall Objective and Overall Competency sections of a performance form templates as rating sources.
This option is helpful if you wish to calibrate the overall form rating based on the ratings given by different roles in different steps instead of using the final overall rating from one role. The customized weighted rating is calculated based on the ratings and weights from the steps and roles that were defined in a business rule. Another rule defines the trigger step used to calculate the overall weighted rating.
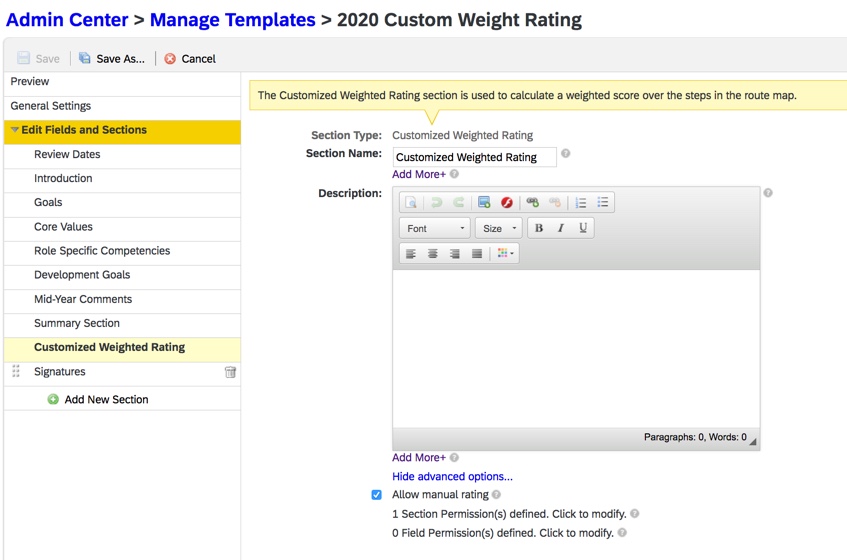
The Customized Weighted Rating section of a performance form template is displayed below.
Customized Weighted Rating Section of PM Template
When using ratings from the Customized Weighted Rating section, make sure the calibration step is after the step where the calculation of the weighted rating is triggered in the PM form. Just remember, when the manual rating is enabled in this template section, the calculated rating would not be available in the Bin view of a calibration session.
The Customized Weighted Rating section of a PM form is shown below.
Customized Weighted Rating section of a PM Form
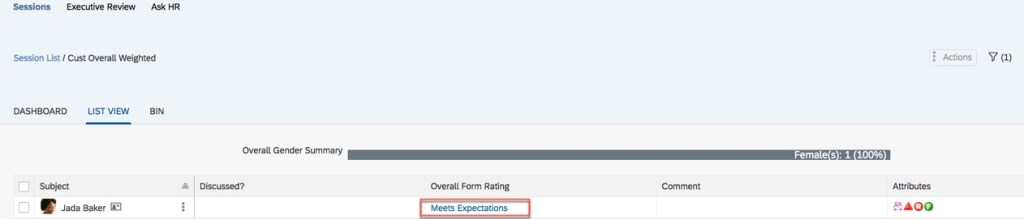
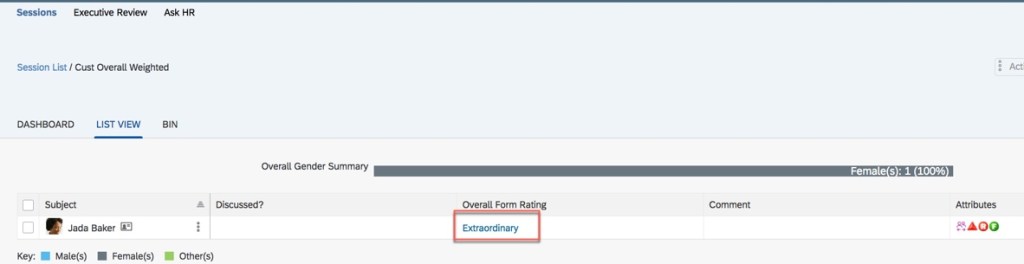
In the example below, you can see the customized weighted rating appearing in a calibration session. It appears in the “Overall Form Rating” column because a manual rating overrides the calculated rating.
Overall Rating in Calibration Session
Continuing with this example, the rating is updated from “Meets Expectation” to “Extraordinary” in the calibration session as shown below.
Updated Rating in Calibration Session
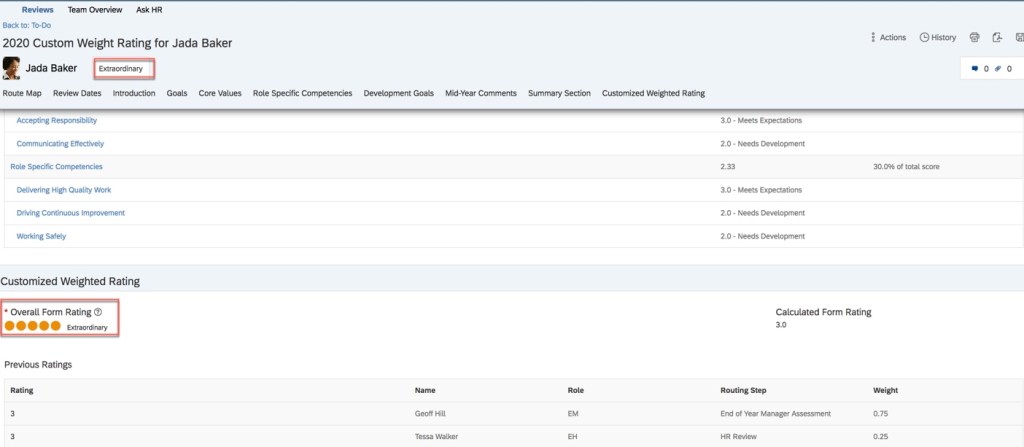
After the calibration session has been finalized, the updated rating appears in the performance form as seen below.
PM Form Reflects Updated Rating
In the Customized Weighted Rating section of the form, the overall rating reflects the updated rating of “Extraordinary” from the calibration session. The overall score pod at the top of the form reflects this updated rating as well.
Now let’s see what existing functionality has been improved in the latest release.
There are four universal enhancements for Calibration.
Subjects List Page Enhancement
In prior releases, when drilling down into one of the standard charts in Executive Review, printing the Subjects List page was not supported. In addition, any list display modifications were not saved. Now it is possible to print out the list of subjects and retain any adjustments made to the page display after refreshing the page. More details are shown below.
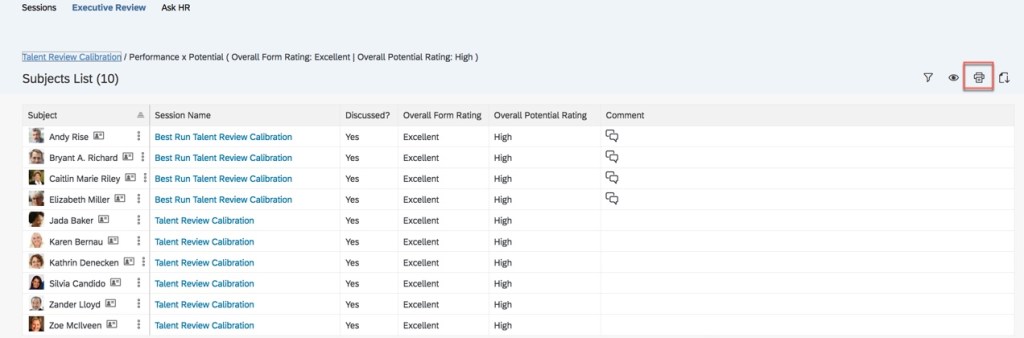
Now when a data point is drilled into a chart, the print option is now available as seen below.
Subjects List with Print Capability
Within this list, the Executive Reviewer may customize the display. Columns may be reordered by dragging and dropping, column widths may be adjusted, the sort mode may be set for columns and display options may be changed. The printed list will reflect the display changes. Notice there is no “save” button, the adjustments are saved automatically. The changes are preserved after the Subjects List page is refreshed as well.
When the Executive Reviewer drills down into another cell in the chart, the updated display has been retained. This enhancement prevents the user from having the update the display each time the Subjects List page is viewed.
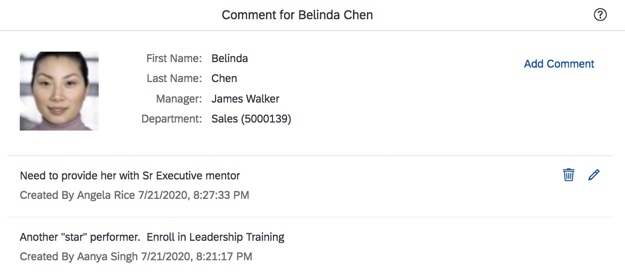
Enhanced Comment Details
This next enhancement is applicable when comments are required when a rating is changed in a calibration session. When viewing comments made on a subject, the name of the calibration participant who entered the comment is listed along with the date the comment was made. An example is shown below.
Comments with Name and Date
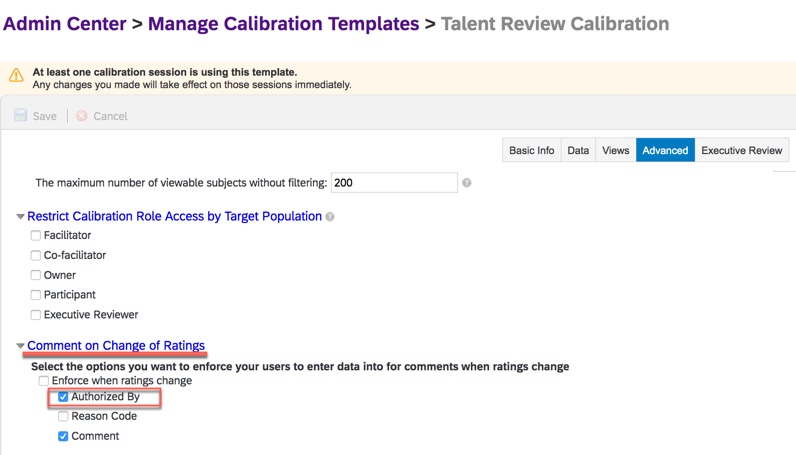
When the rater is required to enter the user name associated with a rating change, your calibration template will have “Authorized By” enabled as shown below.
Calibration Template with Authorized By Enforced on Rating Change
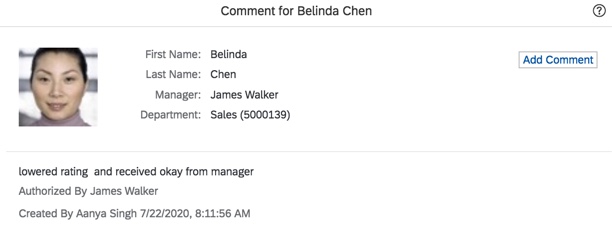
Now when viewing a comment with “authorized by” enabled, the comment detail will include the authorizer as well as the comment creator and date as seen in the example below.
Comments with “Authorized By” Field
Next we will see an update for matrix views within a calibration session.
Full Screen Mode Matrix View
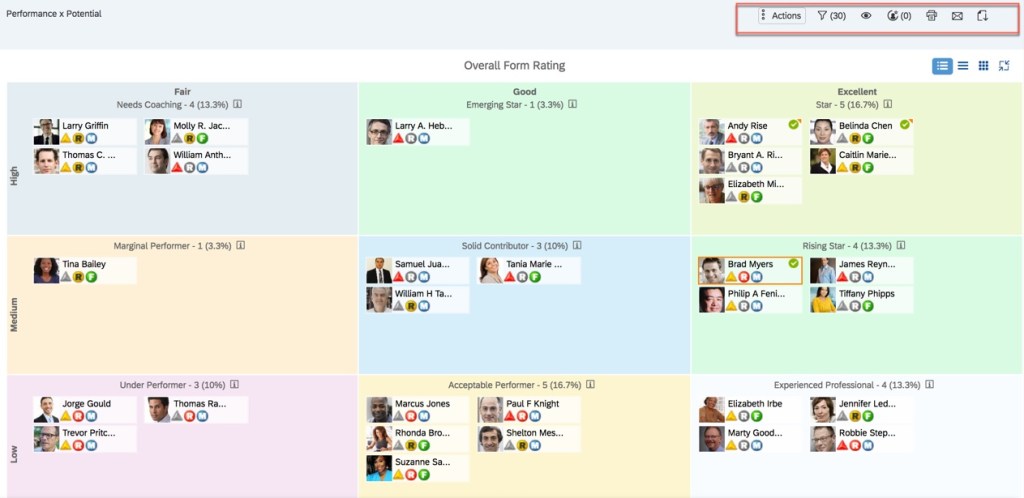
During a calibration session, matrix views will now have the toolbar available in full screen mode. Previously the toolbar was not visible in this mode. From the standard view, the user clicks on the “Open Full Screen” icon as seen below.
Matrix View with Full Screen Icon
When switching to the full screen view, the toolbar is available and enables users to take the same actions in the full screen mode as they would in the normal mode.
Matrix View in Full Screen Mode with Toolbar
New Reporting Columns
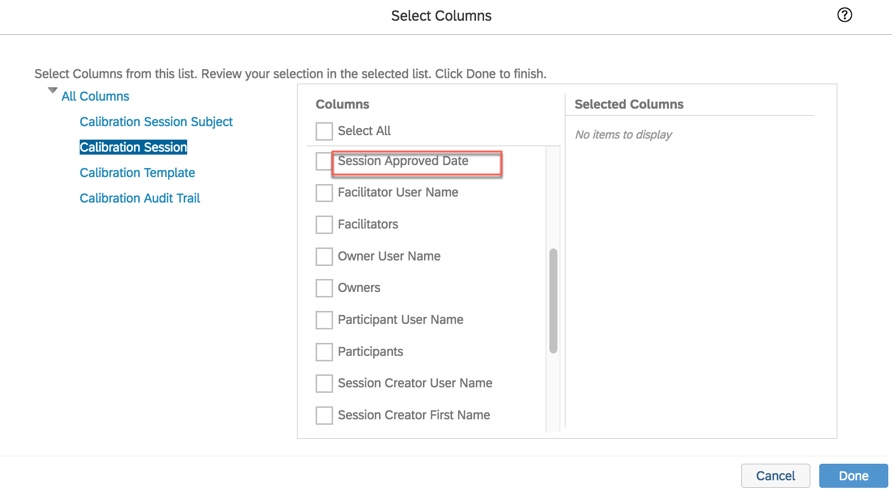
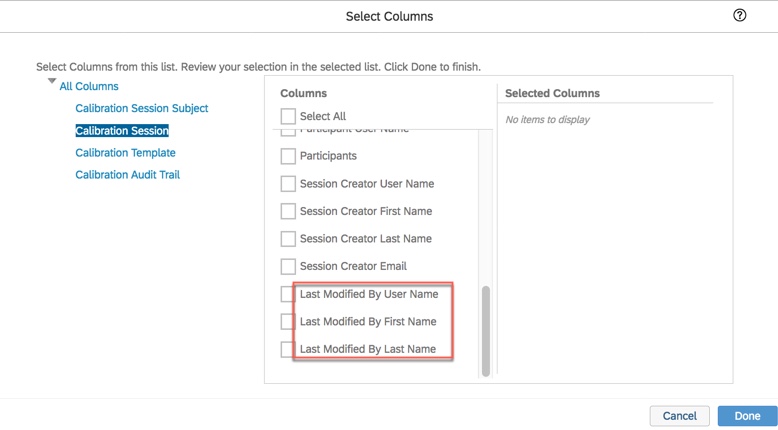
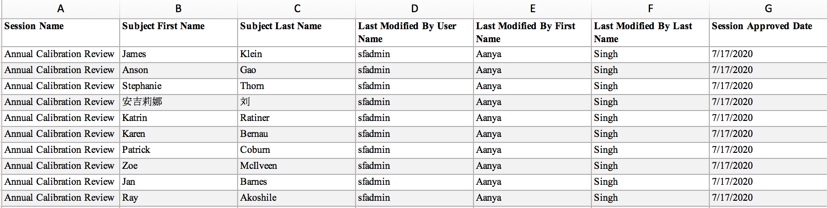
The final Calibration enhancement involves ad hoc and SAC reporting. There are new fields available to report on when generating a report for a finalized session. The session approval date along with the name of the last user to modify the session are now available. Most likely the last user to modify the session was the approver. The last modified user fields include “Modified By User Name”, “Last Modified by First Name”, and “Last Modified by Last Name”.
“Session Approved Date” Field
“Last Modified User” Fields
The new fields are available when reporting for all three calibration domains. A sample report is shown below.
Sample Calibration Report with New Fields
Wrap up
We have now explored what’s new and what features have been enhanced in Calibration. While the updates are minimal, hopefully these features will make your calibration sessions more user friendly. Check out my other blogs on what’s new in Succession and Career Development.
Do you need help with your calibration implementation? Contact us at: info@worklogix.com