
The SuccessFactors Career Worksheet, part of the Development module, may be configured to use Career Paths. Career Paths provide an employee with a graphical route of what their current or other roles may lead to. Career Paths aid an employee in planning how to develop their skills and competencies to advance into roles that interest them. Career Paths show a progression of roles that an employee may grow into.
How to Access Career Path
On the Career Worksheet, an employee may view the career path of any targeted roles on the My Job Roles tab, Job Roles I’m Considering sub-tab.

An employee may also see the career path for their current role on the My Current Roles sub-tab on the My Job Roles tab of the Career Worksheet.
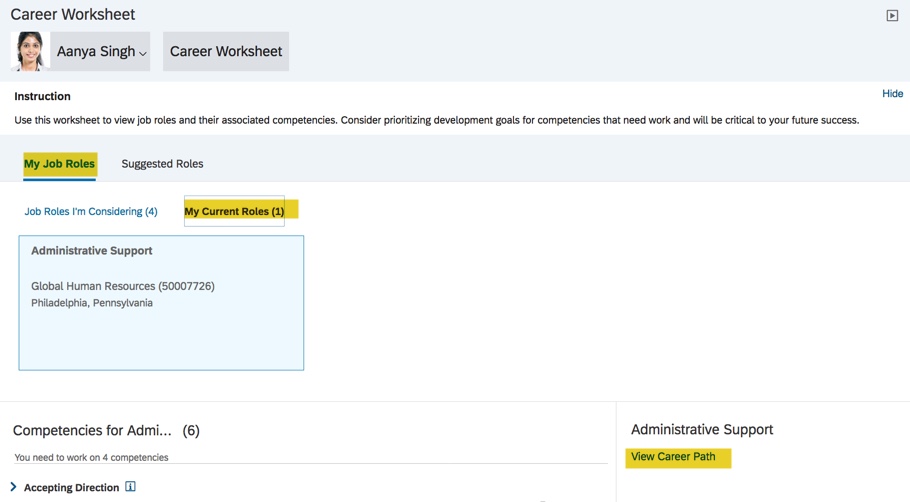
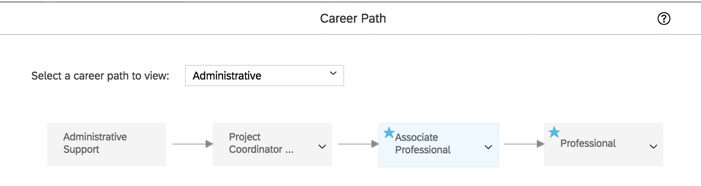
If an employee clicks the link, the career path for the role will display.
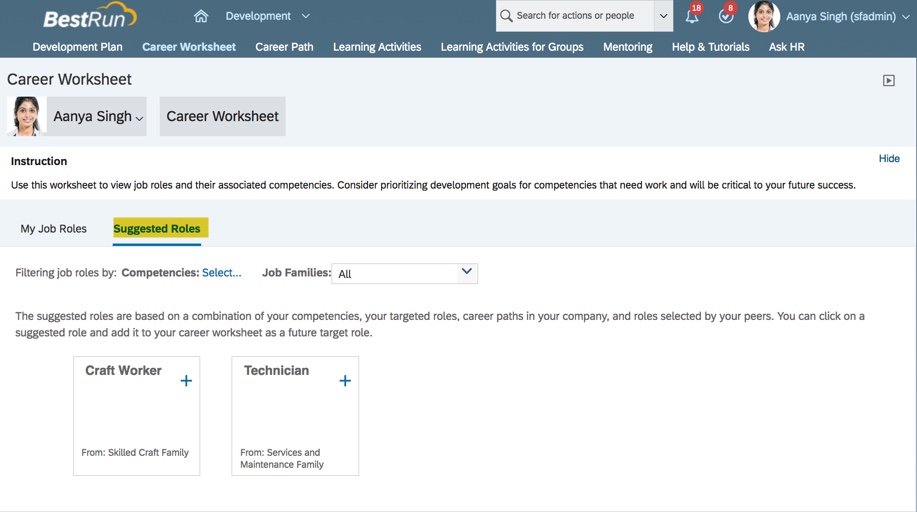
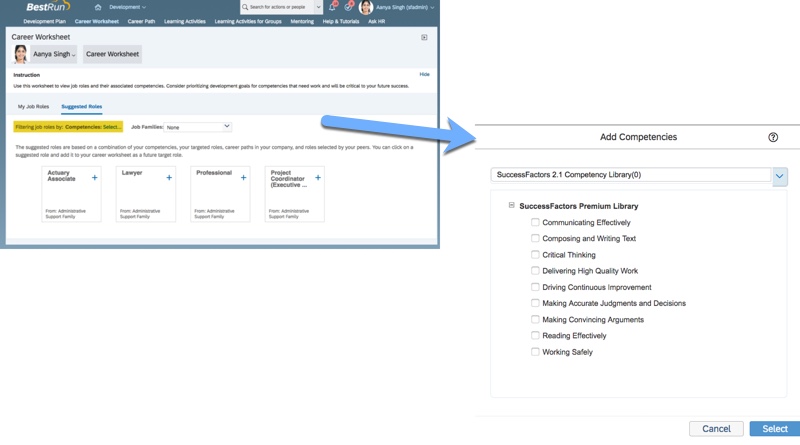
An employee may access Career Paths from the Suggested Roles tab as well.
Based on configuration, the administrator may restrict employee access to Career Paths based on criteria such as role, department, or division.
Configuration in Provisioning
Career Paths can be tailored to an organization’s specific needs. Set up includes which roles can edit and also view the Career Paths. Before an a system or HR administrator can configure the paths in the instance, there are some settings to be enabled in Provisioning.
Provisioning Settings for Career Path
Career Path V2 needs to be enabled in Provisioning.

In addition to enabling the Development Plan V12 and the Career Worksheet V12v in Provisioning, enable Career Path V2. Be sure that Version 12 UI Framework, Enable Generic Objects and Enable the Attachment Manager are set as well.
Role Based Permissions for Managing Career Paths
Once the Provisioning set up is complete, there are some role based permissions within the instance that are required.
In order for the Career Path feature to work for the Career Worksheet, access to Manage Career Path is needed for any roles that can create or view the career path set up screen. Access to configure what shows up in the career path node is required as well.
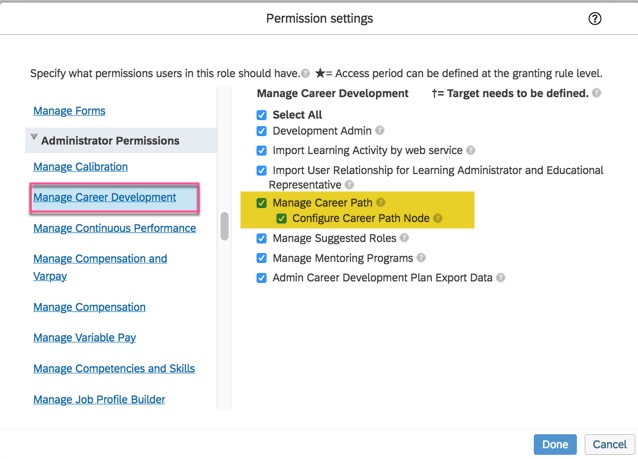
Under Manage Career Development, grant access to Manage Career Path. This allows the admin role access to define and manage the Career Path. In addition, Configure Career Path Node enables access to define the Career Path node details. This allows the admin to configure the Career Path and to identify which elements to display or hide on role nodes in the career path.
If Manage Career Path is not seen in the Manage Career Development permission, the Career Worksheet has not been enabled in Provisioning and/or Attachment Manager or Generic Objects has not enabled.
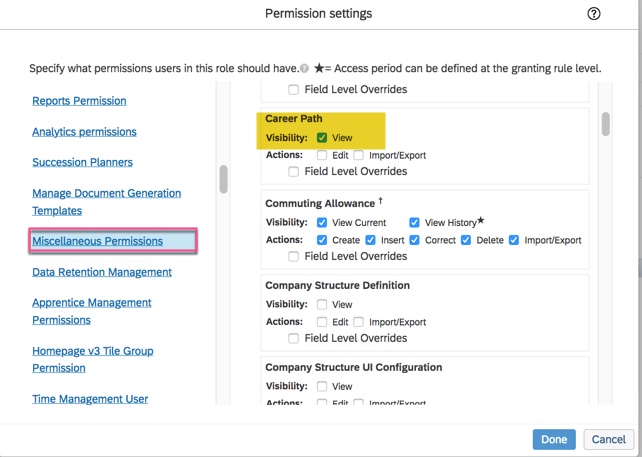
There are additional permissions needed for the admin to view and edit the Career Path. Under User Permissions>Miscellaneous Permissions, the admin will need Visibility and Actions permissions for Career Path.
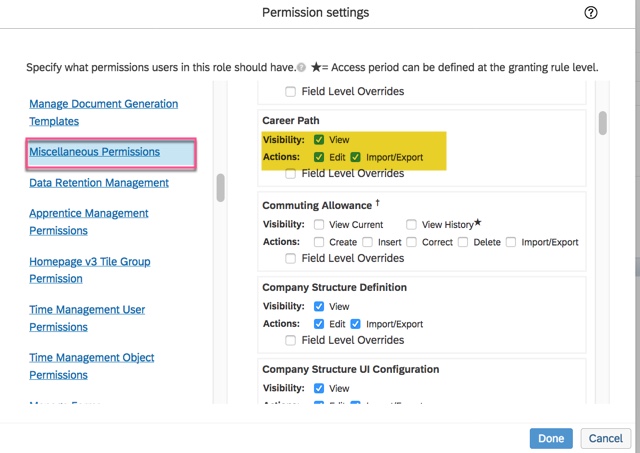
View permission should be granted along with edit and import/export action permissions.
It is also possible to set field level overrides. The Field Level Overrides option grants the right to specify which information to display or hide for a career path. This can be used to identify fields on the career path definition that can only be viewed by a role or to be hidden.
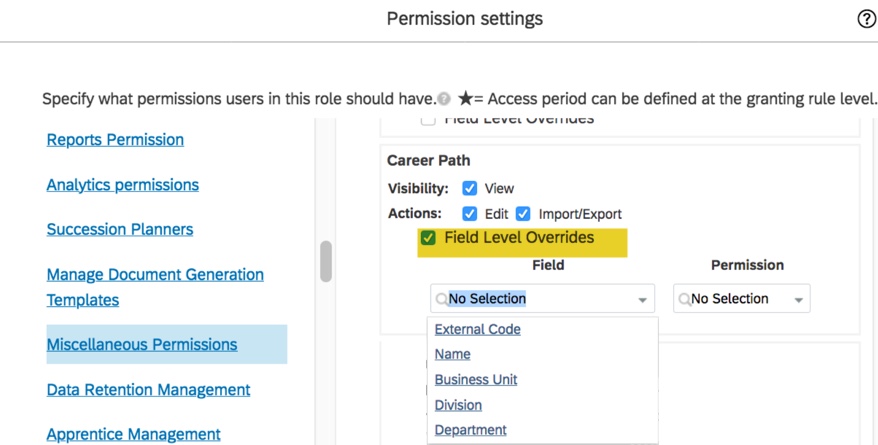
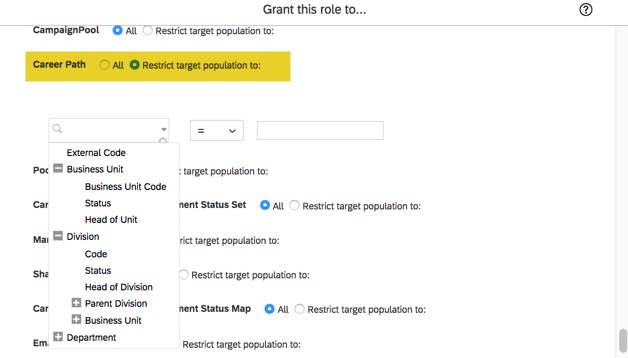
Restricting access to specific career paths is done based on code, business unit, department, division or a custom view.
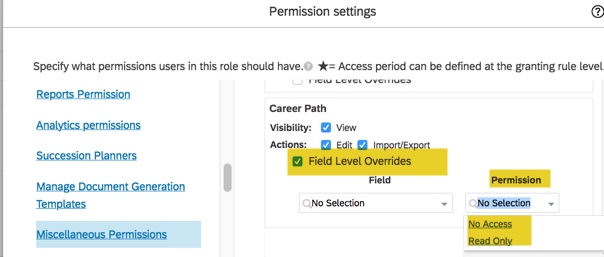
The permission for the selected field limits if the field is hidden (No Access) or visible but not editable (Read Only).
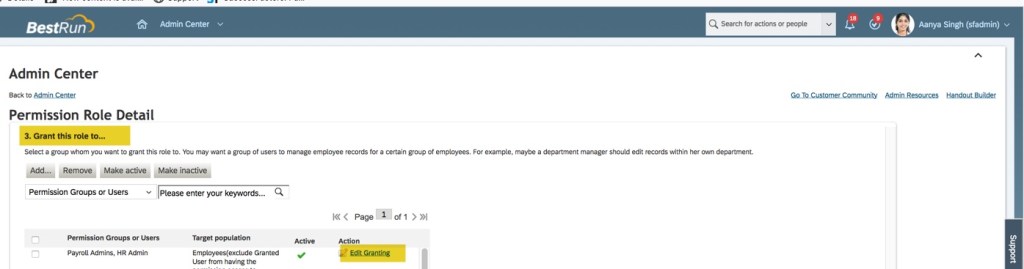
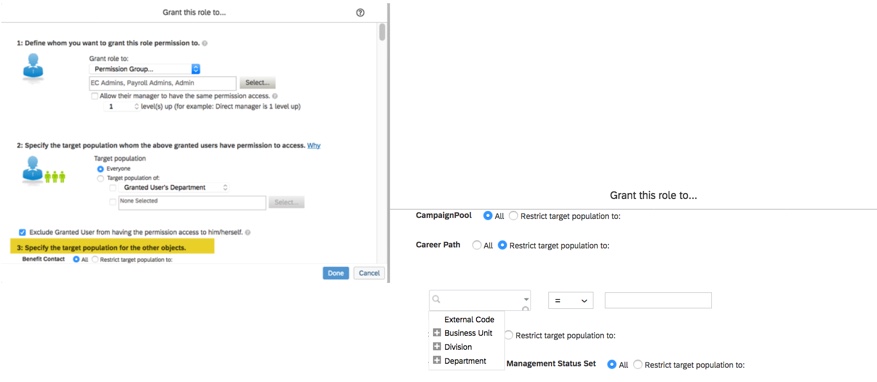
By default, roles with View and Edit access have access to all career paths in the system. However, administrators can restrict their access to specific career paths based on code, business unit, division, department, or a custom view.
To restrict access, scroll down to the Grant this role to… section and click Edit Granting.
Go to Specify the target population for the other objects and scroll down to find Career Path.
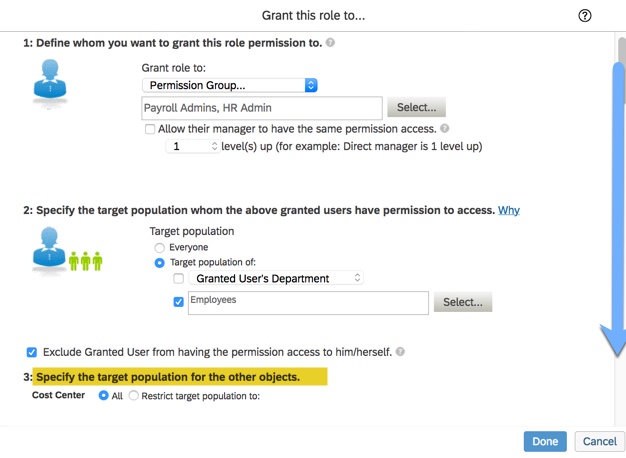
To limit the access to specific career paths, the role may have a target population specified. You may restrict the target population for Career Path by specifying the restrictions in the drop down menu.
After Career Path administration access has been granted, the admin would see an additional tab within the Development module. It is here where the Career Paths are configured for the instance.

To recap, to create and manage career paths, the Career Path v2 feature must be enabled in Provisioning and the admin role should be granted Edit access for Career Paths.
Employee Permissions for Career Path Access
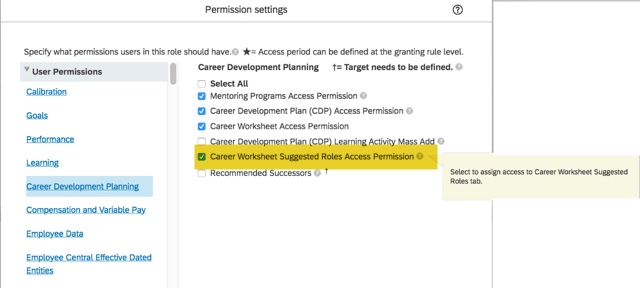
Now that the admin role has access to configure Career Paths, the employee role permissions should be set up. Under the User Permissions, the Career Development Planning section, the employee role should already have Career Development Plan (CDP) Access Permission and Career Worksheet Access Permission. In addition, this role will need Career Worksheet Suggested Roles Access Permission.
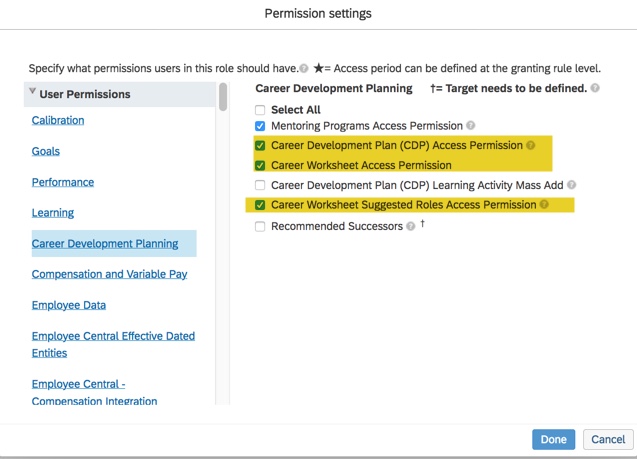
To grant access to View Career Path for a future role or current role on the Career Worksheet, the employee role needs Miscellaneous Permission>Career Path>Visibility>View.
Without this permission, the employee will not be able to view any career paths on the Career Worksheet.
Viewing, Editing and Creating Career Paths
Now that the permissions are set up for the admin and employee roles, here are just things to keep in mind about career paths.
If a role does not have a career path, there will not be a View Career Path link for a future role or the current role on the Career Worksheet.

Multiple career paths may be created and it is possible to associate them with a specific role and also limit employee’s access to the career paths based on pre-determined criteria.
Career Path Set Up
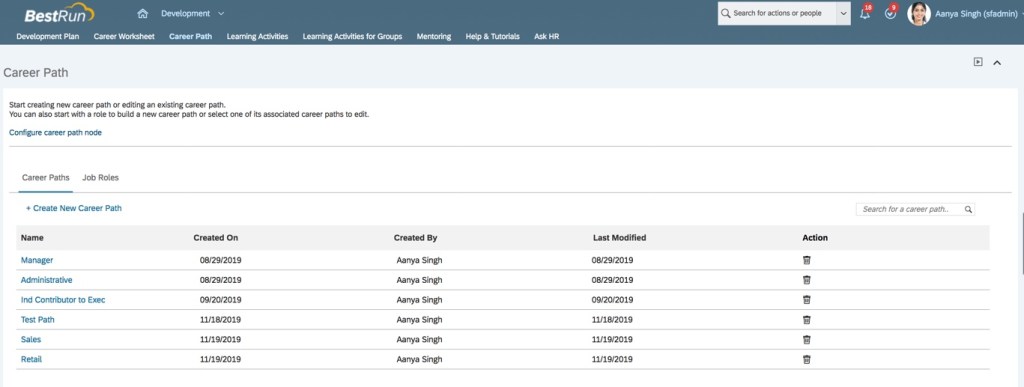
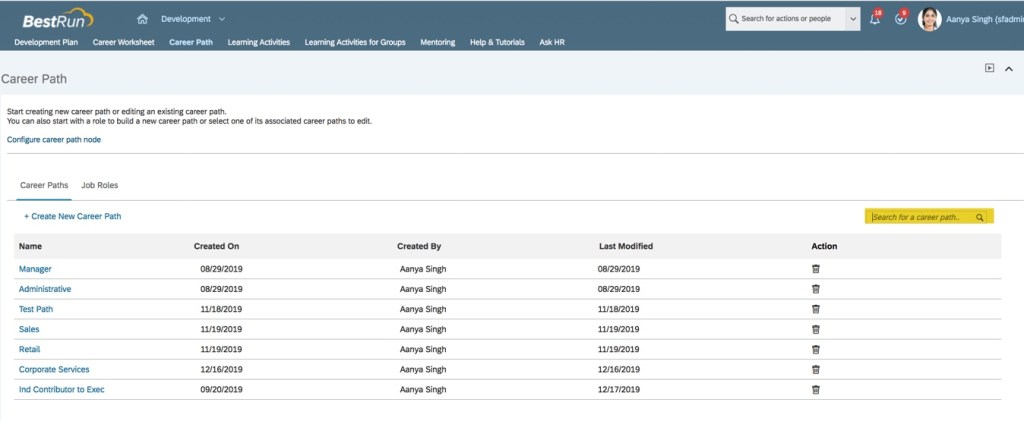
Once permisssioned, the admin would see an additional tab within Development called Career Path. It is here where the paths are managed.

There are two tabs within the Career Path page: Career Paths and Job Roles.
The Career Paths and Job Roles tabs are not permissionable. A role with permission to access the Career Path page has access to both tabs and cannot hide one or the other.
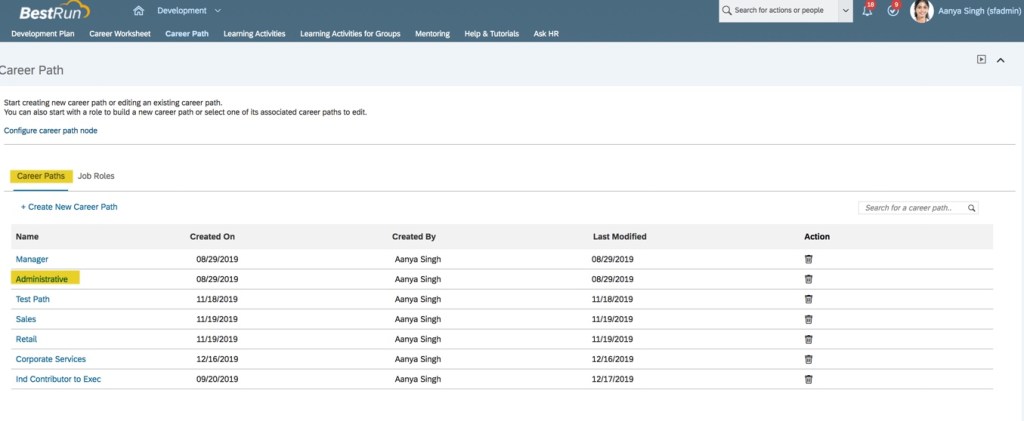
Career Paths Tab
The functions on the Career Paths tab include the following:
- Configure a career path node
- Create a career path
- Edit an existing career path
- Search for a career path
- Edit career path basic info
- Delete a career path
Next we will look at each of the career path functions in detail.
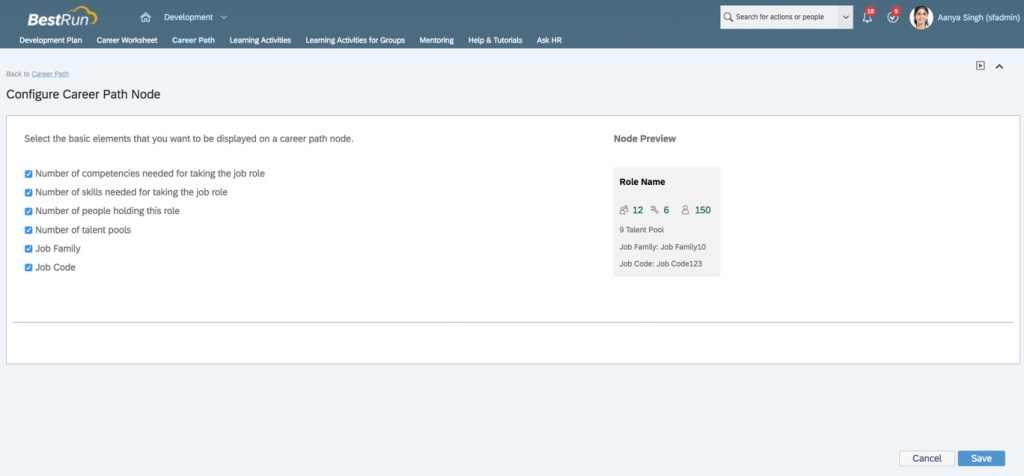
Configure Career Path Node
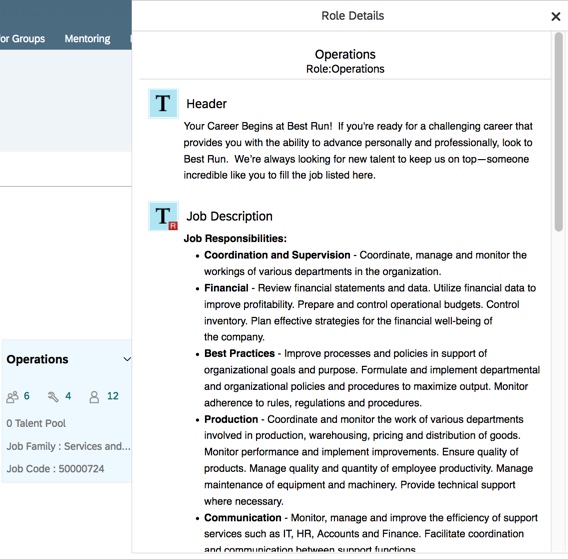
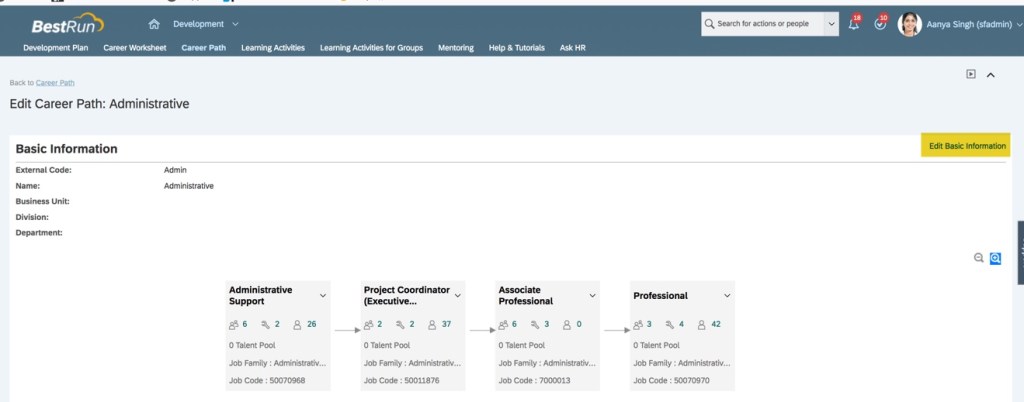
A career path node is a role within a career path. There are six components that may be displayed for career path node. The Node Preview image shows the components that may be included on a node. Deselect any elements to omit from the career path node.
Career Path Node Icons
Let’s look at the icons within the node that can be displayed. The icons provide the admin with useful information about the role.
- Number of competencies for job role
- Number of skills need for the job role
- Number of people holding this role
In addition, the node may contain:
- Number of talent pools that the role appears in
- Role’s job family
- Role’s job code
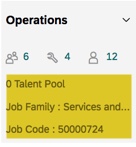
Click anywhere within the node to see the job role details. This is actually a view of the job profile.
Create a Career Path
Once the admin determines what details should be included for the nodes within a Career Path, the Career Path creation may begin.
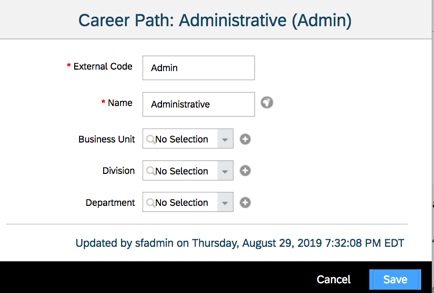
On the Career Paths tab, click Create New Career Path to provide basic information about the path.

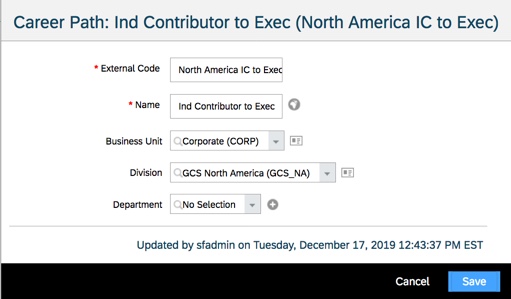
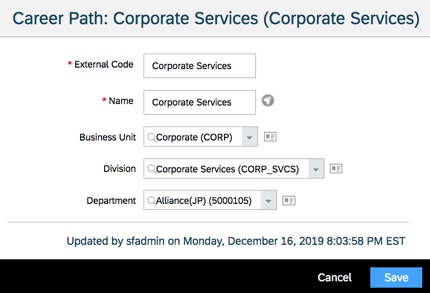
When creating a career path, a code and path name are required. Business unit, division and department can be selected to restrict access to the career path to the employees within those areas.
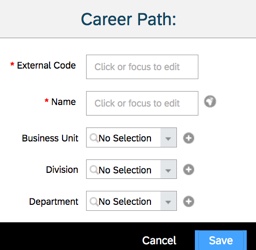
In other words, the admin may limit which career paths will be visible to an employee.
Save the path once it is defined.
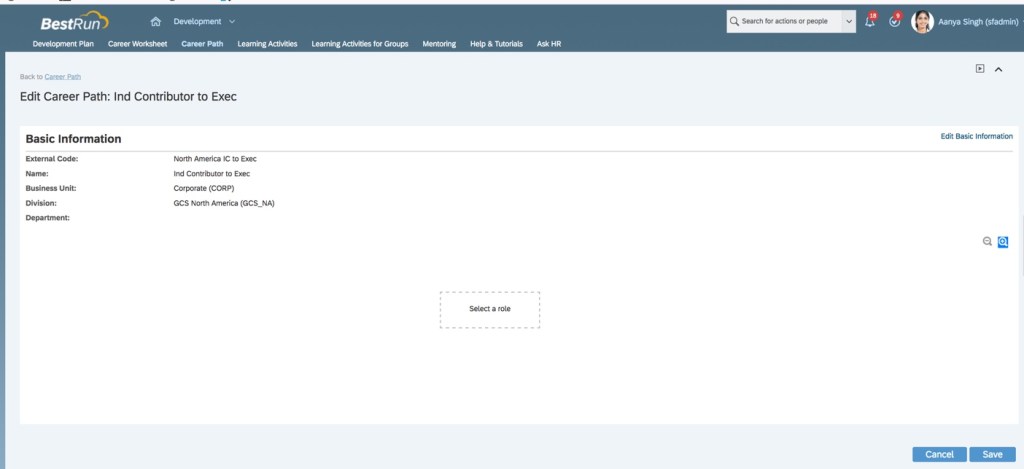
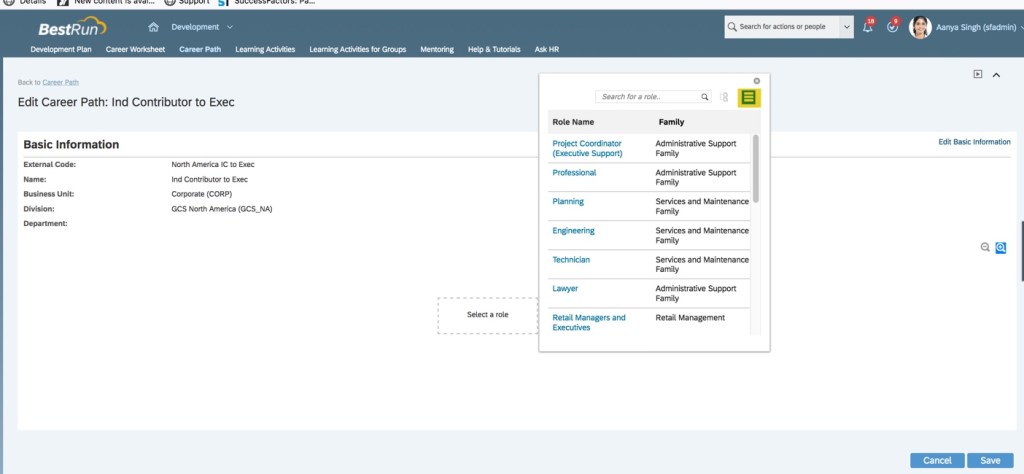
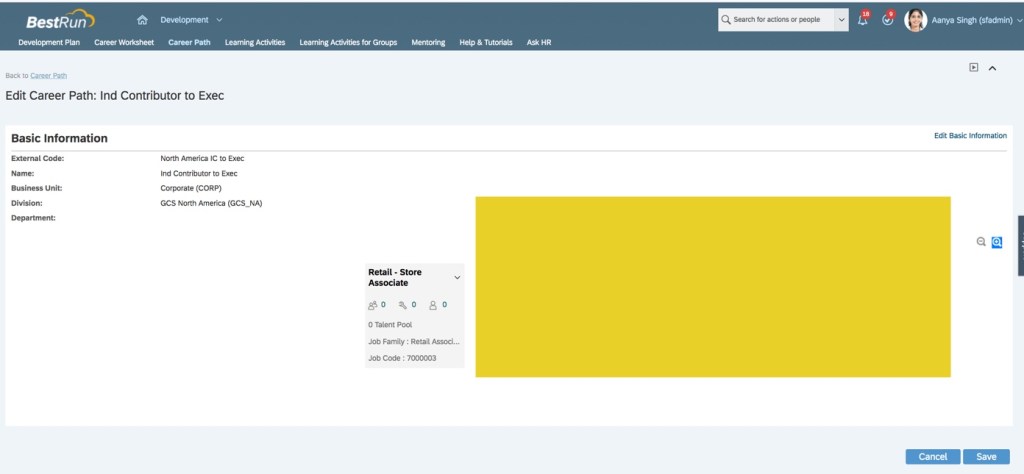
After saving the path’s basic information, an edit page will display with a box to select a role. It is here where you will begin to create the career path.
Creating first node
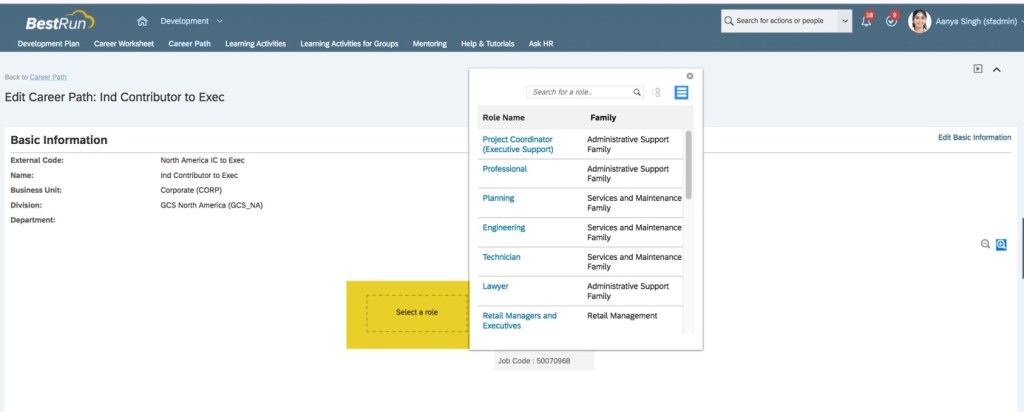
Now you may build the career path by selecting a role. The role will be the first node of the path. Click Select a role in order for the role selection screen to display.

There are two views available to aid in finding a job role. List view is the default.
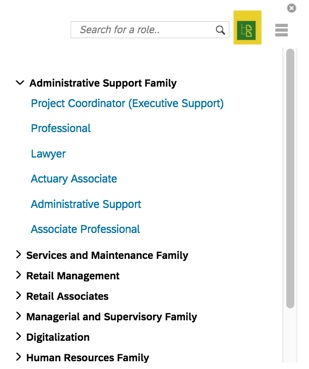
Job roles may also be viewed by family hierarchy.
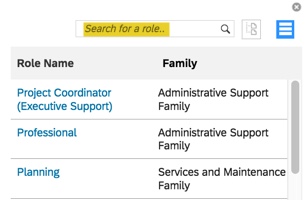
Another way to find a role is via search.
Select a role to use as the starting point of the career path. Once selected, the role is the first node of the career path.
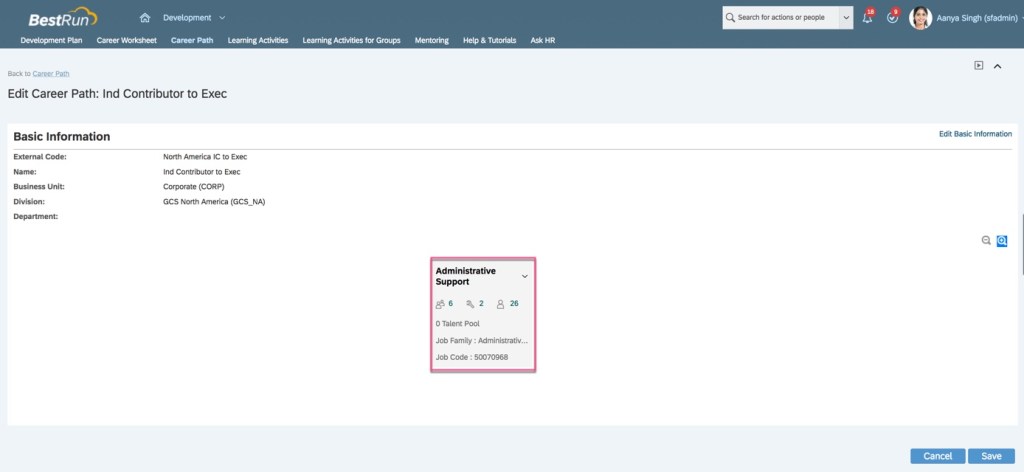
You will see that the node contains all of the icons and details that were configured on the Configure Career Path Node page.
Career Node Actions
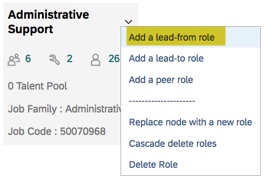
Now we can build the career path. Click on the down arrow to see the options available.

The following actions may be performed:
- Add a lead-from role
- Add a lead-to role
- Add a peer role
- Replace node with a new role
- Cascade delete roles
- Delete Role
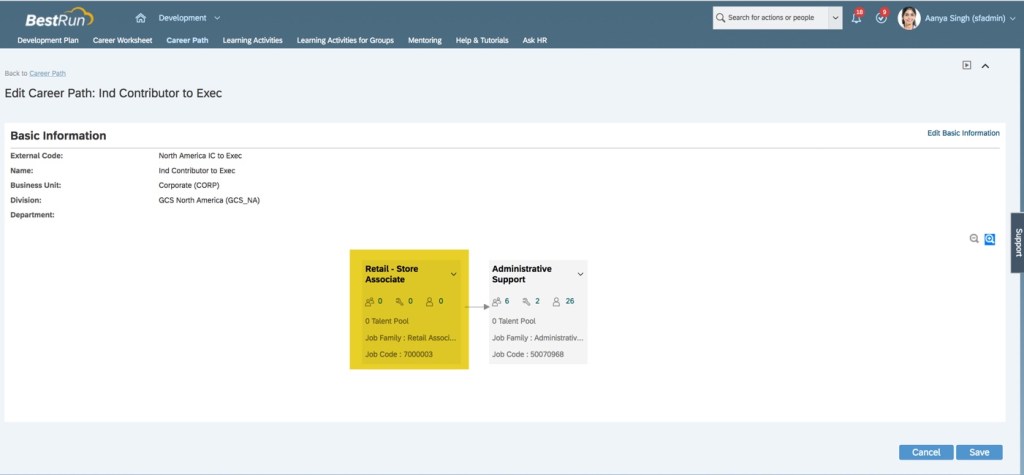
Add Lead-from Role
This action adds a proceeding role to the current role. Creates a “Select a role” box and role list pop up.
Upon selection of a role, it will place the node before the current role.
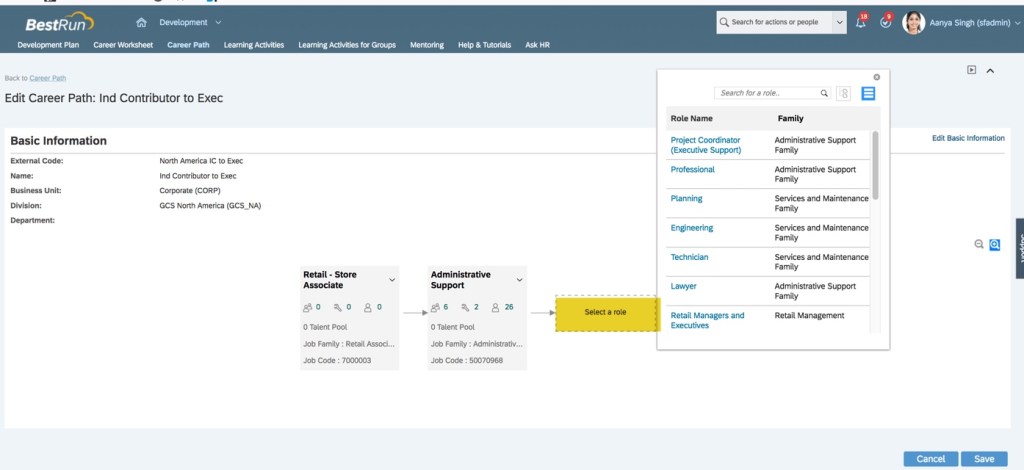
Add Lead-to Role
This action adds a new node after the current role.

This would create the next node in the path.
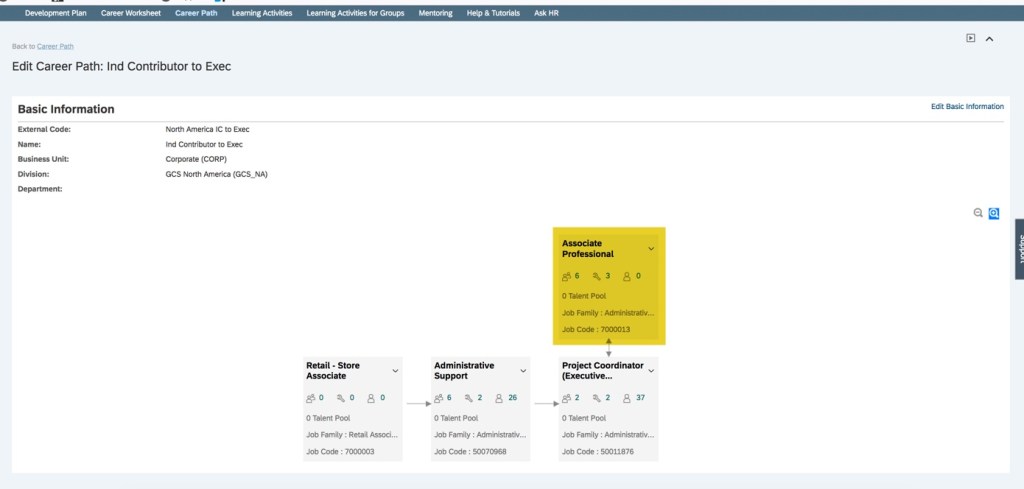
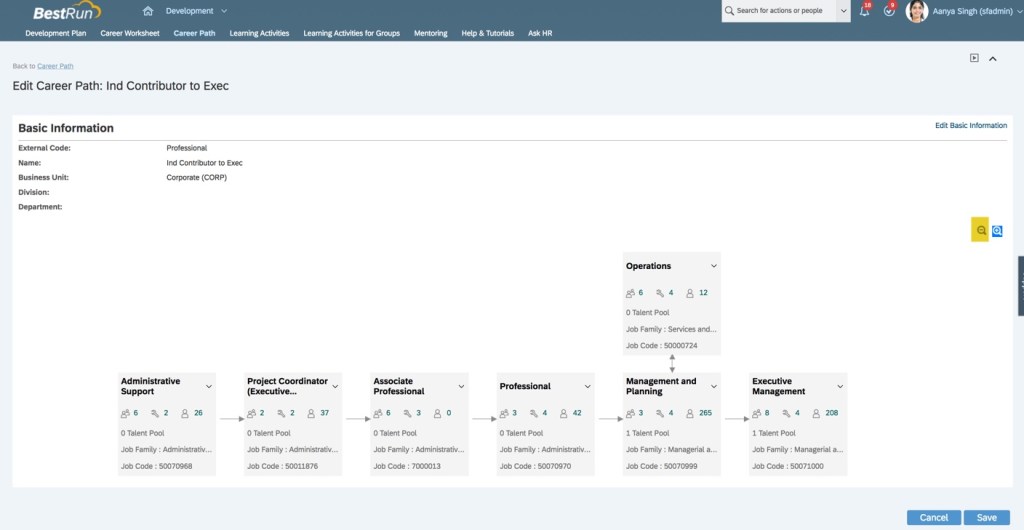
Add Peer Role
This action adds a lateral role above the current role.
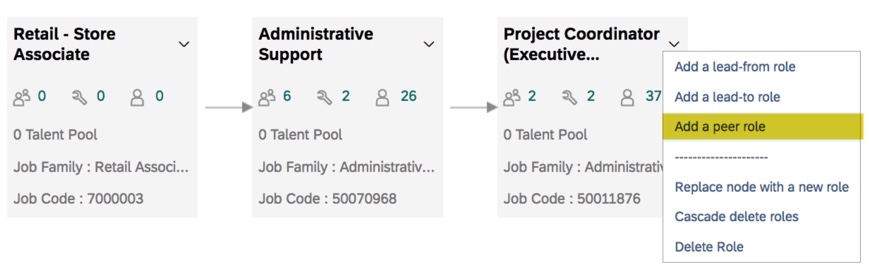

There is a maximum of 2 lateral roles for a node.
Replace Node
This action moves the selected node and allows selection of a replacement node.
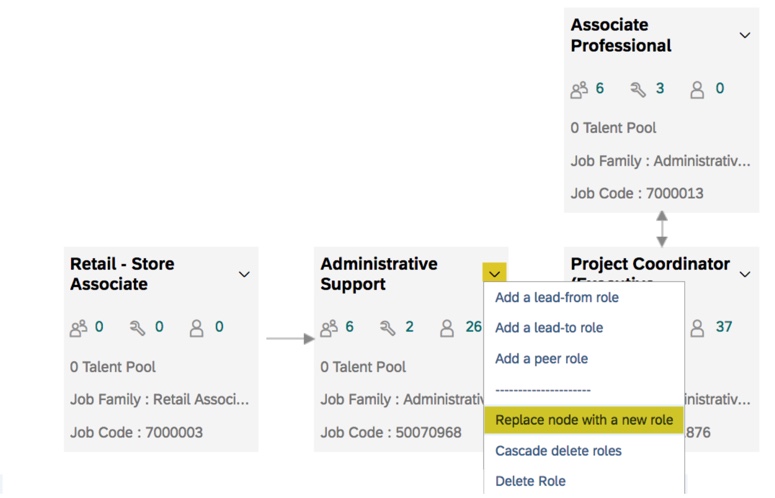
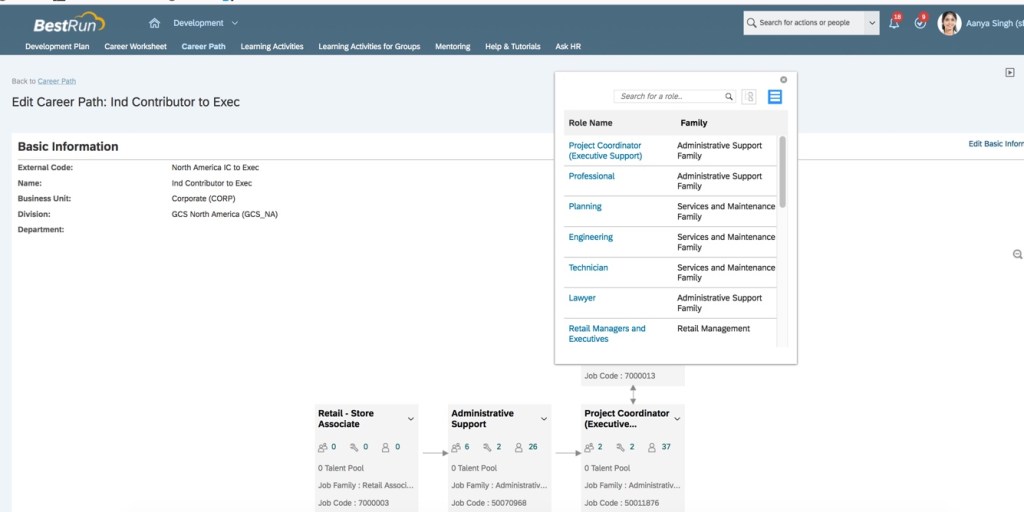
Upon selection of new role, replaces the node.

Cascade Delete Roles
This action removes the current role and any roles that follow in the path.
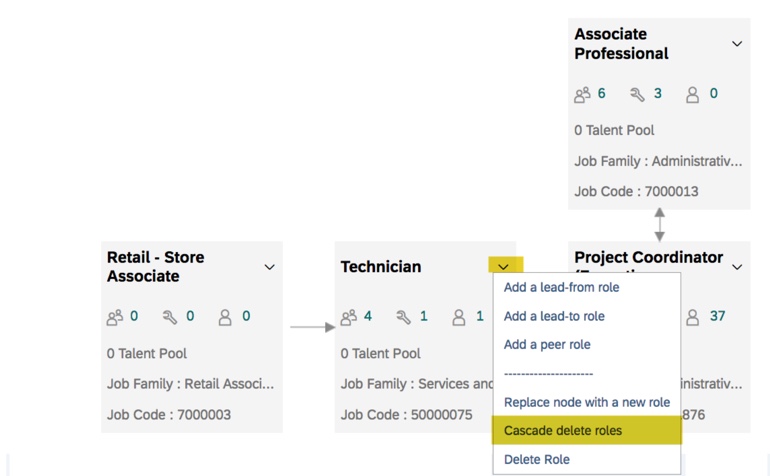
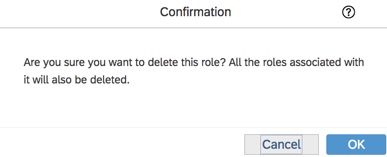
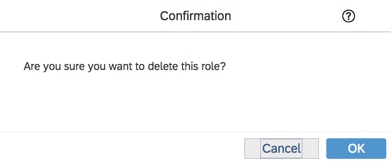
After selecting this action, confirm the deletion.
All subsequent node are deleted including peer roles.
Delete Role
This action removes the selected role and connects lead-from role to the lead-to role.
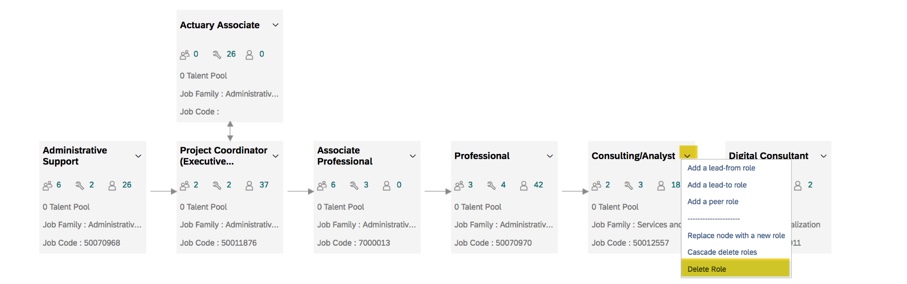
After selecting “Delete Role”, confirm deletion.
After deletion, node is removed.
After saving, the path is updated.
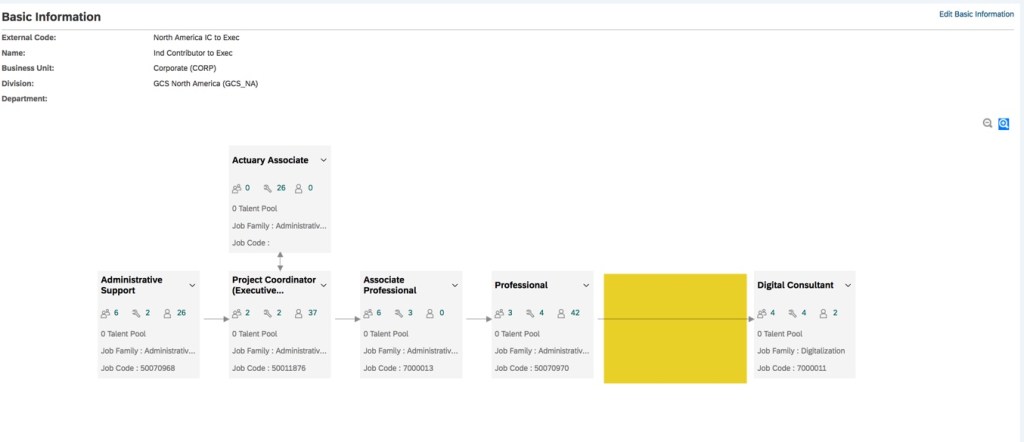
Collapsing Node Details
When viewing the career path in edit mode, it is possible to collapse the path to omit the details.
Click on the Collapse icon to change the view.
The collapsed view of the career path hides the career path node details and only displays the role names.
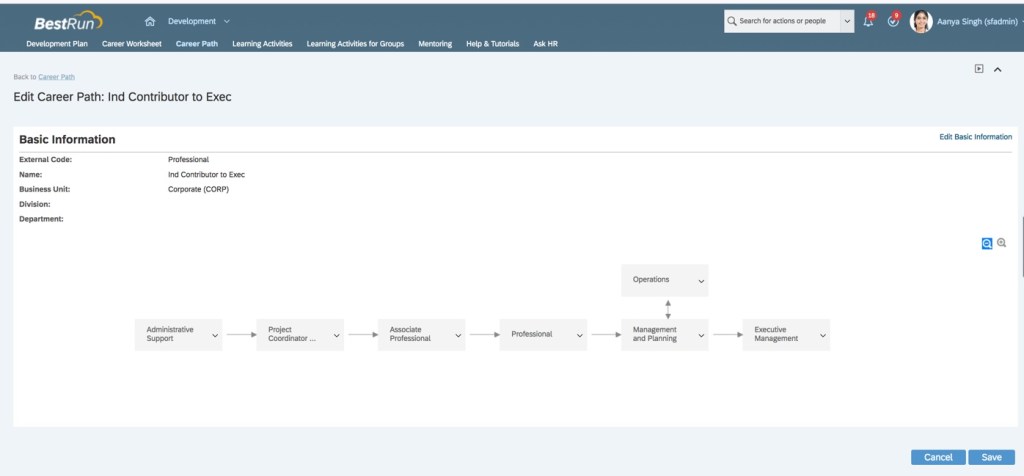
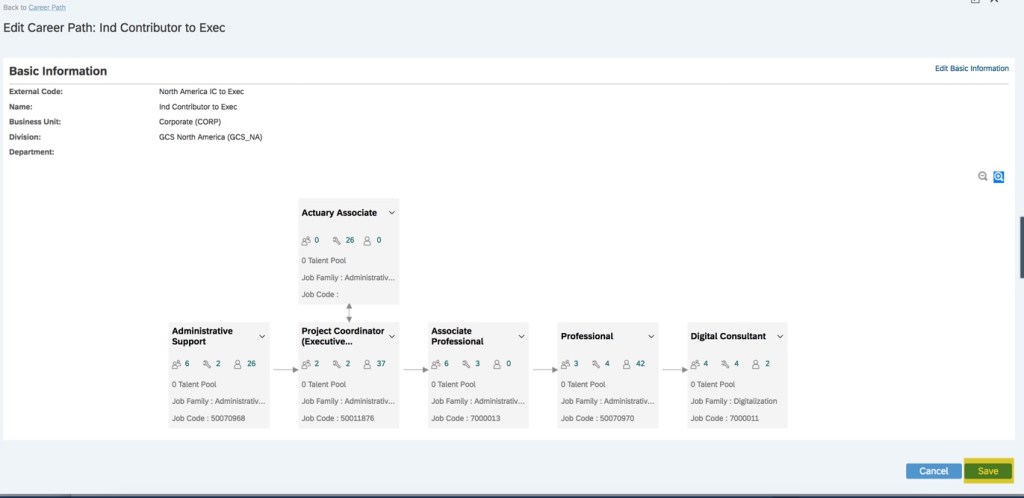
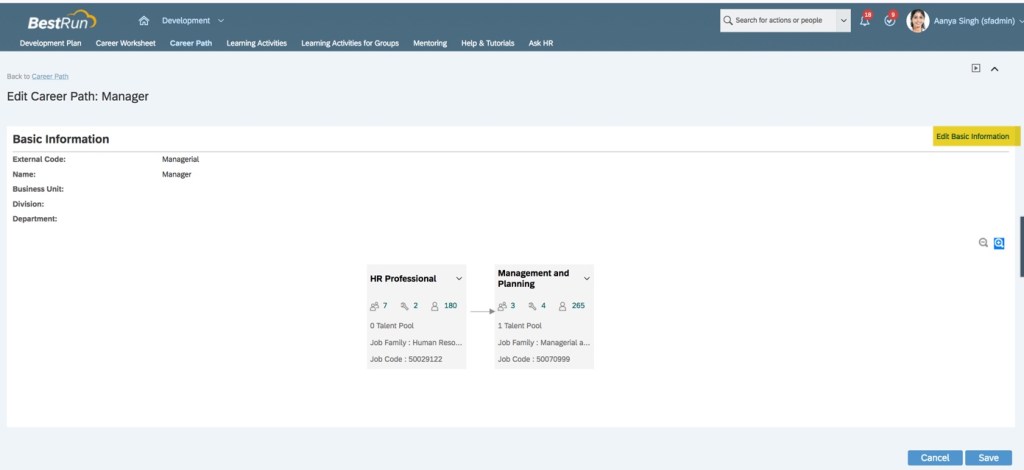
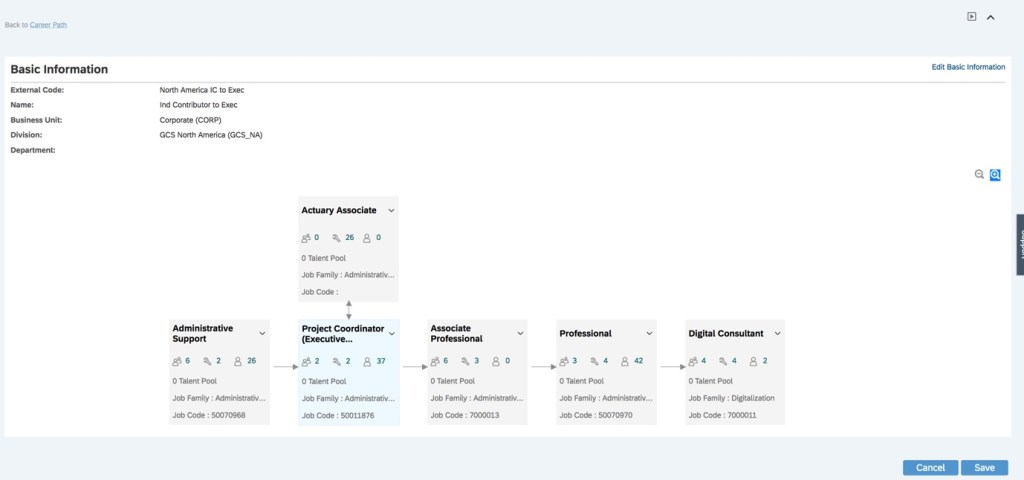
Edit Career Path
From the Career Paths tab it is possible to select any existing career path and make it editable.
Upon selecting a path, the path is ready for updates. From here any node can be added, moved, deleted or updated.

The basic information about the path may be edited as well by clicking on Basic Edit Information found on the upper right corner of the page. After creating a career path you may decide to restrict access to it.
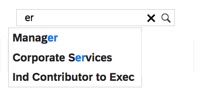
Search for a Career Path
On the Career Paths tab, there is also a search optionI. f your organization has a large number of career paths, you can avoid scrolling through pages by doing a search by path name.
All paths that meet search criteria will display.
Edit career path basic info
Within any career path, it is possible to update the path’s basic information.To update the Career Path’s name or details, click Edit Basic Information.
The path details may be modified to change its name or any of the filters.
Delete a Career Path
From the Career Paths tab, any path may be deleted via the Action column.
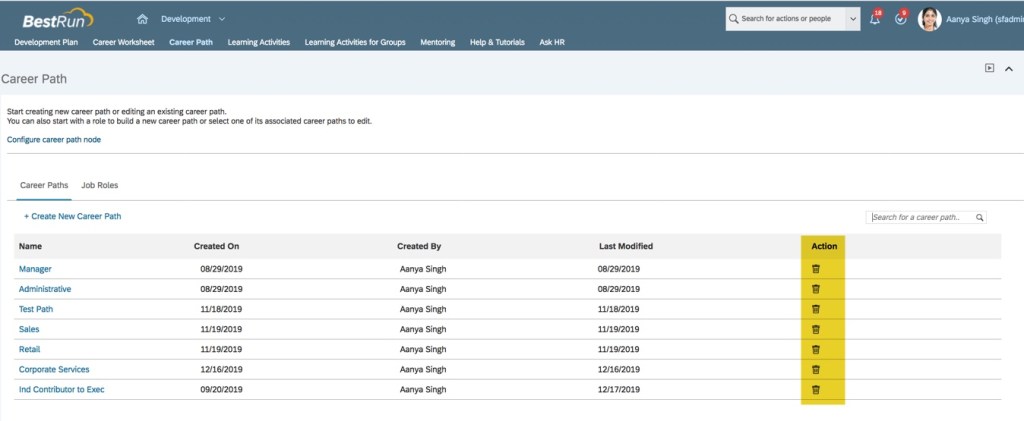
Prior to the deletion of the path, a confirmation screen will display.

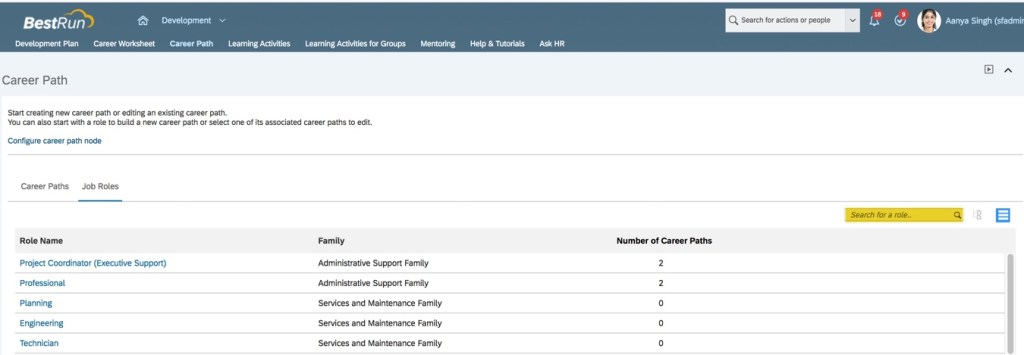
Job Roles Tab
Now that we have reviewed the Career Paths tab, let’s look at the Job Roles tab.
The Job Roles tab lists each role, its associated family and the number of career paths the role is part of.
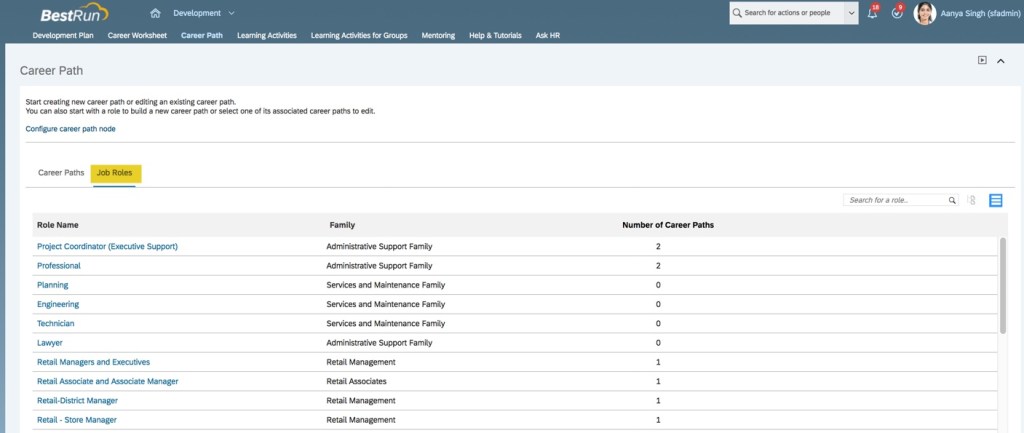
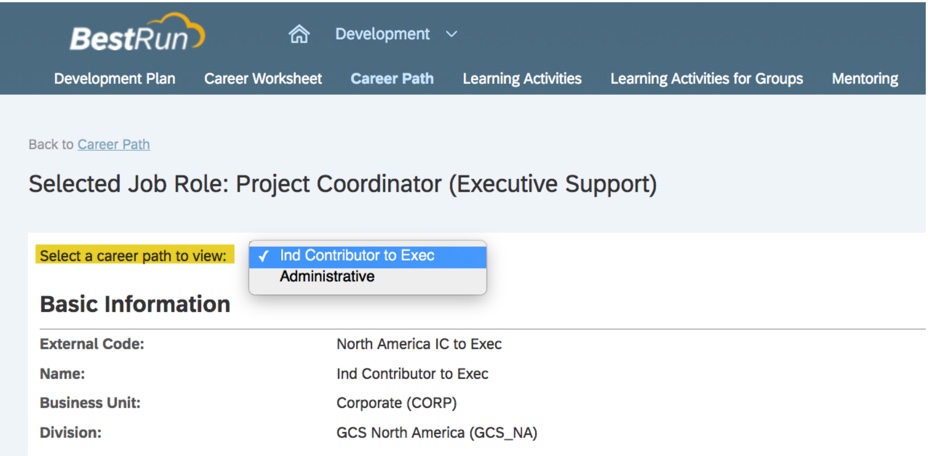
Select a role on the Job Roles tab and the career path opens. If the role is contained in multiple career paths, you may select which path to view when the selected Job Role page opens.
This view is used to see all the roles within a Career Path. Clicking on a node will display the role details.
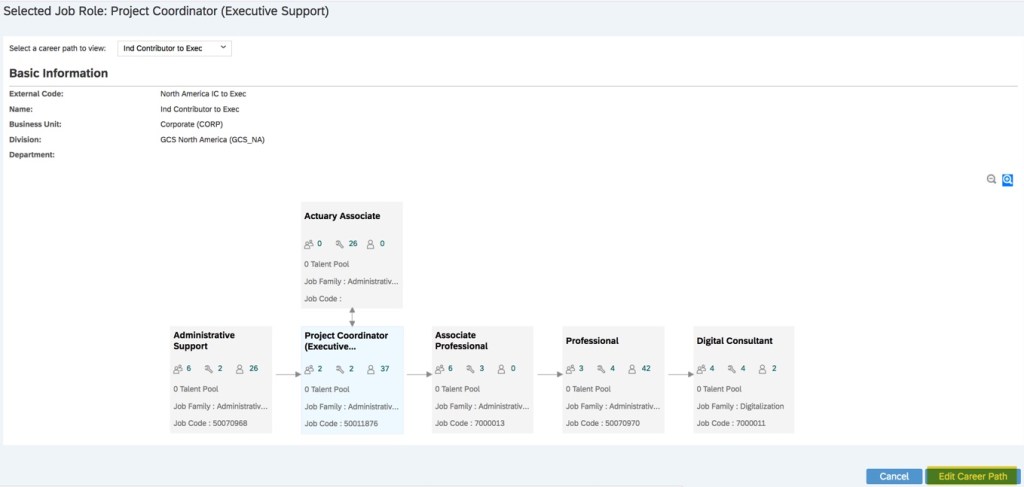
No edits can be made to the career path on this page. In order to edit the career path, click Edit Career Path.
Now the action arrows are available on each node so updates may be made. The option to update basic node information is enabled as well.
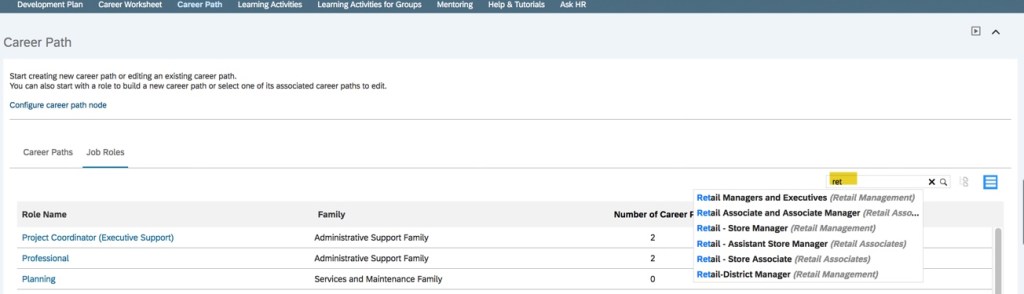
Job Roles Search
Job role search may be done by name.
A job role search option is available. Enter a job role name to see all paths the roles is associated with.
Enter a role name. If the job role is contained in more than one career path, a dropdown menu appears that enables yoy to choose the career path to display.
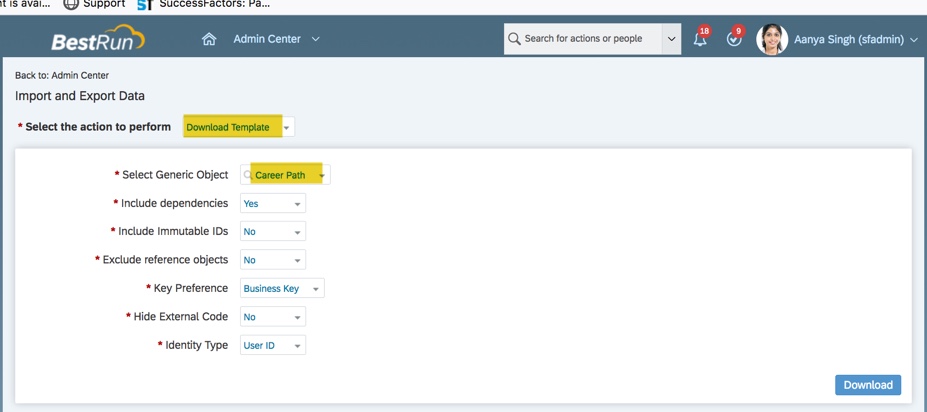
Import and Export Career Path
Career Paths may be imported and existing Career Paths may be exported using the Import and Export Data function. The limitation is that only the basic career path details are contained on the file.
Download the Career Path template.
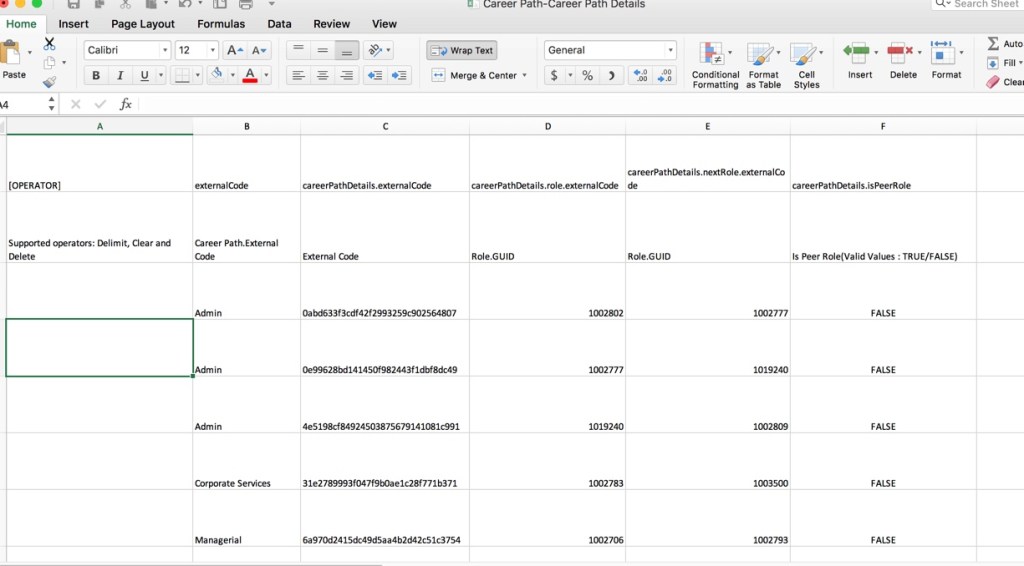
Open the file to see its contents. The CSV file contains two rows of fields that make up the career path names.
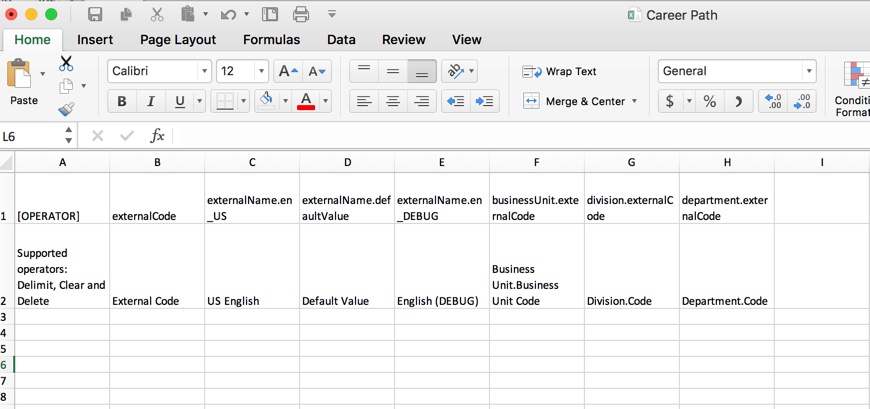
In order to create a new career path via a file, you would need to enter the same fields that you would using Career Paths tab.
The file would mimic the fields populated when you name the career path. Below is an example of the exported career paths file.
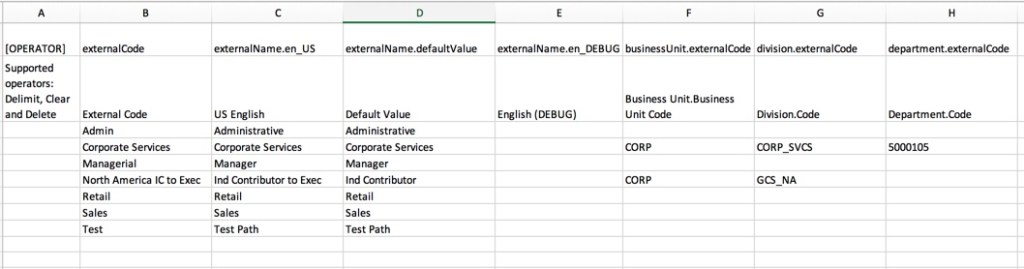
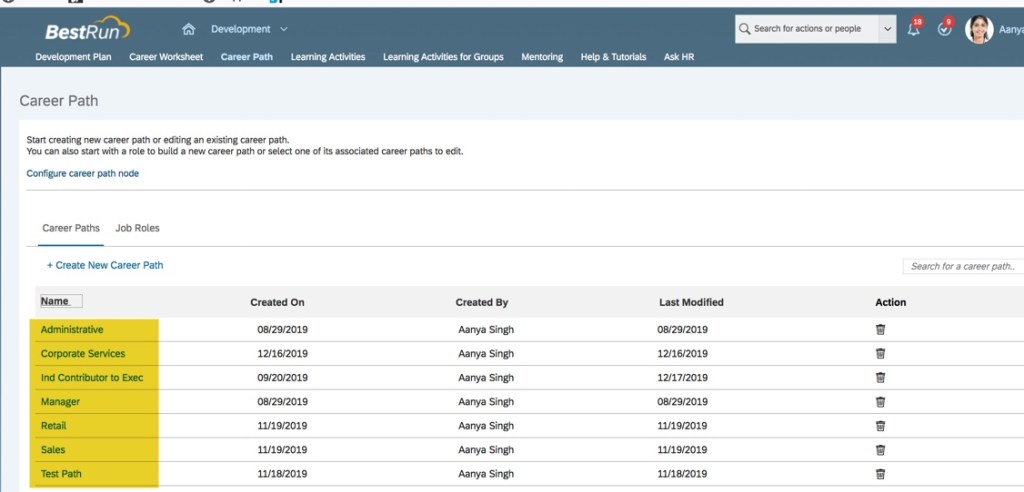
The values in Column C match the Career Path names found on the Career Paths tab.
When updating a career path or adding a new career path, the Import and Export Data screen is used for the import as well.
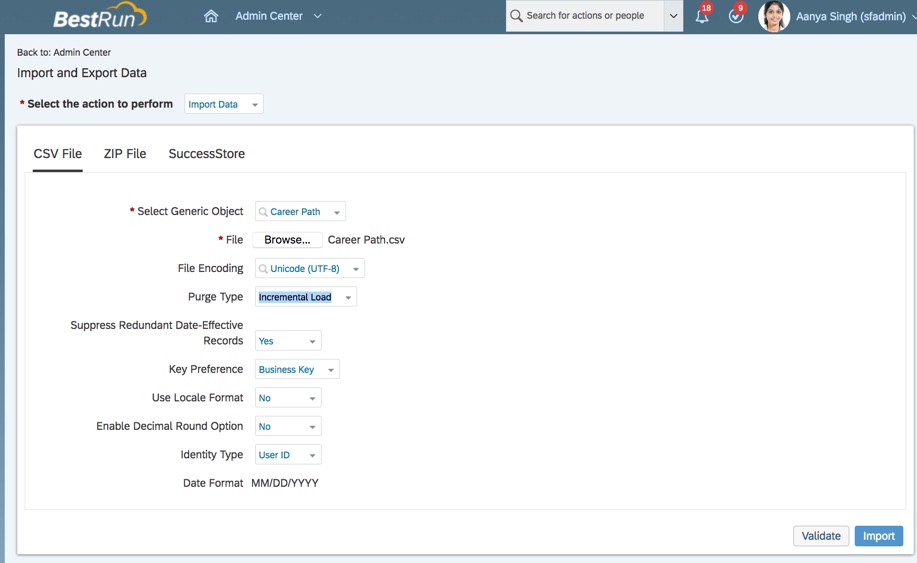
This does not build the Career Path, it simply sets up the path in order to build the nodes. You can download the template for the Career Path details but the values include system generated GUIDs. So it would be difficult to do an import with the nodes.
Suggested Roles
The Career Worksheet also contains a Suggested Roles tab.
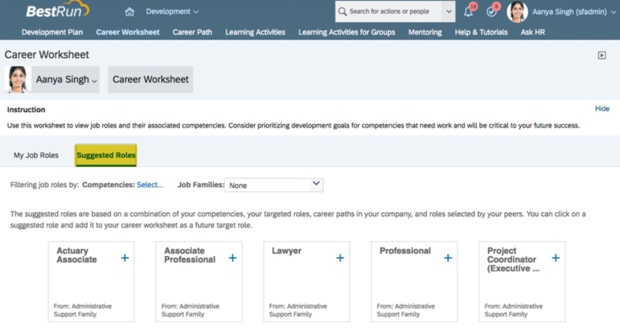
This is visible as long as the employee role has the Suggested Role Access.
Suggested roles can be based on Career Paths created by the system admin or through an algorithm based on a set of criteria. This is done via Configure Suggested Roles. The weightings that are set will determine how suggested roles appear on the career worksheet’s Suggested Roles page.
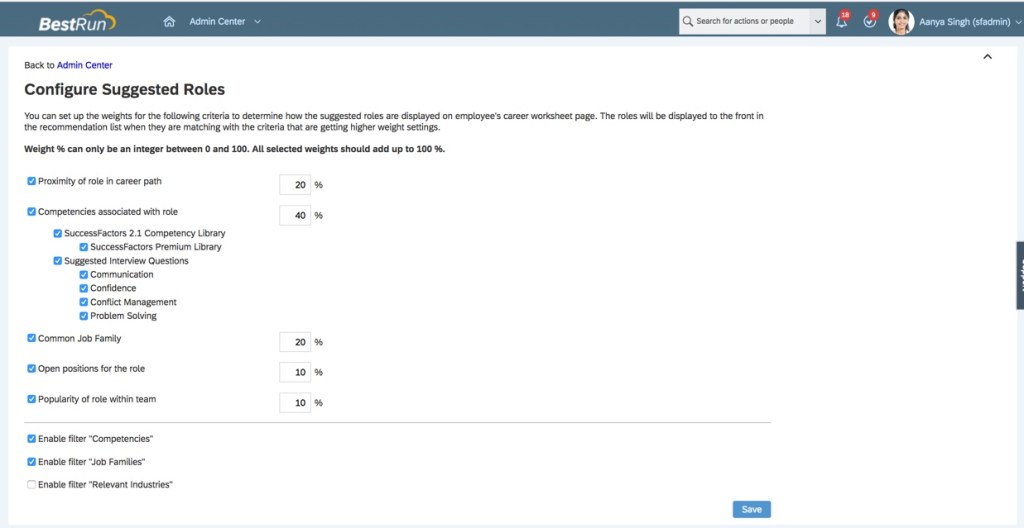
The list of suggested roles is determined based on the factors selected and their weighting.
The system calculates a score (0-1) for the role based on proximity in Career Path, Competency, Job Family, Open Positions and Popularity within team.
- Proximity in Career Path: the further the role is on the career path from the employee’s current role, the lower its assigned score.
- Competency: the system uses the Career Worksheet readiness calculation to compute a competency match score which compares the employee’s competency rating with the expected rating for the role.
- Job Family: the score for Job Family is determined according to whether a role belongs to the same job family of the employee’s current role.
- Open positions within role: only used for Legacy positions in the Succession module.
- Popularity within Team: the score is based on how popular a role is for employees sharing the same manager.
The factors are multiplied with set weights to calculate a final score for each of the considered roles. The roles are then ranked from highest score to lowest and displayed on the Suggested Roles tab.
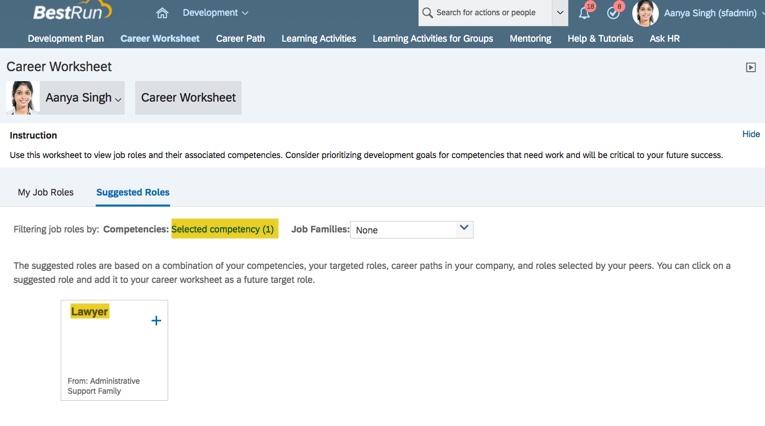
Filters on Suggested Roles
Enabling the competencies, job families or relevant industries filters allow the user to see only roles that met that the filtered criteria. However, filtering for relevant industries is only available when Job Profile Builder is used.
This filter will cause the suggested roles to display only the roles that contain the selected competency.
Career Paths are now set up and an employee may use this feature to help identify roles they may aspire to. Check out the Career Worksheet and the Role Readiness Assessment blogs to learn more.
For more information about Career Paths and other talent management modules in SAP SuccessFactors, check out our book here!
Do you need help with setting up Career Paths or your SuccessFactors Development Implemetation? Contact us at: info@worklogix.com

Leave a comment