The latest release updates are here! In this article we take a quick look at the latest updates for SAP SuccessFactors Onboarding 2.0. Preview release is October 15 and production is November 19. You can view the full set of documentation in the What’s New Viewer here. For full details on the release cycle, check out the SAP SuccessFactors official product updates blog here. Let’s get started! We’ve categorized the enhancements below for you!
Security Enhancements
In the category of security, there’s been an enhancement to proxy where you now have more granular control over whether or not a person who can proxy has access to onboarding. You can select the check box on the Proxy Management screen.
In addition to US I-9, the Canadian TD1form for all provinces is now supported. The New Zealand KS2 KiwiSaver deduction form, Tax code Declaration, and Tax rate notification for contractor forms are now supported.
Qualtrics Integration
SAP continues to further their integrations with Qualtrics across the board. There’s now a new Intelligent Services event to send internal hire information to Qualtrics. This allows you to send email surveys to employees when the internal hire step is completed. There is a new configuration screen that makes this setup easy! It is shown below:
New Hire Enhancements
A few enhancements have been made to the new hire experience. New Hires can now complete the onboarding process on the homepage. There’s new “To Do” tasks that show up for onboarding here for the new hires such as compliance tasks and completing personal data collection.
New hires can also now access LMS courses before their first day of work as shown below!
The complete new hire experience for the home page can now be done on the latest version of the homepage.
Hiring Manager / Admin Enhancements
In addition to new hire experience, the hiring manager and admin experiences have seen some updates as well. Future Managers can also now access information about their new hires in the onboarding dashboard and “To Do” tasks. Role-based permissions also now allow you to assign based on this new future manager relationship.
The Restart process for onboarding has also been enhanced so that you can choose whether or not to retain data or instead reload from recruiting.
General Process Enhancements / Behind The Scenes Enhancements
Behind the scenes, there’s been some other updates as well!
When it comes to picklists, the mapping from recruiting to employee central can be a pain. The system has now been updated to map based on a series of potential exact matches rather than just on labels. First, the system will attempt to map based on the option id since this is the most unique identifier. If no exact match is found, then mapping is performed via label using the external code value. If no external code is available, then the label alone is used.
Also behind the scenes, when a major patch/release is deployed to the system, the default onboarding process in the Business Process Engine is now automatically upgraded. Previously, an admin had to manually upgrade the flow.
The rehire process has also been enhanced to make life easier for admins managing this process. Values such as date of birth, national id, legal entity, and user records can now be seen as shown below:
No shows and rehires are handled better as ell. The value “No Show” has been added as an event reason for cancelling the second rehire check. There is also a new welcome email template specifically designed for rehires.
Conclusion
The SAP SuccessFactors Onboarding product continues to grow and become increasingly more robust! This does not represent all of the enhancements in the H2 2021 release – only the highlights we found most compelling. Check out the What’s New Viewer here for the complete list of enhancements.
See this great article for useful information on how to prepare for a SAP SuccessFactors Regular Release.
Interested in what’s new for Employee Central for H1 2021? There’s quite a few enhancements! In this quick blog we run through the major release updates that caught our attention the most.
Increasing the integration between Qualtrics and SuccessFactors has been a priority for SAP – we’ve seen multiple integrations across modules and now there’s a few more for EC. SAP has added 4 email survey integrations based on intelligent services to trigger in the below events:
Employee Rehire
First Time Manager
Transition from Individual Contributor to Manager
Transition from Manager to Individual Contributor
These surveys can be very insightful to find out if employees are comfortable in their new roles and identify where they might need help!
BizX Talent Integration / Succession Data Model
Integration with the BizX Talent side of SuccessFactors has also been improved. In particular, SAP has made it possible to run a full HRIS sync (that pushes data from EC to BizX) based on individual user ids.
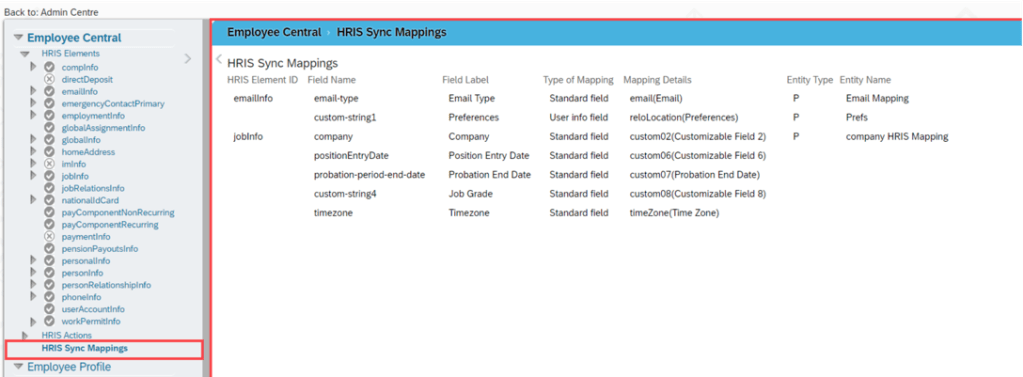
In addition, they’ve made it easier to view what the HRIS mapping looks like in the Manage Business Configuration Screen with an overview screen of all of the mappings in one location. Previously you had to dig through all of the fields individually to find this information! Check out the screenshot below:
Overview of HRIS Sync Mappings
Admins can also now export the Succession Data Model and Country/Region_specific Succession Data models from Admin Center (previously only partners could do this in provisioning). Simply give the new permission “Export Succession Data Model or Export Country-Specific Succession Data Model” permission and you’ll get access to the screen shown below:
New Export Succession Data Model Screen
These enhancements help make the integration between employee central and the talent modules more clear cut.
Business Rule Scenarios
Multiple new business rule scenarios are now available that allow you to:
Configure cross-entity rules triggered from a source entity with changes executed on the target entity
Calculate Full Time Equivalent for a user
Create business validations / raise alert messages for HRIS elements
These enhancements contribute to the ongoing effort to increase the flexibility and robustness of business rules.
SAP Integration
If you sync your HRIS data with SAP, you’ll be happy to know there are 10 enhancements to this integration including:
A comparison tool that compares configuration between EC instances
An enhancement considering the purging status of ERP communication data while replicating employee communication data from EC
The ability to select specific foundation objects by object ID ad choose log or list view when viewing the Foundation Object Transfer Report
In Define Employee Data Settings for EC instance, the field names have been changes to “Standard Mapping (PERNR)” and “Standard Mapping (CP)” for clarity
The Enhanced Work Schedule Rule Transfer Report was updated with a new BAdi to maintain the external code of work schedule rules
Better data replication that considers purged data
Replication of inactive employees that were terminated in EC before the full transmission start date
Sample contract elements (IT0016) content
Replication of OM data infotypes even when relationship data (IT1001) can’t be replicated
Organizational assignment data that was marked as status “Failed” will change to “Outdated” once the next replication job runs
These enhancements help to make the interface more robust and reliable for customers wishing to replicate employee data to on-premise SAP.
Global Benefits
Enhancements and automations came to the global benefits functionality as well. Let’s take a quick look at these:
When an employee has a job change that affects their benefits eligibility, this can now trigger an intelligent service event to create or update benefit enrollments
When benefit master data changes, a new automatic enrollment job now exists to handle creating and updating enrollments
A new pension / retirement savings plan type has been introduced called “Workplace” that offers additional contribution options
Once again, we see how the system continues to provide helpful automations and features to make this functionality more simple and robust to use.
Reporting
Custom fields are now allowed in story reports. The fields can be seen within the query designer.
Conclusion
The SAP SuccessFactors Employee Central product continues to grow and become increasingly more robust! This does not represent all of the enhancements in the H1 2021 release – only the highlights we found most compelling. Check out the What’s New Viewer here for the complete list of enhancements.
See this great article for useful information on how to prepare for a SAP SuccessFactors Regular Release.
SAP SuccessFactors has some exciting new features for your Analytics & Reporting Solutions. They can be found in detail here (S-User ID required). Filter on Solutions for Analytics to review all of the latest changes. Under the Description for each, you can click on ‘See More’ to see screenshots and detailed information.
After reviewing all the changes, we narrowed the list down to the Highlights for H1 2021 SAP SuccessFactors Analytics/Reporting Features:
Calibration, Succession, and Compensation and Variable Pay Reports Now Available for Download in Report Center
Previously, the reports were available for download on the Scheduled Reports page in classic view. This caused confusion for users on how to get to their reports by having to direct them to Switch to Classic View.
You can now download the reports from the My Jobs page within View Schedules in Report Center.
Reports can now be accessed via My Jobs
2. All User Info Fields Are Now Available in Story Reports
You no longer need to set a User Info field as Reportable to make it available in Story reports.
All the User Info fields are now automatically available for reporting using Stories in People Analytics.
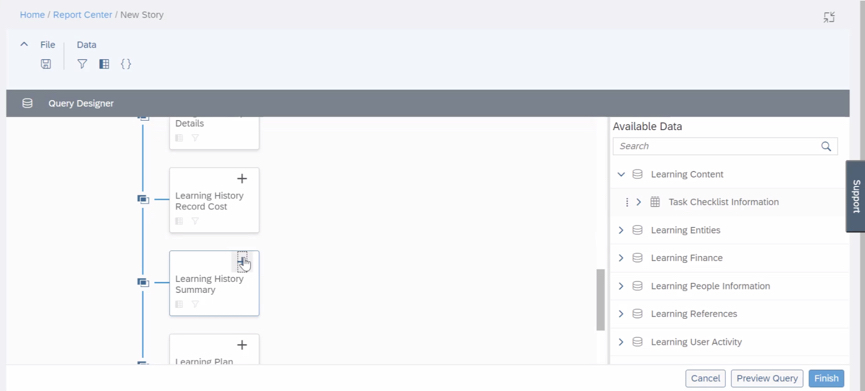
3. Stories in People Analytics for SAP SuccessFactors Learning
You can now create, access, and share Learning stories in People Analytics for generating custom Learning reports.
You can also have the data of SAP SuccessFactors Learning and other modules side-by-side in the same story and link them to apply common filters on them.
Stories in People Analytics for SAP SuccessFactors Learning
4. Increase in Number of Columns Supported in Queries of Story Reports
The number of columns that you can select while creating a query has been increased from 30 to 120.
You can now create complex or detailed queries that involve more than 30 columns.
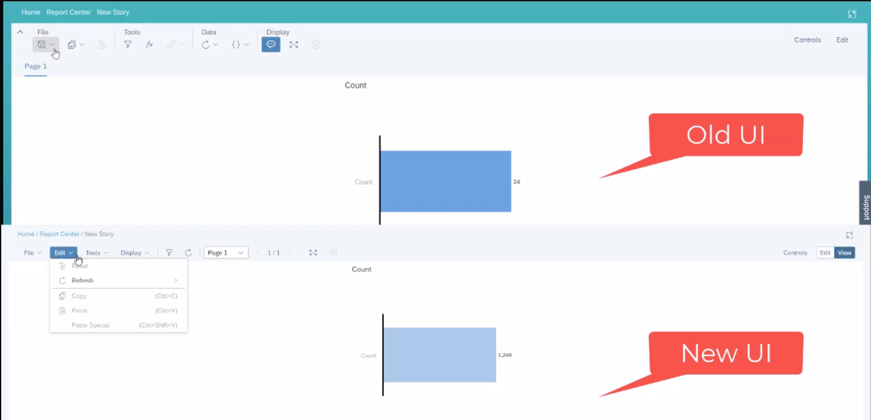
5. UI Enhancements for Stories in People Analytics
The UI enhancements on the viewer mode include:
An updated Display menu, which now has the Tab Bar, and the Comment Mode options. By default, the page dropdown view appears. The multiple pages in tab view now appear when you select the Tab Bar option.
Separate File and Edit menus.
Removal of the Data menu. The refresh option has moved into the Edit menu and the edit prompt option has moved into the Tools menu.
What is the Metadata Framework (MDF) in SAP SuccessFactors? If you’ve been introduced to SAP SuccessFactors, chances are you’ve heard the term “Metadata Framework”. But you may not know the details of what the Metadata framework is exactly. This quick blog will help you understand what comprises the “Metadata Framework”.
To get started, let’s examine the name “Metadata Framework”. “Meta” refers to a greek origin word meaning “beyond”. So the word “Metadata” refers to data beyond the data. Or in other words, Metadata is data about the data. Metadata is data that describes what type of data it is (e.g. a number, or text, or a drop down) how the data looks (e.g. how it is formatted such as a date formatted as 12-31-20 vs. December 31, 2020), what its limits are (e.g. 256 characters long), etc . As the picture at the top of the blog post suggests, a framework is the structure laid out in the initial stages of building a structure. So the “Metadata Framework” is a way to lay out the structure of data in SAP SuccessFactors.
So how do we go about laying out the data structure of SAP SuccessFactors? If you have admin access in the system, you can navigate to the “Configure Object Definitions” screen as shown in the example below. Think of an “Object” as a collection of fields that describe, define, and/or belong to a “thing” in your database/system. Objects could be a chair, a dog, a car, a person or the example below, a position. This screen demonstrates the power of the MDF because you can create objects (as seen in the upper right hand corner under “Create New”, or you can edit existing objects. This ability to create and edit objects lets you store any type of information! In our example, we chose “Object Definition” in the “Search” field and then chose “Position” so we can see how the position object has been defined. You can see below some basic data about the object in general at the top such as whether it is active or not, whether version history is kept on the MDF definition, etc. Below that begins a list of fields within the object and associated attributes of each field such as its technical identifier, length, the type of field it is, etc. Scrolling further down we can even set rules for what happens when a new object is created (such as pre-populating fields) or validation rules to help with data integrity to check fields before the object is saved. We can edit this definition of the overall object and the fields within the object by clicking “Take Action” and then “Make Correction”. Taking a look at the screenshot below, you can start to get a sense of what the MDF is all about.
Configure Object Definitions Screen
It is important to note that not all data in SAP SuccessFactors uses the metadata framework. Most Employee Central data is stored in the MDF–but not all. SAP is working on moving the final few pieces into the MDF within the next few releases. Most of the Talent modules and Recruiting still also reside outside of the MDF. However, as new functionality is built, it is created using the MDF wherever practical.
We hope you enjoyed this quick tour of the MDF! You should now have a basic understanding of what the MDF is and how to configure it. Do you need more help with the MDF? Contact us at info@worklogix.com.
Companies are hiring! A recent LinkedIn article shows that individual companies are now hiring 10,000s of new employees. This is great news for the economy. We at Worklogix have also seen customers gearing up their recruiting systems. But all this renewed activity in the “New Normal” raises the question “How do we keep everyone safe during the process without sacrificing the candidate experience?” In this blog we share how we’ve helped customers expand their recruiting capabilities with SAP SuccessFactors technology to keep candidates and current employees safe.
Engagement
Just because there are more people looking for jobs doesn’t mean engagement needs to go down. Quite the opposite–it means now is your chance to engage the most people to get the best talent! If your company isn’t hiring yet, it makes the challenge even more important because without any postings, you’ll need to come up with creative ways to keep people checking back in with your career site. We’ve helped companies integrate with tools like chatbots that interact with candidates to document their interests and create talent profiles that can be used to trigger email updates. If you are wondering how to create talent pools and target them with email campaigns within SAP SuccessFactors, checkout our other blog article “Actively Engage Prospective Candidates with SAP SuccessFactors Recruiting CRM Features“. Email campaign content can range from virtual career fair announcements and updates on postings, to videos featuring real managers describing why they like working for the company and what they are looking for in a good candidate.
Automated Assessments
Assessment Status and Scores showing within Candidate Overview Screen in SuccessFactors
Even prior to COVID-19, we’ve been helping customers sift through 1,000s of candidates with automated assessments. With more unemployed people seeking jobs, there is increasing pressure to comb through even more candidates per posting. Automated assessments can take the form of surveys or even Artificial Intelligence. For example, we’ve help customers automatically send out 3rd party survey assessments immediately upon applying or at other stages in the recruiting process. From there, the candidate can either be automatically disqualified or be sorted into different statuses and/or given a rating to easily compare against others. Assessment status and scores can also be integrated directly into the SuccessFactors user interfac as shown in the screenshot above and even sorted in descending order for maximum visual efficiency for recruiters. We’ve also worked with cutting edge vendors to give candidate similar ratings based on resume and candidate profile content using AI technology.
One-Way Interviewing / Virtual Interviewing
As in-person interviewing takes on new risk, many are turning to one-way interviewing and/or virtual interviewing. We’ve helped customers setup their SAP SuccessFactors systems to automatically trigger 3rd party video interviewing systems when placed in an interview status. Typically, after the status trigger, the candidate gets an email with instructions, perhaps to download an app on their phone. In a one-way interview scenario, candidates are prompted with specific questions and are allowed to record an audio or audio/video segment answering each question. The recruiter then receives the segments in the vendor system and can even get automated system feedback on how the candidate answered. The advantage here in addition to not having to meet in person is there’s no need to work out scheduling issues and the candidate can often re-record until they are satisfied with the answer they have provided. Two-way interview automations often take the form of automated scheduling systems ending in a virtual conference call.
Will I have to work on site once I get the Job?
Depending on the position, this is probably a question on many candidates’ minds when applying to a new position, and one that recruiters should be prepared to answer with confidence. At Worklogix, we’ve helped companies flagging their positions to denote how critical being “in-person” is to the role and even denote what kind of proximity to other people or exposure risk the role may require. By expanding position objects in the SuccessFactors MDF and linking the field to the requisition, recruiters can post positions and communicate with candidates clearly about the on-site expectations of the role are.
Automated Drug Screening and Background Checks
While some companies may choose to forego drug screenings, others like those subject to DOT regulations have no choice. A recent SHRM article talks about the pros and cons and realities of drug testing during COVID. The question seems to be, are we doing more harm by not conducting screenings designed to provide a safe work environment for employees? Giving candidates options might help here. We’ve helped many customers setup automations with a variety of background check & drug screening vendors. Some of these vendors allow candidates to choose from a variety of facilities that may have different safety options candidates can choose from and feel more comfortable. In a typical automation scenario, the candidate is moved to a background screening status in SuccessFactors which triggers a call to the vendor, which in turn sends an email to the candidate to provide needed information and choose a drug screening facility. Results can also be shown directly in the SuccessFactors UI similar to assessment results.
Delaying I-9 Verification
Once a candidate is ready to hire, companies can also delay unneeded on-site attendance by delaying I-9 verification. As you may be aware, the Department of Homeland Security has delayed the need to verify employee work authorization documents. You can read the updates from DHS here. To comply for this, SAP has made updates to the existing Onboarding 1.0 process. You can read the full SAP note on the COVID-19 onboarding process here. For Onboarding 2.0, the US forms will be out as part of the H2 2020 release.
Wrapping up
Online engagement using chatbots and email campaigns, automated assessments, virtual interviewing, flagging positions for work conditions, automated background checks, and I-9 updates are just a few examples of how company recruiting initiatives are working to make the recruiting and onboarding process both safe and efficient during COVID-19.
SAP SuccessFactors H2 2020 release updates finds us with several admin-opt “latest” versions including Home page, Goal Management and Continuous Performance Management (CPM). Here we will focus on the latest version of Goal Management and discuss how it fits into the new home page and how it integrates with CPM. See my earlier blog post for more information on performance management updates and my blog post for what’s new in CPM.
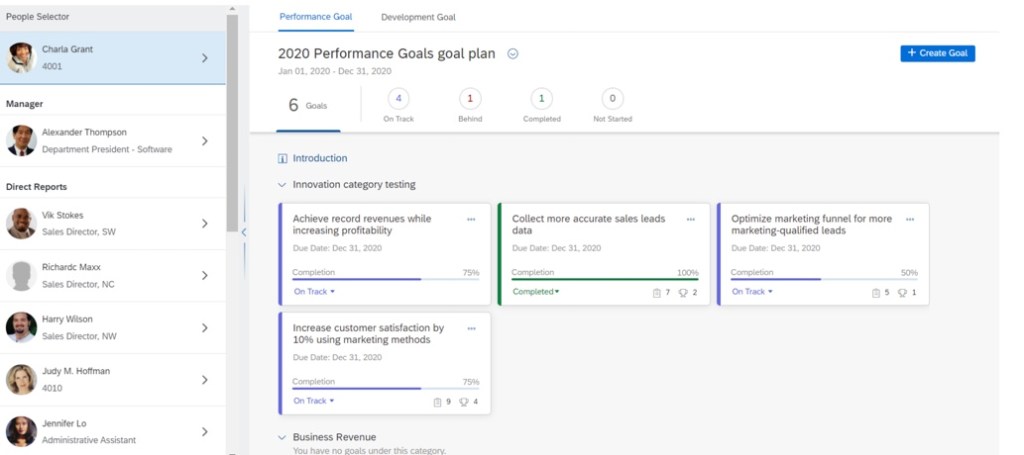
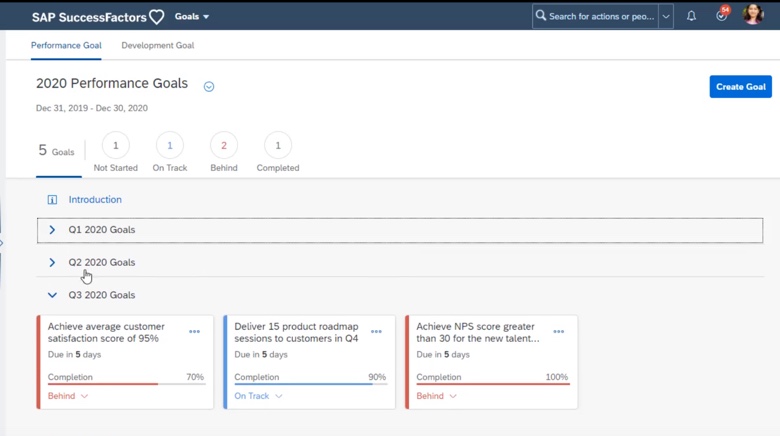
There is a new admin opt-in for the latest version of Goal Management. The latest version of Goal Management provides users with a streamlined view of goals to make it easier to access and manage. Performance Goals and Development Goals are now housed within Goal Management and have improved integration with CPM. Access to Goal Management contains both plans with a tab for each as seen in the example below.
New Goal Management View with Both Goal Plans
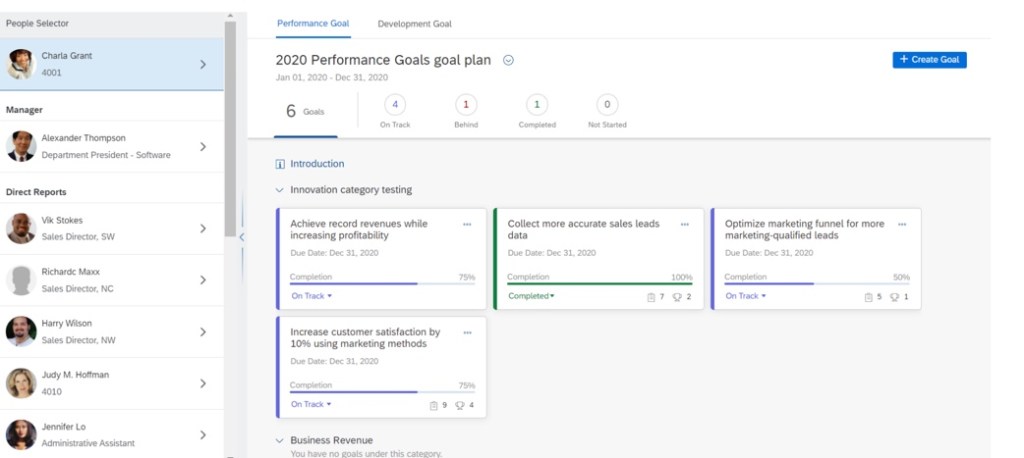
For managers, the new look is especially helpful. It is easy to navigate to direct report’s plans or any other users in their target population. They can swap between between their reports and within the two plans. An example the manager’s goal plan view is seen below.
Manager View of Goal Plans
Latest Goal Plan Features
The latest version of Goal Management still allows for the following existing functionality:
Creation of personal goals.
Development goals can have competencies and learning activities added.
Receipt of goal notifications.
Edit, view, and delete all goals except group goals v1.
Access to other’s goal plans with proper role-based permission.
Existing integration with other modules.
New functionality includes:
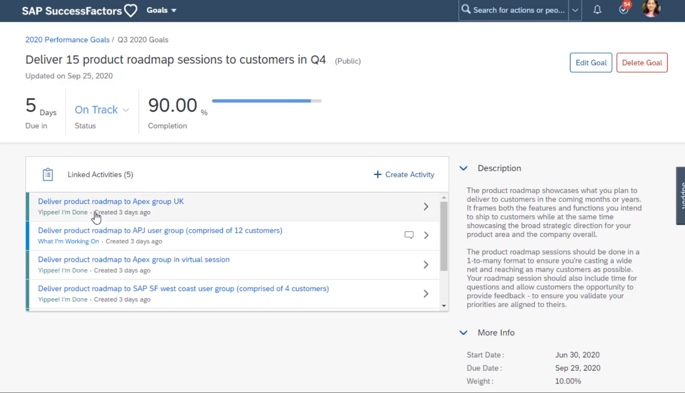
Personal goals not yet at the completed stage and approaching or past due date can appear on the latest home page.
Linked achievements for the latest version of CPM may be created and viewed here rather than having to go out of the goal plan and navigating to CPM.
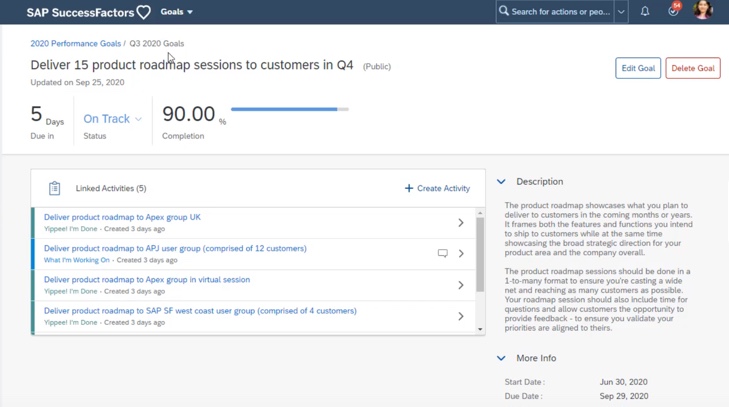
Activities can be added directly to goals and linked activities may also display. An example of activities tied to a goal is shown below.
Add Activity to Goal
However, only the latest version of Goal Management may be used with the latest version of CPM.
Latest Goal Management Limitations
Since this is a new version for Goal Management, there is some goal plan functionality not yet available including:
Mass import of goals.
Ability to cascade and assign goals.
Use of Group and Team Goals.
Changing goal plan states within goal plan.
Use of metric lookup tables.
Use of Coaching Advisor for development goals.
Assigning custom learning activities to development goals.
OData APIs.
Some mobile features which will be identified shortly.
Attributes that may be Configured
Listed below are the the goal plan XML attributes that may be configured in the latest Goal Management:
max-goals
max-weight
max-weight-per-obj
min-goals
min-weight
min-weight-per-obj
new-obj-share-status-public
show-total-goalscore
Unsupported Goal Plan Field Types
Additionally, there are some goal plan field types that are not supported:
Bool
Checkbox
Comment
Link
Table
Text when used for achievement text, actual achievement text, object plan field 1, go to url
Changes to Goal Plan Fields with Latest Version of Goal Management
Name field is required with a maximum length of 500 characters.
Description and metric fields have a maximum 1000 character limit.
State. For use on the latest version of the home page, set the final enum value of the state field to “complete” in order to trigger the change of the goal state which enables incomplete goals to appear on the latest home page.
When using weight, if min-weight-per-obj and max-weight-per-obj attribute values are not met, goal creation is not possible.
For development goals, competencies can only be used in conjunction with Job Profile Builder.
Cannot select a single competency to link to a development goal in the UI.
You may convert existing goal plan templates but the goal plan field types that are not supported will not appear in converted goal plans.
After the upgrade, goal plan templates will need to be converted. Convert a template only once and and one at a time. Only convert the goal plans in use. Goal plans not converted will be read-only. Once converted, the goal plan templates may be used in the latest version of Goal Management.
Mobile Apps Limitations
There are some limitations using the latest version of Goal Management in mobile apps. For Performance and Development goals:
Cannot delete a goal from the goal card.
Cannot enter a negative number in the number field type.
Cannot revert back to the legacy view to see unsupported fields.
For Development goals:
Unable to search for a specific competency.
Unable to display the number of competencies on the goal card.
Unable to add competencies by library or category.
No integration with Learning.
Latest Goal Plan on latest Home Page
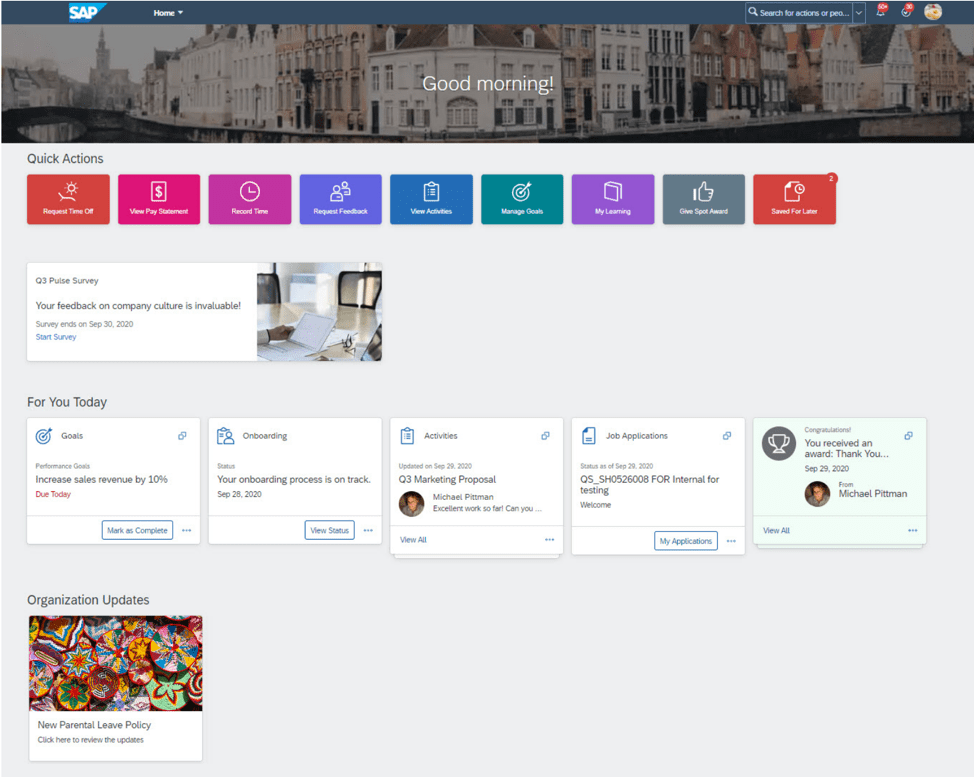
The latest Goal Management may be used in the latest version of the home page. There is a new admin opt-in for the redesigned home page. It is available for early adopters in both Preview and Production. Any existing legacy home page custom tiles or permissions are not impacted by the new page. An example of the new Home page is shown below.
Latest Home Page
The view is less cluttered with customized user and organization content. Tiles are replaced with cards and are system generated and more interactive. The page is divided into three sections:
Quick Actions. For frequent or quick actions.
For You Today. Dynamically generated user content. Displays any recently added goals and CPM activities.
The new Home page shows content from Goal Management, Continuous Performance Management, and Continuous Feedback. On the latest home page, you can view personal goals when the state of these goals is not yet complete and these goals are approaching their due dates or already overdue.
The latest version of the home page handles only personal goals in the following manner:
Updates of goals on the home page appear on for those manually created, modified or deleted.
Goals from an import are not reflected on the home page.
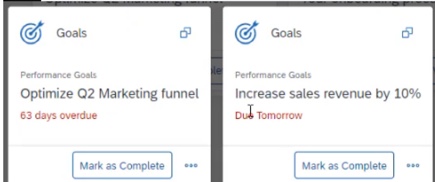
Performance goals appear based on status, if not yet complete and 15 days before due date.
Development goals appear based on status, if not yet complete and 30 days before due date.
Overdue Performance and Development goals will display.
Goals in “For You Today” section
Performance and development goals disappear from the new home page when:
Goals are completed.
Goals are deleted.
Goal due dates are past the due dates configured on the goal plan template.
To-do items list can be opened and acted upon in a side panel on any page. You can take action on each to-do directly from the side panel.Overdue to-do items are indicated in red.
Is the upgrade right for you?
After upgrading to the latest version of Goal Management, you cannot reverse the update, so be sure to fully understand what features you will be gaining and losing. It is wise to fully test in a preview instance before committing to an upgrade to production.
Because there are some substantial limitations to the latest version, it may be premature to upgrade but it is at least worthwhile to anticipate how Goal Management is changing and to gain an better understanding of how modules continue to be more tightly integrated with each release.
There are new universal and admin opt-in features in the H2 2020 Performance Management release along with a large number of universal features. We will start with what’s new. There are two admin opt-in updates and two universal 360 related updates.
New Admin Opt-ins
There are two new admin opt-ins available and we will look at them both.
Latest Version of Goal Management
The latest version of Goal Management provides users with an upgraded user interface with a comprehensive view of goals and development goals. This streamlined tool also enables access to the latest version of Continuous Performance Management (CPM) to create and view linked activities.
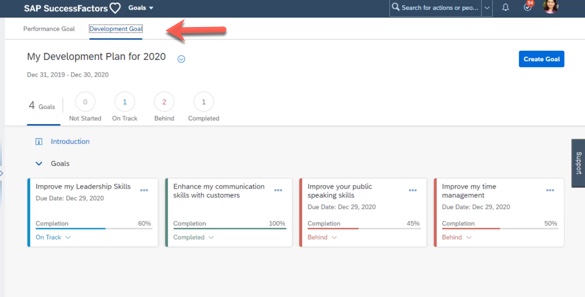
A notable change is combining performance goals and development goals within the navigation menu. Development goals now appear as a tab within Goal Management. An example is shown below.
Development Plan Tab
For both plans, the view is cleaner and more visually appealing. Goals are more prominently displayed and may be viewed by status as well. You can see what the new goal plan looks like below.
Linked achievements for the latest version of Continuous Performance Management (CPM) may be viewed here rather than having to go out of the goal plan and navigating to CPM. Activities can be added directly to goals and linked activities may also display. An example of activities tied to a goal is shown below.
Linked Goal Activities
For managers, the new look is especially helpful. It is easy to navigate to direct report’s plans or any other users in their target population. An example the manager’s goal plan view is seen below.
Manager View of Goal Plans
Job Profile Builder Support for Writing Assistant and Coaching Advisor
The other new admin opt-in feature pertains to competencies when Job Profile Builder (JPB) is used. Previously, to use Writing Assistant and Coaching Advisor for competencies in a performance form, the Teasers and Tunings were added to a competency library via an import file in Provisioning.
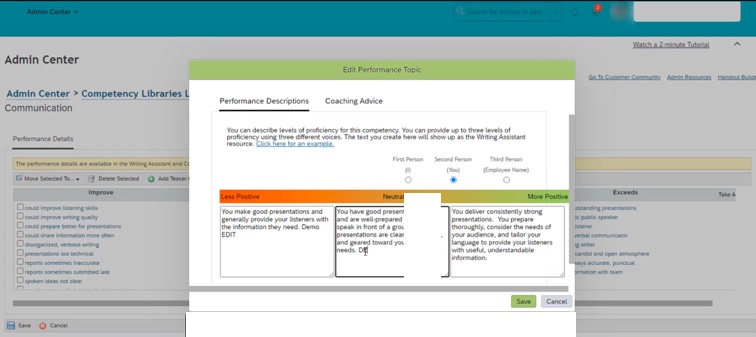
Now this task may be accomplished in the UI with the tool “Manage Writing Assistant and Coaching Advisor“. This update fills a gap between JPB and Job Description Manager. Within this tool, a competency library overview page will display. After selecting the library and finding the competency to update, teasers and tunings can be added to the performance details. An example is shown below.
Adding Teasers when JPB is Enabled
This new feature enables users without Provisioning access to create and modify the writing assistant and coaching advice content.
New Universal Updates
There are two new universal updates for H2 2020 both for 360 Reviews.
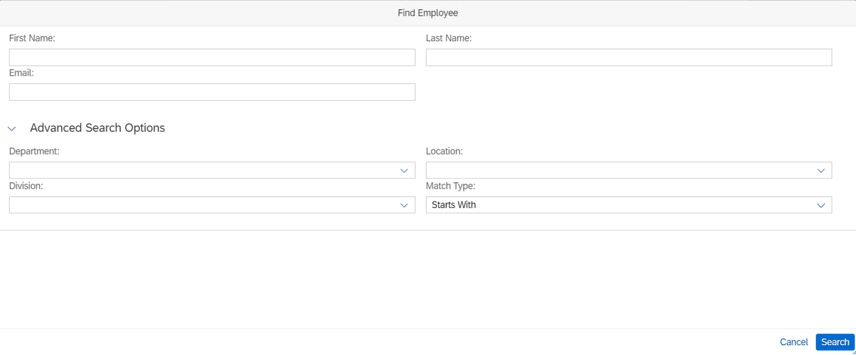
Advanced Search of Universal People Search Available in 360 Reviews – SAP Fiori Version
Advanced Search of Universal People Search is now available for 360 reviews. When searching for employees, when the “Find Employee” dialog box appears, there will be advanced search options. This search can be used in the “Add Participants” dialog box, in the “Send a Copy” dialog box and in the “360 Executive Review” page. The updated search screen is displayed below.
Advanced Search of Universal People Search
Detailed 360 Report in 360 Reviews – SAP Fiori Version
There is a revised version of the Detailed 360 Report. It has cleaner and easier to read layout. An example is shown below.
Detailed 360 Report
The settings are now housed at the top of the report and fonts are bigger and brighter for the gap values. Comments are more visible and appear beside ratings.
There is a radarchart to display competencies and ratings on the Graphical Summary tab. The print set up dialog box now offers an option to print specific views.
Admin Opt-in Updates
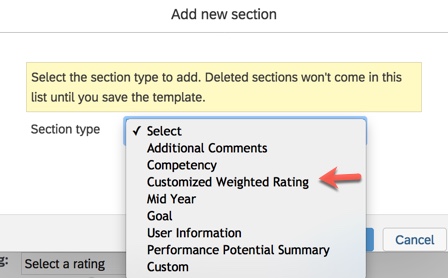
There are three admin opt-in updates available: New Competency Picker in Forms, Qualtrics Surveys for Steps in Performance Reviews and Customized Labels for Calculated Rating and Manual Rating in Customized Weighted Rating Section. Since there are sever
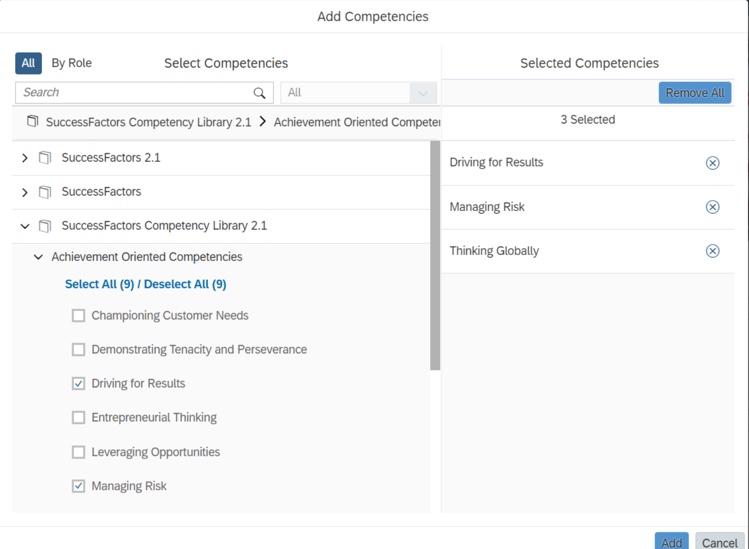
New Competency Picker in Forms
This opt-in is available when Job Profile Builder (JPB) is enabled and is used when adding competencies to a performance form. The new competency picker is used on PM forms to find competencies to add. Competencies can be found using a hierarchy structure and a search option. Competences can be selected by competency library or job roles and using keywords search. An example is shown below.
Add Competencies
Qualtrics Surveys for Steps in Performance Reviews
If you are using Qualtrics surveys in your performance process, the current version only allows the survey to appear after the employee signature step. In the new version, you may select which steps and for which roles the survey should display. The survey can be used for single role, iterative, and collaboration steps.
Customized Labels for Calculated Rating and Manual Rating in Customized Weighted Rating Section
The labels for the calculated rating and the manual rating in the Customized Weighted Rating section can now be customized using an XML file. In the previous version, the labels for the calculated rating and the manual rating were hardcoded as Calculated Form Rating and Overall Form Rating.
Universal Updates
There are several universal updates for Performance Management. Many revolve around the Customized Weighted Rating Section of a performance form. We will look at these but first we will look at the other universal updates.
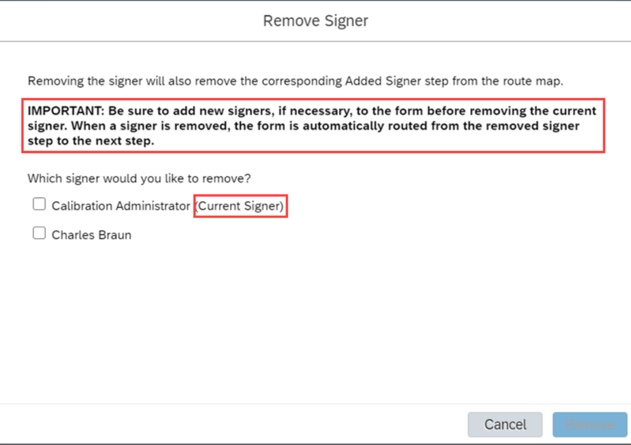
Message to Remind Users Before Removing Signers
In a performance form that allows for a signer to be removed, there is now a reminder in the Remove Signer confirmation pop-up. The message is to remind users that by removing a singer, the form automatically routes to the next step. If that is not the user’s intent, they need to add a new signer before removing the current signer. An example of the new reminder is shown below.
Message Added to Remove Signer
New Feedback Data in Goal Plans
Feedback from Continuous Performance Management (CPM) is now available to display in performance and development goals plans. The CPM achievements column for a goal currently shows the count of achievements tied to a goal. With the latest version of CPM, achievement related feedback will also display. In the CPM achievements column, clicking on the count will now display the feedback topic title along the topic title and three sets of questions/answers from the Achievements tab.
New Feedback Data in Performance Management Forms
The CPM achievements column in the performance and development goal sections of a PM form currently shows the count of achievements tied to a goal. With the latest version of CPM, achievement related feedback will also display. In the CPM achievements column for a goal, clicking on the count will now display the feedback topic title along with the three related feedback question/answers.
If any achievements or feedback is deleted in CPM, the data is also deleted from PM forms, including completed forms.
You can check out my blog on the H2 2020 CPM Release Updates to see what else is new.
The remaining universal updates that we will discuss pertain to a very specific summary section of a performance form: Customized Weighted Rating.
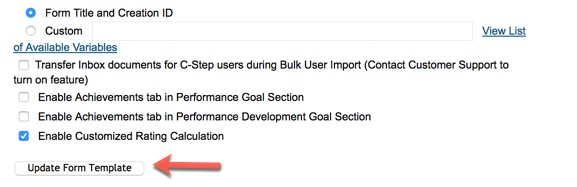
Removal of Enable Customized Rating Calculation from Form Template Settings
“Enable Customized Rating Calculation” no longer appears in Form Template Settings as seen in the example below.
Current Method to Enable Customized Rating Calculation
“Enable Customized Rating Calculation” was a prerequisite to enable the calculation.
In the new version, simply adding the Customized Weighted Rating section to a form template acts as the prerequisite to enable the calculation of the overall customized weighted rating.
Enable Customized Weighted Rating
The business rules that trigger the calculation must also be configured.
Rating Scale for Customized Weighted Rating Section
In the previous version, the rating scale for the Customized Weighted Rating section used the same rating scale as the other rating section. In the new version, the Customized Weighted Rating section has its own rating scale.
“Unrated” and “Too New to Rate” in Previous Ratings of Customized Weighted Rating Section
In the previous version, “Unrated” and “Too New to Rate” were not in the Previous Ratings table of the Customized Weighted Rating section of a PM form and just displayed as 0. In the new version, “Unrated” and “Too New to Rate” are displayed in the Previous Ratings table of the Customized Weighted Rating section and both are ignored in the calculation of the overall customized weighted rating.
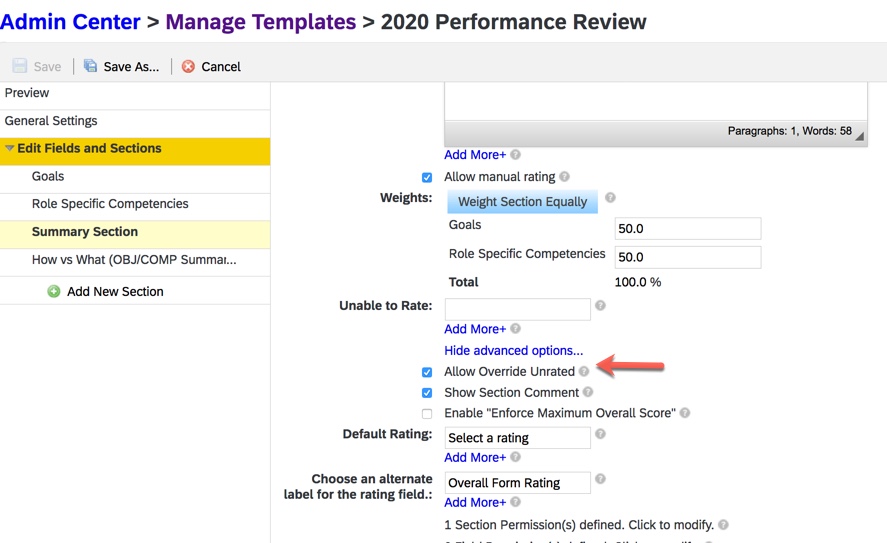
Allow Override of Unrated Manual Rating for Customized Weighted Rating Section
In the Customized Weighted Rating section of a form template, there is now the option to override the unrated manual rating. The option, Allow Override of Unrated Manual Rating has been added so this summary section can work like the others as seen in the example below.
Allow Override Unrated
In the previous version, the unrated manual rating displayed as Unrated. In the new version, the unrated manual rating can be overridden by the calculated rating.
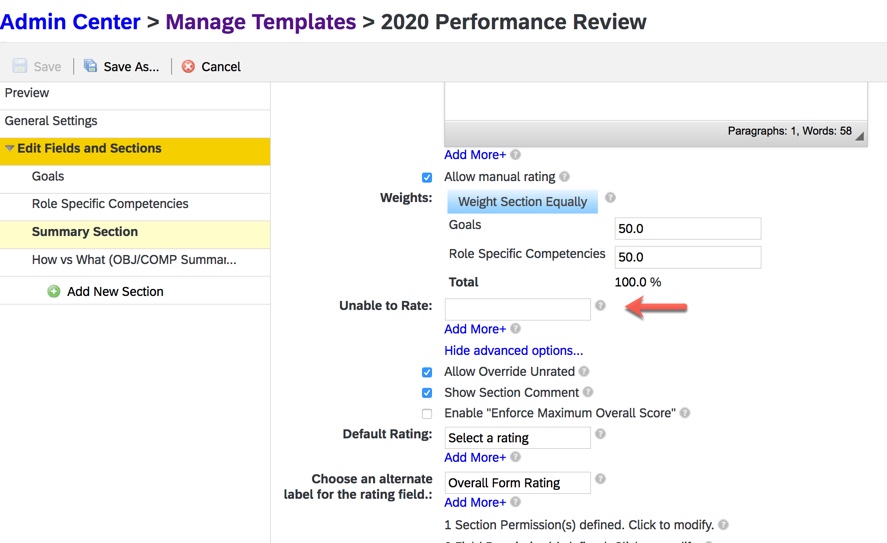
Too New to Rate in Customized Weighted Rating Section
Like the other summary sections, there is now the option to provide a label to explain why an employee is not rated. An example using the current summary section is displayed below.
Unable to Rate Label
The summary section example above shows the Unable to Rate field will be available as an option in the Customized Weighted Rating section of a form template.
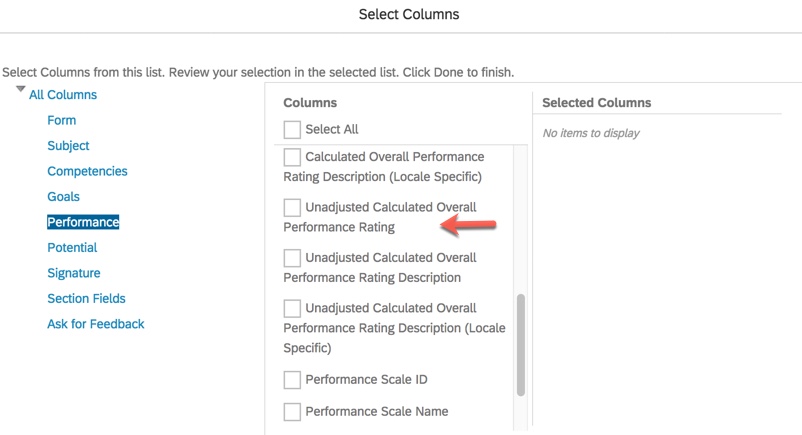
Calculated Rating from Customized Weighted Rating Section in Ad Hoc Reports
If you are using the calculated rating in the Customized Weighted Rating section of a form template, ad hoc reports use the unadjusted calculated rating from the performance template summary section instead. An example of creating an ad hoc and selecting rating columns is shown below.
Unadjusted Calculated Overall Performance Rating
In the new release, when creating an ad hoc report, when this same field is selected, the Unadjusted Calculated Overall Performance Rating from the Customized Weighted Rating section is used. This means reporting will accurately reflect the ratings in the performance forms. This is especially important when the template has both the Summary section and the Customized Weighted Rating section. The calculated rating from the Customized Weighted Rating section overrides the unadjusted calculated rating from the Summary section.
Customized Weighted Rating Section and Ratings Displayed in En Route Folder
In the prior version, when a form with the Customized Weighted Rating section was in the En Route folder, this section’s ratings were not in sync with the in-progress form. In the new version, the Customized Weighted Rating section section of a form will display in the En Route folder and will be synced with the in-progress form. The Previous Ratings table of the section will contain the ratings from the previous steps for the login role and by other roles.
Calculated Rating from Customized Weighted Rating Section in Bin View
There is a another feature available when a calibration template is based on a performance form template that contains a Customized Weighted Rating section. Currently, when the data source for a calibration template is a performance form template with this summary section, either the manual or the calculated rating can be calibrated. However, the calculated rating cannot be displayed in the Bin view of a calibration session.
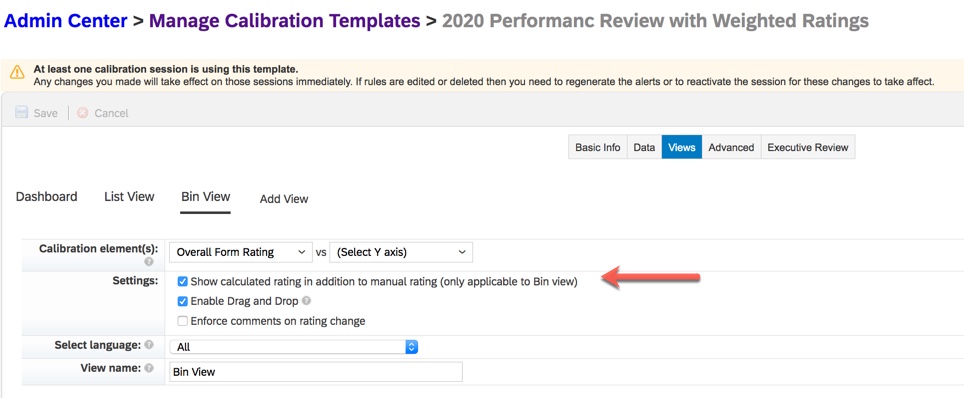
With the latest release, the calculated rating from the Customized Weighted Rating section may display in the Bin view if this calculated rating comes form a PM form and the “Show calculated rating in addition to manual rating (only applicable to Bin view)” setting is enabled. An example is displayed below.
Calculated Rating Option for Bin View
Label for Rating Scale Scores in Previous Ratings of Customized Weighted Rating Section
In order to get a clear picture of what the numeric rating means, labels are now visible. In the previous version, the ratings in the Previous Ratings table in the Customized Weighted Rating section were displayed only as numeric values.
An example is shown below.
Numeric Rating in Prior Version
In the new version, the ratings in the Previous Ratings table of the Customized Weighted Rating section are displayed as numeric values with corresponding text labels. If rating numeric values are mapped to labels in the manual rating scale, the label display next to the rating’s numeric value. If no labels were mapped, the rating will continue to just display its numeric value.
And example is shown below.
Customized Rating Section with Rating Labels
There is a checkbox in the form template for this section: “Hide numeric rating values (only show text labels)” similar to other summary sections.
If a rating’s numeric value is mapped to a certain label for the manual rating’s rating scale scores, the corresponding label can be displayed next to the rating’s numeric value in the Previous Ratings table. Otherwise, the rating is displayed as its numeric value.
There is an added checkbox for this form section in ” Manage Templates“. There is the option to hide numeric rating values and only show text labels.
Customized Weighted Rating Section in Print and Save as PDF
In prior versions, the section calculated rating details were not displayed in the printed or saved performance form. Now the calculated rating details of the Customized Weighted Rating section of a performance form will be included in the printed or PDF version of the form.
To Learn More
All in all, there are over 20 items being changed or enhanced in this release for Performance Management and we didn’t cover every detail here. For more information, check out the What’s New Viewer here.
Do you need help managing your SuccessFactors Release cycles? Email info@worklogix.com to see how we can help!
Lately, in a variety of customer engagements for various SAP SuccessFactors modules, I’ve had to bring up the topic of the Job Profile Builder. As a relatively new feature that touches every module, it’s really no wonder! But there’s still a lot of customers who aren’t quite familiar with it. This blog should give you an understanding of what the Job Profile builder is, why you would want to use it, and an overview of what it takes to go about setting it up.
What is the Job Profile Builder?
The Job Profile Builder is an important SuccessFactors Platform feature that enables customers to build and organize a catalog of well-formed jobs. So what exactly is a “job”? If you are familiar with position management in HRIS systems, you’ll know to traditionally think of positions as a seat. One person sites in one seat (I know there’s some exceptions, but let’t not get complicated here). Jobs are an abstraction above positions. So where there might be a Maintenance Tech I position who services a building in San Francisco, there’s also a Maintenance Tech I position in Seattle that does the same thing but is a unique instantiation of a position from the San Francisco position. The job describes the common tasks, required skills, education, & competencies, etc. for these positions. If you’d like an idea of what kinds of information companies associate with a job regardless of the system they use, Mercer has a great article here.
What Benefit Does it Provide?
Quite a few benefits are to be had with a well maintained job catalog. From a business process perspective, it will help you categorize and regulate your positions. For example, standardizing pay bands, required competency levels, government classifications, etc. On the Successfactors side, the Job Profile Builder integrates across all modules and can greatly reduce redundant data entry while helping facilitate the business process benefits. The following integrations are available with the job profile builder:
Employee Central: Direct association with positions in Position Management
Performance Management: Automatic Assignment of Competencies
Succession Management: Successor suggestions based on competency assessments
Compensation: Derive compa-ratio based on link with job grade
Recruiting: Automatic population of job posting description from job profile
Workforce Analytics: Planning based on required job Competencies
LMS: Assigning learning content based on job
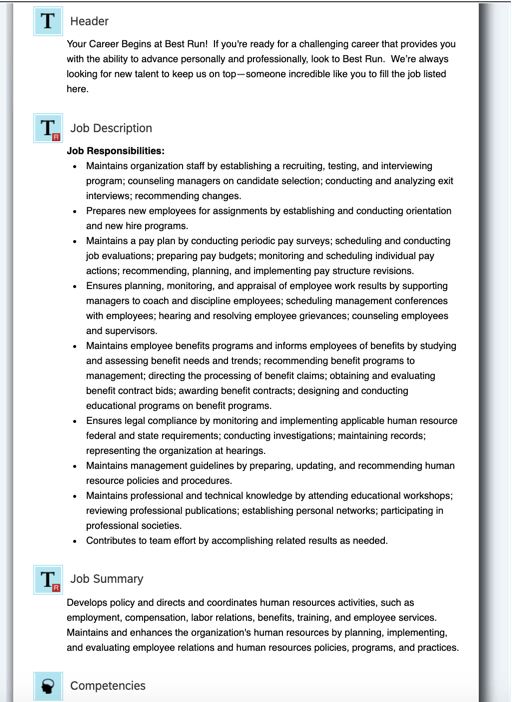
In the example screenshot below, we can see how the recruiting integration automatically pulls the job description from the job profile for internal and external requisition postings. This can save your recruiters a great amount of time having to re-type job descriptions for each posting.
Example Job Profile Integration with Recruiting
How does Job Profile Builder work?
There are 3 major components and corresponding configuration screens of the Job Profile builder:
Job Profile Content: Define the options (e.g. drop-downs) that show on the profile. For example what skills or competencies or education types will exist in the system that can be placed on a profile. An example of configuring what degree types will exist for selection in creating a job profile in the system is shown below. There’s also a lot of helpful pre-built content from SAP available for download from the SuccessStore that pops up as you build your content. For more info, see the link here: https://help.sap.com/viewer/70097a1a469d47a0ae08809e4a240f98/2005/en-US/99856fa2c4944001ab5991e92c9454eb.html
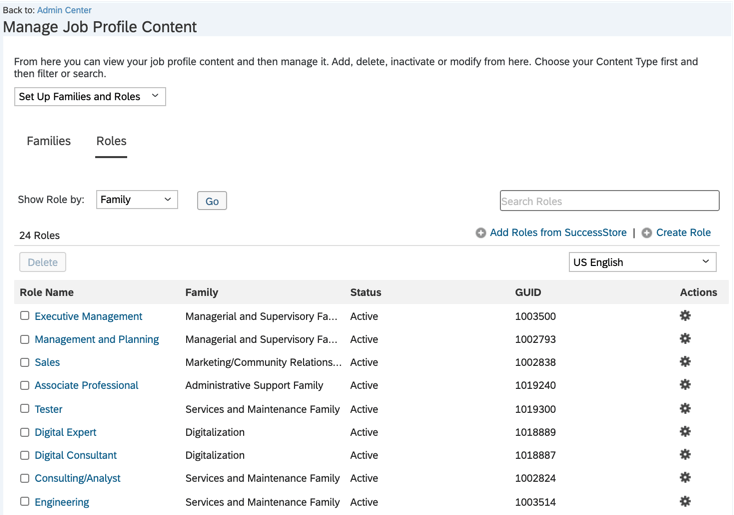
Managing Job Profile Content
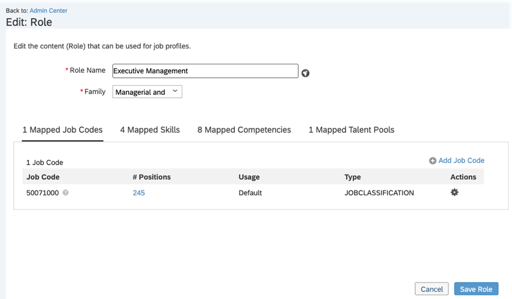
Job Roles: Roles are what you build the profile around. They represent a specific set of skills, competencies, description, etc. Roles can be associated with job codes which in turn associate to positions. Job roles can also be grouped into similar categories called Job Families. You setup the Job roles within the Job Profile Content screen. See the example below. For more info, see the link here: https://help.sap.com/viewer/70097a1a469d47a0ae08809e4a240f98/2005/en-US/aa2d3d5b1027403bbcffa8b29f70196d.html
Setting up Job Roles
This still doesn’t tell us what the Job profile is….well, when you create a Job Profile you are associating it to a specific Job Role and filling in a specific template with the specific content relevant for that role. So to answer the question of what is a Job Profile?–It is the marriage of these 3 components. You can see in the screenshot below where a specific template is being filled in with the content we have setup in the system to define a particular role.
The Manage Job Profile Screen: Editing the Content on Your Specific Job Profile
How does the Job Profile Integrate with Employee Central Position Management?
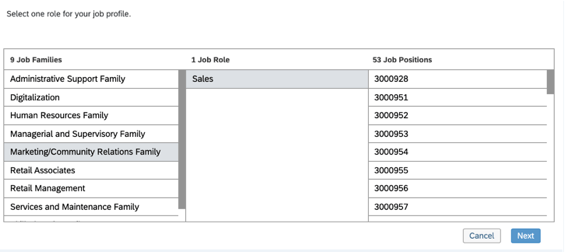
You will notice when you start creating a Job Profile, there’s a screen asking you to associate the profile with a Job Role:
Example screenshot showing organization of Job Families to Roles and Positions when creating a Job Profile
When you edit roles, the system will ask you to map Job Codes. Those Job codes sit between the job Role and the Positions. Thus while there’s a 1:1 relationship between the Profile and the Role, there can be many codes associated to a role. Since there’s many codes across many positions, thus there are many positions that can be associated to one job role and profile.
This provides us with many benefits! For example, whenever you create a requisition from a position with an associated Job Profile, the requisition will automatically pull in the Job Profile as well and activate this integration seamlessly!
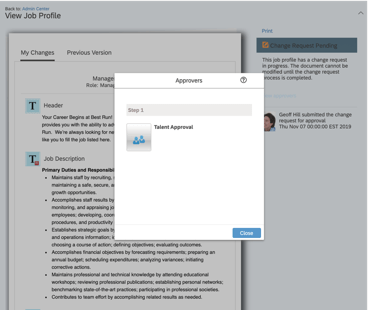
Furthermore, the Job Profile builder can utilize Employee Central workflows as well! This can be beneficial as you manage you job catalog as a variety of resources all using the profiles across the modules may want to make edits. In the screenshot below we can see when one of these interested parties modifies the Job Profile it will trigger a workflow.
Screenshot of Job Profile Builder Edits Triggering Workflow
Conclusion
Hopefully you now have a good understanding of the Job Profile Builder and are excited to start using it! Setting up a job catalog can be a tremendous undertaking, but hopefully now that you understand how the tool works, it can make the task a little easier. If you have an existing job catalog you’d like to import, there are also import screens available for you. As I mentioned before, there’s also a lot of helpful pre-built content available from the SuccessStore.
For more information about the Job Profile Builder and other talent management modules in SAP SuccessFactors, check out our book here!
Do you need help with integrating or setting up the Job Profile Builder? Contact us at: info@worklogix.com
Calibration is a process used to appraise employee performance in a fair and consistent manner. Managers meet in calibration sessions to discuss employee performance and achieve agreement on performance ratings. At the onset of a calibration session, the definition of each performance rating can be agreed upon to enable a common language to use when discussing and evaluating performance. The intent is to help eliminate any potential manager bias when discussing employee performance and finalizing ratings.
SAP SuccessFactors Calibration provides a framework to objectively evaluate employee performance. This tool provides HR and senior managers the means to impartially review and adjust performance ratings across teams, departments and the organization. A calibration session provides a visual presentation of employee data from multiple sources in multiple views. Evaluating ratings in several formats with different filters may help to find areas of bias.
Calibration may be a standalone process or part of a performance review process, a talent review process, or a compensation review process.
Information used within Calibration may be sourced from Performance Management, People Profile, Compensation, or Succession data. Within Performance Management, overall performance, potential, competency, and goal ratings may be calibrated. The Succession related metrics that may be calibrated are Risk of Loss,Impact of Loss and Reason for Leaving. Compensation ratios may be evaluated using the salary, bonus, stock and variable pay components of a compensation template. Overall potential, performance, competency, objective and two custom ratings may be calibrated from the talent profile section of People Profile. Upon completion of a calibration session, ratings are updated in the original source.
We will focus on calibration based on ratings from a performance form template.
Basic Configuration of Calibration
There are several steps to perform before we are ready to run a calibration session:
Enable Calibration in Provisioning
Configure Succession Data Model
Set role-based permission for Calibration access
Configure data source template
Enable calibration related e-mail notifications
Configure Calibration Template
Configure Calibration Settings
Assign users to Executive Review role
Configure Calibration History Portlet in People Profile
In this blog we will cover the steps to configure Calibration in Provisioning. The steps to configure Calibration in your instance will be covered in the next blog, “Configuring SAP SuccessFactors Calibration Part II – Instance Set Up”.
Enable Calibration in Provisioning
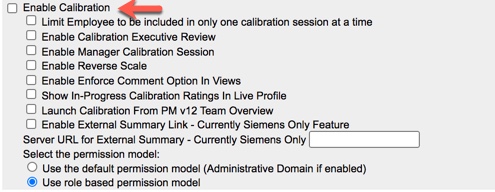
First we must enable Calibration in Provisioning. Within Company Settings, search for “Calibration” to find the section called Enable Calibration. Once found, click the checkbox as seen below.
Enable Calibration
Additional settings under Enable Calibration may be enabled here. If you plan on using Executive Review, which summarizes calibration activity across sessions, enable this feature here. We will need this feature enabled when creating the calibration template.
If you are going to permit managers to create their own calibration session, click the checkbox for “Enable Manager Calibration Session”. We will need this feature when configuring the calibration settings.
The other features may be set in the instance directly via Manage Calibration Settings and will then reflect as enabled in Provisioning. We will be discussing these features in the next blog, so we can leave the rest unchecked here.
There is also a radio button within Enable Calibration used to identify the permission model used. The default permission model is legacy permissions but you should be using Role-Based Permissions (RBP). Make sure “Use role based permission model”is selected.
Use Role-based permission model
Save the settings in this section of Company Settings before moving on to the next set of features to enable.
Calibration Reporting Permission
There are no standard reports or dashboards for calibration. Any calibration reporting will need to be done using ad hoc reports. If you wish to make calibration data available for reporting, go to the Analytics and Dashboard Tabs & Misc Reporting section of Company Settings.
“Additional Adhoc Sub domain Schemas Configuration” and “Enable INCLUDE STARTING FROM USER in people pill” will need to have the following enabled:
Calibration
Calibration Org Chart Coverage
Calibration Activity
After saving the settings, back out of Company Settings and we will continue with additional configuration set up.
Configuring Calibration in the Succession Data Model
There are elements in the Succession Data Model that can be used for calibration. We will need to update the data model to ensure these elements are configured. Export the data model in order to make updates.
Open the file using an XML editor. Here we will be updating the following:
Rating elements
Display options
Filter options
Calibration History Portlet
We will look at each of these.
Rating Elements
The ratings that can be calibrated are based on the available ratings configured in your system. While setting up Calibration in your instance, you identify the data source of the ratings. Earlier we had mentioned that ratings may come from performance form templates. You may calibrate ratings from an existing performance form template or you may decide to create a new performance form template in order to utilize additional rating types such as overall competency, overall goal and overall potential.
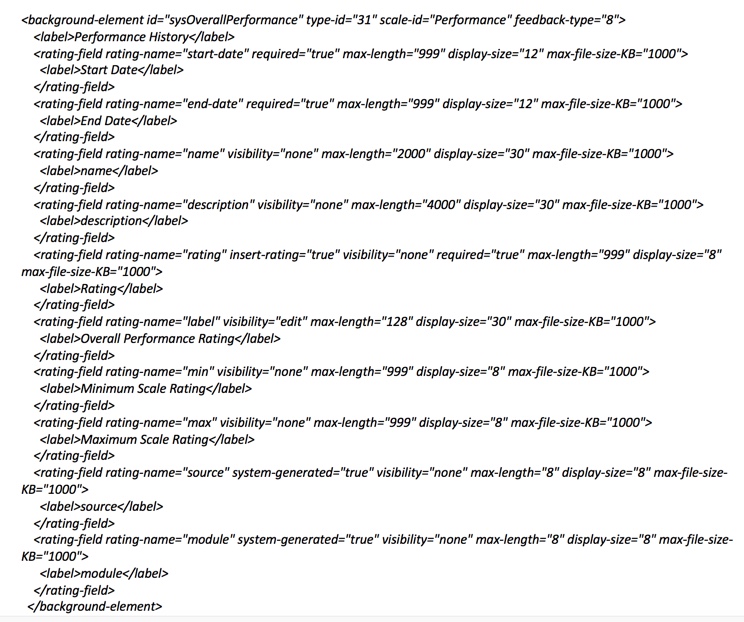
In either case, the data model must contain the rating elements that you wish to calibrate. Most likely these already are already in the data model but you will need to verify this. The rating elements are:
sysOverallObjective
sysOverallCompetency
sysOverallPerformance
sysOverallPotential
sysOverallCustom01
sysOverallCustom02
A code segment seen below displays an example of the overall performance rating background element.
sysOverallPerformance Background Element
Make sure all of the rating types that you wish to calibrate are included in your data model.
Additional Elements to Calibrate
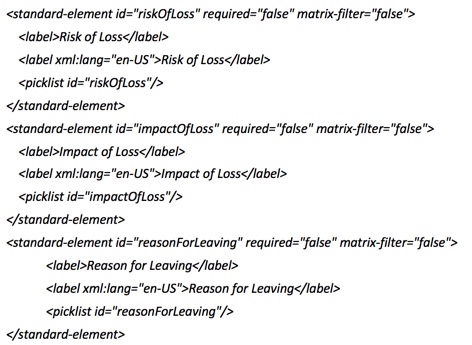
There are three standard elements that may display in some of the views in a calibration session. If you are using SAP SuccessFactors Succession, these most likely are in used for Talent Flags and Matrix Grid reports.
riskOfLoss
impactOfLoss
reasonForLeaving
A code sample of the flags is shown below:
Talent Flags in Data Model
Display Options
Calibration sessions can display data in many views. In Part II of this series, you will learn how to create these views. There is a display option feature that is particularly useful for the List view tab. Here the data is displayed in a table with a row for each employee being calibrated. If there are several columns for this table, there could be a lot of back and forth scrolling. With the display option feature, some columns may be hidden. There is an icon for display options that enables users to add or remove certain columns from the view. Some are hardcoded and will always show up as display options in a calibration session:
First Name
Last Name
Count
Quickcard (if enabled in the calibration template)
The Quick Card display option may be enabled when configuring the Calibration template which we will discuss in Part II.
When clicking on the display options icon within the calibration session, any of these fields may be deselected and those columns will no longer display on the view.
There are some icons that may be added as a display option fields. Any display option fields defined for Succession in the Matrix Grid Classifier tool in Provisioning or the flags be set in Matrix Grid Report Icon Reconfiguration may also be used as display options in a calibration session. In the list view, any of these icons selected would appear in a new column called “Attributes”. Bin and matrix views the icons appear underneath an employee’s name. Having these icons readily visible for each employee may be useful when comparing employees.
Filter Options
Filter Options are used in a calibration session to narrow the list of the employees that display. If there are a large number of subjects, this is a way to view a smaller group that meet the filter criteria. It may be more manageable to view subsets of employees during the session.
Within a calibration session, the standard fields that are available as filter options are:
Manager
Division
Department
Location
Jobcode
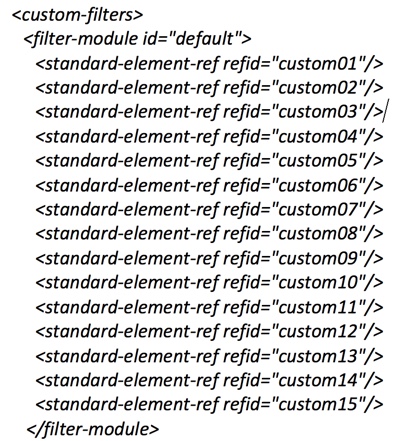
These will always appear as filter fields for a calibration session. If Risk of Loss, Impact of Loss and Reason for Leaving are also in your data model, these fields will also be filter fields. The 15 custom fields that may be defined in the data model may also be added as filter options. To set this up, the custom fields must be part of the default filter in the data model as shown below in the code segment sample.
Adding the custom fields as default filters
These custom fields may also be used in as filters in calibration. Module specific filters are defined within <custom-filters>. Identify the calibration module filters by adding this tag:
<filter-module-id=”calibration”>
Include the custom elements that you wish to use as calibration filters. This should be placed after the default filter as shown below:
Calibration Filters
There is one additional calibration specific element that may be added to the data model. We will look at this next.
Calibration History Portlet
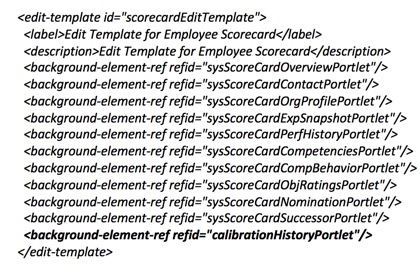
Calibration data may appear in People Profile when the Calibration History Portlet is configured. This portlet provides a snapshot of calibration session data along with ratings. The background element for the portlet must be added to the data model. A code segment sample is shown below.
<background-element id="calibrationHistoryPortlet" type-id="138"> <label>Calibration History Portlet</label></background-element>
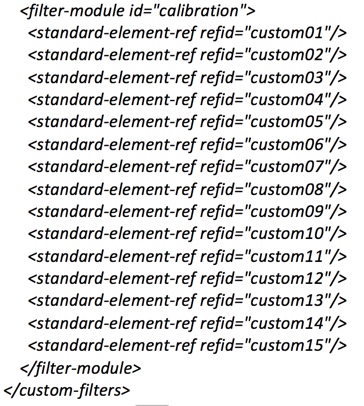
If you also wish to use the portlet in the Employee Scorecard, the portlet must be added under the view-template “employeeScorecard”. A code segment sample is shown below.
Adding Calibration History Portlet to Scorecard
After making the data model updates, save and import the data model.
Congratulations! Calibration is now enabled and you are ready to set up Calibration in your instance. Coming soon will be my blog, Configuring SAP SuccessFactors Calibration Part II – Instance Set Up to learn how.
For more information about Calibration and other talent management modules in SAP SuccessFactors, check out our book here!
Do you need help setting up your Calibration implementation? Contact us at: info@worklogix.com
Starting in 2020, SAP SuccessFactors has changed its release schedule from every quarter to biannually. With this change, the releases will be larger with an additional preview week. Here we will focus on what’s new and what has changed in Calibration.
There is one new feature for Calibration along with four enhancements. Let’s start with what’s new!
Customized Weighted Ratings now used in Calibration
There is a new universal feature that allows ratings from the Customized Weighted Rating summary section of performance form template to be used in Calibration. Prior releases of Calibration could only use ratings from the Overall Performance, Overall Potential, Overall Objective and Overall Competency sections of a performance form templates as rating sources.
This option is helpful if you wish to calibrate the overall form rating based on the ratings given by different roles in different steps instead of using the final overall rating from one role. The customized weighted rating is calculated based on the ratings and weights from the steps and roles that were defined in a business rule. Another rule defines the trigger step used to calculate the overall weighted rating.
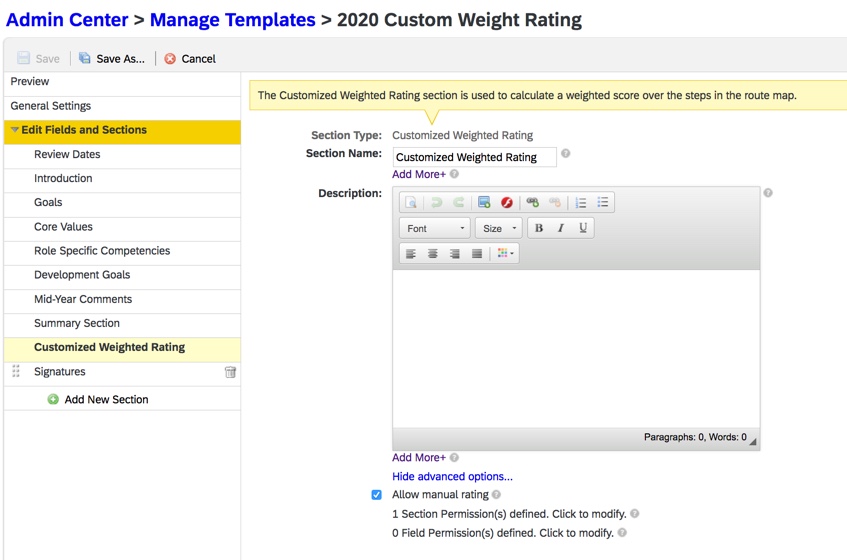
The Customized Weighted Rating section of a performance form template is displayed below.
Customized Weighted Rating Section of PM Template
When using ratings from the Customized Weighted Rating section, make sure the calibration step is after the step where the calculation of the weighted rating is triggered in the PM form. Just remember, when the manual rating is enabled in this template section, the calculated rating would not be available in the Bin view of a calibration session.
The Customized Weighted Rating section of a PM form is shown below.
Customized Weighted Rating section of a PM Form
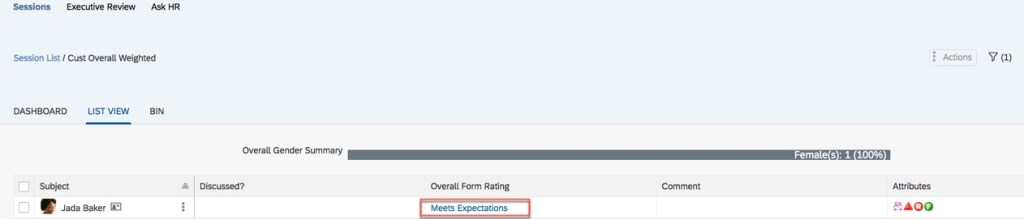
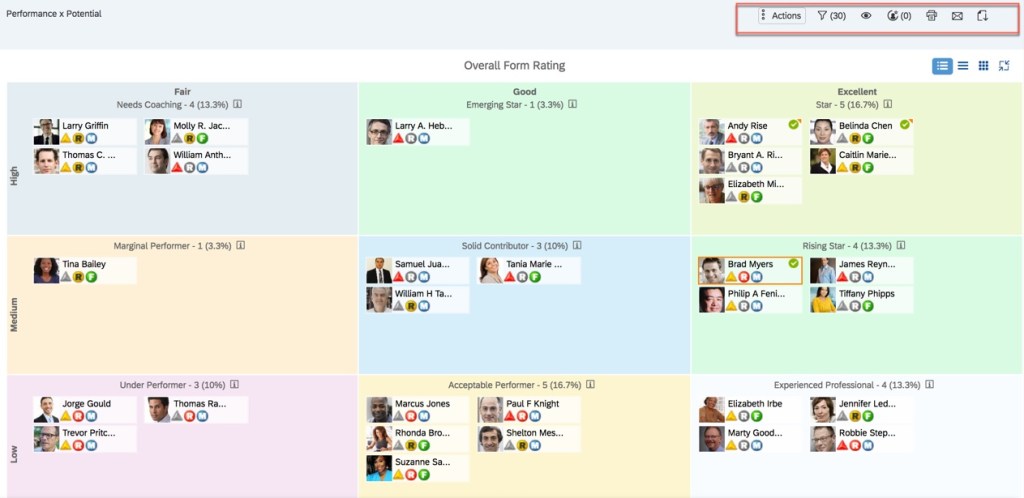
In the example below, you can see the customized weighted rating appearing in a calibration session. It appears in the “Overall Form Rating” column because a manual rating overrides the calculated rating.
Overall Rating in Calibration Session
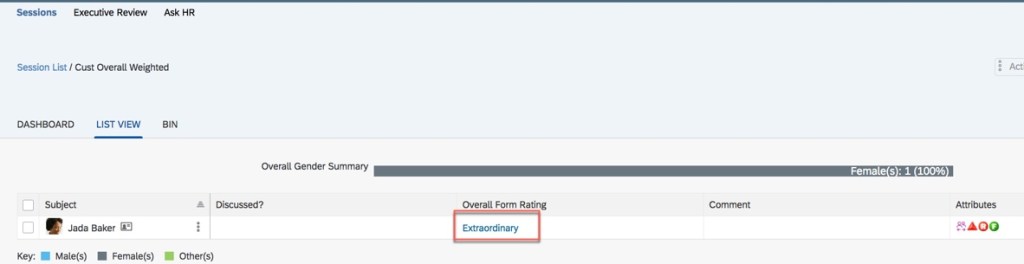
Continuing with this example, the rating is updated from “Meets Expectation” to “Extraordinary” in the calibration session as shown below.
Updated Rating in Calibration Session
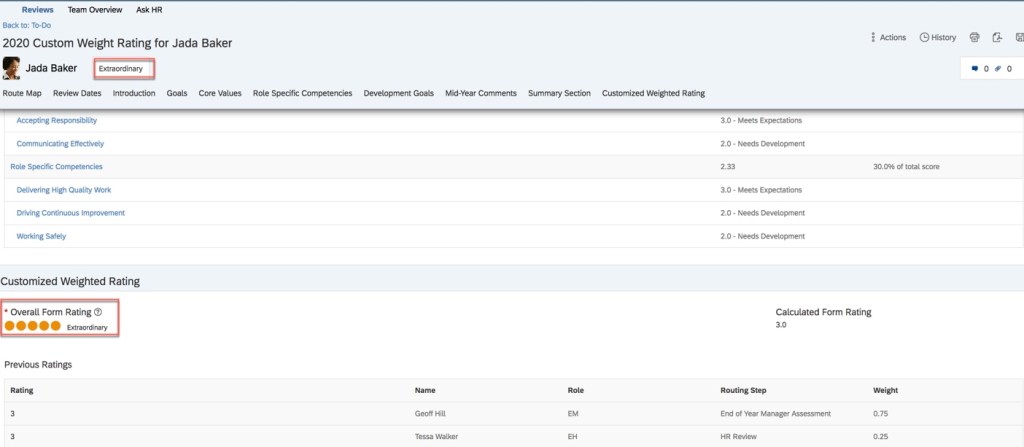
After the calibration session has been finalized, the updated rating appears in the performance form as seen below.
PM Form Reflects Updated Rating
In the Customized Weighted Rating section of the form, the overall rating reflects the updated rating of “Extraordinary” from the calibration session. The overall score pod at the top of the form reflects this updated rating as well.
Now let’s see what existing functionality has been improved in the latest release.
There are four universal enhancements for Calibration.
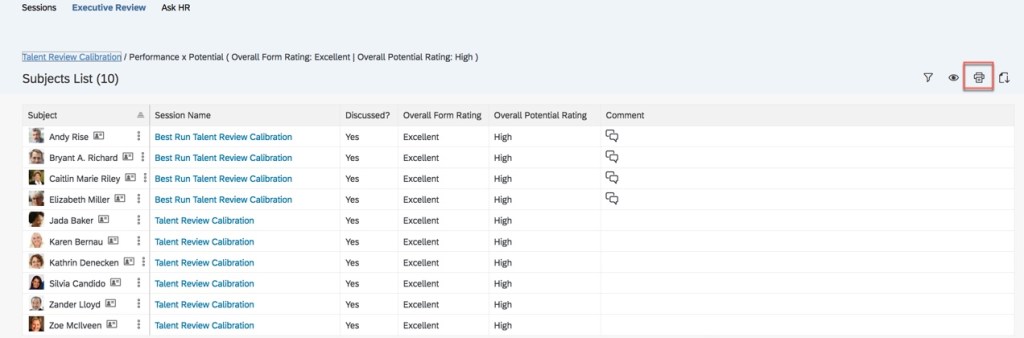
Subjects List Page Enhancement
In prior releases, when drilling down into one of the standard charts in Executive Review, printing the Subjects List page was not supported. In addition, any list display modifications were not saved. Now it is possible to print out the list of subjects and retain any adjustments made to the page display after refreshing the page. More details are shown below.
Now when a data point is drilled into a chart, the print option is now available as seen below.
Subjects List with Print Capability
Within this list, the Executive Reviewer may customize the display. Columns may be reordered by dragging and dropping, column widths may be adjusted, the sort mode may be set for columns and display options may be changed. The printed list will reflect the display changes. Notice there is no “save” button, the adjustments are saved automatically. The changes are preserved after the Subjects List page is refreshed as well.
When the Executive Reviewer drills down into another cell in the chart, the updated display has been retained. This enhancement prevents the user from having the update the display each time the Subjects List page is viewed.
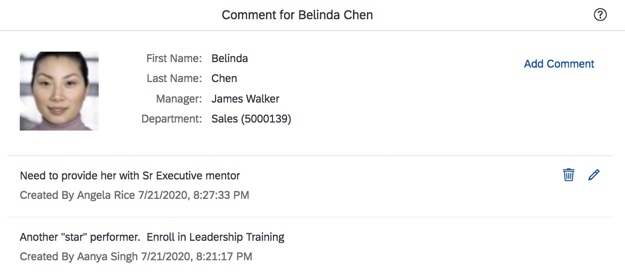
Enhanced Comment Details
This next enhancement is applicable when comments are required when a rating is changed in a calibration session. When viewing comments made on a subject, the name of the calibration participant who entered the comment is listed along with the date the comment was made. An example is shown below.
Comments with Name and Date
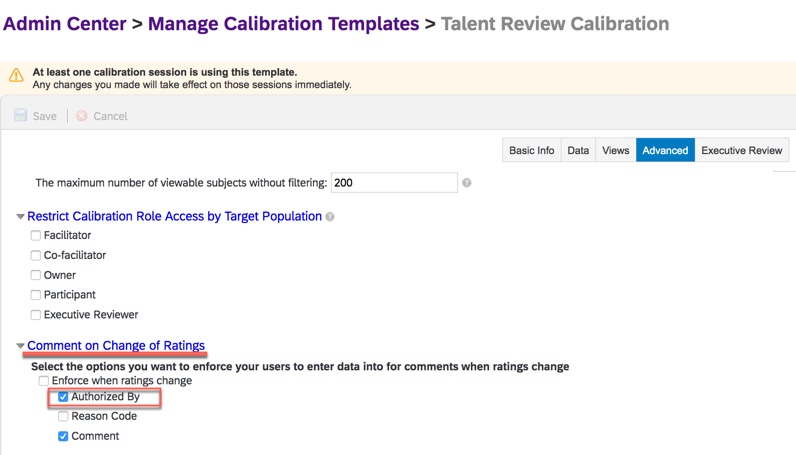
When the rater is required to enter the user name associated with a rating change, your calibration template will have “Authorized By” enabled as shown below.
Calibration Template with Authorized By Enforced on Rating Change
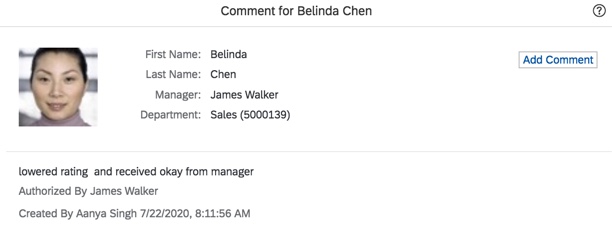
Now when viewing a comment with “authorized by” enabled, the comment detail will include the authorizer as well as the comment creator and date as seen in the example below.
Comments with “Authorized By” Field
Next we will see an update for matrix views within a calibration session.
Full Screen Mode Matrix View
During a calibration session, matrix views will now have the toolbar available in full screen mode. Previously the toolbar was not visible in this mode. From the standard view, the user clicks on the “Open Full Screen” icon as seen below.
Matrix View with Full Screen Icon
When switching to the full screen view, the toolbar is available and enables users to take the same actions in the full screen mode as they would in the normal mode.
Matrix View in Full Screen Mode with Toolbar
New Reporting Columns
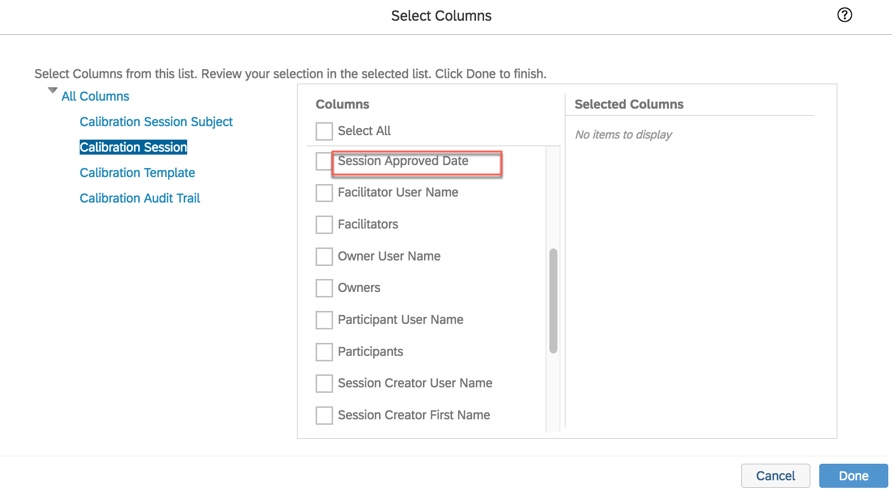
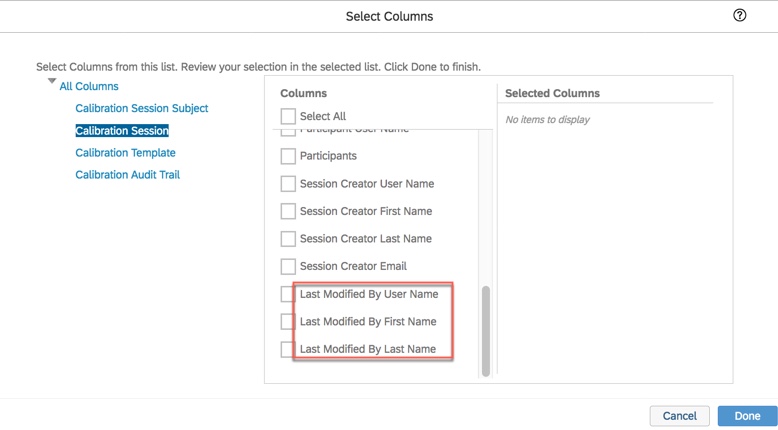
The final Calibration enhancement involves ad hoc and SAC reporting. There are new fields available to report on when generating a report for a finalized session. The session approval date along with the name of the last user to modify the session are now available. Most likely the last user to modify the session was the approver. The last modified user fields include “Modified By User Name”, “Last Modified by First Name”, and “Last Modified by Last Name”.
“Session Approved Date” Field
“Last Modified User” Fields
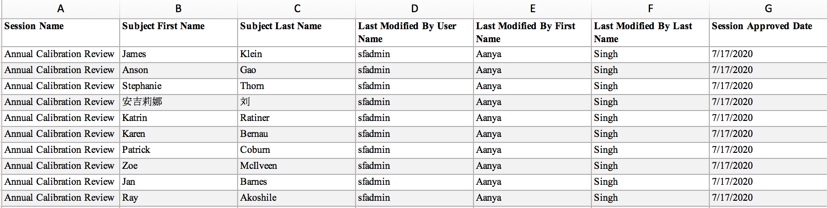
The new fields are available when reporting for all three calibration domains. A sample report is shown below.
Sample Calibration Report with New Fields
Wrap up
We have now explored what’s new and what features have been enhanced in Calibration. While the updates are minimal, hopefully these features will make your calibration sessions more user friendly. Check out my other blogs on what’s new in Succession and Career Development.
Do you need help with your calibration implementation? Contact us at: info@worklogix.com