Basic Configuration of Calibration
As we learned in the blog, “Configuring SAP SuccessFactors Calibration Part I – Provisioning“, there are several steps to perform before we are ready to run a calibration session:
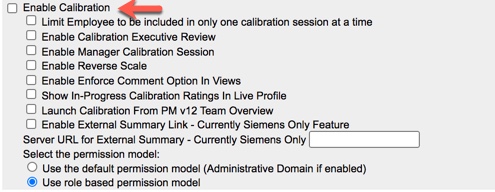
- Enable Calibration in Provisioning
- Configure Succession Data Model
- Set role-based permission for Calibration access
- Configure a data source template and route map
- Enable calibration related e-mail notifications
- Configure a calibration template
- Configure calibration settings
- Assign users to Executive Review role
- Configure Calibration History Portlet in People Profile
In the previous blog, we talked about the settings to enable Calibration in Provisioning along with updates to make to the Succession Data Model. We will continue here with the role-based permissions to set up, the features to enable and the calibration configuration to be done in the instance.
Role-based Permissions for Calibration
Role-based permissions will need to be set for Calibration The types of permission needed include:
- Administrative – to configure and administer Calibration
- End user – to access calibration sessions and the Calibration History Portlet
- Reporting – to report on calibration related data
Role-based permissions (RBP) control who a user can see (target population), what features they have access to and what actions they may perform. We will need to set role-based permissions for the admin to configure and manage Calibration, set up e-mail notifications, configure the Calibration History Portlet on People Profile, create Calibration Alerts and create and run calibration activity reports.
You will need to decide which roles will perform calibration related administrative functions. The permissions could be divided between roles such as a system admin and an HR or Calibration admin. A system admin could set up the role-based permissions and configure the calibration settings. An HR/Calibration role could create and manage calibration sessions.
To set up the role-based permissions, choose the admin role that will be used to administer calibration. Within the Administrator Permissions section of the role permissions, find Manage Calibration. The table shown below contains the description of each of the calibration administrative features. Review these features if you think you would like to split the calibration administrative tasks across multiple permission roles.
| Feature | Description |
| Manage Calibration Sessions | Used to create and manage calibration sessions. |
| Manage Calibration Settings | To configure what the roles within a calibration session may do and to identify fields that will appear within an employee search when creating a calibration session. Also may choose which calibration template a manager may launch from Team Overview in Performance, and to set global settings for all calibration sessions. |
| Manage Calibration Templates | To create templates used for calibration sessions, to identify data source for ratings and define the views of the data and ratings during the sessions. |
| Mass Create Calibration Sessions | To create multiple calibration sessions via spreadsheet import. |
| Manage Permissions for Executive Review | To identify the users that may access the Executive Review page for a calibration template. |
| OData API Calibration Export | To access the Odata API calibration export. |
Ad Hoc Reporting Permissions
The admin and HR manager roles could be granted permission to create and run calibration reports. Instead you may decide to create reports as the admin and then share the reports with HR managers to run for the groups that they support. In that case, grant Create Report access to the admin and Run Reports access to the HR manager. The Reports permissions are found within the User Permissions section of the role permissions. The three calibration domains should be selected: Calibration, Calibration Activity and Calibration Org Chart Coverage.
End User Permission for Calibration Tab
You may grant the admin, HR manager and manager roles access to Calibration. After selecting the role to update, within the permission role details in the User Permissions section you will see Calibration. To allow a role access to a calibration session, the Detailed Calibration Permissions and View Calibration Tab permissions should be set. The Detailed Calibration Permissions require a target population and identifies which users may be viewed in session. The View Calibration Tab grants access to the Calibration tab found in the Home menu. The permissions are found below.

There is a caveat to the calibration permissions that we will review when discussing calibration settings. If a user is not assigned to a role with access to the Calibration tab, but is identified as a facilitator, owner or participant of a calibration session, they will have access to the session. This gives the selected users access to the session through the Calibration tab in the Home menu listing without role-based permission. Users identified as facilitators of a session will be able to run the session but not create additional sessions. For any users that need to create sessions, the users should be assigned to a permission group that is tied to a permission role that has permission for “Manage Calibration Sessions”.
Make sure you have a role for all employees that contains General User Permission > Company Info Access and User Search. Without this permission, a user would not be able to open a calibration session and search for users.
Role-based Permissions for Configuring the Calibration History Portlet on People Profile
If you are using the Calibration History Portlet in People Profile, make sure the admin role can manage employee files in order to configure the portlet. The role-based permission can be found within the role permissions under Administrator Permissions>Manage System Properties.
Role-based Permissions for Viewing Calibration History Portlet on People Profile
The admin, manager and HR manager roles may be granted access to the Calibration History Portlet on People Profile. To do this, open these roles to grant access to the Calibration History Portlet background element found under User Permissions>Employee Data as seen below.

Access to view this portlet is not given to the employee role.
Before we dig in, it may be helpful to understand some calibration concepts. Calibration can be thought of in terms of templates, views, roles and sessions. Let’s introduce and define them and then we will go into greater detail.
- Calibration Template – defines the data source for the ratings, the settings, the views, and defines the executive review graphs. A calibration template is referenced by a calibration session which inherits all of the template settings.
- Calibration Views – identified in the calibration template and defines the various ways the subjects and their ratings data will display in a calibration session.
- Calibration Sessions – defines who is being calibrated (subjects) and by whom (participants). Defines the session owners and facilitators, session date and the calibration template used.
- Calibration Roles – set in “Manage Calibration Settings” to define what each role can do during a session.
There are a few other features to enabled before we can begin the calibration set up. We will start with the data source for the ratings being calibrated. The data that may be used in calibration session is based on the data source defined in the calibration template. In the calibration template, the data sources may come from four sources: Performance Management, Employee Profile, Succession and Compensation. We will focus on the calibration of performance form ratings.
Configuring the Performance Review Template and Route Map
We have to make sure that the performance form template used for calibration has the necessary components. First, a manual rating must be configured in the form template for any of the ratings that you wish to calibrate (overall performance, overall potential, overall objective, or overall competency). Manual ratings are updated in the calibration session and also allow the drag and drop functionality which is an easy method for the facilitator to update ratings. If your performance form template has both calculated and manual ratings, manual ratings take precedent over calculated ratings.
The route map associated with the performance form template will need to have a dedicated step where calibration will occur. However, this step cannot be an iterative or signature step. Ideally the step will immediately follow the step where the manager enters the rating in the summary section. If you are using an existing performance form template with a step that goes to HR for review after the manager does the rating, this can be used for the calibration step and no route map changes will be needed. An example of the route map with a calibration step is shown below.

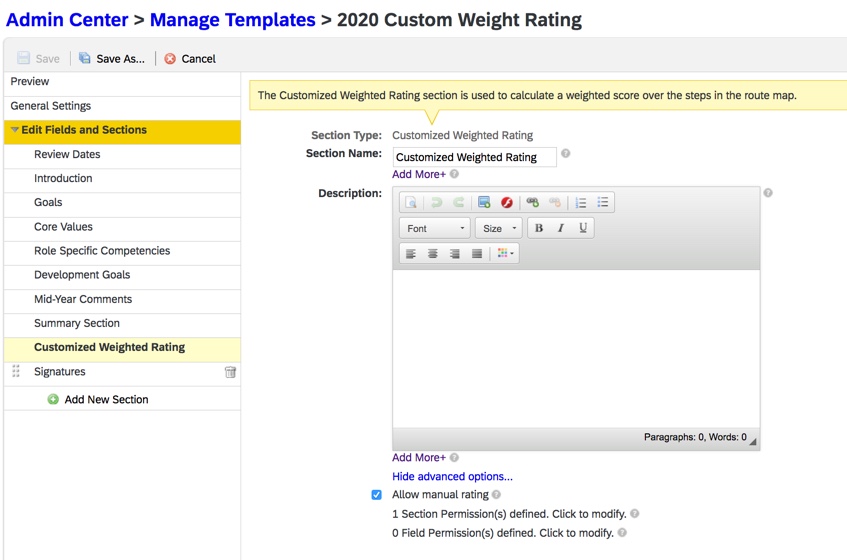
If your performance form template contains a Customized Weighted Rating summary section, make sure the calibration step occurs after the step where the calculation of the weighted rating is triggered.
If you have to add a new step to the route map, the performance form template will also need to be updated to create permissions for the new step. Unless you want the role designated for the calibration step (HR manager) to be able to update the form while the forms are in the session, you can make all of the fields and sections “read only” for the HR role in the calibration step. The HR manager would not be able to edit the form from their Performance inbox in this step. Rating updates would be done solely in the calibration session and when finalized would update the performance form.
If you would like the performance form accessed and editable while in a calibration session, the HR role for the step would need “write” permissions for the rating fields. Without this permission, the performance form may still accessed during the calibration session but it will be read only.
If your existing performance form template contains an HR step after the manager assessment step, this can be used as the calibration step, provided it is not an iterative or signature step. Make sure the performance form template has the HR role with the read or write permissions that you wish to allow when accessing the form within Performance.
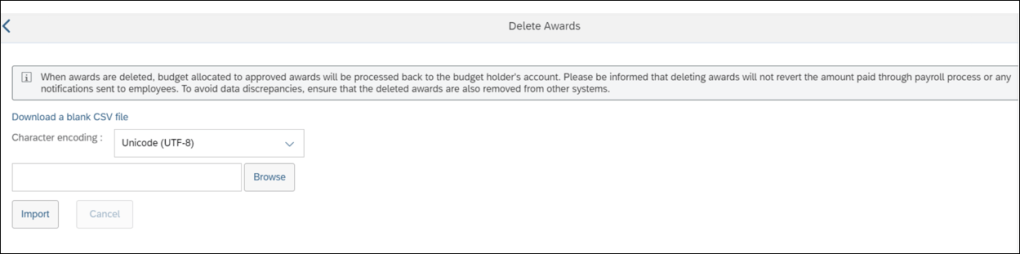
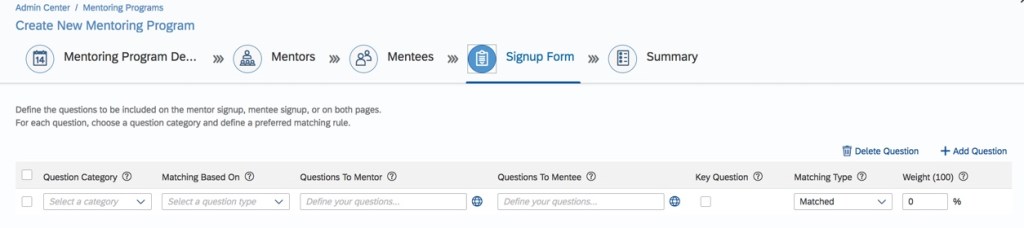
E-mail Notifications
There are calibration specific e-mails within the “E-Mail Notification Templates Settings” tool that may enabled. Notifications may be sent at various points in the calibration process so you will need to decide which to turn on. Four of the Calibration e-mail notifications that may be enabled via Email Notification Templates as shown in the table below.
| Description | |
| Notify Calibration Participants to Submit Ratings | Notify manager of upcoming calibration session and remind them to submit ratings so that forms can move to the calibration step. |
| Notify Calibration Participants of Session Finalization | Notify owners and participants the calibration session has been finalized. This is a signal that the forms have final ratings and are available. |
| Notify Calibration Participants of Auto-Routed Forms | Notify manager that a form was auto routed by admin or facilitator to get the forms to the calibration step. |
| Notify Calibration Participants of Session Activation | Notification to participants of upcoming calibration session. |
The additional notification, Notify Calibration Rating Changes during Session Finalization, is enabled within the Advanced tab of “Manage Calibration Templates”.
After Calibration has been enabled in Provisioning and the role-based permissions are granted, the admin will now see the calibration tools in Admin Center as shown below.

We will explain more about these tools starting with Manage Calibration Templates.
Manage Calibration Templates
The Calibration Template defines the review period, data sources, and data views for any calibration sessions that are linked to it. The template is used to identify the data to calibrate and how data is presented.
One calibration template may be used for multiple calibration sessions, providing the data source is the same. Later when creating a calibration session, it has to be associated with a calibration template and will inherit all of settings from the template.
If you are going to be creating additional calibration sessions but need to calibrate ratings from a different performance form template from another data source, a new calibration template would need to be created.
A sample of the Manage Calibration Templates Overview page is shown below:

Calibration templates are created, edited and deleted here. We will create a calibration template and review the settings that can be made.
Some columns of note:
- Data Source for Calibration History Portlet – for each template, the checkmark will display in this column if the Calibration History Portlet is enabled on the Advanced tab.
- Used in Sessions -a count of the number of calibration sessions using the calibration template. Clicking the number will display the names of the calibration session associated the template.
- Used in Talent Profile – displays a green checkmark if the template is a data source for the Talent Profile. Clicking on the green checkmark to disable.
Click on the “Create New” button to set up a new calibration template. We will walk through the tabs that are used to build the template.
Basic Info Tab
The first tab, Basic Info, is used to name the template and define its review period. Both entries are required. A sample of the tab is shown below.

You will be unable to move to the next if these entries are not made.
Data Tab
The Data tab is used to identify the data sources to calibrate. Ratings to be calibrated may come from many sources: Performance, Compensation, and Employee Profile. Additionally talent flags may be calibrated. Although we are focusing on performance review ratings as our source, let’s look briefly at all the options. An example of the tab is shown below.

Once a data source selected, its section will expand in order to make additional selections.
Performance
Here the performance form template that will be the source of the ratings to calibrate should be selected. The associated route map will populate and the route map step where calibration should take place needs to be identified. Based on the performance form template selected, the rating types to calibrate will differ. Select which rating(s) should be calibrated.
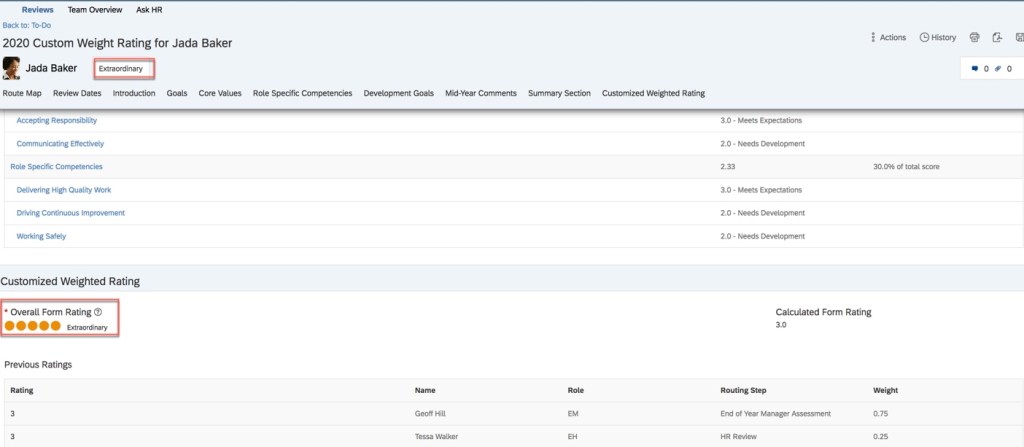
Calculated and manual override ratings may be calibrated. If manual ratings are used in the performance form template, these ratings populate the calibration session. If the form template contains calculated ratings, the ratings need to be mapped to values from the rating scale.
In the example shown, performance was selected as the data source. The performance form template has an overall form rating and an overall potential rating. You may select either or both.

Guidelines may be used to enforce alignment to the recommended ratings distribution. Based on the performance template rating scale, a percentage is set for each score. Guidelines can be optional or enforced.
Compensation
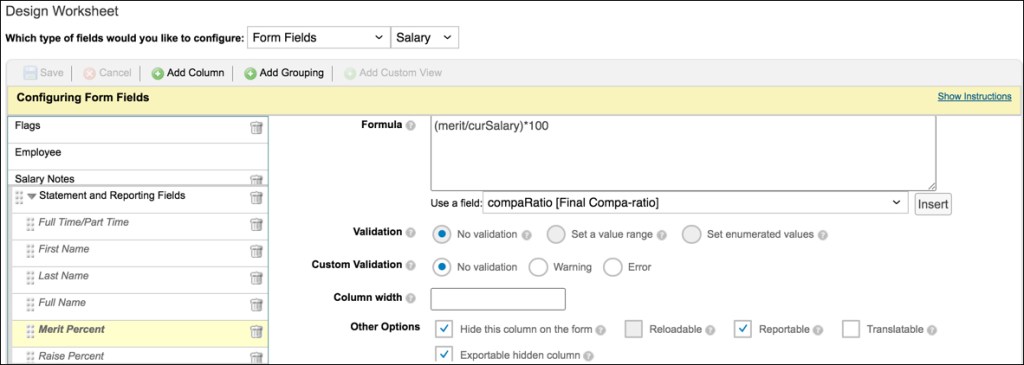
Compensation may be calibrated for an employee’s compensation ratios. Any of the standard planning fields can be selected as can either the final range penetration or final compa-ratio benchmark.
Select the compensation template and the route map step where data can be used. Like the performance form template, the Compensation template must have a single user or collaborative modify step. The template’s planning components and range groups display. An example is shown below.

The available planning components and range groups available for selection will vary based on the template but can include salary, bonus and stock elements. Once the elements are selected, the number of range groups (two to five) are set along with the percentages or amounts used for employee placement. Variable pay cannot be calibrated.
Employee Profile
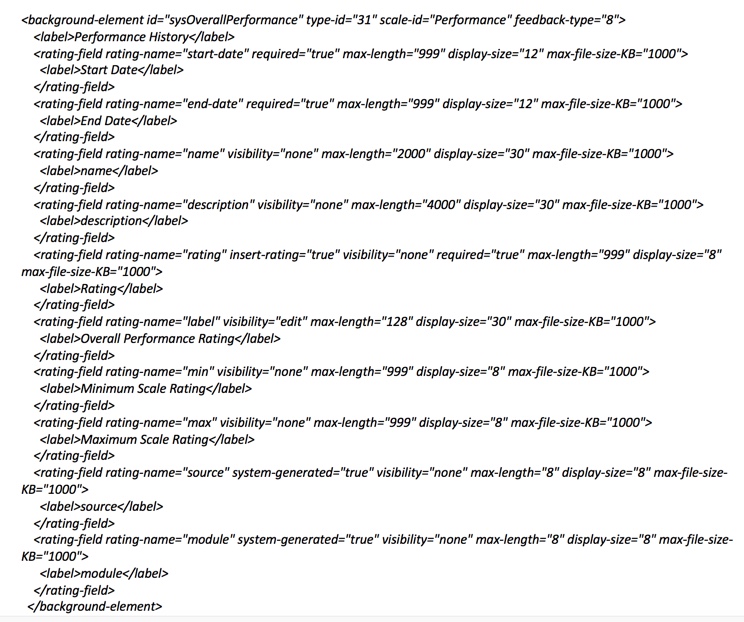
Ratings in Employee Profile are based on elements that are configured in your data model. Possible ratings include overall objective rating, overall competency rating, overall potential rating, overall form rating, and two custom ratings. The calibration session will use ratings stored in Employee Profile that are effective during the review period defined on the Basic Info tab. An example is shown below.

Once the rating type is selected, rating guidelines may be set. Although decimal ratings are supported, they must be mapped to whole numbers. Rating changes made during the calibration session won’t display in Employee Profile until the calibration session is finalized unless the template is configured to display in-progress ratings.
Succession
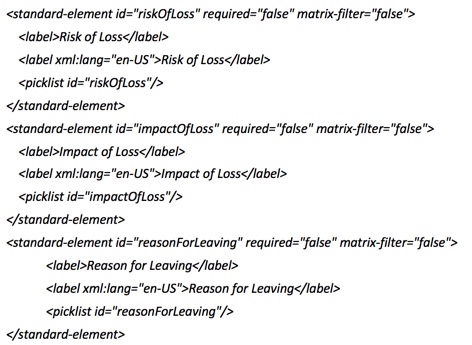
If the standard talent flags, Risk of Loss, Impact of Loss and Reason for Leaving are defined in the data model, they may be included in a calibration session. Often these flags are used to plot on a 9-box. An example is shown below.

Selection of a flag allows distribution guidelines to be set.
Others
The final option on the Data tab is “Others”. Additional informational sources can be selected as reference within a calibration session. Options include to a subject’s development plan, learning activities, quick card, succession matrix report icons and CPM achievements. An example is shown below. These cannot be calibrated.

Views Tab
Based on the data sources and rating elements selected on the Data tab, multiple views of the calibration data may be created which allows different ways of looking at the employees during the calibration session. Multiple views of the data may be configured and each offers some different features. The view types are Dashboard, List View, Bin View, Matrix Grid, and Executive Review
Dashboard
The Dashboard view provides summarized data in a chart format. An example is shown below.
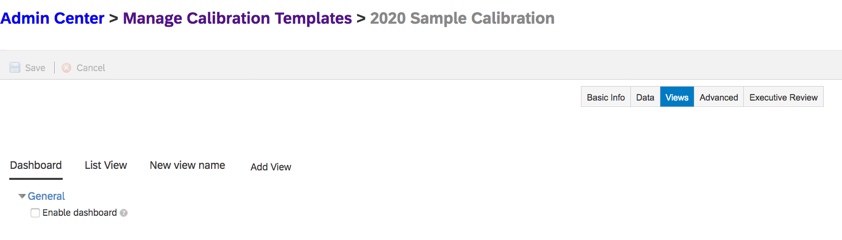
When enabled, the Dashboard view is the first view that is seen when opening a calibration session. Any view, except for the list view, may be summarized into a chart.
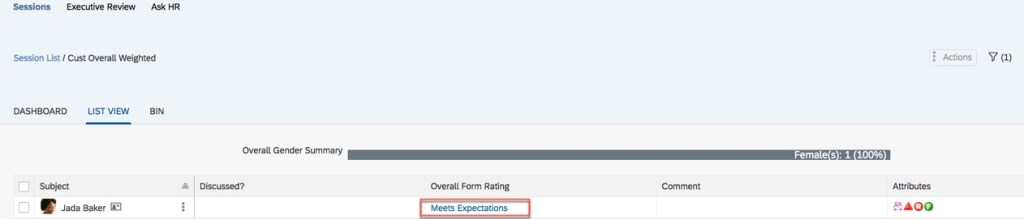
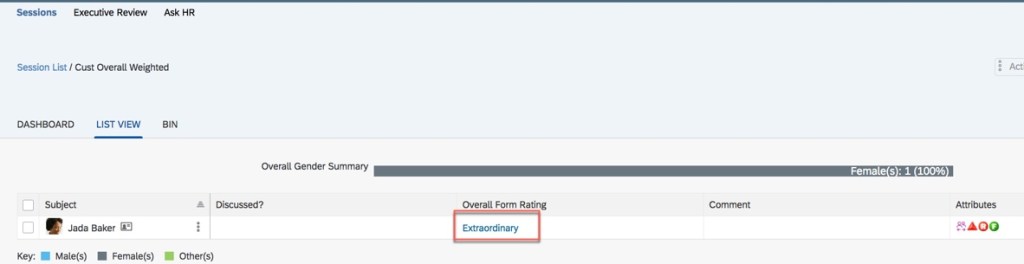
List View
The calibration data displays in a table-like format. There is a row for each subject being calibrated. You may update ratings, see ratings from other views, add comments, have access to employee data, compare subjects and mark subjects as discussed.
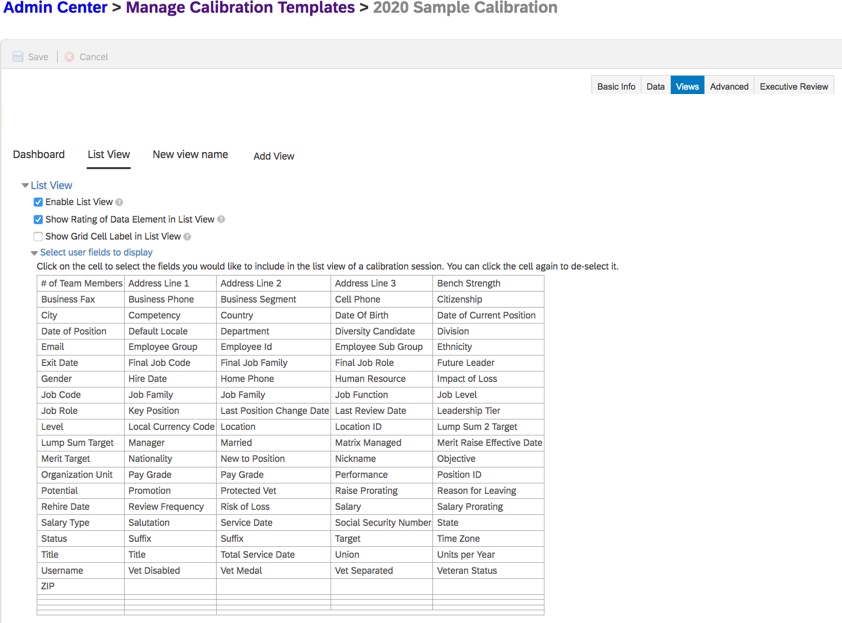
There are checkboxes to enable in the List View:
- Enable List View. When enabled, the calibration session will display the List View. It is recommended to enable this option.
- Show Rating of Data Element in List View. When enabled, the rating elements selected to calibrate on the Data tab will display as columns in the List View. For example, on the Data tab, if the selected performance form template has an overall rating, an overall competency rating and an overall goal rating to be calibrated, you will see a column for each rating type in the list view. It is recommended to enable this option.
- Show Grid Cell Label in List View. When enabled, all of the matrix view ratings will display as columns on the list view tab. For example, if you create a matrix view for “Overall Goal Rating vs Overall Competency Rating”, you will see a column on the list view that shows where in the matrix the subject’s rating lies.
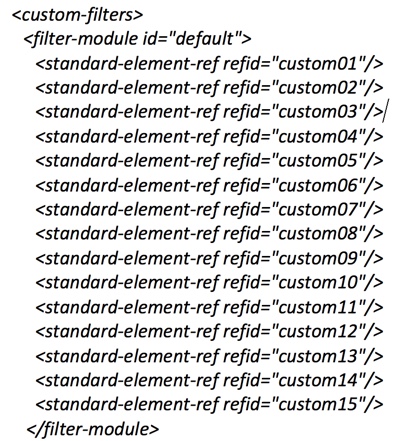
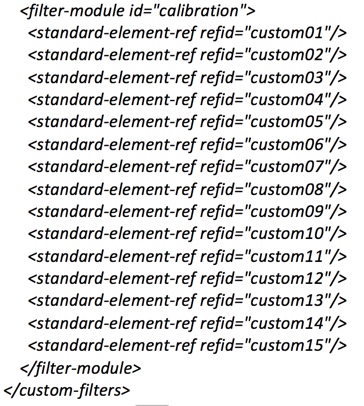
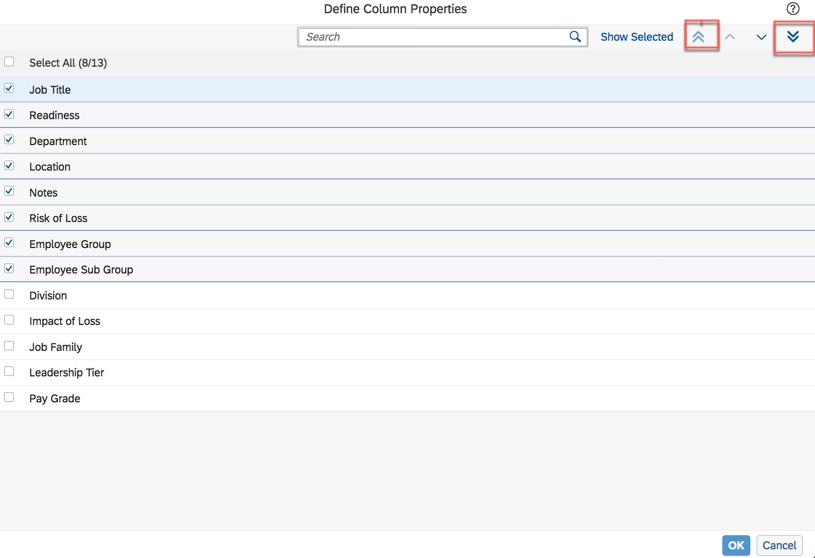
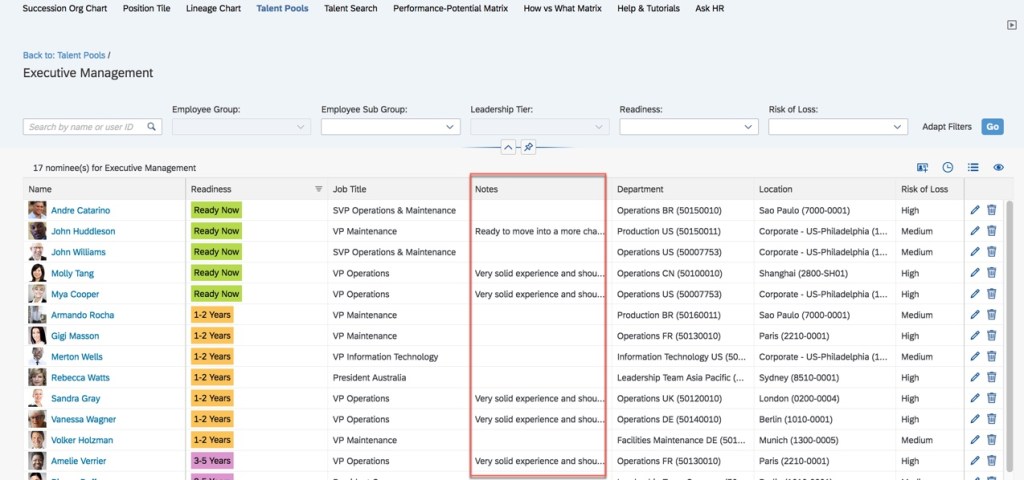
Select any additional fields to displays as columns in the List view. These are the standard user fields configured in the data model including the 15 custom fields .An example is shown below.

Bin View
The Bin view groups employees in buckets based on one rating element that is being calibrated. Select the rating element to be used as the “X” axis. The rating elements to choose from are based on the data source(s) selected on the Data tab. Click on the “Add View” tab to create another calibration view. Additional Bin views may be created for any other single rating element. An example is shown below.

After providing a name for the view and identifying the calibration rating element to be used, there are some additional settings that may be enabled:
- Show calculated rating in addition to manual rating (only applicable to Bin view). When enabled, the view shows the calculated rating in addition to the manual rating.
- Enable Drag and Drop. This option is available for manual performance form template ratings and Employee Profile ratings. You cannot drag and drop a calculated form rating. If there are only calculated ratings selected, the drag and drop option is disabled. Drag and drop is not available for compensation elements either.
- Enforce comments on rating change. Whenever a rating is changed in this view, a popup will display and a comment will need to be written to justify the change.
- Show an extra column for bin view. An additional rating column may be selected to display for a bin view.
If you choose an element for the “Y” axis as well, this is no longer a Bin view, it becomes a grid (matrix) view instead.
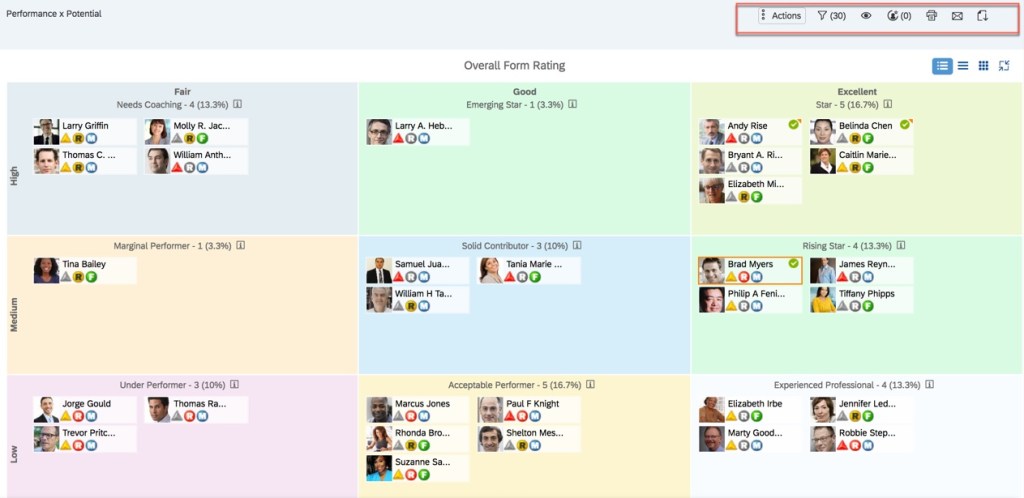
Matrix View
A matrix view plots two different rating sources against one another for a matrix placement of subjects. This is sometimes referred to as a “9-box”. Like the bin view, drag and drop may be enabled as well as enforcing comments when a rating is changed. You may create multiple views varying the rating sources.
As soon as you select ratings for the “X” and “Y” axes, the screen expands and there are additional selections to make. An example is shown below.
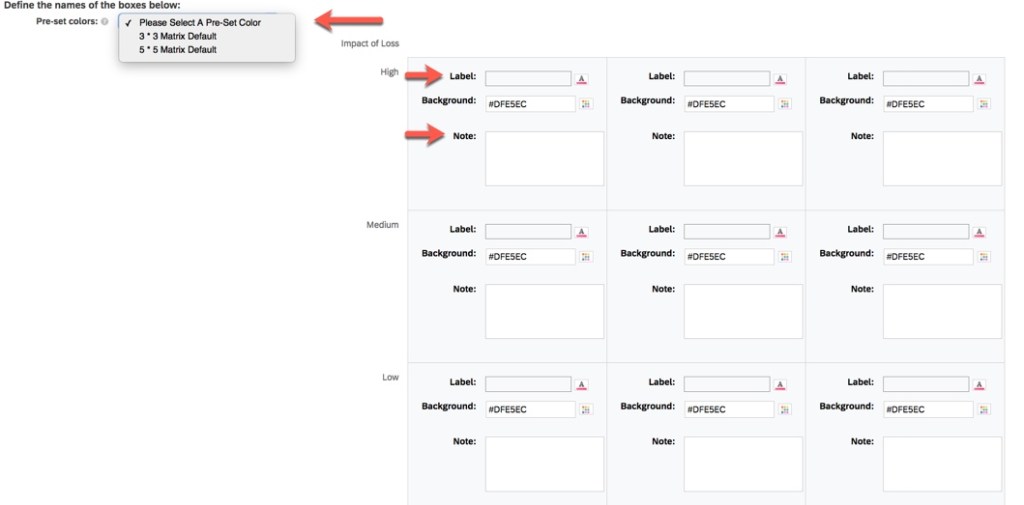
Define the matrix grid cell labels and choose the pre-set colors. You may choose the pre-set colors based on the default colors set in your Succession settings. There is an option to add notes for each cell. These “inline” notes can be used to provide information for the calibration participants to get a better understanding of what each cell represents. The intent is to help avoid unintentional bias. An example of a matrix grid with colors, labels and inline notes is shown below.

If you are going to use the same color codes as the matrix grid report in Succession, currently the background color of the placements in Matrix Grid view on Calibration sessions will show paler tones.
Advanced Tab
The Advanced tab is used to enable some features that will apply to all calibration sessions associated with the calibration template. There are four sections in this tab where you will make selections to enable for your template. An example is shown below.
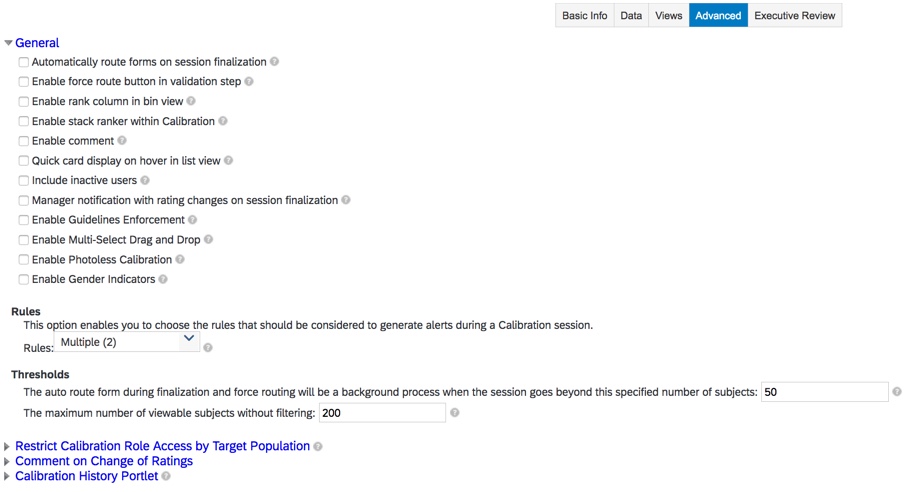
General Options
General Options define some of the functionality within a calibration session. See the table below for the options that may be enabled.
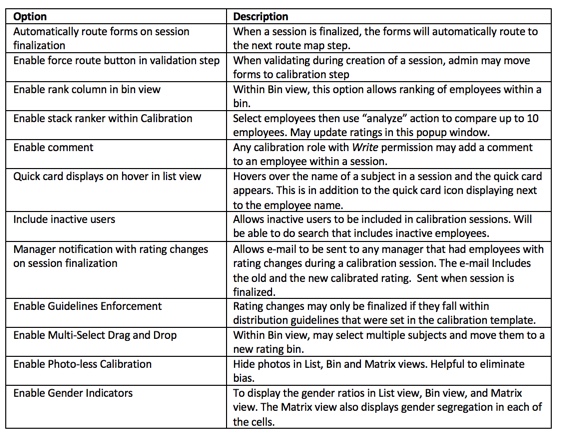
There are two additional general options. Rules and thresholds. The Rules option will not appear unless business rules have been created to trigger calibration alerts. Here any calibration related business rules may be applied to the template. Business rules define scenarios that may cause bias.
A threshold may be set to identify the number of subjects’ forms that will cause a background process when force routing and auto routing during finalization occurs. It is recommended to specify a number no larger than 50. A threshold may also be set for the number of subjects that appear per page of a session. Filters must be used to view subjects above the maximum set.
Restrict Calibration Role Access by Target Population
Calibration sessions allow facilitators, owners, participants, and executive reviewers access to view information for all subjects being calibrated. Access for any selected calibration role may be limited to only subjects in their target population.
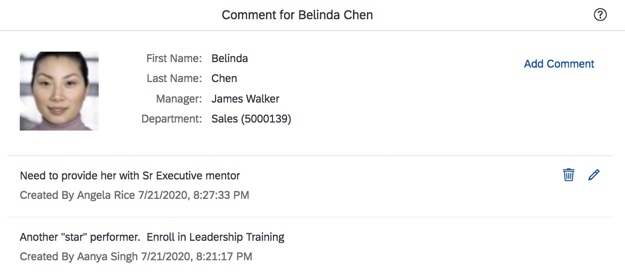
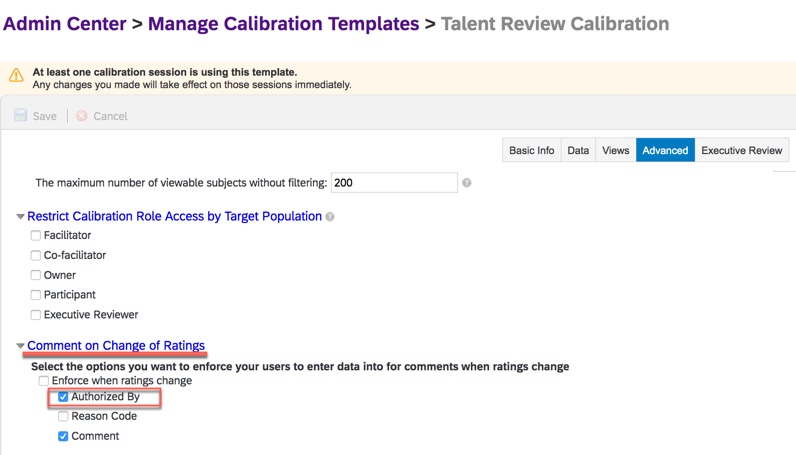
Comment on Change of Ratings
This option is used to identify the field required to enter when changing a rating. During a calibration session, a popup with display and the user will be required to enter any of these options:
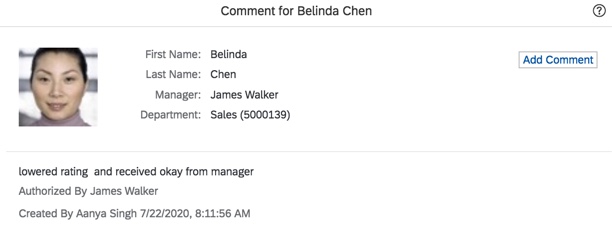
- Authorized By – the name of the user who approved the rating change.
- Reason Code – a dropdown list of reasons for the rating change. A reason code picklist must be identified to use this option.
- Comment – when a rating is changed within a calibration session, a comment must be entered. The character limit for the comment field is 4000 characters.
When “authorized by” or “reason code” is selected, either would be required entries with a comment optional.
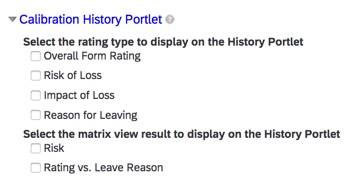
Calibration History Portlet
If you have added the Calibration History Portlet background element to the data mode and granted permission to view this portlet, here you will select the rating types to display along with any matrix views. The options that you see listed are based on the performance form template that is the data source for the ratings.
Now that we have seen the Advanced Settings tab, let’s look at the Executive Review tab.
Executive Review Tab
This tab will only be visible if Executive Review was enabled. It can be enabled in Provisioning to make it available when creating the calibration template. It may also be enabled in “Manage Calibration Settings”.
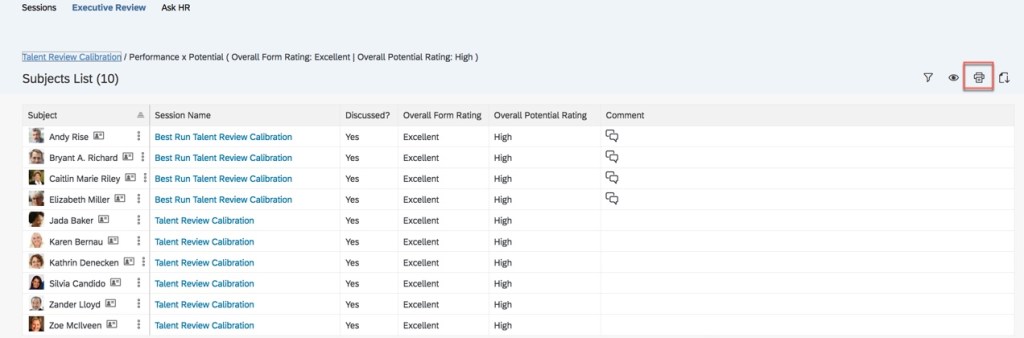
Executive Review provides aggregated graphs and session details for the template. This view provides a roll-up of calibration activity across all calibration sessions associated with the template. Executive Review provides aggregated graphs and session details across all calibration sessions associated with the template. An example of the tab is shown below.
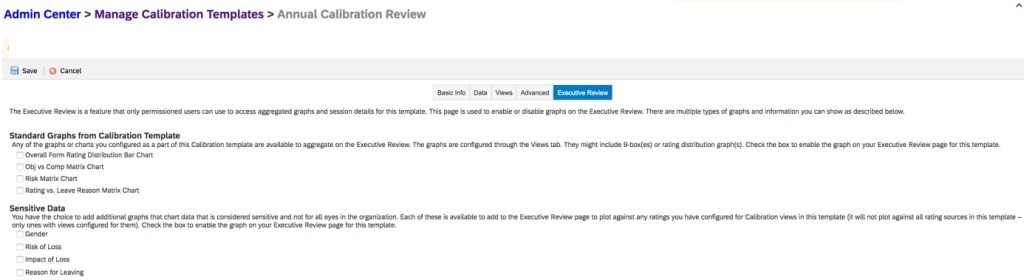
The Executive Review tab identifies the graphs and data that will appear on the Executive Review page for a calibration session. All of the graphs or charts created from views of the calibration template can be aggregated. There is also the option to add “sensitive” data points to plot against ratings that have views created:
- Gender
- Risk of Loss
- Impact of Loss
- Reason for Leaving
If you make any calibration template changes once calibration sessions are created, the changes will take effect the sessions using the template. Now that the calibration template options have been reviewed. Let’s move on to some additional set up that is needed.
Manage Calibration Settings
The settings that will apply to all calibration sessions are identified within Manage Calibration Settings regardless of the calibration template used. The settings are used by the admin to perform several functions:
- Select action permissions for calibration session reviewers.
- Select the calibration template for managers to launch from Team Overview.
- Select the fields to display after a search while creating a session.
- Select the tools available for Calibration.
The tool is comprised of four tabs:
- Permissions
- Manager Template (optional)
- Search Results Fields
- Global Settings
Permissions Tab
The Permissions tab identifies the actions (Read, Write, Finalize, Export, and Delete) that the various calibration roles may perform for both active and approved sessions. The calibration roles need to be assigned actions for In Progress and Approved calibration sessions. The users selected when a calibration session is created will have access to the session through the Home menu and will see the Calibration tab even if they do not have role-based permission to calibration.
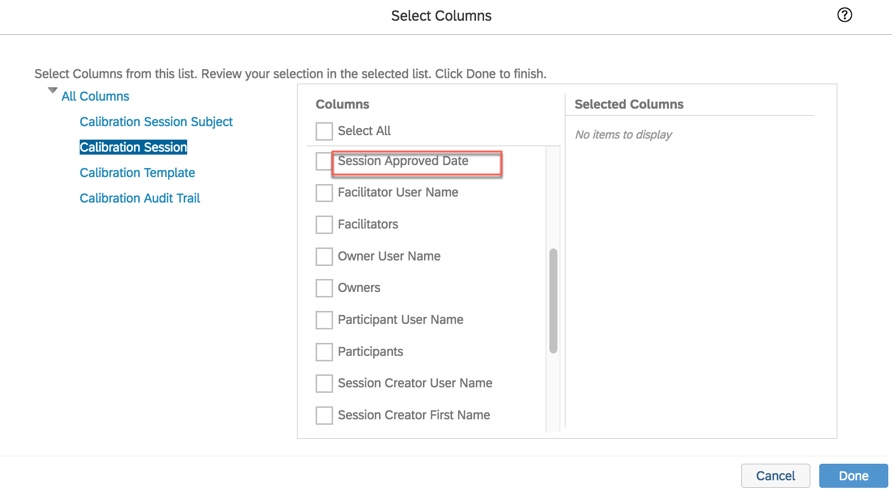
Active sessions are those currently in progress while approved sessions have been finalized. The permissions granted for these roles are only applicable to Calibration. An example of this tab is shown below:

The calibration roles that are used within a session are:
- The Facilitator is usually someone from HR that can be impartial. The facilitator conducts the calibration session and leads the discussion. The facilitator typically does the updating of the ratings and finalizes the session. The facilitator may also create sessions if the RBP role for an HR manager has Manage Calibration Sessions permissions.
- A Co-facilitator acts a backup to the facilitator. This role will have the same permissions that the facilitator role has been assigned. Any permissions added or removed for the facilitator role will automatically be updated for the co-facilitator role. The role is optional, you do not need to identify a co-facilitator.
- A Calibration Subject is an employee that is being calibrated in the session.
- A Session Participant is involved in the calibration session to make the rating decisions. The role is usually assigned to managers of those being calibrated.
- A Session Owner is a high-level manager who direct reports are participants in the calibration session. The participants’ direct reports are being calibrated.
- An Executive Reviewer is a business or HR executive who needs summarized data across sessions. Users who are assigned this role get direct access to the sessions as well as the Executive Review summary page.
The individuals who will be in these roles will be identified when creating the sessions. These roles are not related to role-based permissions. These roles are specific to Calibration. The Executive Reviewers are chosen in a separate function.
Action Permissions
Read, Write, Finalize, Export and Delete actions need to be set for each calibration role. The permissions can differ for active sessions and finalized sessions and you must explicitly assign the actions to the roles. The absence of a permission prevents the role from performing the action.
Anyone assigned to a calibration role with Read permission will have access to the calibration session. This means that a user without role-based permission for access to Calibration within the Home menu will be able to access the calibration session.
- Read permission allows the role to see the calibration session but not make any updates to the ratings.
- Write permission allows ratings to be updated within the session. Write permission is also needed for a role to create comments on an employee in a calibration session.
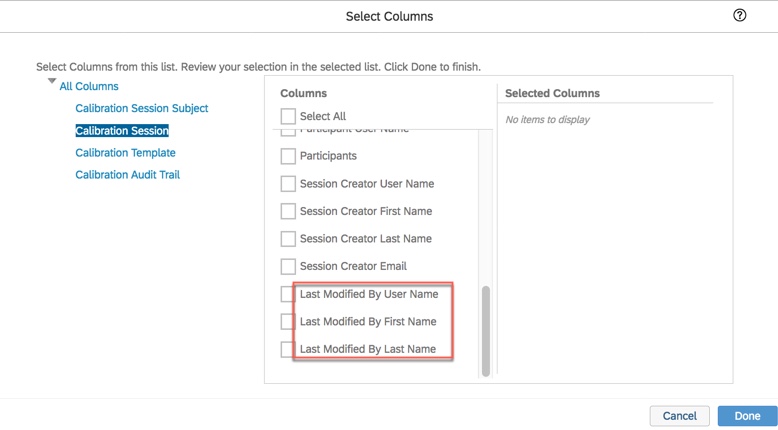
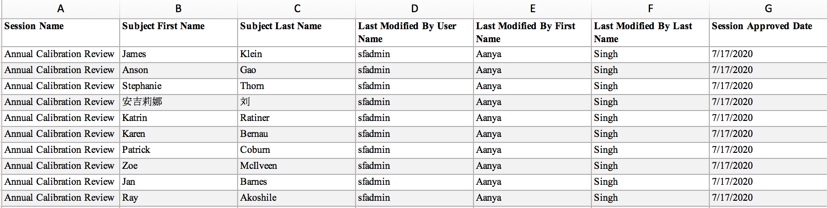
- Export permission allows a role to download the session from any of the session views. The session will download as an Excel file containing a separate tab for each view.
- Delete permission allows a role to delete a calibration session. Only the facilitator and co-facilitator roles have the option to delete sessions.
Manager Template Tab
The Manager Template tab is used to identify which calibration template should launch for a manager in Team Overview in Performance. An example of the tab is shown below.

This tab will not be visible if “Launch Calibration From PMv12 Team Overview” was not enabled in Company Settings in Provisioning. You can also enable the setting on the Global Settings tab that we will review shortly. In order for it take effect, save the settings, go back to the Home page.When you go back into Manage Calibration Settings, the Manager Template tab will be visible.
Remember the calibration template is linked the performance form template that you selected in the Data tab of “Manage Calibration Templates”. Therefore, when you launch the calibration session, the system will know which performance form template to access. If a calibration template is not selected, the Calibration button will not be enabled on Team Overview.
Search Results Fields Tab
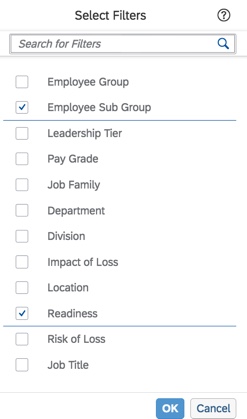
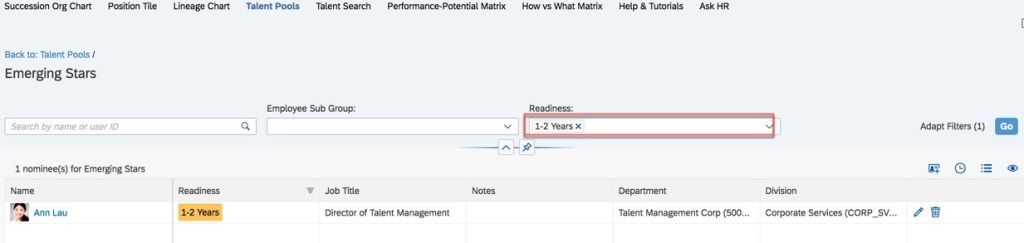
The settings selected on the Search Results Fields tab are used on the People tab of Managing Calibration Sessions which will be discussed in a future blog. This tab is used to identify the fields to display after an employee search when creating a calibration session. Additional fields may added to the view after a search as well. An example of the tab is shown below.
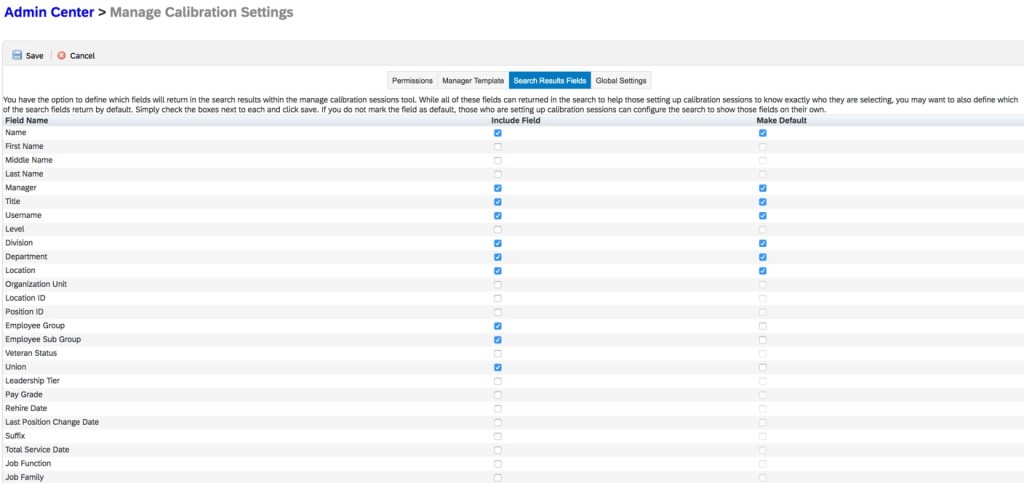
The column on the far right, Make Default, is used to select fields that displays for each user in the search results when creating a session.
The “Include Field” column on the Search Results Field tab enables you to choose which additional fields you may add to the view after the search.
Global Settings
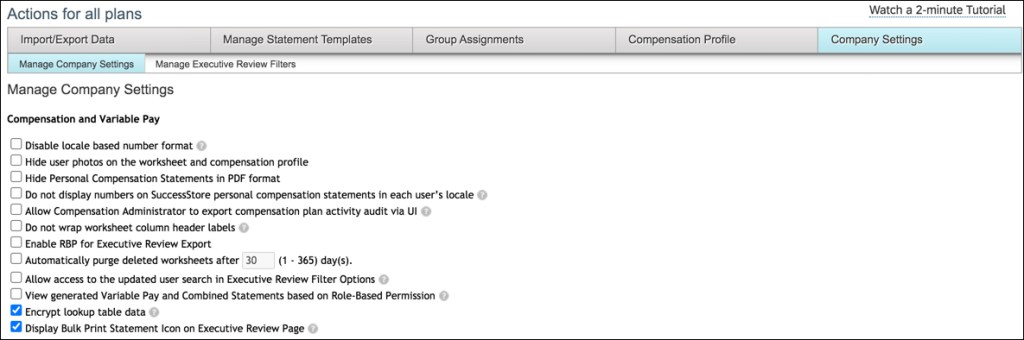
The selections made on the Global Settings tab apply to all calibration templates, sessions, and roles. This tab is used to make selections on how calibration will act for your instance. An example of the tab is shown below.

If some of these features are already enabled, that means that were already enabled in Provisioning. These settings will be applied to current and new calibration sessions, and calibration templates. The description of these settings is shown in the table below.

Configuring Calibration Talent Card
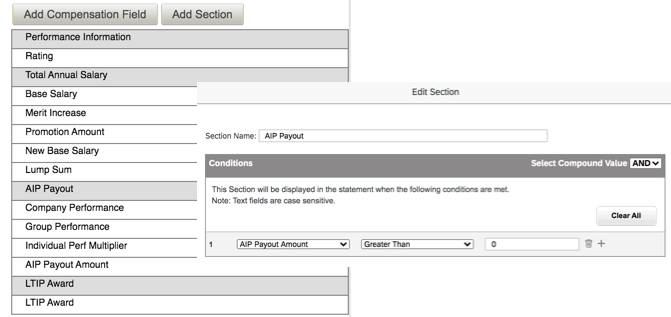
The admin may edit sections of the Calibration Talent Card. You may add standard sections or create custom sections. An example is shown below.
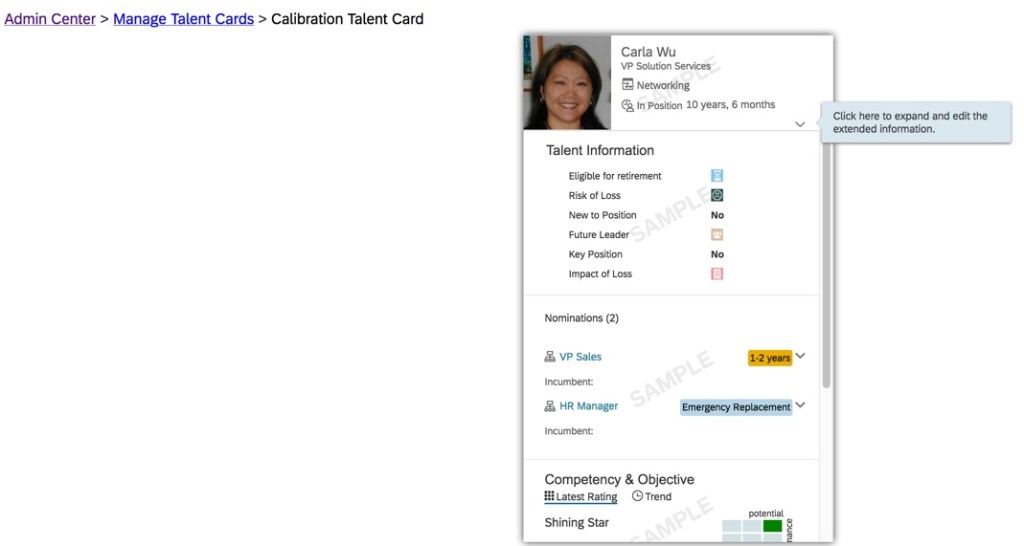
The Calibration Talent Card may be opened for a subject in a calibration session.
Manage Permissions for Executive Review
After creating a calibration session, you may determine which users should have access to the Executive Review page. Permission is applicable to all calibration sessions that use a specific calibration template. An example of the tab is shown below.
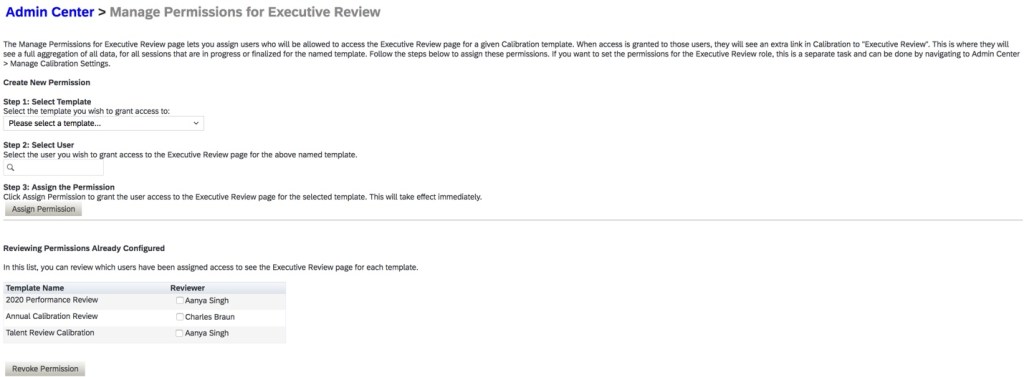
Any user selected will have access to data from all sessions tied to a calibration template. They will get access to all of the sessions in addition to seeing the Executive Review page. They will see aggregated data and detail done to the subject level. Use this screen to remove access for any existing Executive Reviewers as well.
Calibration History Portlet
Any user selected will have access to data from all sessions tied to a calibration template. They will get access to all of the sessions in addition to seeing the Executive Review page. They will see aggregated data and detail done to the subject level.
Adding Calibration History Portlet to People Profile
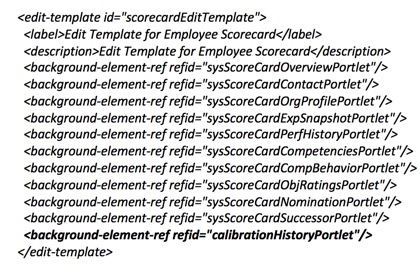
If the Calibration History Portlet background element was added to the data model and permission granted to this data for the admin, manager and HR manager roles, the portlet can be added to People Profile. Add the calibration history background element to People Profile using “Configure People Profile”. Typically this block is inserted in a talent portion section that managers have access to.
To select the ratings to appear in the portlet, go back to “Manage Calibration Templates” to find the template that you are going to reference in the portlet. Go to the Advanced tab to find the Calibration History Portlet section. The rating options that are listed are based on the rating types that were selected on the Data tab and any matrix view results from the Views tabs. Select the rating types that you wish to display in the portlet. You may include up to five rating types and three matrix views.
Calibration Home Page Tile
There are two standard Home page tiles for Calibration: Calibration (Manager) and Calibration (Specialist). The tiles share the same name (“Calibration”), act identically and provide a direct link to the Calibration sessions page. A user would never have both tiles. When enabled, managers will have access to the Calibration (Manager) tile and non-managers will have access to the Calibration (Specialist) tile.
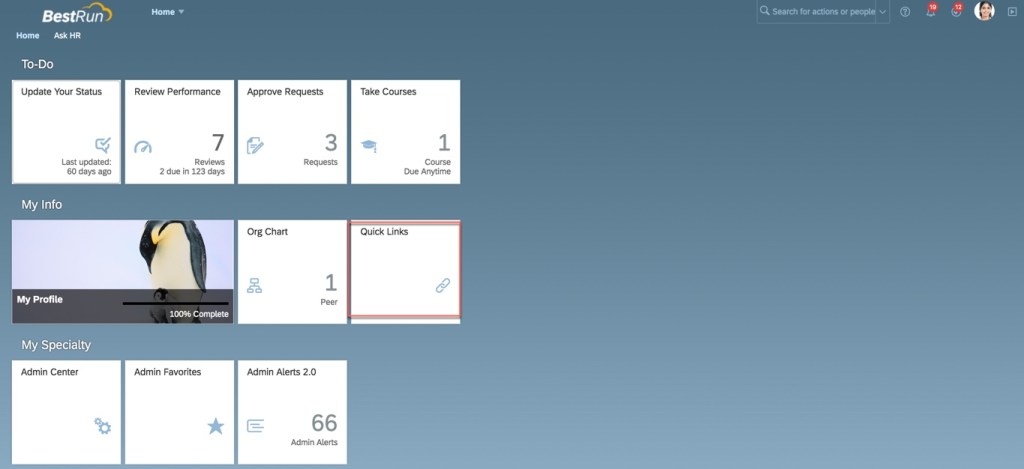
A manager will see the calibration tile in the “My Team” section of their Home page. Non-managers will see the calibration tile in the “My Specialty” section of their Home page.
To see the tile, permission to the calibration tab and to the Homepage V3 Tile Group Permissions are granted through role-based permissions. For non-managers without access to the calibration tab, they would only be able to see the calibration tile if they are identified as a participant in a calibration session.
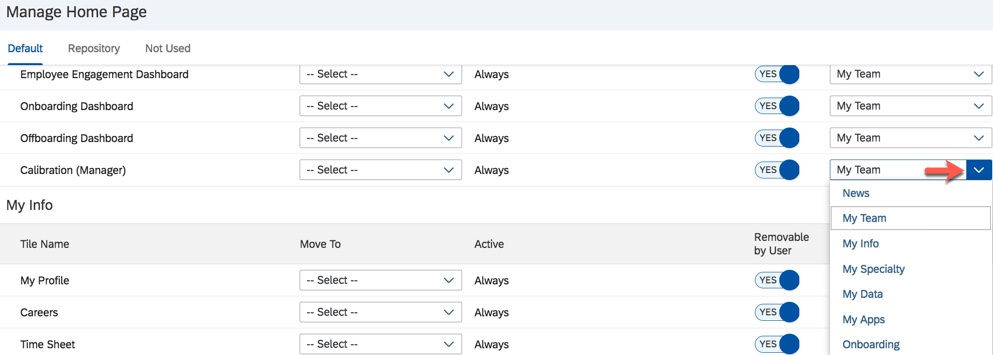
To verify that the tiles are enabled, go to “Manage Home Page”. If the “Calibration (Manager)” tile is on the “Repository” or “Not Used” tab, click the dropdown arrow in the “Move To” column, select “Default” and save the settings. An example is shown below. This will automatically put the tile in the “My Team” section of the Home page.

Moving the tile to the default tab will place it in the “My Team” section. Next, find the “Calibration (Specialist)” tile. If the tile is on the “Repository” or “Not Used” tab, click the dropdown arrow in the “Move To” column, select “Default” and save the settings. The tile will appear in the default tab in the “My Specialty” section. The tiles can also be moved to different sections of the Home page from any of the tabs by using the dropdown listing for “Select Section”. An example is shown below.
Calibration Team Summary Tile
There is a standard summary tile available for managers called “Calibration Team Summary”. To see this tile, the participant of the session must be the manager of the subjects. The Team Calibration Summary tile will only display if the data source of the session comes from a performance form. This tile may be hidden or displayed. Also found within “Manage Home Page”, go to “To-Do Settings”. The list of the standard tiles will display as seen below.
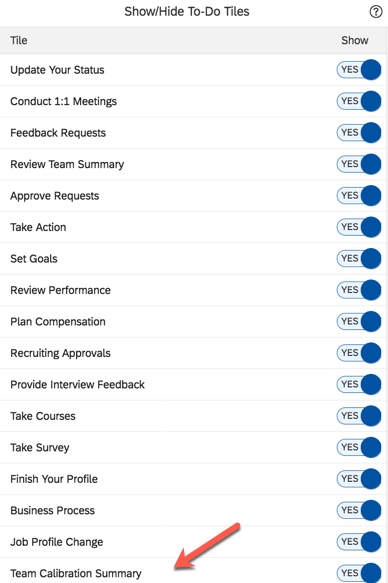
To hide this tile, move the toggle to “No” for the Team Calibration Summary tile and then save the settings.
Calibration Alerts
If Employee Central, MetaData Framework and Intelligent Services are enabled, Calibration Alerts may be set up. The alerts can be used to point out situations where bias could impact the evaluation of some subjects. Calibration business rules may be created that trigger an alert in a calibration session when evaluating subjects. The alert would display when saving the session with a list of subjects that triggered the business rules. The label of the alert message can identify the problem and the alert message can further explain the problem and offer possible solutions.
Typical alerts are:
- Subject had a leave of absence which may have impacted their performance rating since they did not have a full twelve months of work to evaluate.
- Subject had a noticeable reduction in their current year performance rating compared to the prior year rating.
- Subject received very favorable ratings for prior years and has not been promoted.
When creating the business rules, up to three years’ worth of performance ratings may be compared. This means three performance form templates can be identified when creating the business rules. The business rules must then be linked to a calibration template. Within “Manage Calibration Templates”, select the calibration template and on the Advanced tab, select the alert rules to apply.
The alert messages need to be created via Manage Data>Create New. An example is shown below.

External code, effective status localized header and localized description are required. The message should identify the issue and offer solutions (localized description).
Next, the business rules for the alerts must be configured and the triggers identified. Type and select “Configure Business Rules” in the search bar and click “Create New Rule”. As example is shown below. Up to three performance form templates can be referenced when creating a business rule.
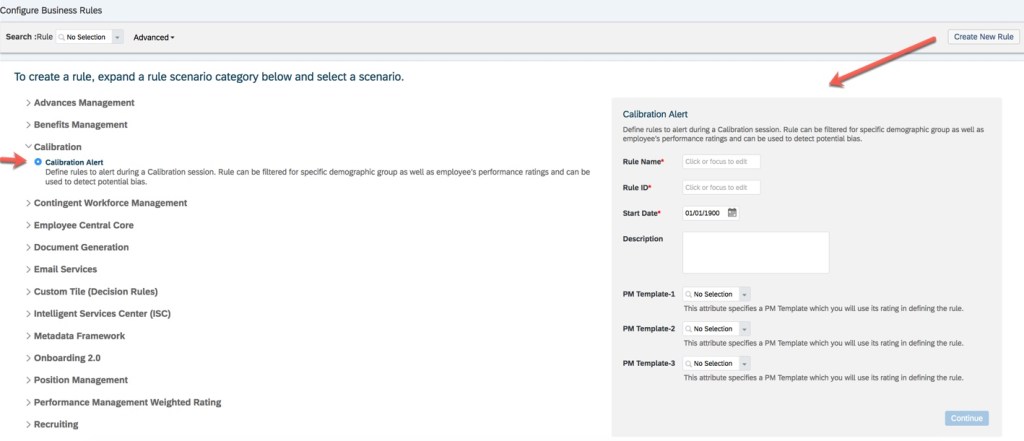
Create an alert scenario using If/Then logic or True/False. Define how the system would respond if the “THEN” or “ELSE” option is met. The calibration alert message created in the prior step must be referenced here. An example is shown below.

Once the rules are created, they must be linked to a calibration template. Go to “Manage Calibration Templates”. Select the calibration template to add the rules to. On the Advanced tab, select the alert rules from the Rules dropdown list. An example is shown below.

All sessions linked the calibration template will use the alerts.
Wrap Up
The calibration template identified the data source for the ratings to be calibrated, defined the data views used for the calibration sessions, and enabled some general features. Next we configured the calibration settings. The settings defined what each calibration participant role could do, determined search results fields and enabled global settings. If managers will be able to launch their own calibration sessions in Team Overview in Performance, we identified the calibration template to be used. The features and settings are applicable to each calibration template and each calibration session. We also looked at some additional features to configure for Calibration.
Watch for the next blog in the series. We will create a calibration session.