This guide is to help system administrators with Provisioning access to understand and configure the Career Worksheet template.

Enabling the Career Worksheet In Provisioning
To get started, let’s handle the settings needed in Provisioning. You should already have enabled Goal Management Suite (Total Goal Management) and Development Plan V12. In order for the Career Worksheet to be used in the Career Development module, My Goals Tab and Career Worksheet V12 must be enabled in Company Settings.

To use these features, Version 12 UI framework (Revolution), Enable Generic Manager and Enable the Attachment Manager should be enabled as well.
Configuring the Career Worksheet
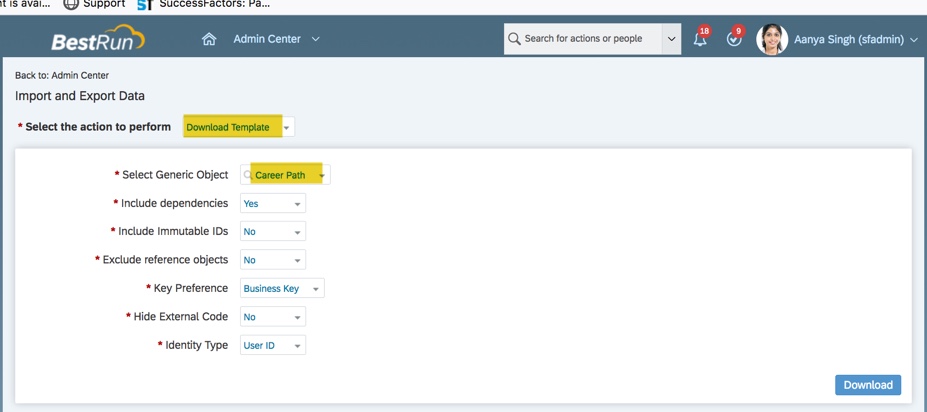
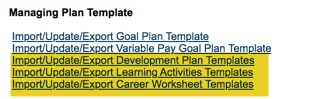
The Career Worksheet is based on a template found in Provisioning. The Career Worksheet template is found under the Managing Plan Template section and may be seen by clicking on the Import/Update/Export Career Worksheet Templates link.

If the Career Worksheet Template is not found, you may download the Career Worksheet XML from a sales demo and then import into your company.
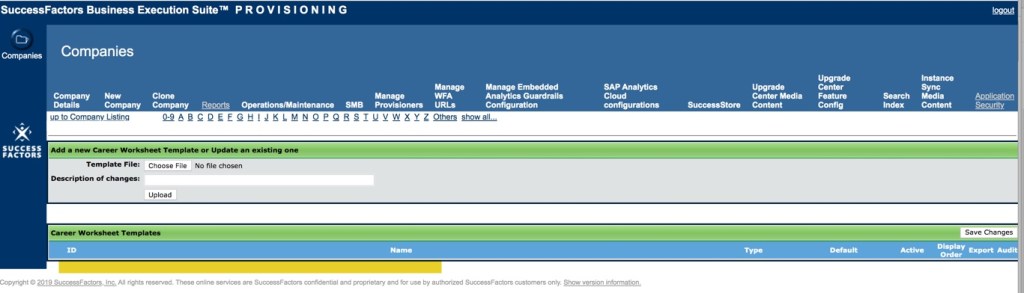
Once you see the Career Worksheet template, export it to tailor the features to your organization’s needs. The Career Worksheet XML may be updated to change field labels, define the rating scale, choose which features to switch on and set permissions.

Career Worksheet Template Elements
Let’s explore the Career Worksheet XML to get an understanding of the elements and their purpose.

Look for the first field-definition tag. It will follow tags for text replacement, behaviors, and self-assessment.

The standard field-definition ids are:
- Competency name
- Last rated form
- Last rated date
- Last rating
- Development goals
- Readiness Meter
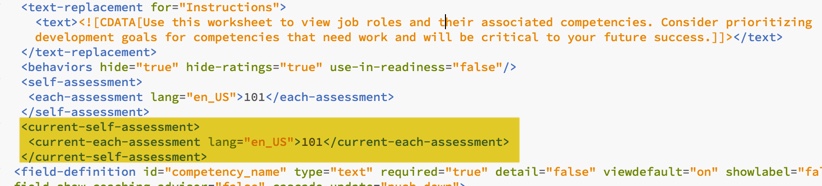
The field definitions within the Career Worksheet XML are highlighted below:

No custom fields are allowed in the Career Worksheet XML.
All of the field elements are required with the exception of the readiness meter. It is recommended to use the readiness meter, without it, the target roles will not display the percentage of how ready an employee is for a role.
Field definitions and the Career Worksheet
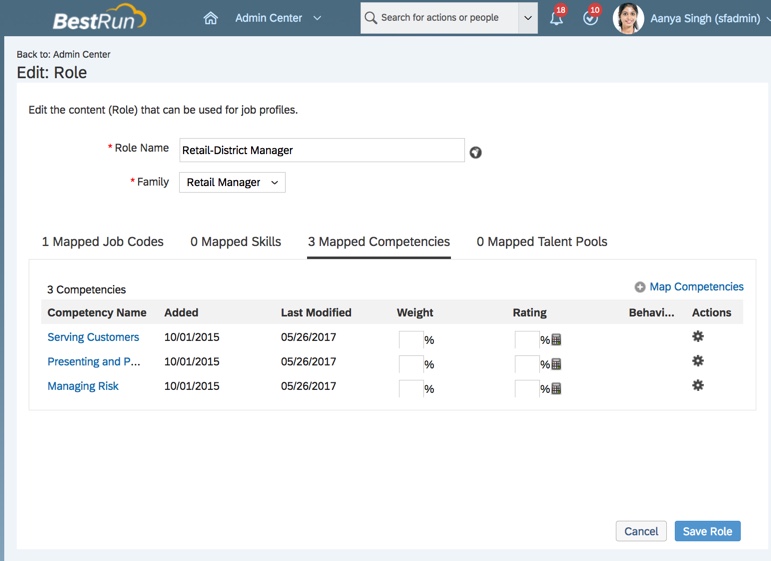
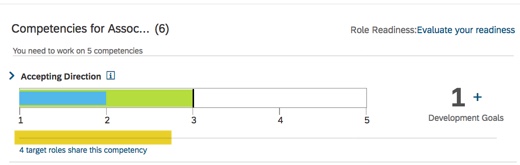
The fields defined in the Career Worksheet XML are related to the competencies for a role.
The first field definition id: competency_name. The name of the competency required for the targeted role.

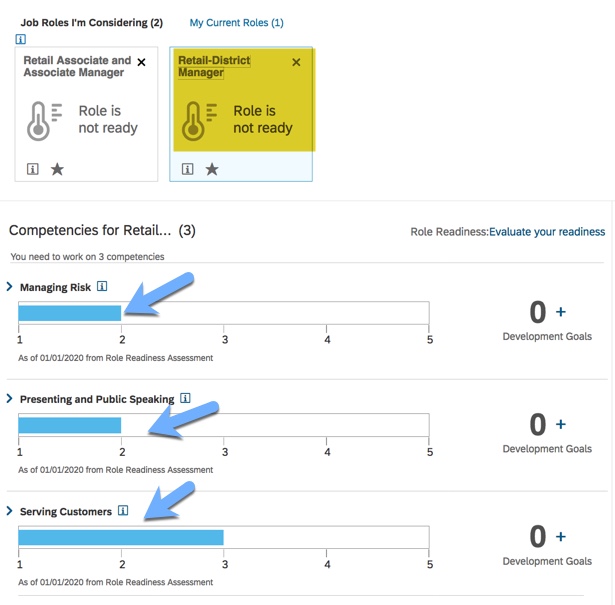
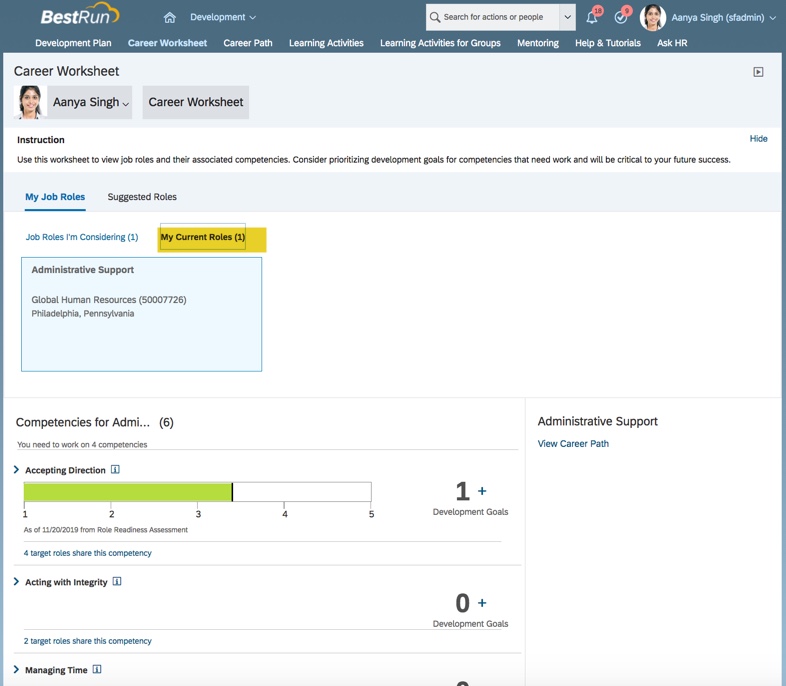
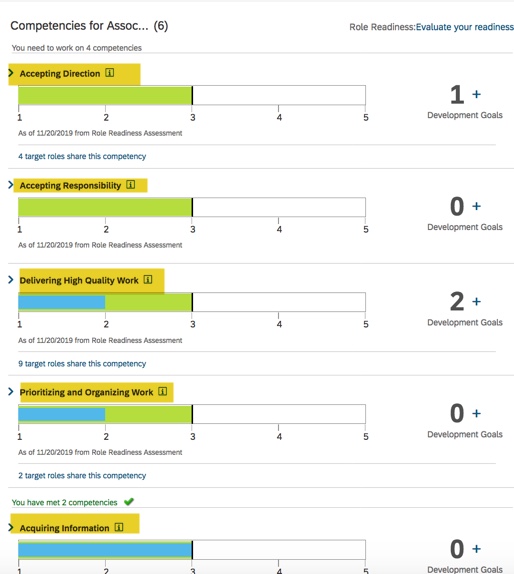
Each competency that is required for the targeted role is displayed on the Career Worksheet.
Field definition id: last_rated_form. The name of the form where the competency rating was pulled from.

The name of the form where the rating comes from is displayed beneath the competency gap graph.

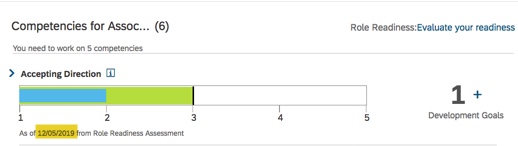
Field definition id: last_rated_date. The date on which the competency was last rated.

Used in conjunction with last_rating_form, it displays the date that the form was completed.
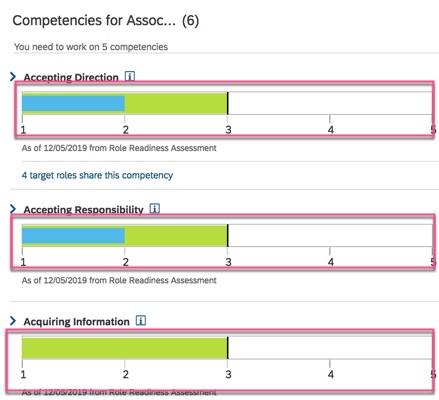
Field definition id: gap_graph. Image that shows the gap between the expected rating for a competency compared to the employee’s actual competency rating.

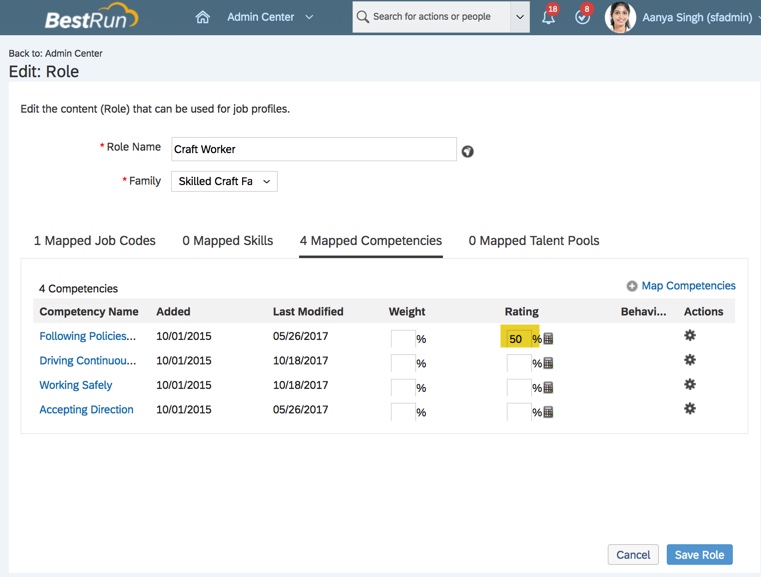
Field definition id: last_rating. The user’s latest competency rating.

The system uses the latest rating information in the system as the default. You can also specify a specific form or a couple of forms as the source of the existing ratings. We are concentrating of the use of the role readiness form as the source.
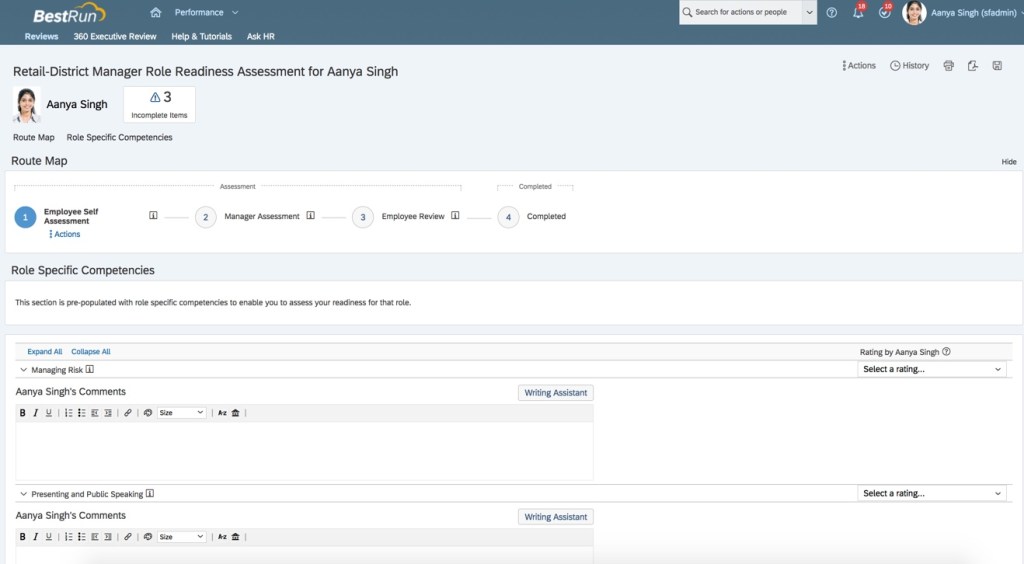
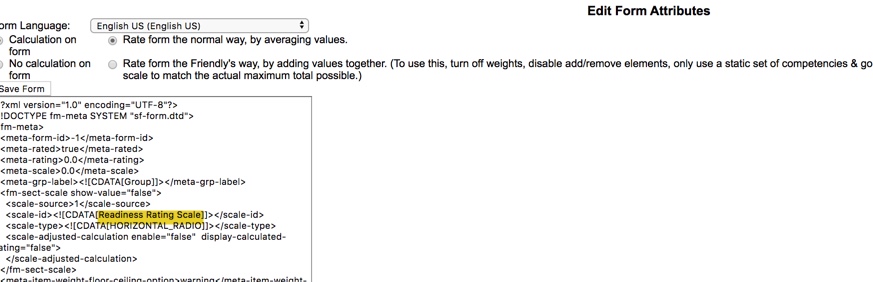
Be sure to reference the same rating scale that is used in the Role Readiness template. Otherwise the Career Worksheet will not have the readiness meter populate after an evaluation is completed.

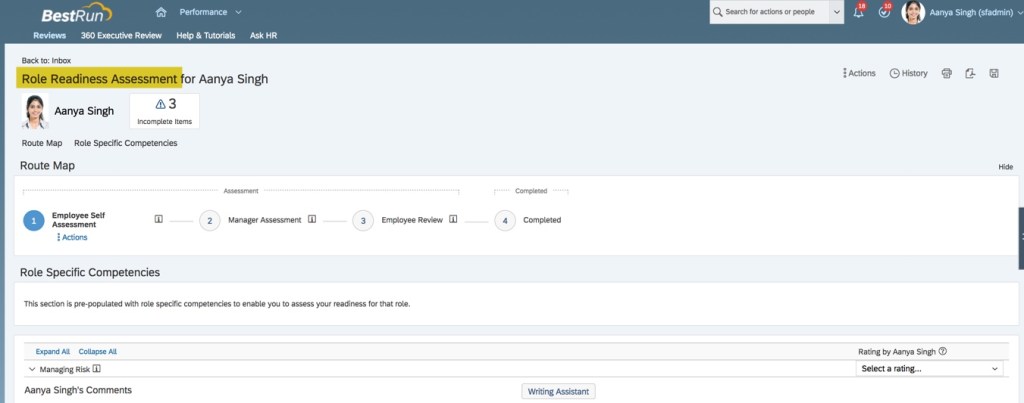
The rating is pulled from the form that is identified in the Role Readiness Assessment Template as the source.
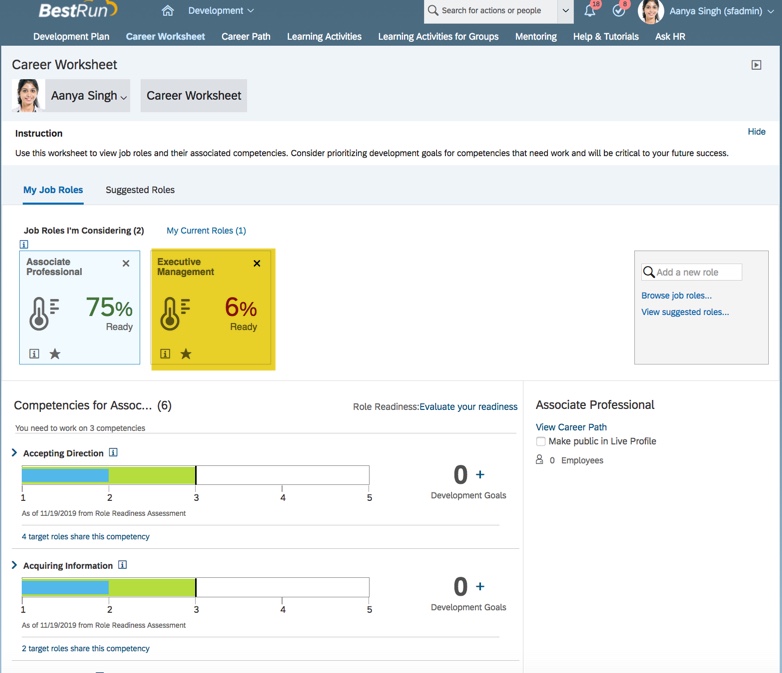
The competency rating is represented in the gap graph for each competency.

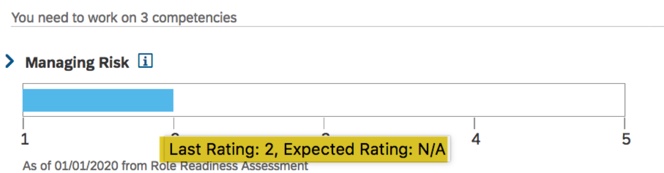
When hovering over the graph, the actual employee numeric competency rating will display along with the expected competency rating. The graph is based on the competency rating scale used in the form.

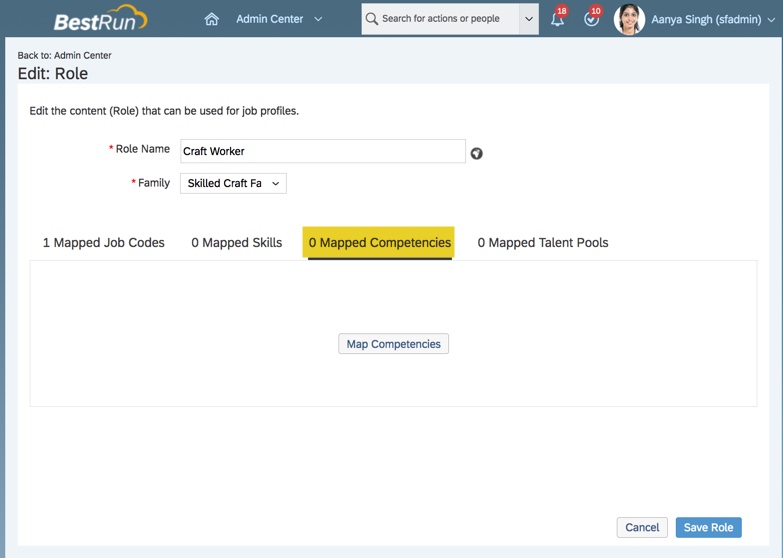
Field definition id: development_goals. This field is used to show the number of existing development goals for each competency along with a button to create a new development goal. Use of this field requires that a development plan template with competencies is loaded. The worksheet will use the default development plan.


In order to use this, there must be an active development plan template with a competency field defined.

On the Career Worksheet, you may expand a competency to see any development goals the employee has already associated with the competency. If configured in the development plan, the employee may edit or delete the competency.
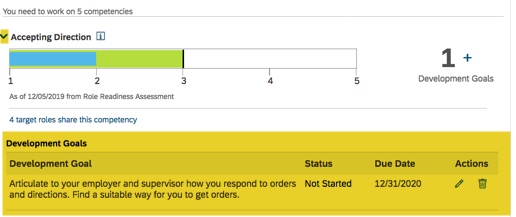
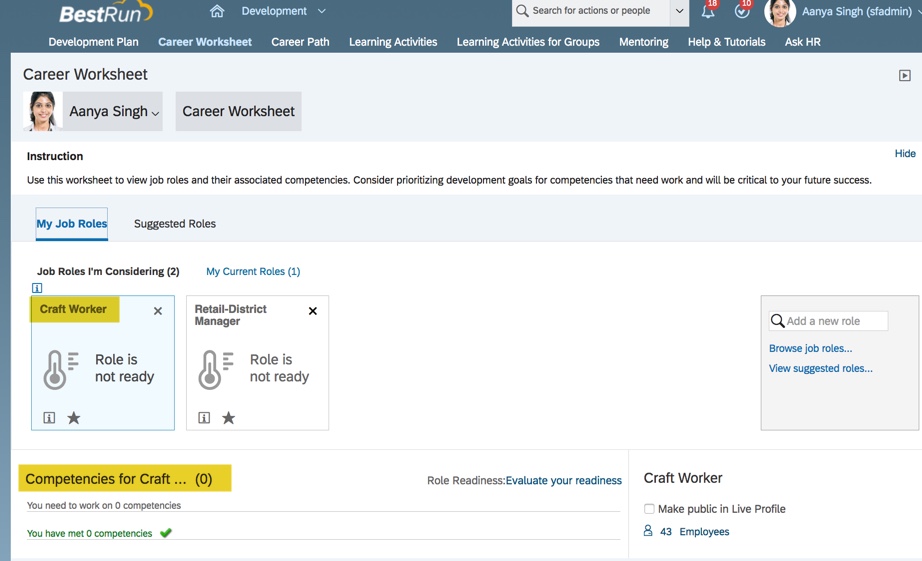
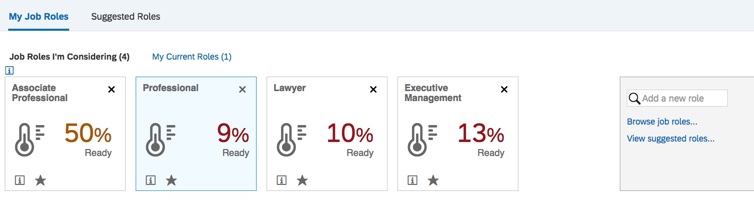
Field definition id: readiness_meter. The percentage rate of readiness for the target roles based on calculation of actual competency rating and expected competency rating.

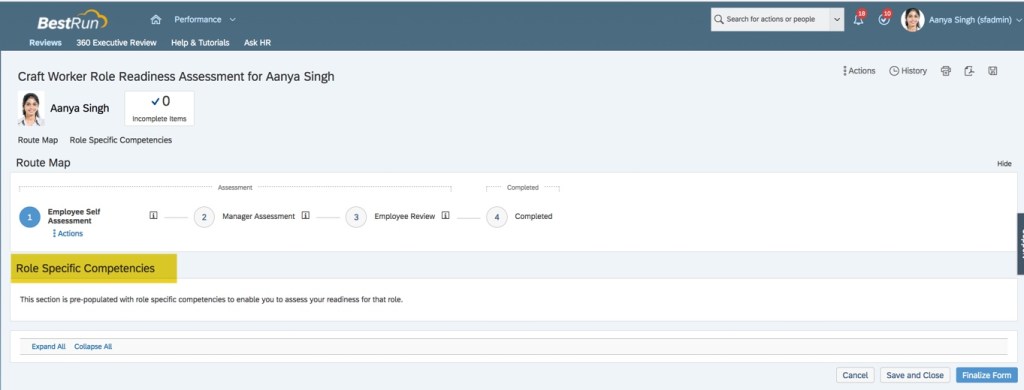
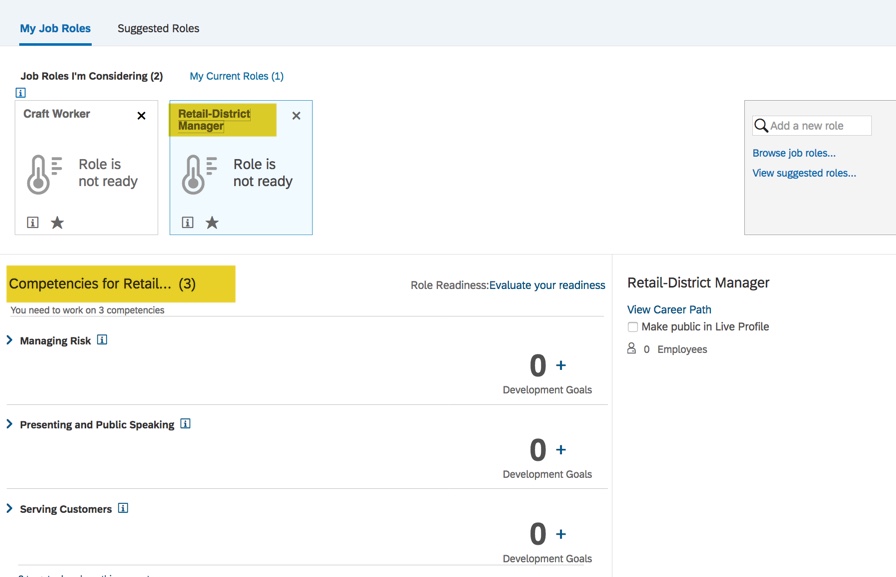
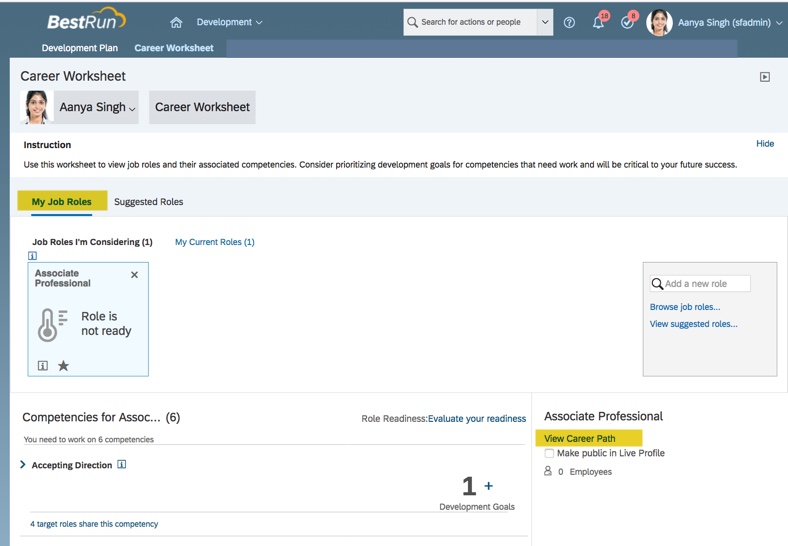
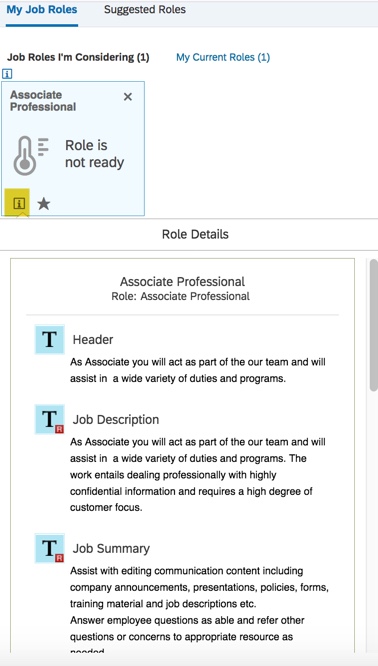
Until a role readiness assessment form is completed, the target roles’ meters will show that the role is not ready.

Once the initial role assessment is completed, all of the targeted roles will have the readiness meter show the percentage of how ready the employee is for the role based on the competencies needed for the role.
Career Worksheet Permissions
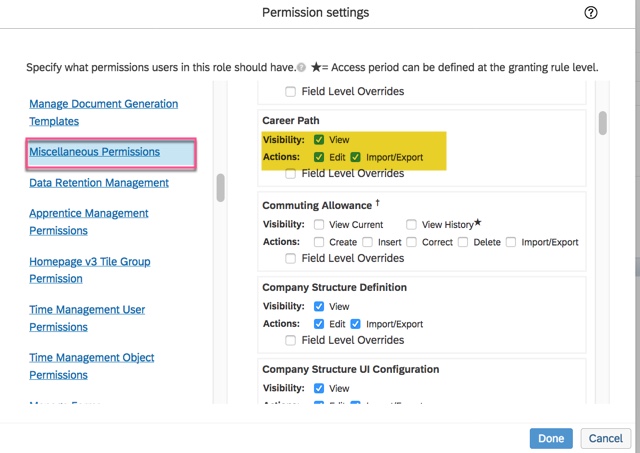
The ability to view the content of the Career Worksheet and the actions that a role may perform are set in the Career Worksheet template.
Now that the Career Worksheet fields have been reviewed, let’s move on the permissions for these fields.
Career Worksheet Field Permissions
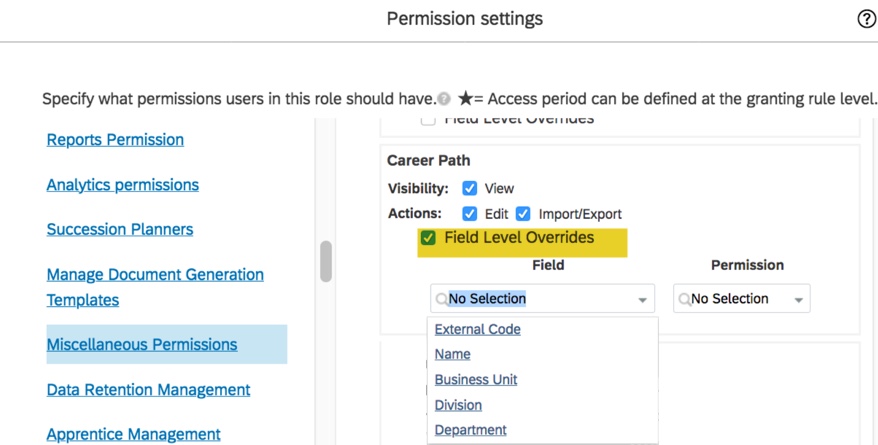
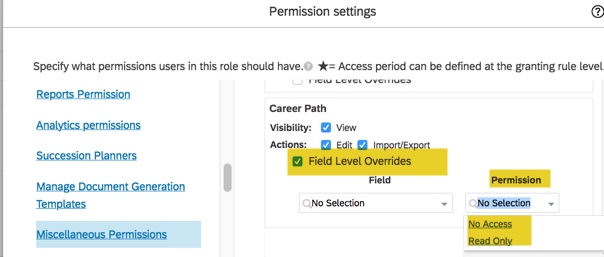
The visibility of the fields on the Career Worksheet are influenced by the Read permissions in the template.
Write permissions for any fields on the template are ignored because the template does not support write permissions for the fields.
The competency_name permission allows the user to see the name of the role’s competencies. If read access is not granted to competency_name but is granted for the last_rated_date and last_rated_form fields, the competency name will show on worksheet as “undefined”.
Example of no read permission for competency_name field:

View of worksheet without read permission for competency_name field.

Competencies required for a role are shown as undefined rather than by the name of the competencies.
The development_goals permission allows user to see the development goals associated with each competency. The read and write permissions for development goals come from the development plan template.
The last_rating read permission is needed to view the gap graph for each competency.
The last_rated_date permission displays date of the most recent rating for each competency.
The last_rated_form permission displays form name for the most recent rating for each competency.
A role must have permission for both last_rated_date and last_rated_form in order to see the source and date of the rating.

Without read permission for both fields, date and form name do not display.
The readiness_meter read permission allows the “Readiness” percentage to display for each of the targeted job roles.

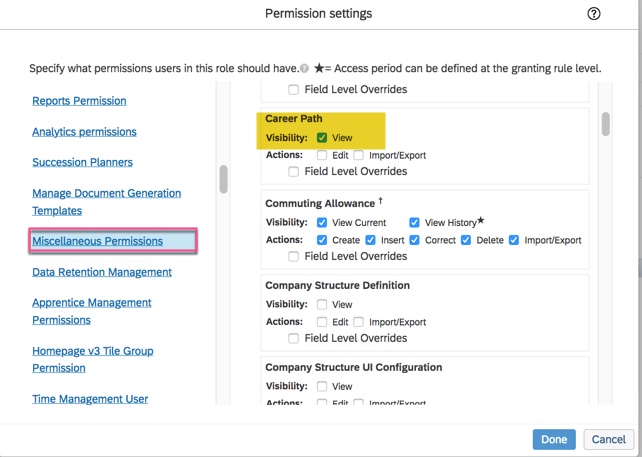
Example of read permission for all fields for employee, manager hierarchy and HR roles.

All roles should be able to read the readiness meter. Without the read permission for role set to “*”, the readiness meter will not populate after the role assessment is completed.

Switches
There is a section within the XML to add switches that will control some of the features. The switches tag should be inserted prior to the text-replacement tag.


Switch for Job Profile Builder Profile
When Job Profile Builder is used and job profiles are defined, turn on the sync switch in Career Worksheet template xml.
This is done by setting the disable-jpb-profile-in-csw switch to “off”.

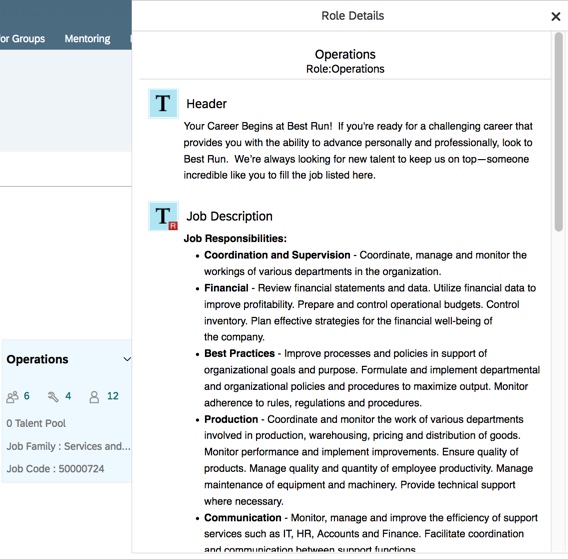
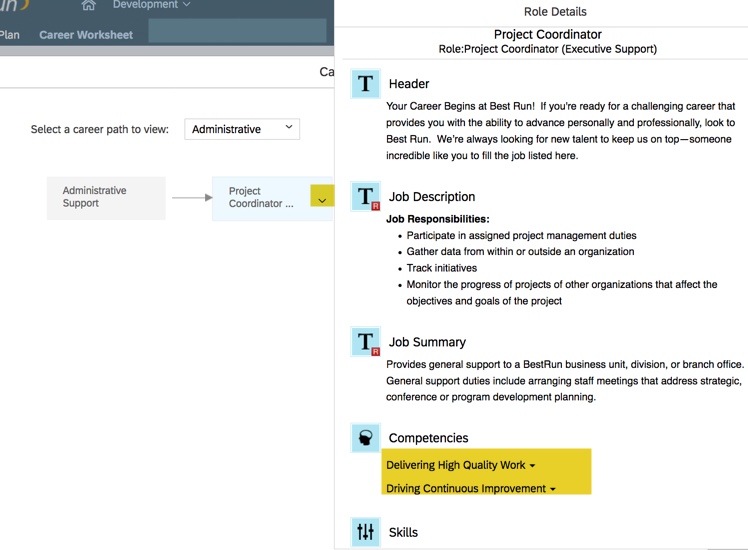
When the sync is on (value on switch is set to “off”), the future role details in the career worksheet come from Job Profile Builder Job Profile shows for future role when you hover mouse on i icon, as below:

Switch for Position Count per Role
For each targeted role, it is possible to see the number of openings using the “hide-position-count” switch set to “off”.

The default value is “off”, however, this position count only works for Legacy Position Nomination Method for Succession so the switch should be set to “on” to hide the count.

Switch for Development Goals
When competencies are included in the worksheet, a switch may be set to allow the competency descriptions to display.


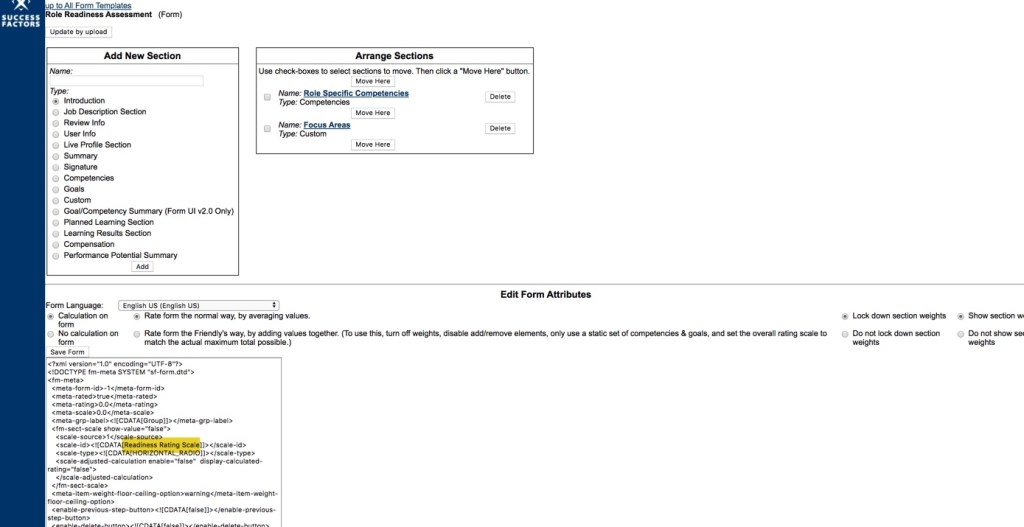
Switch for Competency Rating Calculation
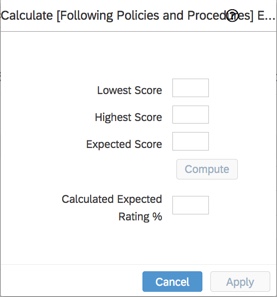
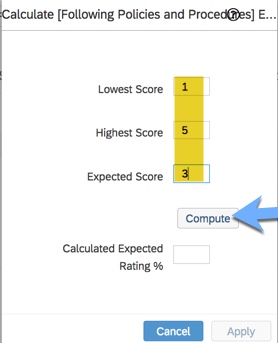
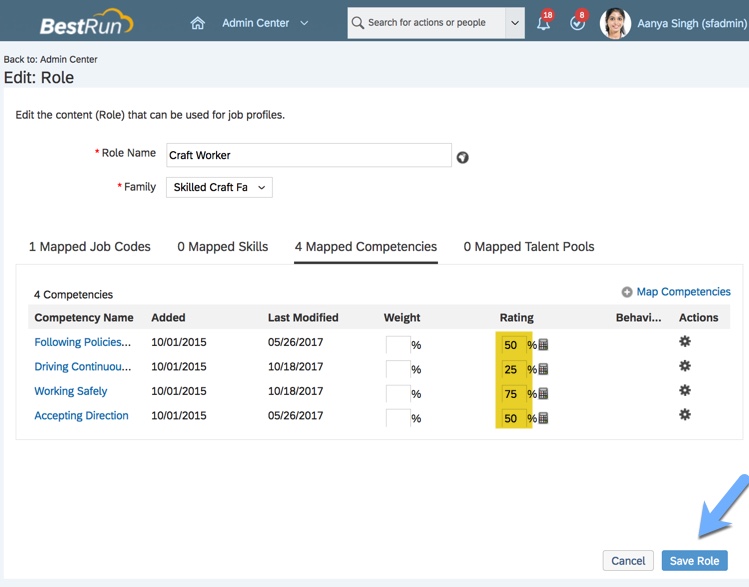
To use the role readiness meter, you need to define how role readiness is calculated. There are two calculation types: averaging competency readiness or summing up the number of ready competencies.
Either calculation type requires the employee’s current competency ratings which can come from the latest rating from the performance review, average rating from 360 form or role readiness form. The default rating is the latest rating in the system
The default rating calculation switch is “off” which calculates role readiness using a score of either 1, for those competencies where a user met the expected rating, or 0, for those competencies where a user did not meet the expected rating.
For a proportional calculation for role readiness, add the switch for new_role_readiness_calculation with value “on”.
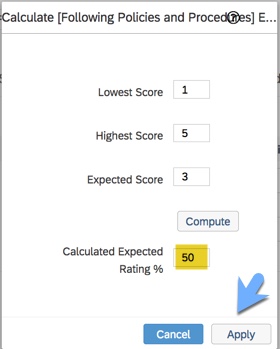
When the switch is set to “on”, each competency rating is weighted as a percentage of the expected rating. The average of each of the competencies rating those percentages determines role readiness.
The system calculates readiness for each required competency for a role, and then calculates an average of the competency readiness.

If no switch is included, the default calculation is summing up the number of ready competencies.
Switch to launch form for current role
The Career Worksheet XML can be configured to allow employees to launch the Role Readiness Assessment form for their current role. This is accomplished with the following switch added to the Career Worksheet XML.
<switch for=”show-self-assessment-in-current-role-tab” value=”on” />

Will also need to identify the form to use when creating a current-self-assessment tag.

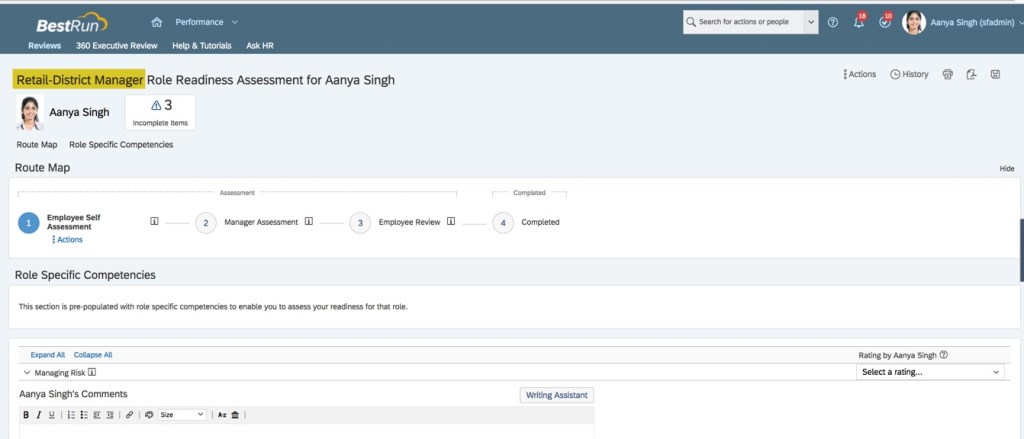
Once the Career Worksheet XML is imported in Provisioning with these updates, the Current Roles tab will contain a link to evaluate readiness.

Click the link to open the form for the current role.
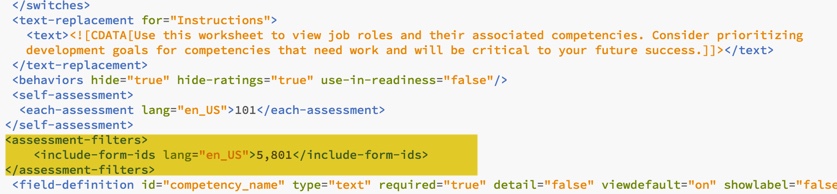
Identify source of ratings
The default rating is the latest rating in the system. It is possible to identify a specific form or forms as the existing ratings source. First find the form ids in Provisioning>Form Template Administration.

Next add <assessment-filters> tag to the Career Worksheet XML to identify the form to be used as the rating source.
Action Permissions in the Template
The action permissions for create, delete and private access need to be defined.
The ability to view the content of the Career Worksheet and the actions that a role may perform are set in the Career Worksheet template.
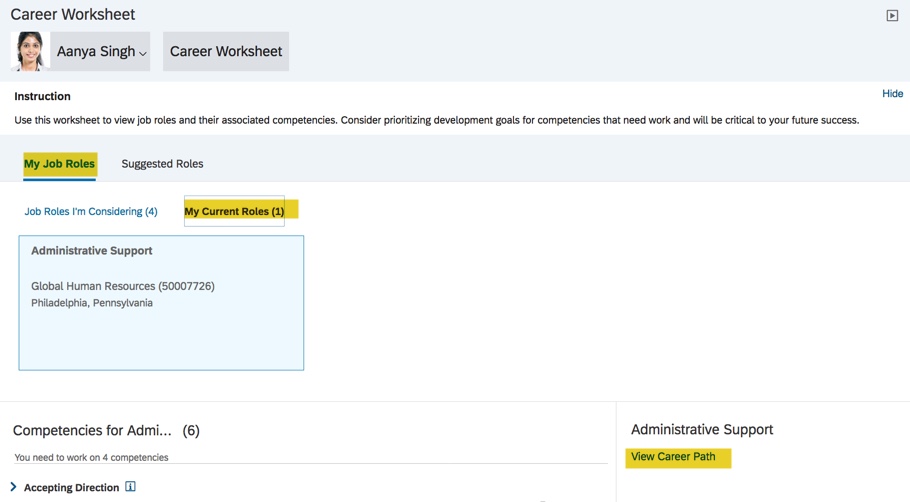
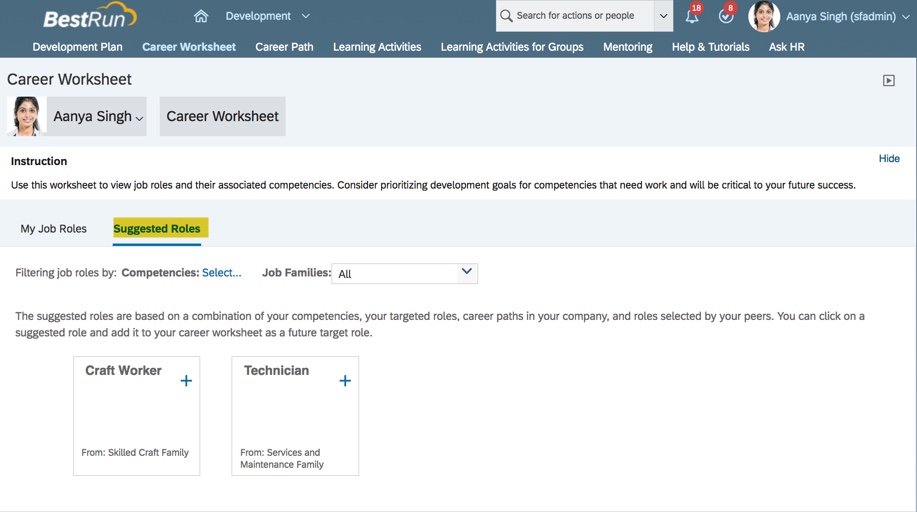
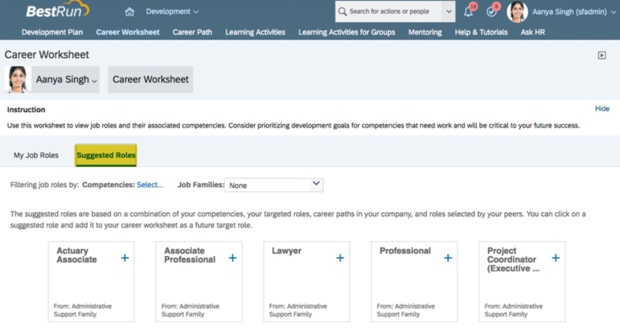
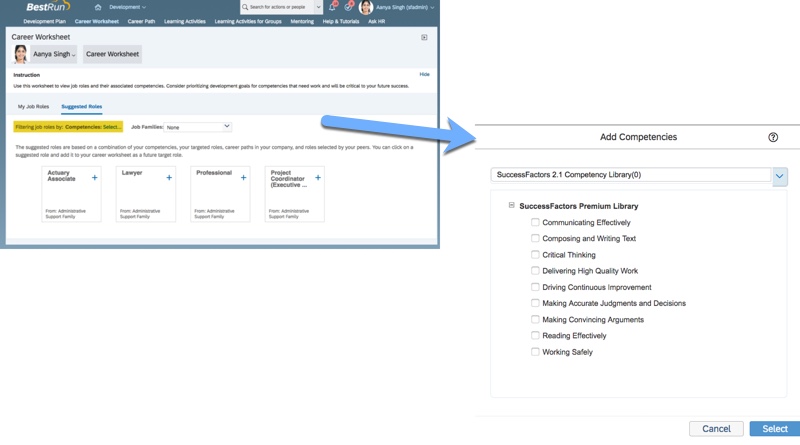
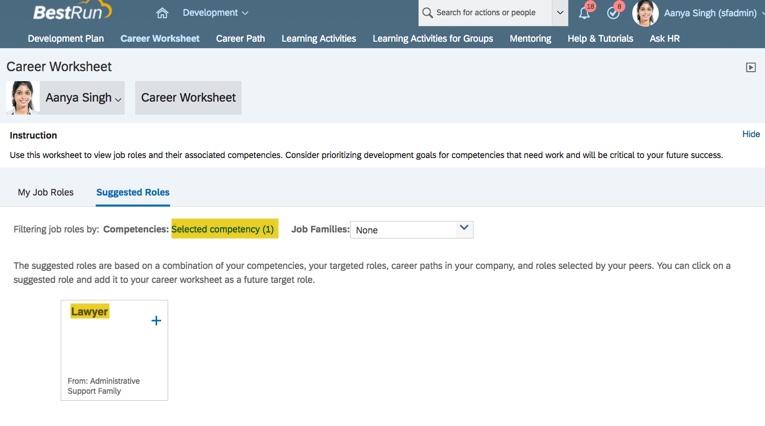
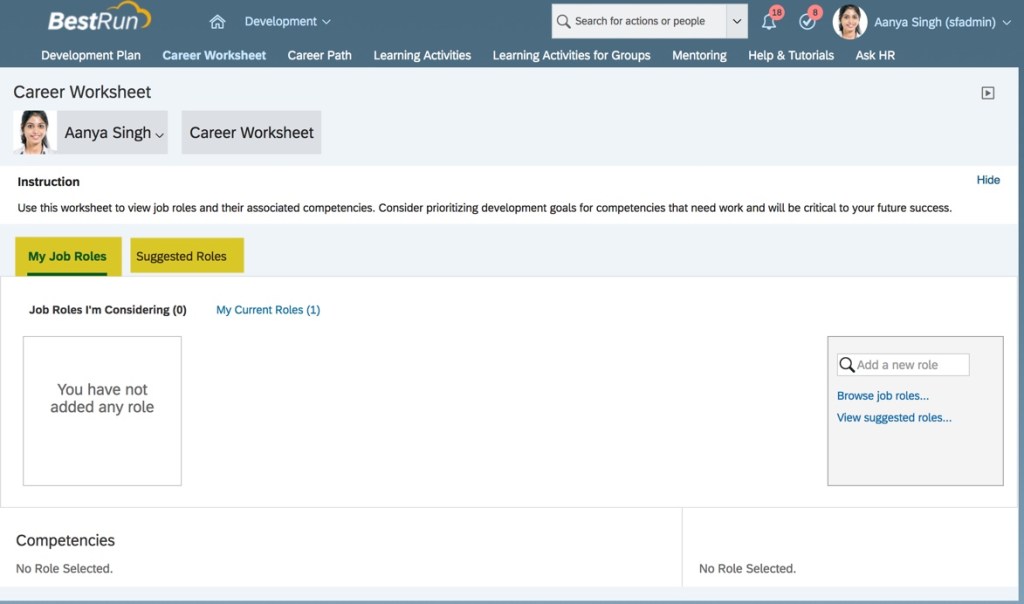
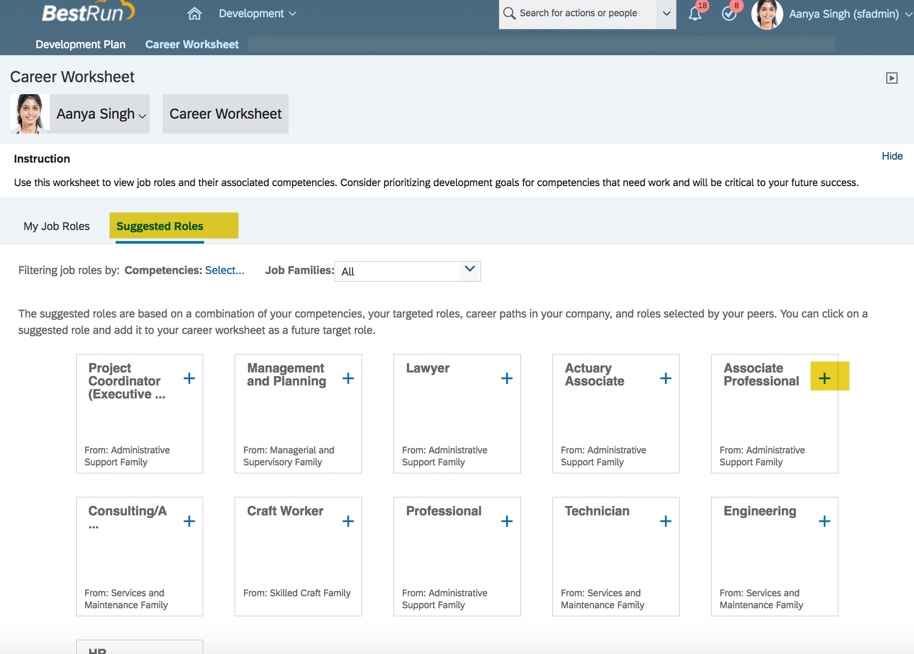
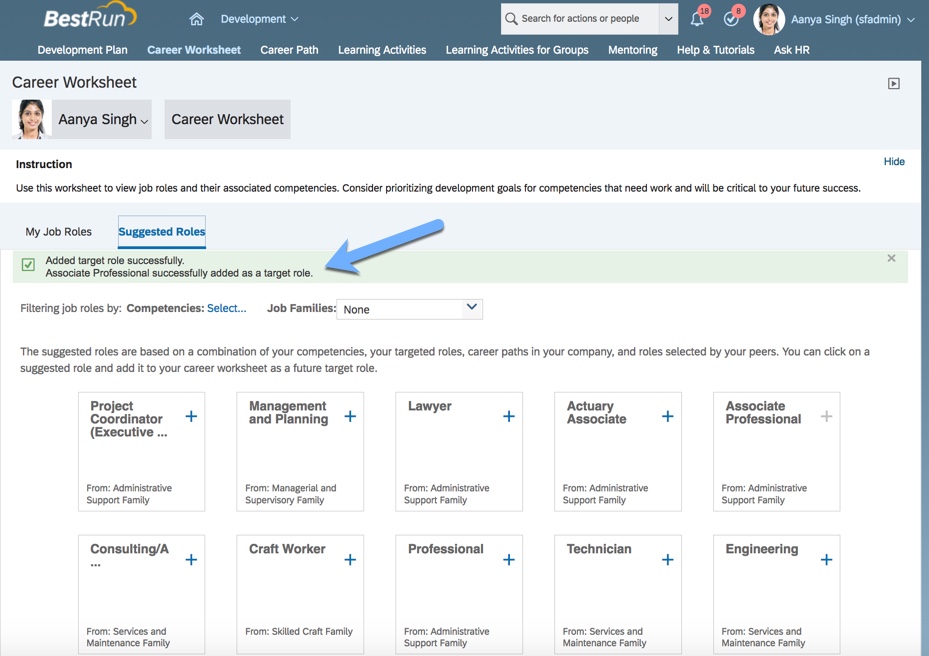
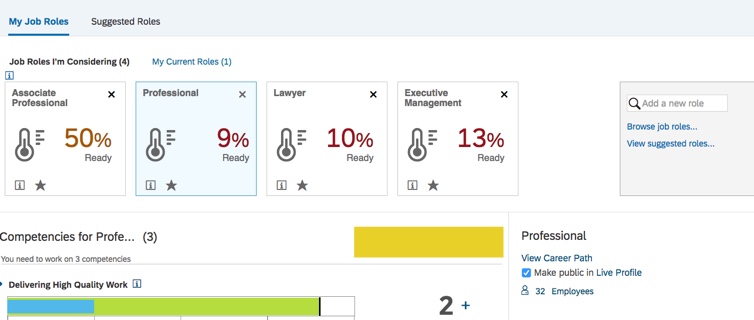
Create permission allows users to add Job Roles to the Job Roles I’m Considering section of the Career Worksheet. This permission is also necessary for the Suggested Roles tab to be visible.

At the minimum, the employee role should be able to add targeted roles to the Career Worksheet. Based on your organization, you may decide that the manager or HR may add roles to the worksheet.
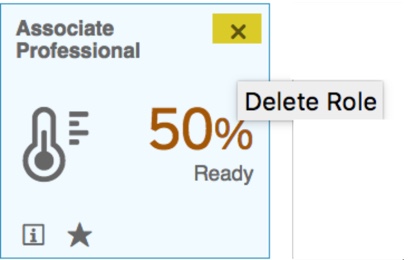
Delete permission allows a user to remove a targeted role from the job roles that they are considering.

At the very least, the employee role should be able to delete targeted roles from their Career Worksheet.
Private-access permission allows users to see the content in the “Job Roles I’m Considering” section of the Career Worksheet.

In addition, the Career Worksheet template will need to have the Share permission enabled. At the least, the employee role should be permissioned to allow sharing of a role in their plan.

Additional Settings
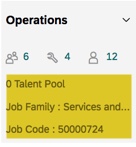
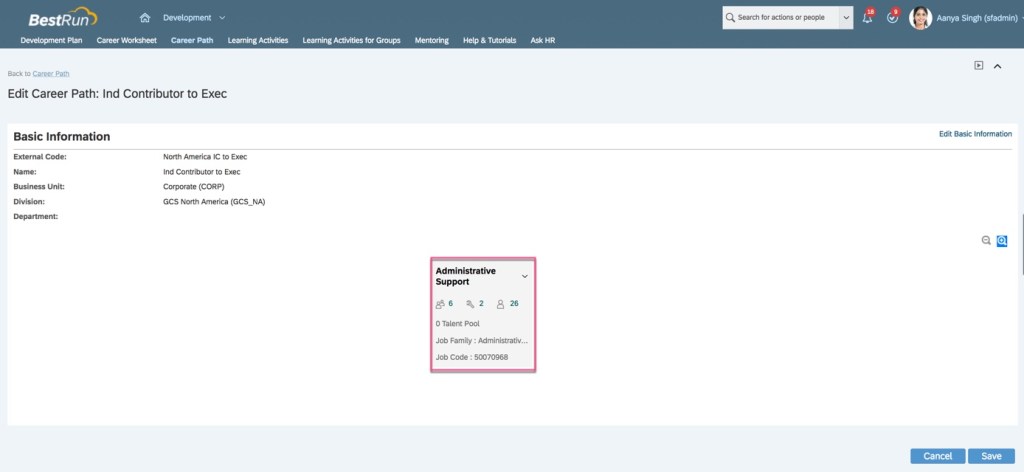
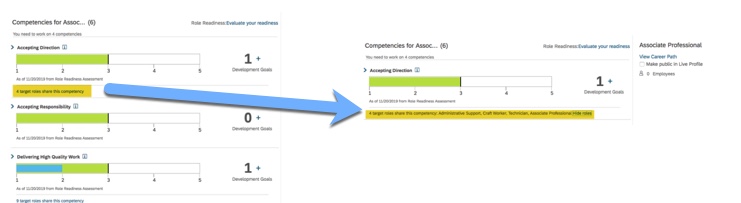
For each targeted role and current role, there is an count of the number of employees for each targeted role and current role.


When this feature is on, and the Employee Directory to be enabled in Provisioning, there will be a link to see the list of employees in this role.

If the directory is not enabled, you will see the number of employees but there will be no link to the list.
If you don’t wish to see the employee count for the number of employees in a targeted role, the Career Worksheet XML will need to be updated to change cws-people-role from “true” to “false”.
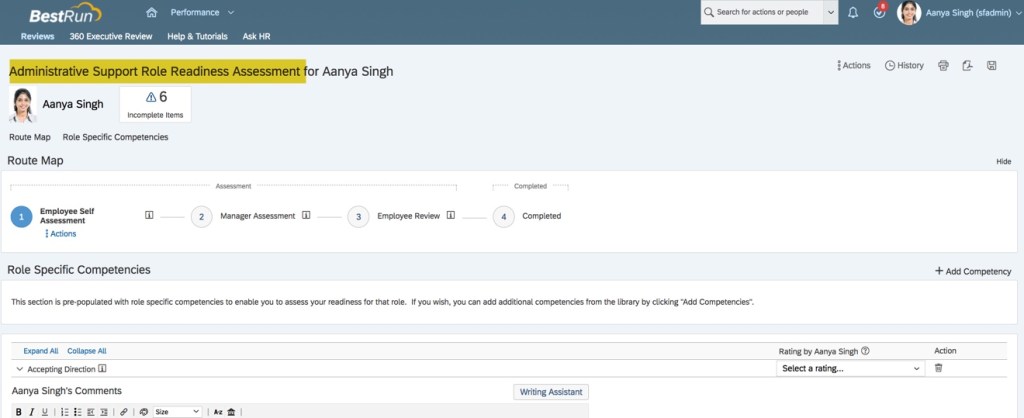
Additional Configuration in Career Worksheet XML for Role Readiness Form
A link to the role readiness form within the Career Worksheet enables an employee to launch the form and rate the needed competencies for a future role. To enable linking to the correct form, the role readiness form id must be identified within the Career Worksheet XML.
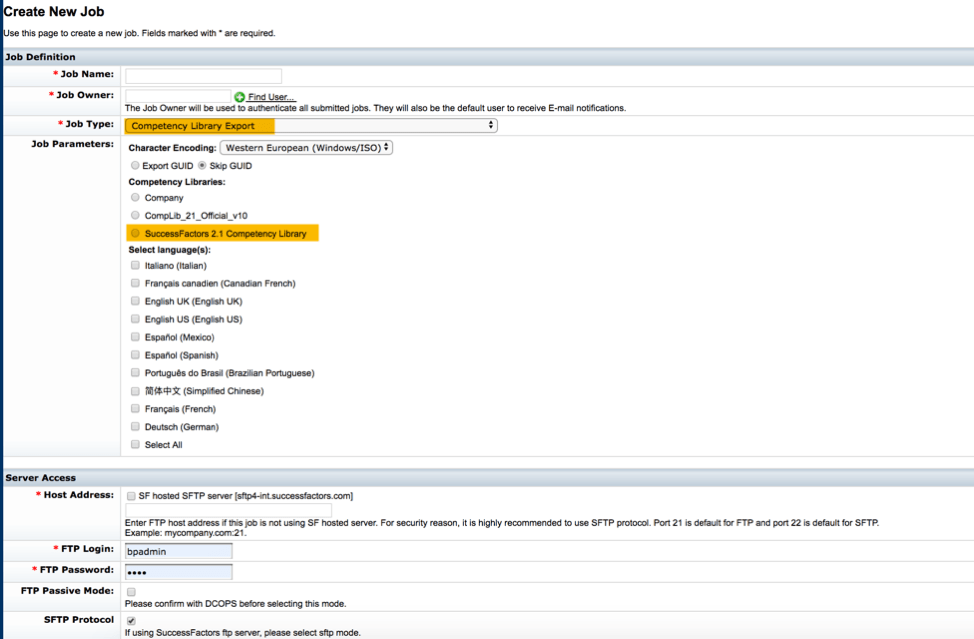
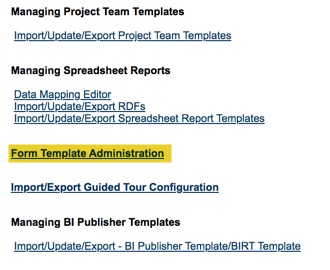
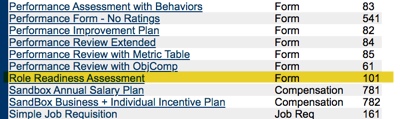
The Role Readiness Assessment form id may be found in Provisioning within the Form Template Administration section.

Go into Form Template Administration to see all of the form templates. Find the form id associated with the form that will be used to identify readiness for a role.

Using the form id associated with the Role Readiness Assessment template, add the self-assessment tag which includes the role assessment form id to the Career Worksheet XML.
The tag which includes the form id is inserted before the first field definition tag.

If the form is used for multiple languages, include an entry for each locale with the Role Readiness Assessment form ID. You may have multiple entries using the same form id ut only but only one self-assessment form may be specified.

Without the self-assessment tag in the Career Worksheet XML, the “Evaluate your Readiness” link will not appear in Career Worksheet.
Career Worksheet access also allows a user to the “User Search” permission and to make the details of the Career Worksheet publicly available. The content will be restricted based on the Career Worksheet template permissions, so do not give all roles (*) read access to all Career Worksheet fields as shown below.
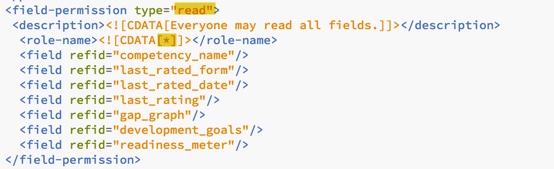
To prevent users from seeing the details of any other user’s Career Worksheet, the permissions should be restricted in the Career Worksheet template. Limit the read permission for these fields to just the employee, manager and HR roles.

Once the updates have been made to the Career Worksheet XML, import the template in order for the updates to be reflected in the Career Worksheet.
Succession Data Model Updates
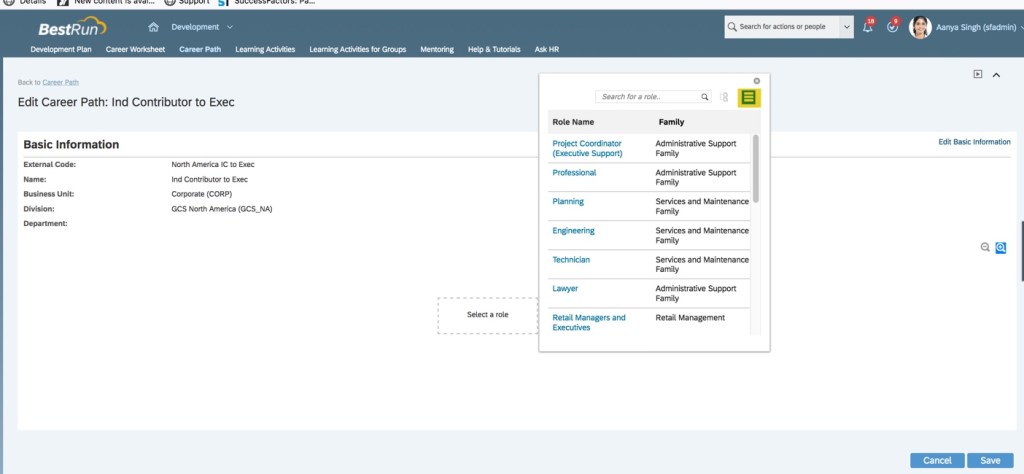
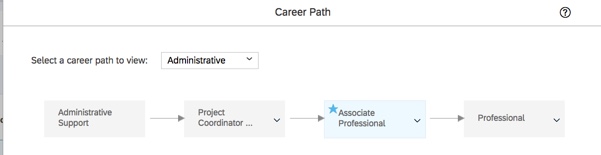
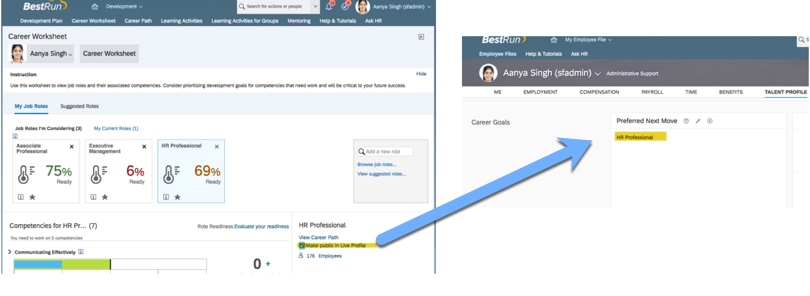
There is an indicator on the Career Worksheet which enables the employee to display any future role on their profile as a potential career move. On the Job Roles I’m Considering sub-tab, there would be a checkbox to make the future role public in their profile. This may be selected for each of the roles under consideration.

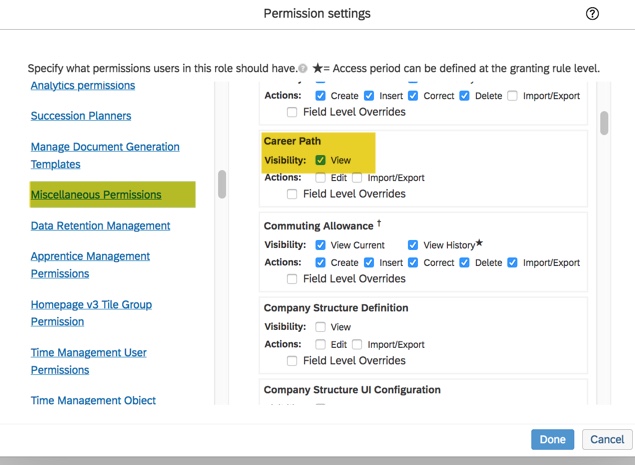
When the indicator is set for any of the target roles, the role will be visible on the employee’s profile is the background element is set up in the Succession Data Model, configured in People Profile and role based permissions granted.

Any or all of the future roles can be set to display on their profile.

Select each targeted role and set the indicator in order for the role to appear on the profile.
In order to enable this feature, the Succession Data Model must be exported from Provisioning in order to have the “preferredNextMove” background element added. The future job role on the Career Worksheet is used in the title field on the background element and is what will display in the profile.

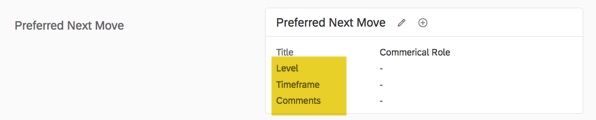
The background element’s Title field is required. Any additional fields that you wish to include on the background element should not be required. These additional fields are not displayed on the Career Worksheet. When the targeted role is selected on the Career Worksheet, it will then appear on the employee’s profile in the Preferred Next Move block. But any additional fields would be blank until the employee enters information. However these fields would not be seen on the Career Worksheet. It is probably best then to use only the Title field on the background element for Career Worksheet purposes and use another background element for Career Goals fields.
You may also relabel the background element; Future Roles, Career Goals, or any other name that is meaningful to your organization.
Here is an example of the background element that contains additional fields that are not required.

Any additional fields would appear on the block in the profile where they could be updated but would not reflect in the Career Worksheet.
Once the data element is added and the data model re-imported, the profile within the instance needs to include this element. Go to Configure People Profile to include this block.
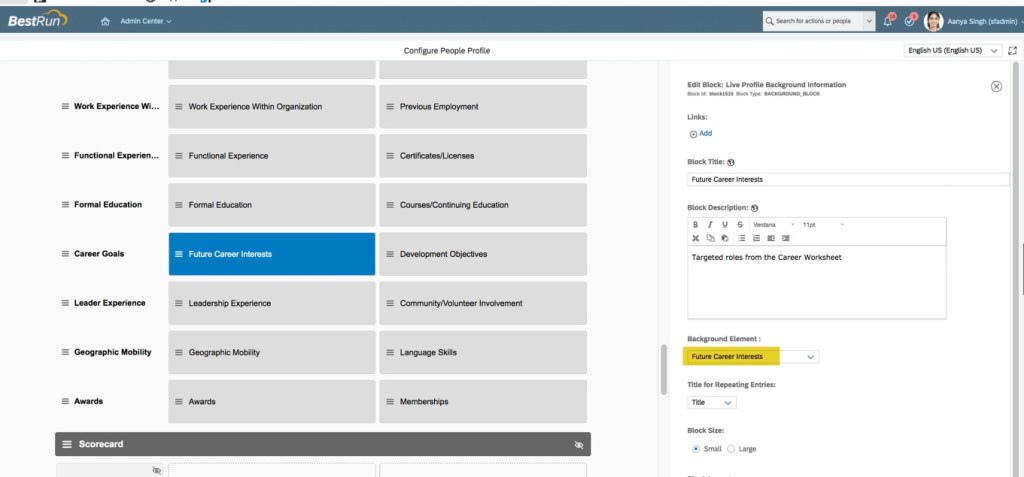
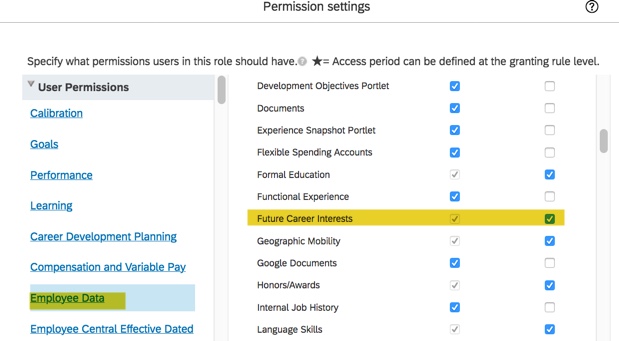
Add background element permission to any role that may edit or view this block on the profile.
Role Based Permissions for Employee
In addition to the field permission granted to users within the template, the user will also need access to the Career Worksheet and access to the content of the Career Worksheet in the Development module.
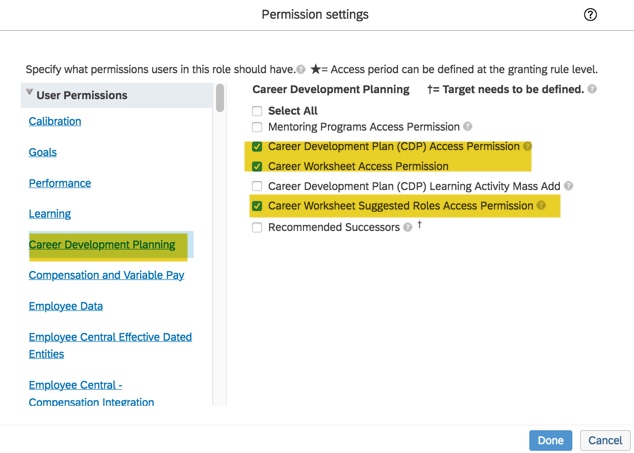
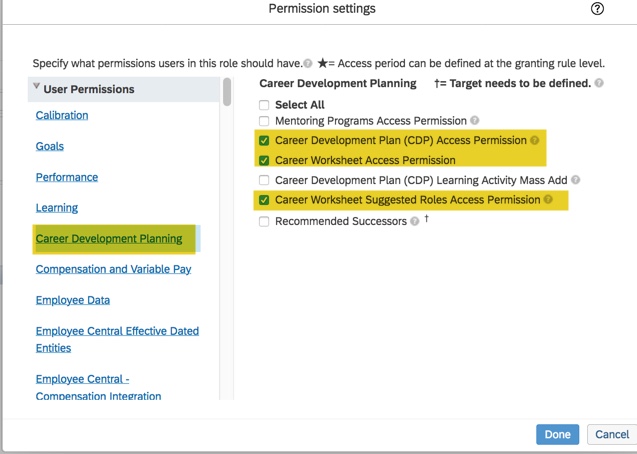
- Career Development Plan Access Permission allows access to Development.
- Career Worksheet Access Permission allows access to the Career Worksheet.
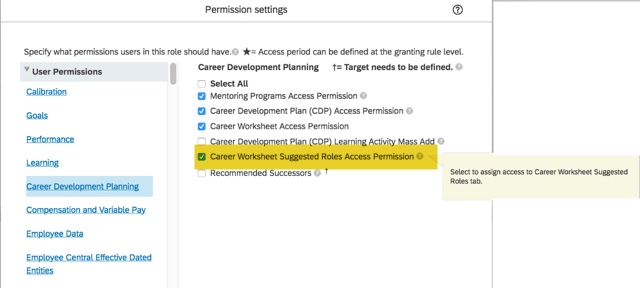
- Career Worksheet Suggested Roles Access Permission allows access to the Career Worksheet Suggested Roles tab.
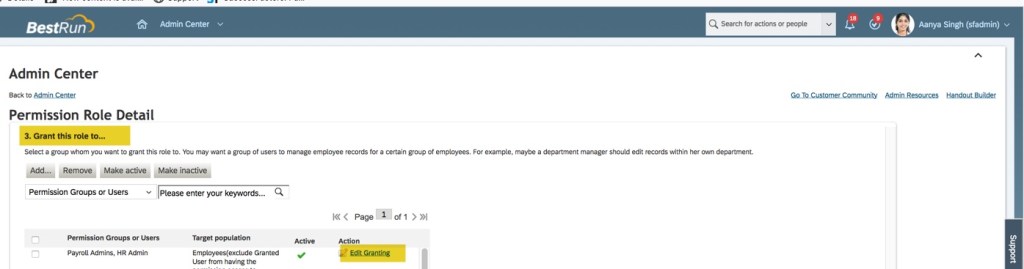
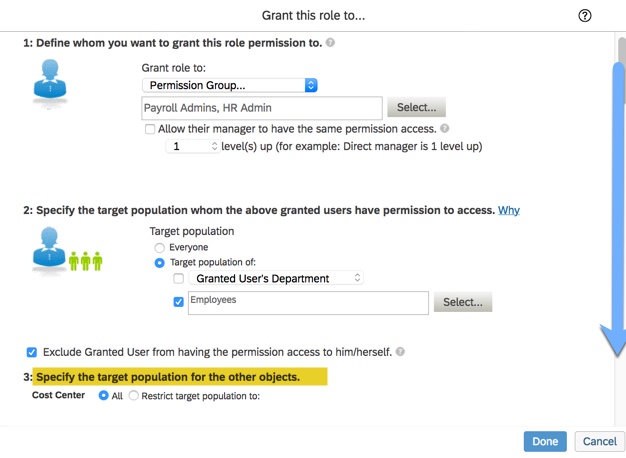
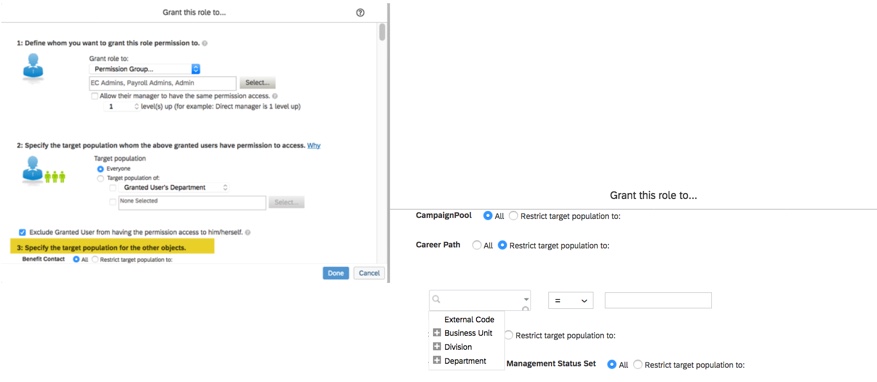
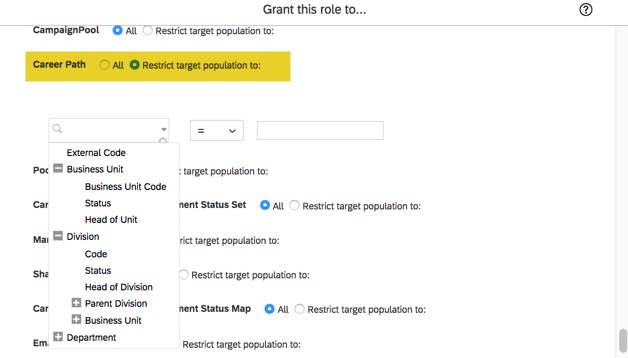
Grant the required role-based permission so that the permitted roles can access Career Worksheet under Development.
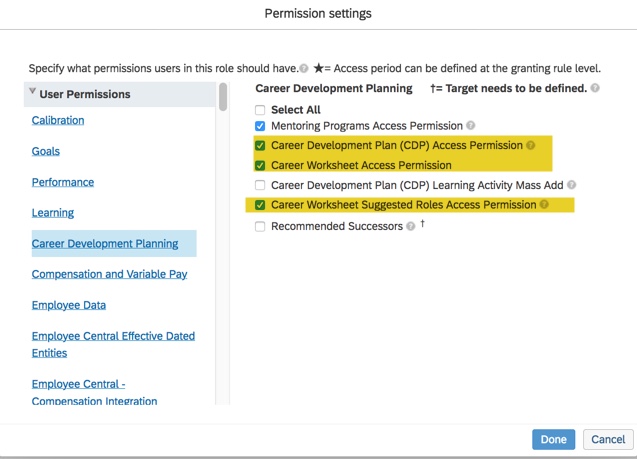
The employee role will need access to Career Development. Under the Career Development Planning User Permission, enable Career Development Plan Access Permission, Career Worksheet Access Permission, and Career Worksheet Suggested Roles Access Permission.
The employee role will need access to Career Development. Under the Career Development Planning User Permission section, enable Career Development Plan Access Permission, Career Worksheet Access Permission, and Career Worksheet Suggested Roles Access Permission.

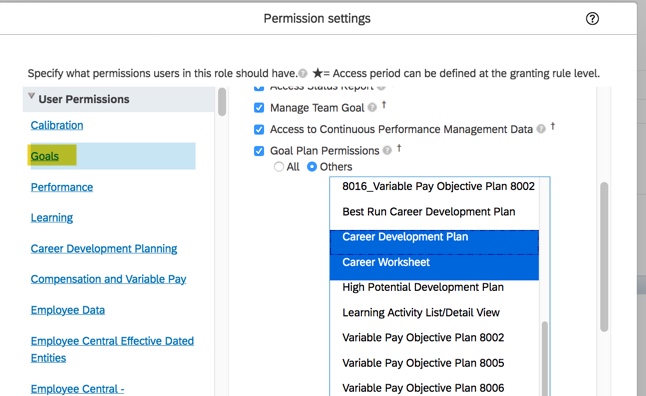
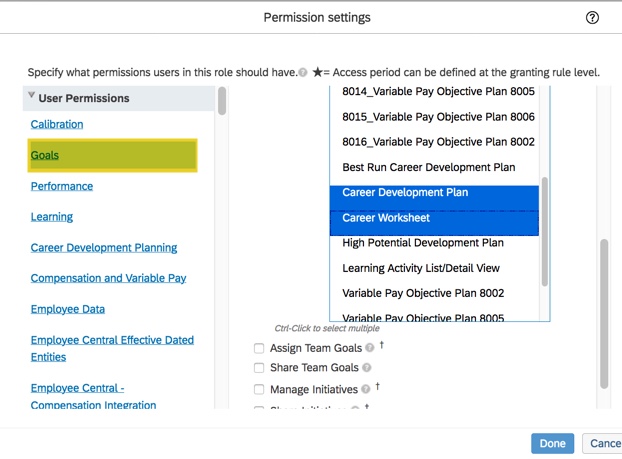
In addition to the Career Development Plan permissions, the employee will need access to the Career Worksheet. When the employee opens the Career Worksheet tab, they are not authorized to view the career worksheet plan without it. Under Goals, select the Goal Plan Permissions for the Career Worksheet.

The target population of the “Goal Plan Permissions” is ignored when viewing the Career Worksheet.

Career Worksheet access also allows a user to the “User Search” permission but the content will be restricted based on the Career Worksheet template permissions. To prevent users from seeing the details of any other user’s Career Worksheet, the permissions should be restricted in the Career Worksheet template.
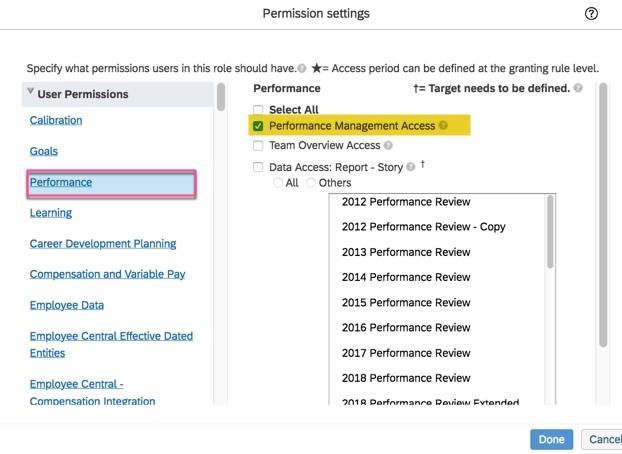
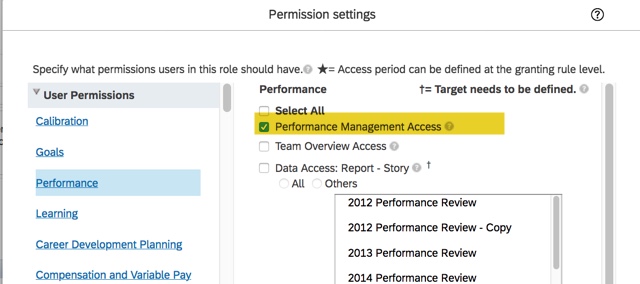
Performance Management Access permission is needed as well. Without it, “Evaluate your readiness” link will not appear on Career Worksheet when targeted roles exist.
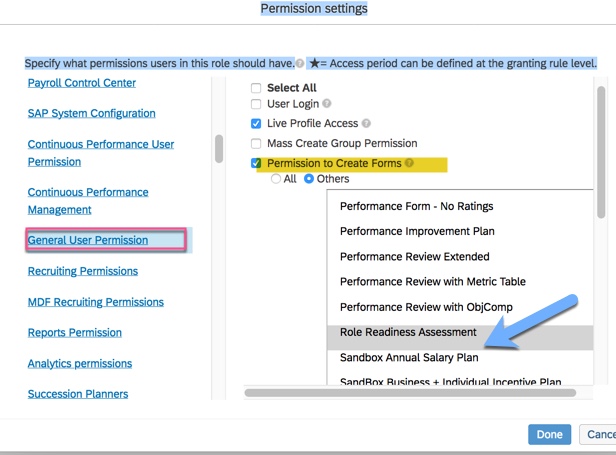
Now that the Career Worksheet is configured and permissioned, you are ready to create a Role Readiness Assessment form to be used within the worksheet. Check out the guide to set up the Role Readiness Assessment for more details.
For more information about the Career Worksheet and other talent management modules in SAP SuccessFactors, check out our book here!
Do you need help with your career worksheet or SuccessFactors Development implementation? Contact us at: info@worklogix.com