SAP has announced the latest updates and changes for SuccessFactors for the first half of 2023.
Preview release is on April 28 with the production release is scheduled for June 2. You can view the full set of documentation in the What’s New Viewer here. For full details on the release cycle, check out the SAP SuccessFactors official product updates blog.
For tips on how to manage a release, check out our blog here.
For your convenience, we’ve summarized the highlights of what’s new for 1H 2023 Career Development below.
Career Development
There are a few universal updates for Career Development that are reviewed below.
Career Worksheet – General Availability
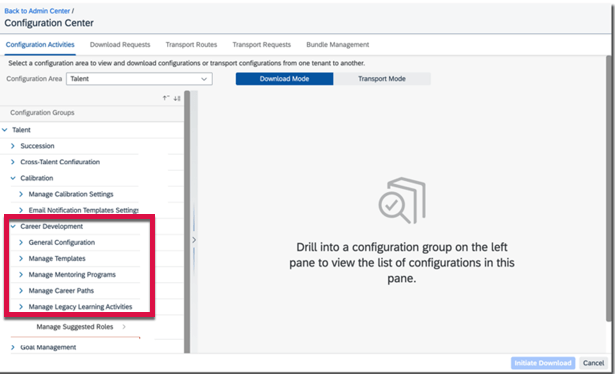
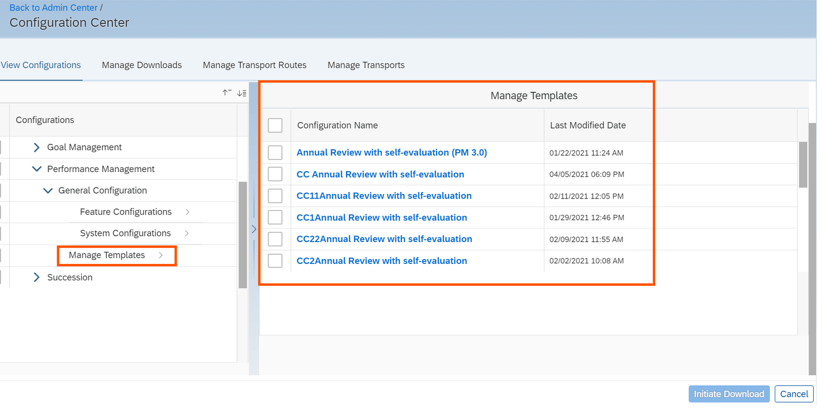
Career Development Configurations Available in Configuration Center
You can now view, download, and transport Career Development configurations using Configuration Center.
Configuration Center
New Action Available in Action Search
On a career worksheet, View my current role in Career Worksheet action is now available for use in the global search box. Users can enter the exact text of the action or select from suggested actions to navigate to the Career Worksheet page.
Current Role Action
The new action takes users directly to a selected page and eliminates multiple steps to get there.
Career Worksheet Data in Story Reports Now Limited to Target Population
The Career Worksheet data that users can view in Story reports, including current and target roles, is now limited to their target population.
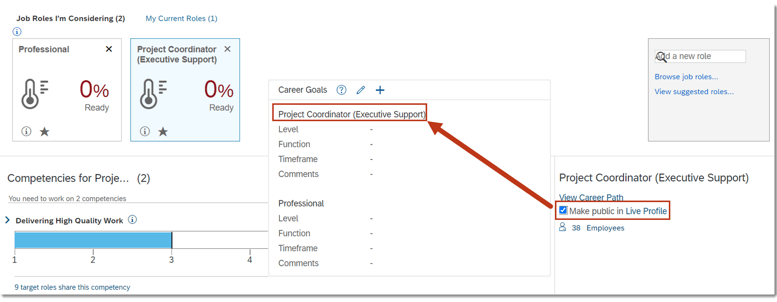
Changed Permission for Users to Show Target Roles in People Profile
Now a user only needs View permission (User Permissions>Employee Data>Preferred Next Move) in order to select the Make public in Live Profile checkbox in Career Worksheet to show target roles in People Profile.
Previously, View and Edit permissions were required. Now a user can select the option to show a role in Career Worksheet. The role then appears in the Career Goals block in People Profile.
Link to Career Goal Block
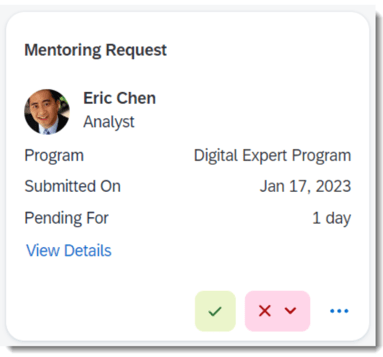
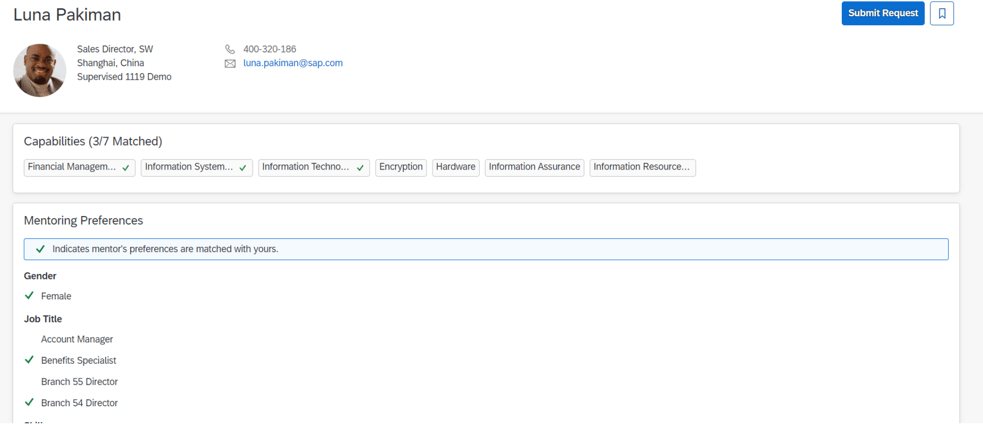
Mentoring – General Availability – Universal
Approvals for Mentoring Requests on the Latest Home Page
In an open enrollment or unsupervised mentoring program, Mentors can now accept or decline the mentoring requests sent by mentees in the Approvals section on the latest home page.
Accept or Decline Mentoring Requests
View More Recommended Mentors
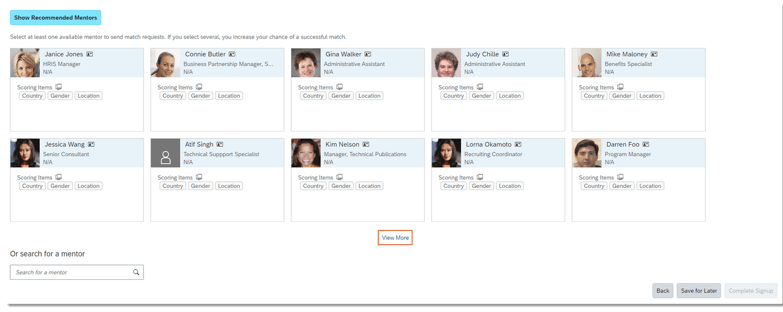
When a user signs up for a mentoring program as a mentee, they can now view up to 100 recommended mentors. Previously, only 10 mentors were recommended.
While signing up and choosing Show Recommended Mentors, now there will be two rows of recommended mentor cards with the View More link below the cards.
Recommended Mentors
Customize Mentoring Email Notifications
For any customized program type created with text replacement for a Mentoring programs, email notifications for a specific program type may be customized in Email Notification Templates Settings as well.
Customize Mentoring Emails
Approvals for Mentoring Requests on the Latest Home Page in iOS and Android Mobile Apps
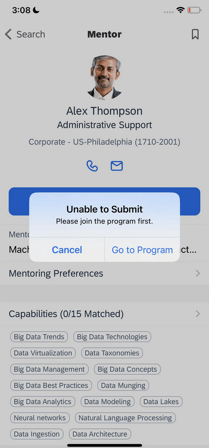
SAP SuccessFactors Mobile users can now search for mentors from a recommended mentoring program they haven’t joined in Opportunity Marketplace. Previously, they had to join the program first.
When a user wants to invite someone they found to be their mentor, choose Submit Request on the Mentor or Bookmarks page. They will be prompted with a message guiding them to join the program first.
Mobile Message when Joining
After joining the program, users can submit a mentoring request to their preferred mentor directly on the page.
Highlights are identified by module and the type of change.
Universal- for modules enabled, universal means no steps are required to have access to the new functionality. These features are automatically made available.
Admin Opt-In – the admin must enable the new feature, usually in Admin Tools
Admin Opt-Out – the admin must disable the new feature, usually in Admin Tools
Provisioning Opt-In and Opt-Out require a Partner or Product Support request For your convenience, we’ve summarized the highlights of what’s new for 2H 2022 Performance Management below.
Latest Goal Management
The updates are for the latest Goal Management are admin opt-ins. The new features are described below. These features are also now available in iOS and Android mobile apps.
General Availability – Admin Opt-Ins
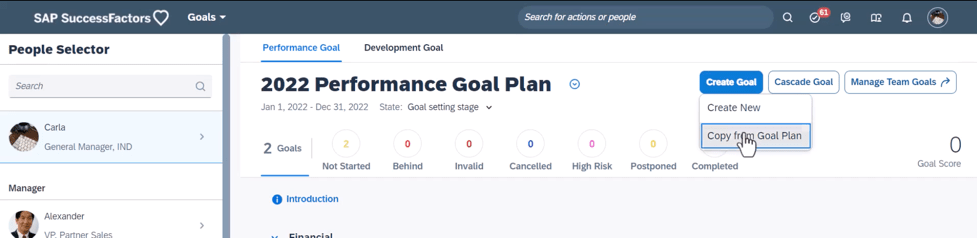
Copy Goals from Goal Plans using the latest Goal Management
Users can now copy personal goals from their own goal plans as a new option to create goals.
Requirements to use this feature include:
The TGM/CDP Goal Transfer Wizard feature is enabled
The create permission is granted in XML configurations
The write permission for goal fields is granted
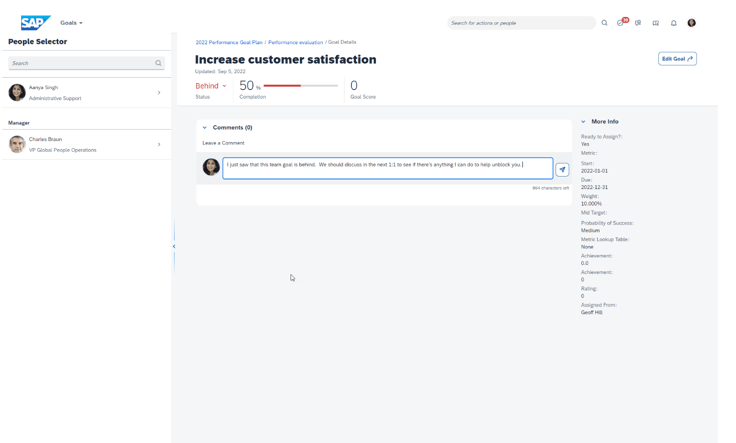
Leave Comments on Goals when using the latest Goal Management
Users can now add, edit, or delete comments on their own goals or those of their direct reports. In legacy Goal Management, comments are shown in the goal list or on the goal editing page.
Copy form Goal Plan
In the latest Goal Management, the updated comment feature is supported and comments are shown on the goal details page.
Comments Section on Goal Details
Comments can also be managed in Performance Management forms, 360 Reviews forms, and Career Development.
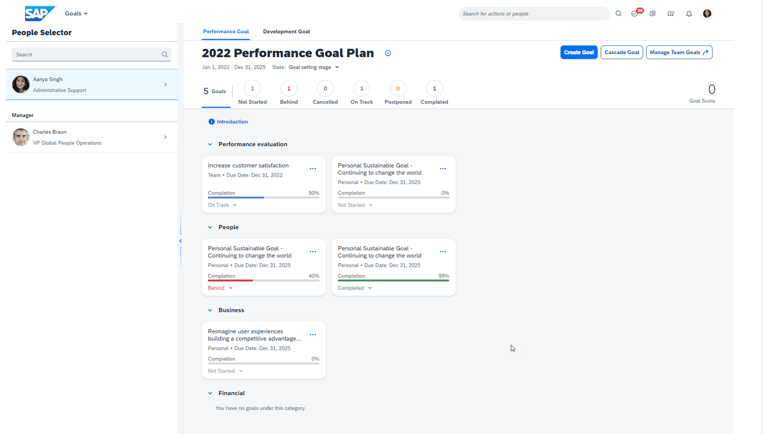
Team Goals Now Available when using the latest Goal Management
Users can now create, manage, and be assigned team goals in the latest Goal Management.
Users may:
Create, edit, or delete team goals
Access team goals from their own goal plan
Assign/unassign team goals to people from their team or people found via search
Share/unshare team goal ownership with others
If configured, users can manage team goals assigned to them in Continuous Performance Management.
Team Goal Landing Page
Users can also manage team goals assigned to them in Performance Management forms, 360 Reviews forms, and Continuous Performance Management.
Group Goals are no longer supported.
These new features are available in iOS and Android Mobile Apps as well.
Performance Management
The majority of the performance management updates involve Multi-Rater 360 forms and Calibration. However there are a few goal and performance related updates that we will begin with.
General Availability – Universal Updates
SMART Goal Wizard not available when using the latest Goal Management
It will not be possible to use the SMART Goal Wizard when adding a goal to a performance form. This feature currently is not supported. Even if you enable the SMART Goal Wizard setting in Form Template Settings this option will not appear when adding a goal.
Enhanced OData Entities for Querying Development Goal Sections on Forms
You can now use APIs to query development goal sections and goal items on Performance Management forms. The FormContent, FormPMReviewContentDetail, FormObjective, FormObjectiveDetails, and FormObjectiveSection APIs. Previously these APIs were used to query performance goal sections and goal items only
General Availability – Admin Opt-In
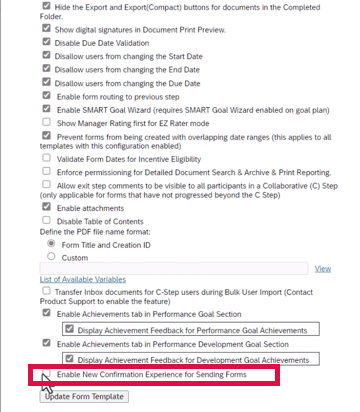
Confirmation prior to Sending Forms
When users send a form, a message popup appears and allows them to confirm the action.
In the advanced settings for the template, there will be a new option to enable the new experience as seen below.
New Setting Available
A pop-up will appear for a user that is sending a form back or forward a step to allows the user to confirm the action. It is also applicable when signing a form, rejecting form or sending a copy of a completed form.
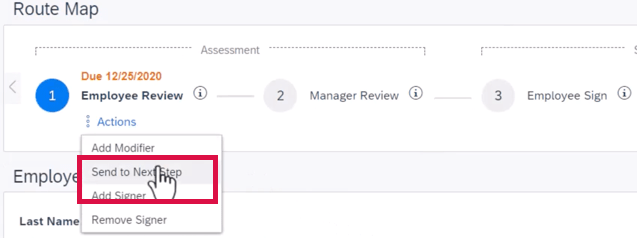
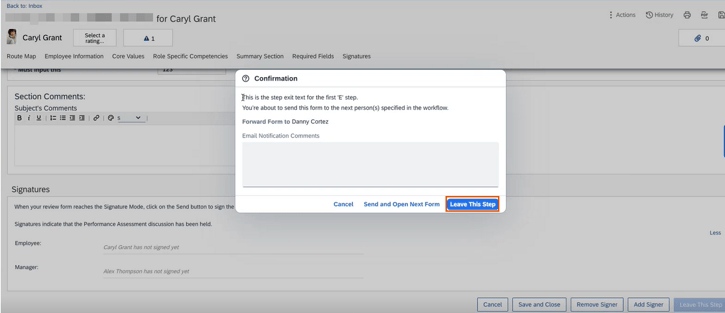
In the route map on the form, clicking Actions in the current step, will display a dropdown list.
Actions on Route Step
Selecting the action will cause a pop-up to display.
Confirmation Pop-up
Continuous Performance Management
General Availability – Universal
Updated Character Count for Continuous Feedback Topic Field
In the previous version, when users chose the “send” button on a form, a confirmation page appeared.
The character count for the Continuous Feedback topic field to 200 characters.
Replacement of Continuous Performance Management Legacy Version with the Continuous Performance Management Latest Version
The legacy version of Continuous Performance Management (CPM) will reach End of Maintenance on May 20, 2022 and will be retired as of May 24, 2024. The replacement is the latest version of CPM, initially released in 2H 2020, that is currently available in the Upgrade Center. If no action is taken, your company will be automatically upgraded to the latest version after the retirement date.
General Availability – Admin Opt-Ins
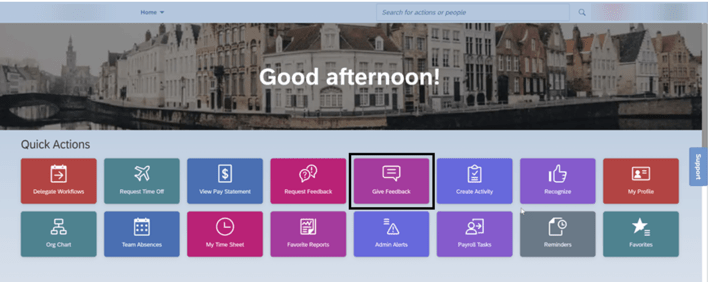
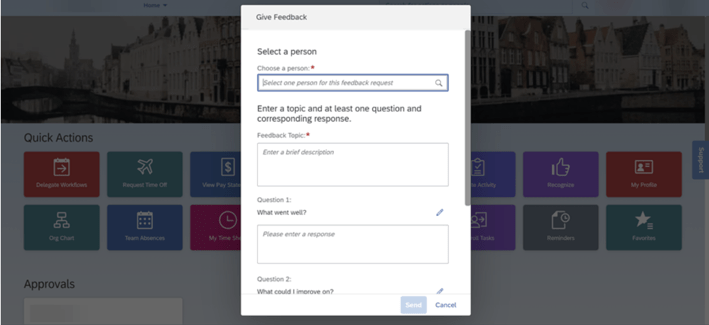
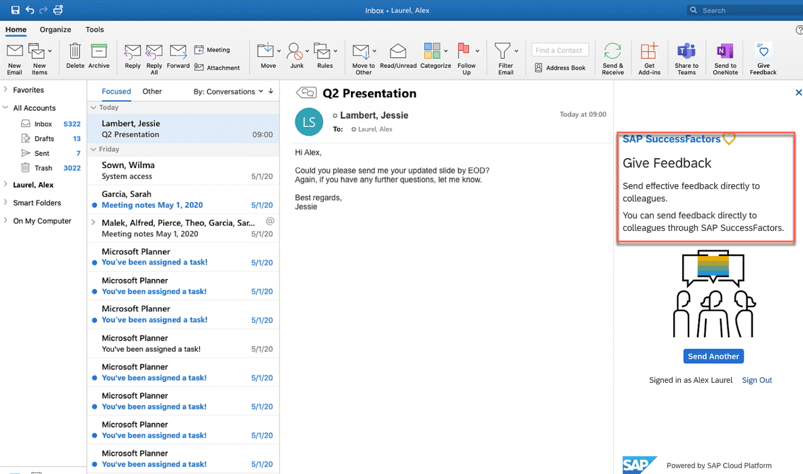
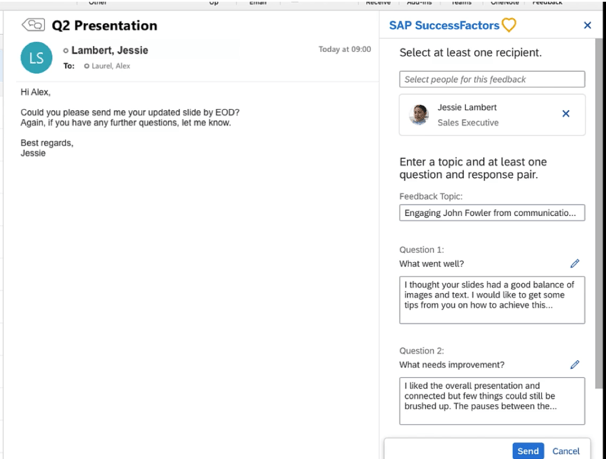
New Quick Action to Give Feedback on the Latest Home Page
Employees can now choose to Give Feedback from the Quick Actions section on the latest home page.When the Give Feedback is selected, the user can search and select one person, input a topic, and provide feedback to the other user.
Give Feedback from Quick Actions
Once selected, the user may select the person, feedback topic, and questions.
Selections for Feedback
OData v4 API Continuous Feedback for the Latest Version of Continuous Performance Management
You can now use the Continuous Feedback OData v4 API with the latest version of Continuous Performance Management.
The OData v4 API for Continuous Feedback has been added to support third-party integrations and extensions for the latest version of Continuous Performance Management (CPM).
Calibration
General Availability – Universal
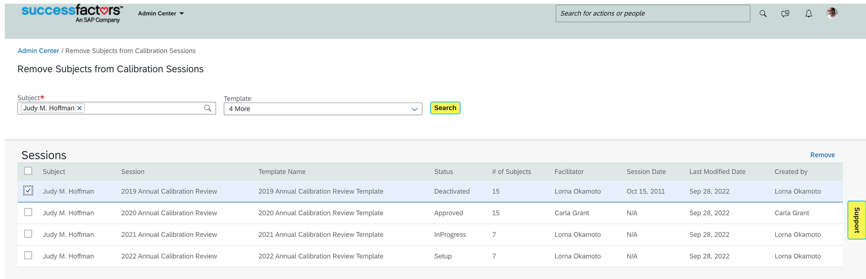
Remove Subjects from Calibration Sessions
There is a new admin tool, Remove Subjects from Calibration Sessions, used to search for the sessions where an employee has been included as a calibration subject.
When the employee is included in many sessions, you narrow down the search results by selecting a calibration template name. Then, only the sessions created with the specified template are listed.
Remove Subjects from Calibration Sessions
General Availability – Admin Opt-In
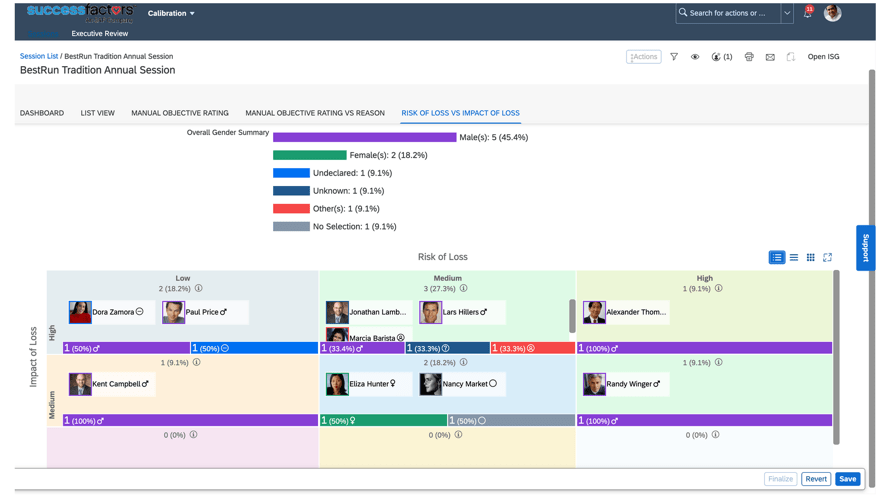
More Gender Values in Calibration Views
Male and Female were supported for visualization in Calibration Views. Now there are the other three standard values: Unknown, Undeclared, and Others.
The gender icon is displayed next to the employee’s name. When the gender of an employee hasn’t been specified in the system yet, it will be indicated as No Selection.
Gender Icons
The gender bars in the matrix grid view are now rendered in different colors:
Male: Violet
Female: Green
Undeclared: Blue
Unknown: Dark Blue
Others: Red
No Selection: Grey
Matrix Grid View
Enhancement to Guidelines Enforcement During Mass Finalization
There are more guidelines enforcement scenarios that are supported when you finalize multiple sessions at one time.
More than one rating is included in a guideline defined with a rating group
An operator other than “=” is configured in a guideline defined with a rating range
Not all ratings have a guideline
No longer are guidelines enforced only when finalizing an individual calibration session. With the latest release, multiple sessions can be finalized as long the distribution of subjects doesn’t meet one of the above-mentioned definitions. Distributions would need to be adjusted in order to finalize all of the sessions.
Previously, these guidelines were enforced only when you finalized individual sessions.
360 Reviews
There are several updates for 360 Reviews. Highlights are described below.
General Availability – Universal
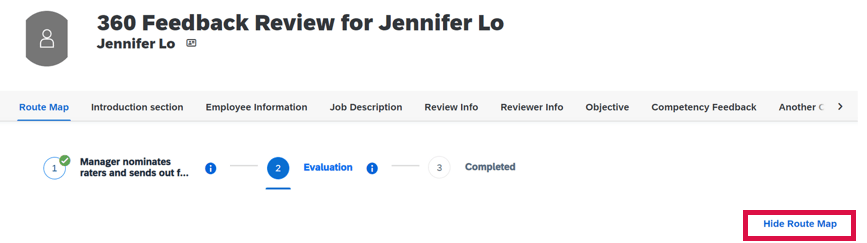
Hide Route Map on 360 Reviews Forms
Similar to PM forms, a route map may be collapsed on the form.
This is done through the advanced settings of the 360 Review template by selecting “Hide Route Map on the Form”. Once enabled, when viewing the form, clicking on Hide Route Map will hide the route map from view on the form.
Visible Route Map
Clicking on Hide Route Map will collapse the route map from view on the form.
Click Show Route Map
Hidden Route Map
Required Fields Marked on 360 Reviews Forms
Fields defined as required are now identified with red asterisks on forms in the Evaluation stage. This now matches how required fields display in PM forms.
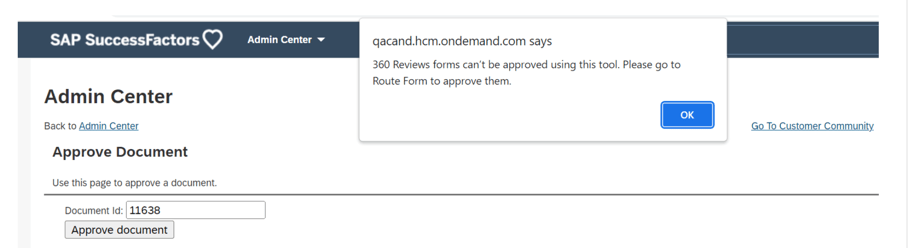
Updated Messages for Users Approving or Routing Forms Using Unsupported Tools
In the Approve Form or Route Signature Stage Form tool, once users enter document IDs and chose the buttons to approve or route forms, they weren’t informed that these tools don’t work for 360 Reviews forms.
Now if a user tries to approve or route 360 Reviews forms using unsupported tools in Admin Center, a message will display reminding them that these tools aren’t supported and are shown the correct tool to use.
Messaging when Routing using Unsupported Tools
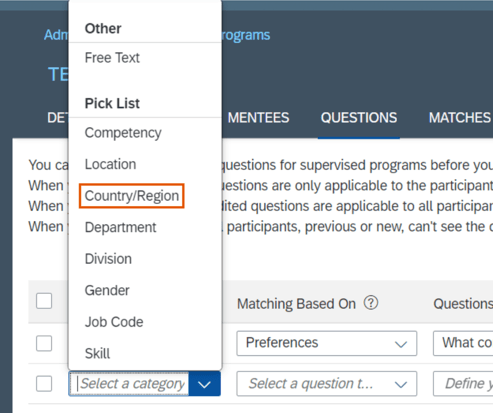
“competency-filter” Attribute Supported in 360 Reviews Forms
The competency-filter attribute can be used to control what competencies users from different participant categories can view and rate on 360 Reviews.
Within the meta-cat element in the meta section of the form XML, define different participant categories in order to:
After the form is launched, in the Show Assignments dialog, participants belonging to the categories allowed to rate a competency are automatically selected for that competency. However, users can still select any competencies for a participant that weren’t initially included in the competency-filter defined for the participant’s category.
If a participant’s category is changed in the Modify stage, the participant’s competency assignment will be automatically updated to comply with the new category’s competency-filter.
If a participant is added in the Evaluation stage, the participant’s competency assignment will follow the competency-filter defined for the participant’s category.
If a competency is added to the form, filters including or not including this competency will apply to related competency assignments.
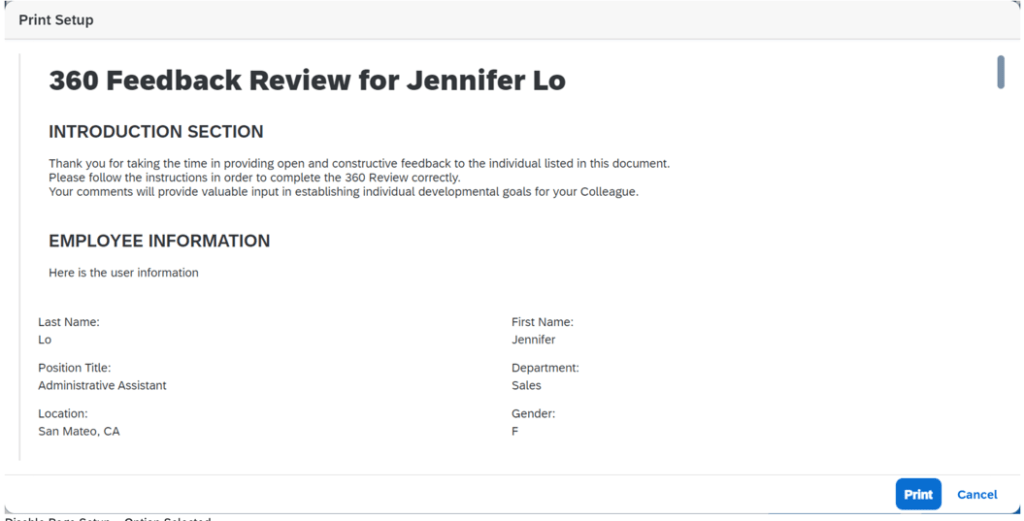
Disable Page Setup When Printing 360 Reviews Forms
It is now possible to prevent a user from specifying to print the Summary View or 360 Executive Review form. Instead the form will be printed in its entirety.
In Form Template Settings there is a new option – Disable Page Setup. When enabled, users aren’t allowed to specify the sections to print and the entire form will print.
Print Setup without Section Option
Show Behaviors in Summary Section by Enabling Rate-by-Behavior
When behaviors are associated with competencies, it is now possible to show behavior names and ratings in the Summary section.
To enable rate-by-behavior, set use-behavior to true and behavior-mode-opt to 0. In the Summary section, add the show-behaviors-in-summary element.
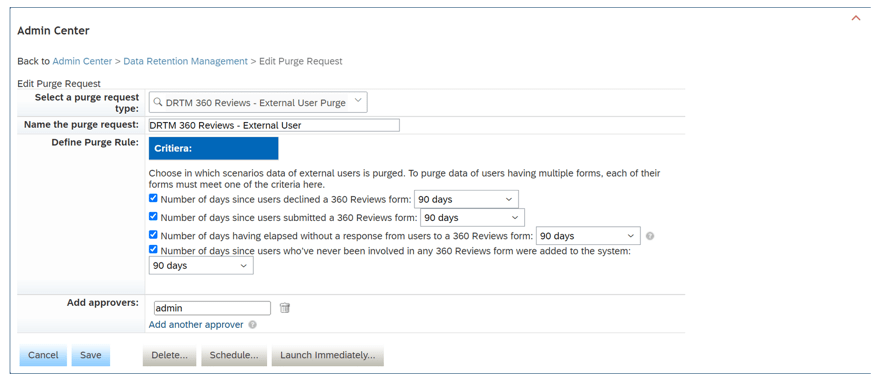
Purge Data of External Users in 360 Reviews
There is a new purge request, DRTM 360 Reviews – External User Purge used to delete data of external users no longer needed in 360 Reviews forms.
The External User Purge for 360 Reviews can be defined by the following purge rules.
A specified number of days have passed since the user declined a form
A specified number of days have passed since the user submitted a form
A specified number of days have passed and the user hasn’t responded to a form
A specified number of days have passed since the user who has never been involved in any form was added to the system
To successfully purge a user’s data who has multiple 360 Reviews forms, each form must satisfy one of the first three criteria.
360 Reviews External User Purge Request
Deprecation of 360 Reviews v11 Version
The 360 Reviews v11 version will reach the end of maintenance on May 19, 2023 and will be deleted on November 17, 2023.
360 Reviews v11 Version is being depreciated because 360 Reviews – SAP Fiori Version is generally available and includes the majority of features and functions that were available in 360 Reviews v11. In addition the SAP Fiori version has an enhanced user experience and updated visualizations.
If you’re using 360 Reviews v11 Version, please migrate to 360 Reviews – SAP Fiori Version.
Career Development
There are a few universal updates for Career Development that are reviewed below.
Career Worksheet – General Availability – Universal
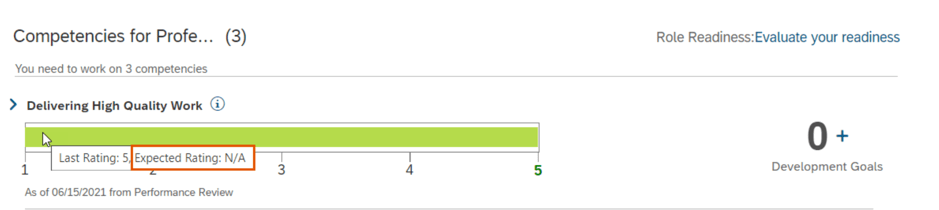
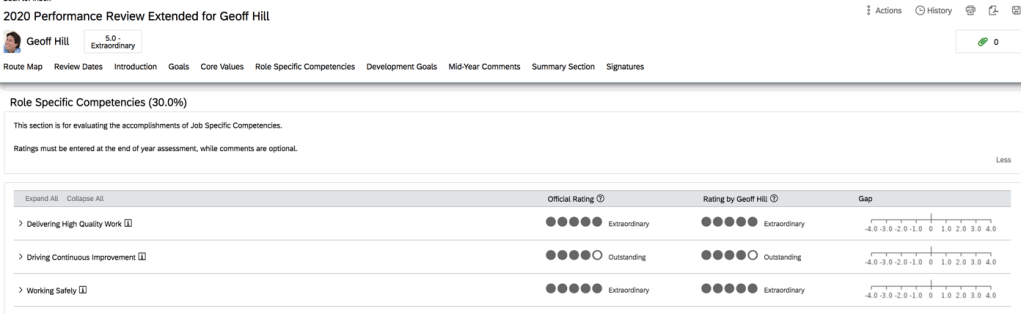
Enhanced Competency Gap Graph in Career Worksheet
Previously, the gap graph was shown only when a competency had both a last rating and expected rating. With the latest release, if a competency has either a last rating or expected rating, a horizontal bar graph for ratings is shown below the competency.
In the example below, the competency has an expected rating shown in blue with no last rating.
Gap Graph
In the previous version, no horizontal bar graph was available if both ratings were not available.
Career Worksheet – General Availability – Admin Opt-Ins
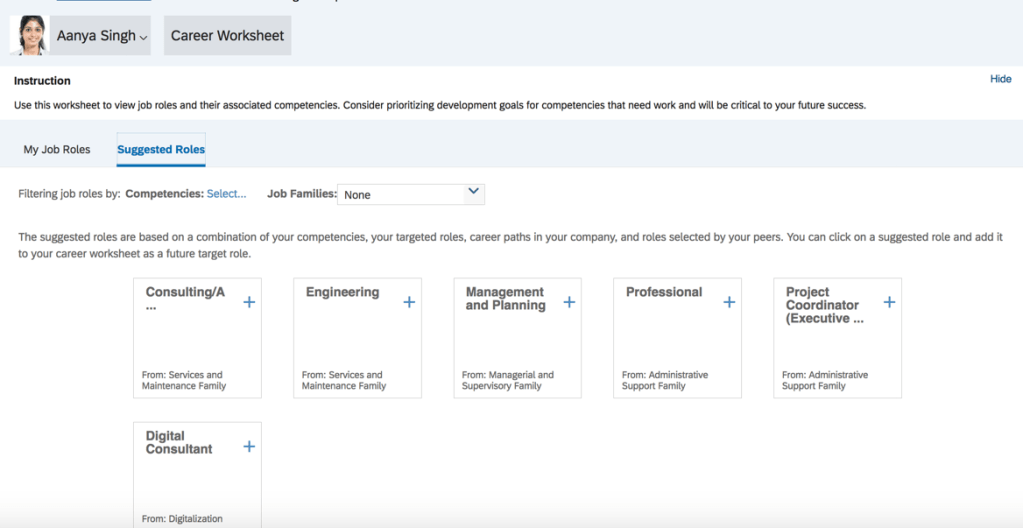
Career Explorer Now Generally Available
Previously, Career Explorer was only available for customers in an Early Adopter Care (EAC) program. It is now generally available.
Career Explorer recommends career opportunities to employees based on the career paths of people who are similar to them in the organization. It provides a means for employees to find relevant opportunities in their organization outside their hierarchy, career moves of people who are similar and paths that they may not have considered.
For a recommended role, an employee can expand the card to see a career path in a lineage chart and view job profiles and recommendation reasons. The role may be added to Career Worksheet to do gap analysis for personal skills, or dislike the role to further personalize subsequent recommendations.
Recommended roles are refreshed every two weeks or when there are enough delta changes to the data. This allows employees to visit the Career Explorer page regularly to explore new recommendations.
Career Explorer Page
Mentoring – General Availability – Universal
Country/Region Picklist Available for Mentoring Matching Questions
A “Country/Region” picklist is now available in the question category to use for automatic matching. Matching rules can be created to allow mentees to define their preferred country/region when signing up for a program, and mentors’ country/region information is pulled from their profile data.
Country/Region Picklist for Mentoring
Mentoring Program Available in Cross Domain Table Reports
Mentoring Program is now available as a domain in Cross Domain reports in Table reports. This can be used with Performance Management, Goal Management and Employee Profile domains to gather mentoring program related data.
In Conclusion
We have now covered the highlights of the PM related updates for 2H 2022.
For your convenience, we’ve summarized the highlights of what’s new for 1H 2022 Succession and Career Development below.
Career Development
General Availability – Universal Updates
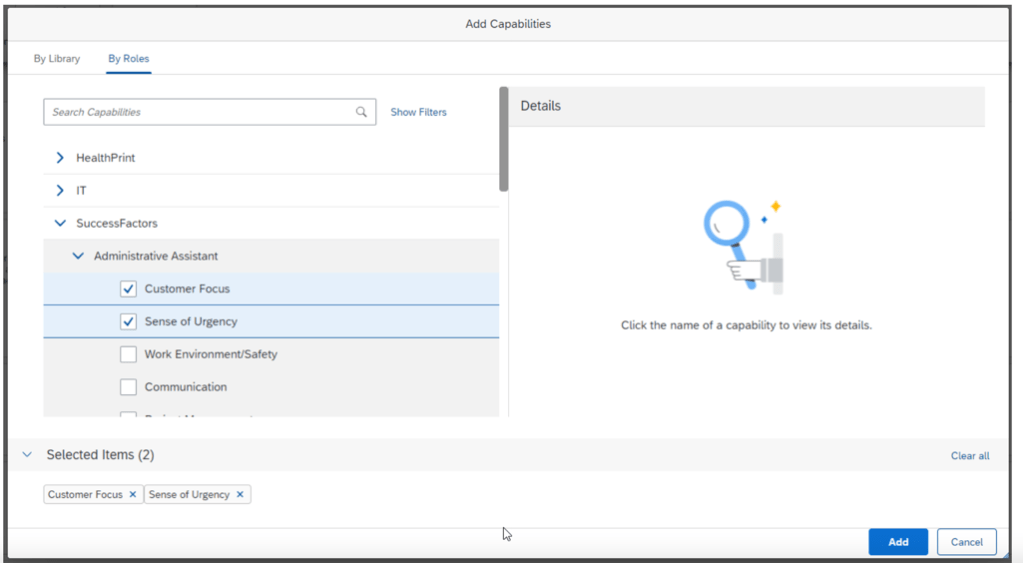
Use Capability Picker in Job Profile Builder, Performance & Goals, and Succession & Development
Users can now use the Capability Picker to add competencies in Job Profile Builder, Performance & Goals, and Succession & Development.
Capability Picker replaces New Competency Picker, with a new UI that includes employees’ competencies, behaviors, and skills within an organization.
Career Development
Users can use the Capability Picker to add competencies to development goals in the latest Goal Management.
The latest Goal Management must be be enabled and development goal plan XML the show-competency-browser switch is configured.
Succession Planning
Capability Picker can be used to select competencies by competency libraries or job roles and search for competencies using keywords.
Job Profile Builder must be enabled.
In the Talent Search Settings in Admin Center, select Enable Capability Picker.
Here is an example of Capability Picker with a search box and a hierarchy structure of capabilities.
Adding Capabilites
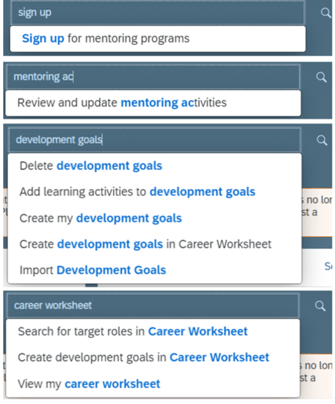
New Actions Available in Action Search
Additional Mentoring, Development Goals, and Career Worksheet actions are now available in the global search box.
Users can enter the text of an action or select from suggested actions to get to the selected product page.
Sign up for mentoring programs
Review and update mentoring activities
Update status of development goals
Add learning activities to development goals
Delete development goals
Search for target roles in Career Worksheet
Launch role readiness assessment in Career Worksheet
Create development goals in Career Worksheet
Add learning activities in Career Worksheet
These new actions take users directly to product pages.
Action Searches
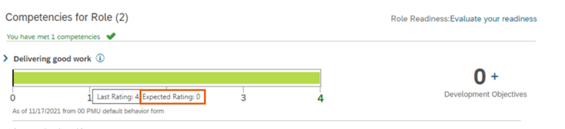
0% Expected Rating Now as the Lowest Rating in Career Worksheet
If a competency’s expected rating is set as 0% in Manage Job Profile Content, the expected rating now appears as the lowest rating in the rating gap chart in Career Worksheet.
Previously if no expected rating was set, “N/A” would display as seen below.
Prior Version with N/A Expected Rating
With the latest release, it is now possible to differentiate between “N/A” and 0% expected rating.
New Zero Expected Rating
Job Profile Builder must be enabled.
Enhanced Permission Control for Viewing Roles and Competencies
Before this release, users could view all the roles and competencies regardless of user permissions in Career Development.
Now users can only view the roles and competencies to which they have permissions in Career Development.
This permission control has been enhanced for viewing job roles and competencies within multiple features in Career Development:
Development Goals
Career Worksheet
Career Path
Mentoring
Users within the target population for certain job roles and competencies can view the roles and competencies on Career Development pages.
Job Profile Builder must be enabled.
Permission control is applicable in Development Goals, Career Worksheet, Career Path V2, and Mentoring. More details are explained below.
Development Goals
Creating, editing and viewing development goals in Career Development or People Profile, users can view the competencies based on their permissions. If behaviors are mapped to competencies, the same permission control applies.
Using OData APIs when creating, updating, deleting or querying,development goals, users can create, update, delete or query the competencies that they have permission for.
Career Worksheet
Users can view their current roles and suggested roles that they have permission for.
Browsing or searching for job roles, user can view the job families and roles that they have permission for.
Viewing the career path of current or target roles, users can view the job roles to which they have permissions.
Users can view all competencies and behaviors (if configured) of the current and target roles in the gap analysis charts based on their permissions.
When creating development goals for competencies, users can view the competencies in the goal creation dialog box based on their permissions.
Users can add learning activities to the competencies based on their permissions.
In Suggested Roles when filtering job roles by competency, users can view and select the competencies to which they have permissions.
Career Path V2
Users can view the job roles to which they have permissions. Administrators can manage the job roles to which they have permissions.
Mentoring
Program participation may be limited by selecting dynamic groups. Upon sign up to a mentoring program, the users within the groups can view and select picklist options only for their group in the signup form.
General Availability – Admin Opt-Ins
Create and Edit Goals in Non-Goal Management Modules
It is now possible to try out the latest Goal Management in non-Goal Management modules:
Career Development
Succession
Performance Management
Multi-Rater
People Profile
Continuous Performance Management
Creating or editing a goal in one of these modules, the user is prompted with a dialog with new UIs offered by the latest Goal Management.
Creating Goal
Mentoring
General Availability – Universal Updates
There are several universal updates for Mentoring.
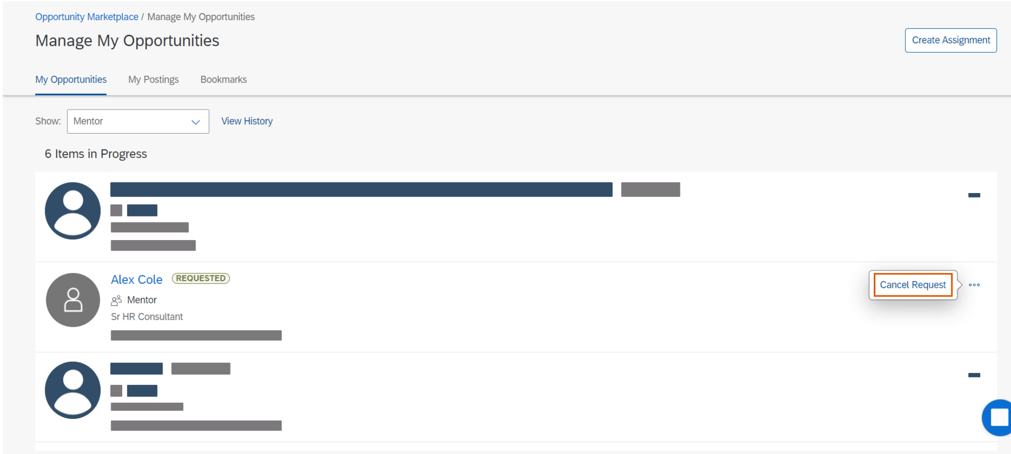
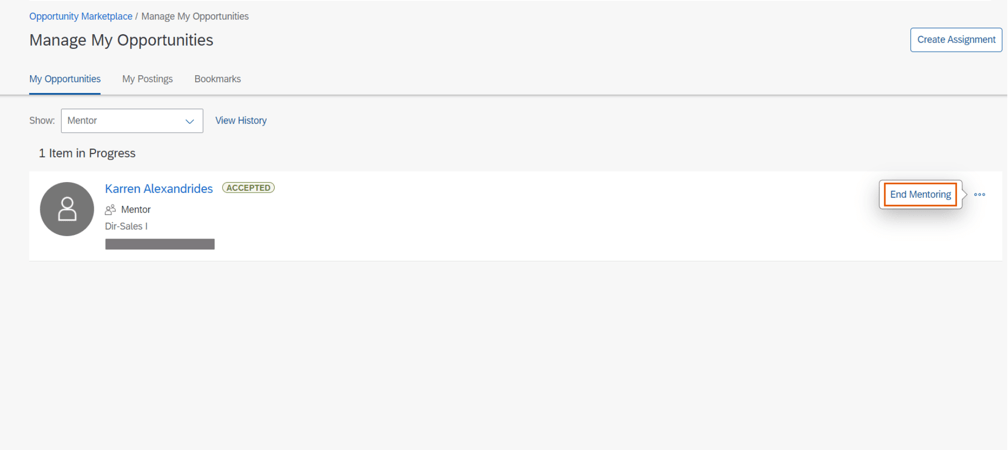
Cancel Request and End Mentoring on Manage My Opportunities
On the Manage My Opportunities page, users can now cancel the mentoring request that they made directly in Opportunity Marketplace, without navigating to other product pages.
Cancel Mentoring Request
If a mentee is already connected to a mentor it is now possible for them to end the mentoring relationship on their My Opportunities tab.
End Mentoring Relationship
Text Replacement for Mentoring in Opportunity Marketplace
User created customized mentoring text is now available in Opportunity Marketplace.
This includes mentoring, mentoring program, mentor, mentee, including plurals and uppercases at the program level.
Previously:
Mentor Labels
Now:
Customized Labels
Recommended Mentors and Mentoring Programs Available on iOS and Android Mobile Apps
In iOS and Android SAP SuccessFactors Mobile apps, employees may get recommended mentors and mentoring programs in the Connect with People section.
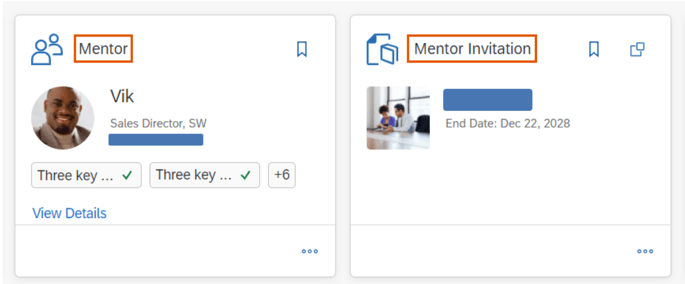
Mentor Details Page in Opportunity Marketplace
Opportunity Marketplace now has a Mentor Details page. Users can perform a variety of tasks such as viewing details of recommended mentors, bookmarking mentors, submitting and canceling mentoring requests, checking mentoring status, and ending mentoring relationships.
Mentor Details Page
Mentoring – Admin Opt-Ins
Qualtrics Feedback Opportunity for Mentoring Program Completion
Intelligent Services events can be used to send employee information to Qualtrics in order to send a Qualtrics feedback survey to all of the mentoring program participants when the program ends.
Manage Qualtrics Integrations in the Admin Center now includes the Complete a Mentoring Program option in the Event Name field’s drop-down list for Talent.
To use this feature requires a Qualtrics Employee Experience license so that you can create Lifecycle projects. You also need to integrate SAP SuccessFactors with Qualtrics, and enable Intelligent Services and Integration Center.
Succession
Enhanced Permission Control for Searching Positions by Roles and Families
In the previous version, you could access all the job families and roles regardless of permissions.
In the current version, you can only view the job families and roles to which you have permission when browsing positions.
Browsing job roles to find the position to nominate a successor to will be limited to the job families and roles that the user has permissions for.
The permission control applies to the following scenarios:
Opening a nomination dialogue through the nomination section in Succession Talent Cards.
Opening a nomination dialogue through the nomination block in People Profile.
Job Profile Builder must be enabled.
Wrap Up
We have now covered the highlights of the Career Development and Succession related updates for 1H 2022. See our blog for 1H 2022 PM release features.
Highlights are identified by module and the type of change.
Universal- for modules enabled, universal means no steps are required to have access to the new functionality. These features are automatically made available.
Admin Opt-In – the admin must enable the new feature, usually in Admin Tools
Admin Opt-Out – the admin must disable the new feature, usually in Admin Tools
Provisioning Opt-In and Opt-Out require a Partner or Product Support request For your convenience, we’ve summarized the highlights of what’s new for 1H 2022 Performance Management below.
Performance Management
The majority of the performance management updates involve Multi-Rater 360 forms and Calibration. However there are a few performance related updates that we will begin with.
General Availability – Universal Updates
Restrict Data Access of Inactive Users’ Forms
This enhanced was designed to comply with data privacy and protection standards.
Currently there is no way to limit a user’s access to inactive employee forms. With this release, there is a role permission that may be enabled which restricts the data in an inactive user’s PM form.
To set this up, open a permission role that should have the restriction.
Under User Permissions>Performance>Restrict Data Access of Inactive Users’ Forms
With this permission set, users with this permission role will not be able to access the data of inactive users’ forms in the following areas:
Home Page (only can review performance related To-Dos but not form pages)
Stack Ranker
Team Overview
Form OData APIs that include form subject information
Use Capability Picker in Performance & Goals
The previous “New Competency Picker”, now the Capability Picker, has a new UI which includes employees’ competencies, behaviors, and skills within an organization.
The Capability Picker can be used to add competencies in competency sections on PM forms.
To this use, Job Profile Builder must be enabled. In Performance Management Feature Settings in Admin Center, Enable Capability Picker must be selected.
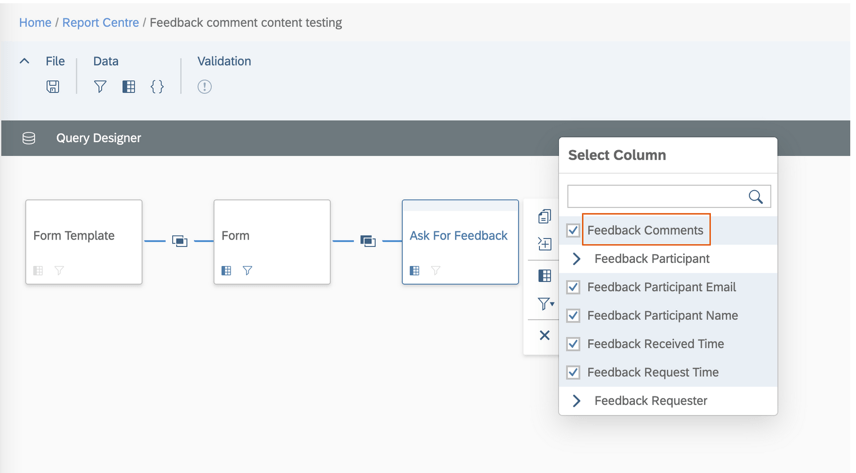
New Columns for Performance Management in Story Reports
In Story reports for Performance Management, users can now include feedback comments in the Ask For Feedback table as seen below.
Ask For Feedback Comments Columns
These are the Ask for Feedback comments provided by internal and external users through emails.
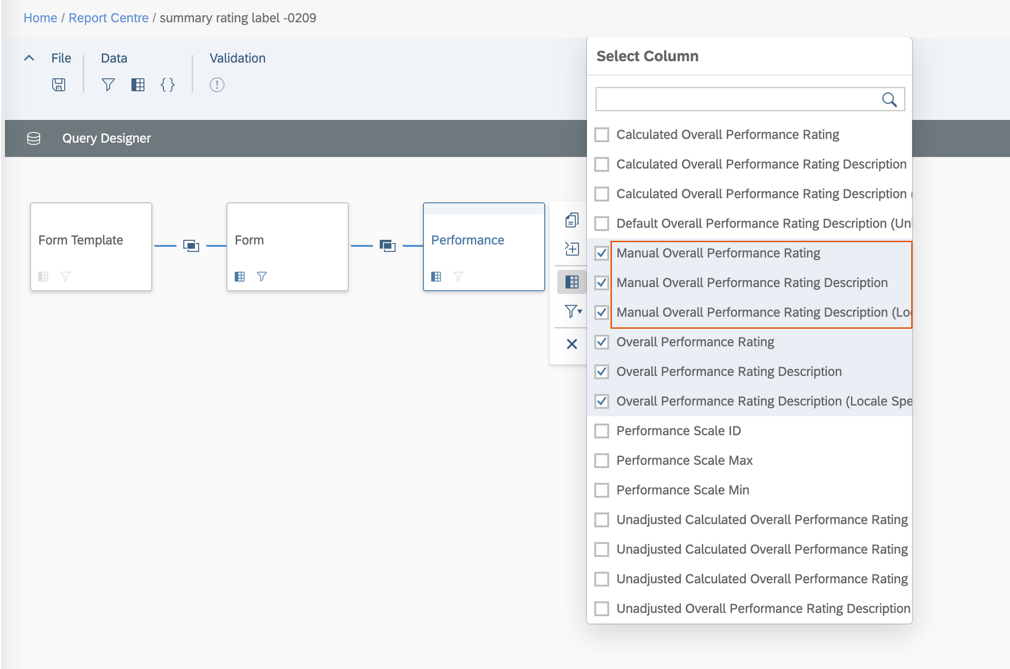
In addition, manual overall performance rating, manual overall performance rating description, and locale specific manual overall performance rating description are available in the Performance table.
Rating Columns
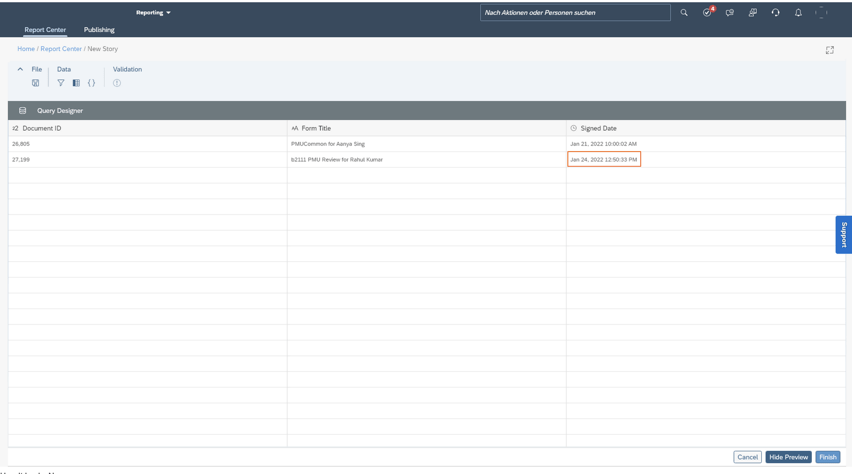
Enhanced Signed Date Column in Story Reports
Signing a form using Route Form and Sign Form, the Signed Datecolumn in Story reports now shows the date and time when the form was signed using the time of tenant preferred time zones. Only the latest record is shown in the reports if users have signed the form multiple times.
Form Signed Date and Time
Enhanced OData Entity FormAuditTrail
The FormAuditTrail API has been updated with a permission check. This API can be used to access all audit trail records of forms in the system. Otherwise, users can only access audit trail records of forms in their folders.
Permission is needed to access all audit trail records of forms in the system and the permission role should include Administrator Permissions> Manage Documents>Admin Access to Forms OData API permission.
General Availability – Admin Opt-Ins
There is a performance management related admin opt-in that is applicable for CPM achievements and feedback on a performance form.
View Achievements and Feedback on Forms on iOS and Android Mobile Apps
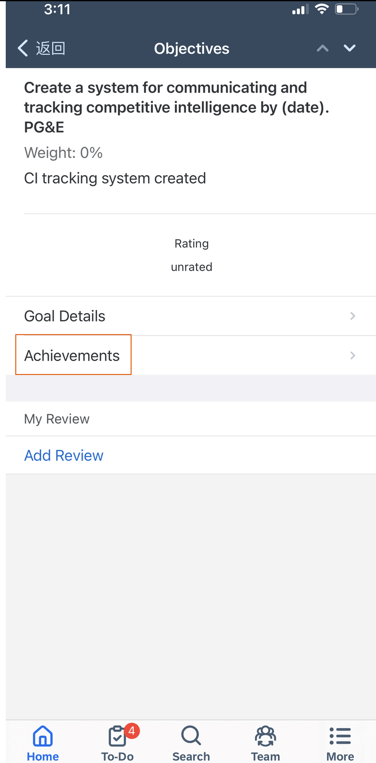
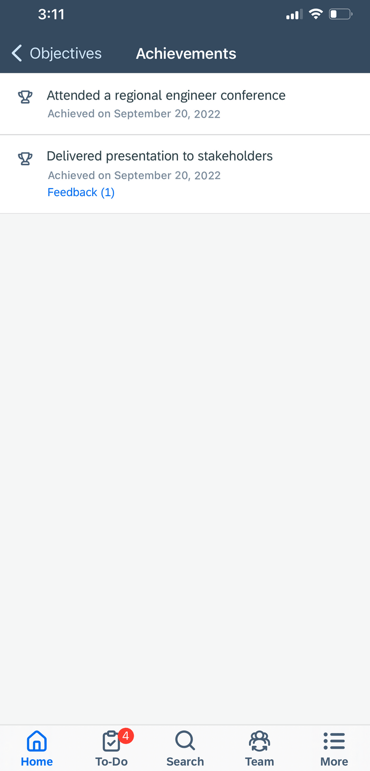
Performance reviewers with iOS and Android SAP SuccessFactors mobile apps, achievements and feedback linked to employees’ goals on performance forms can now viewed.
On the goal item page, there will be an Achievements row as seen in the example below.
Goal item on PM form
Achievement details may be viewed by clicking Achievements for the goal. If the employee had any achievements linked to a goal, they would appear as seen below.
Achievements linked to a goal
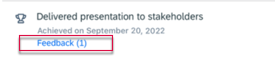
If there is any feedback for an achievement, it will noted with the number of feedback given.
Feedback Indicator for an Achievement
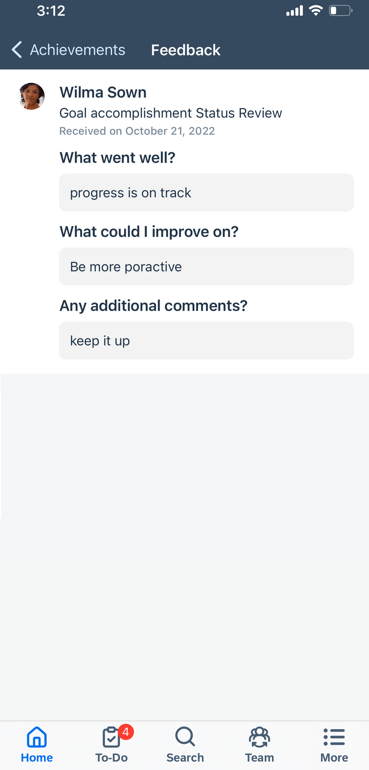
Clicking the feedback indicator, reviewers can view feedback for the achievement.
Feedback for an achievement
To take advantage of this feature, the latest version of CPM must be enabled.
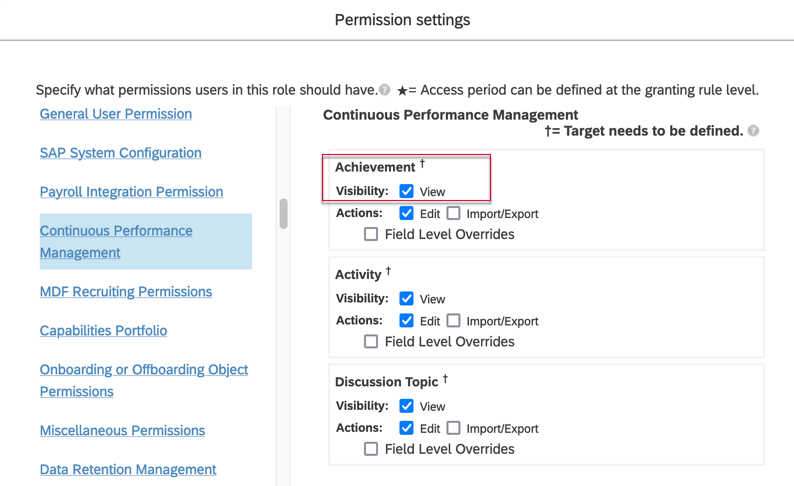
Reviewers will have to the View permission for User Continuous Performance Management Achievement in their permission role.
Permission to View Achievements
360 Reviews
There are several 360 Reviews – SAP Fiori Version updates. One is also applicable to 360 Reviews v11.
General Availability – Universal Updates
Participants Able to Recall Completed Forms
A participant may recall a 360 Reviews form after providing feedback and submitting it. However this recall feature available for raters but is not applicable to process owners, managers, employees, HR representatives, or approvers.
A Recall button will appear in the action column of the Evaluation Summary section of the form.
Recall 360 Form by Participant
Using the Recall button moves the form back to the participant’s inbox.
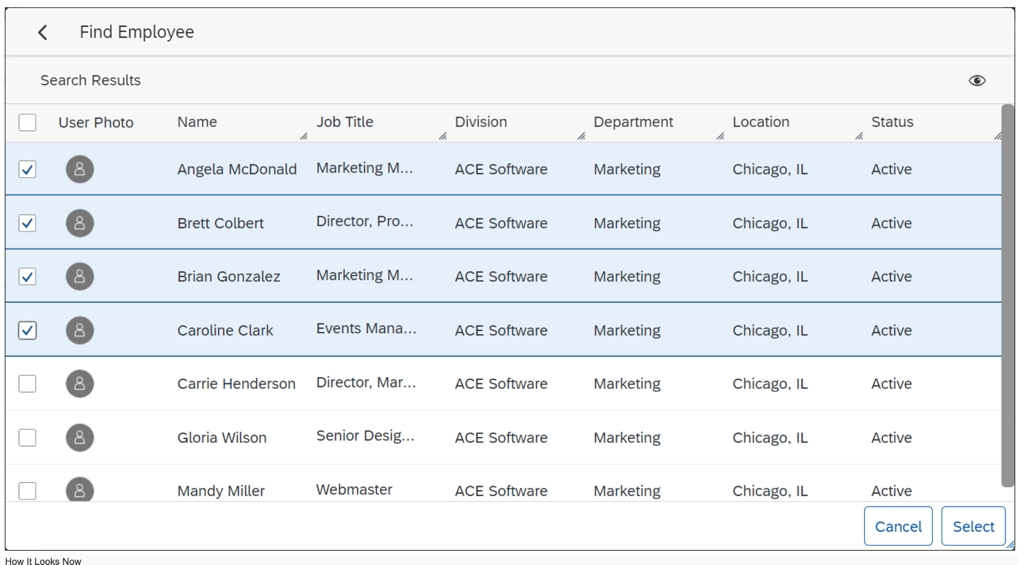
Select Multiple Employees on Advanced Search Dialog
Previously, managers were only able to select/add one employee from the search results at a time. To add more, filters had to redefined for each selection.
Managers can now select multiple employees from a search done on the Advanced Search Dialog and add them all to the Participant List at once.
Multi select employees
Refill the Participant List After Declines Occur
Process owners may now add alternative participants to the participant list if some of the initially added participants have declined to evaluate. This helps ensure that process owners get enough feedback for evaluations.
In order to use this feature, in the advanced settings of the 360 form template, all check boxes should be deselected for the option Hide the Decline to Participate button on the 360 Form for as seen below.
Deselect Hide Button
In the advanced settings of the 360 form template, select at least one role for the option Enable Add New Participants after 360 Evaluation starts for. This allows the selected role to add participants after the evaluation has begun.
Enable adding a Participant
Form Titles Editable in 360 Reviews
It is now possible for users to edit titles of 360 Reviews forms received in their Performance Inbox folder. Already available in 360 Reviews v11, it is now available in the SAP Fiori Version as well.
In the advanced settings of the 360 form template, select the option Enable form title editability in Form info page (V10) or Enable form title editability in the Form (V10), depending on where you want to change titles.
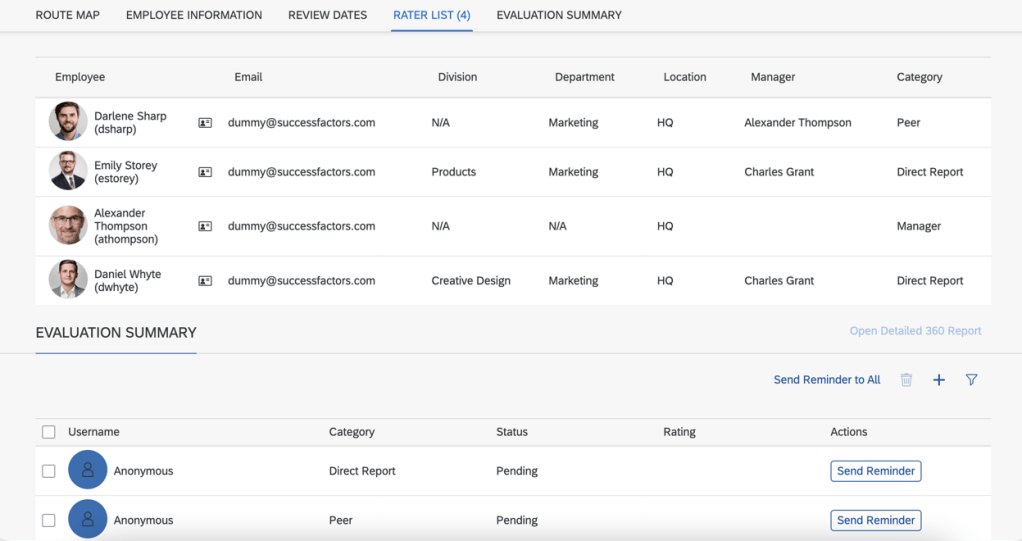
Process Owners Able to See Participants on Anonymous Forms
Process owners now can see the participants who have given evaluation feedback even on anonymous 360 Reviews forms. This provides participant information such as employee name, email, division, department, location, manager and category.
The Evaluation Summary will still show “anonymous” for each rater, but the Rater List will show rater names instead of “anonymous”.
Rater List with Names
In order to use this feature of a Multi-rater form, some set up is needed.
The 360 template to be used should have Anonymous 360 configured in Provisioning >Form Template Administration.
Anonymous 360 Form Attributes
Within Form Template Settings for the form, on Show Participants in Status Summary (Applicable to Anonymous 360’s only) needs to be enabled.
Enable Show Participants in Status Summary
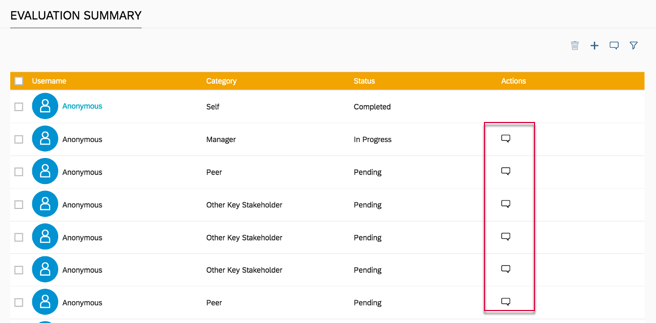
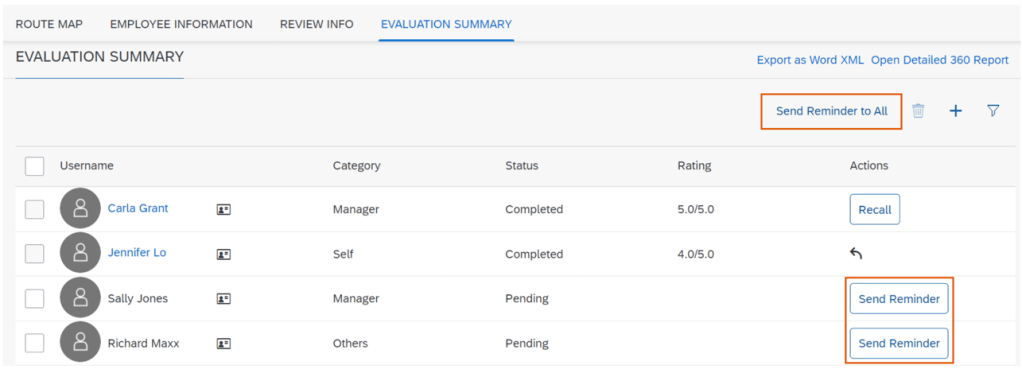
Improved Reminders Buttons
The Reminder icon in the Evaluation Summary section has been transformed into a button. Previously the Actions column contain a reminder icon as seen below.
Recall icon
This has been replaced with a Recall button in the Actions column. Users can now send reminders to those who have not given feedback yet; to a one or multiple participants. There is a new Send Reminder to All button will send a reminder to any rater that has not given feedback yet (a status of Pending). The user will also receive a confirmation of this action before reminders are sent.
Send Reminder Buttons
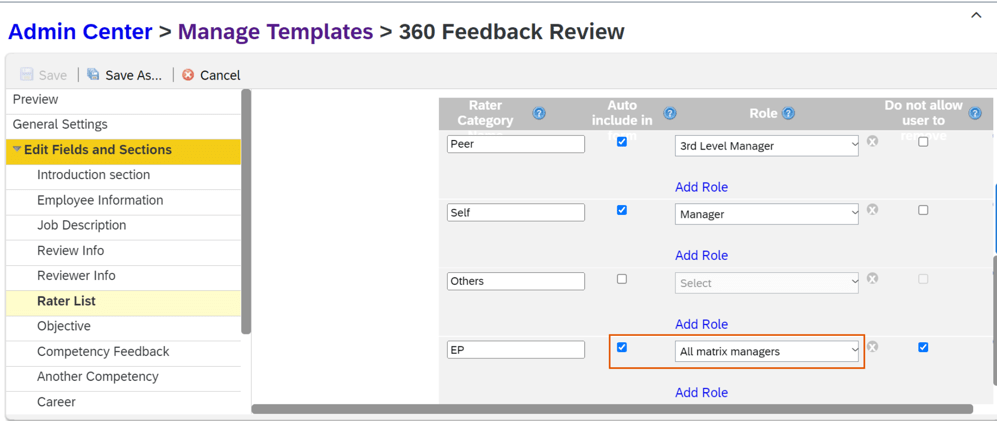
Add “First Matrix Manager” and “All Matrix Managers” as Default Rater Categories 360 Reviews v11 and 360 Reviews – SAP Fiori Version
Within the Manage Templates tool or by editing the XML form template, First matrix manager and All matrix managers are now options as default rater categories in both 360 Reviews v11 and 360 Reviews – SAP Fiori Version. When selected, the employee’s first matrix manager or all matrix managers will then show on the rater list by default when a 360 Review form is launched.
All Matrix Managers Role
The feature saves users from manually adding a first matrix manager or all matrix managers as raters after the form is launched.
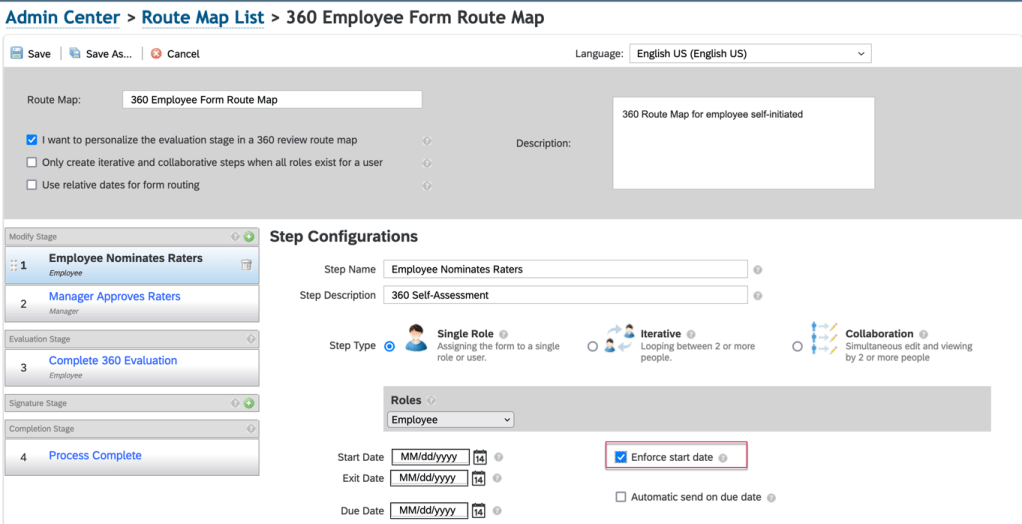
Enforce Start Date in Route Map
A feature currently available for PM forms is now available for 360 forms.
Within the route map associated with the 360 template, select the Enforce start date option and then enter the start date for the step. This may be done for any step in the Modify and Evaluation stages on the route map.
Before the step start date, forms are read-only, but participants can open the forms to check the details.
Support for Learning Activities in Development Goal Section in 360
It is now possible to use Learning activities in the Development Goal section of a 360 Review form. A user may view details of a learning activity, add LMS learning activities, and delete LMS learning activities or Transcript-enabled custom learning activities.
In Provisioning>Company Settings make sure to select the option: Transcript — requires “Version 11 UI framework (ULTRA)”.
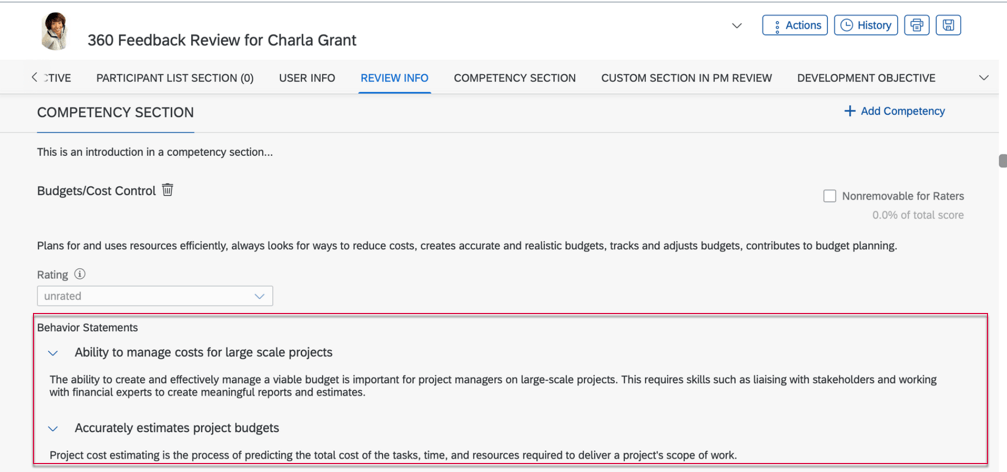
Show Behavior Descriptions When Not Rating by Behavior
If competencies have behaviors associated with them, behavior descriptions may be included in the Competency section of a 360 multi-rater form, even if the behaviors are not being rated.
Competency Behaviors
When including behaviors, the behavior name displays but descriptions are hidden by default. Clicking the arrow button will show the behavior’s description.
In order to use behaviors on the form, the XML form template needs to have behavior-mode-opt in the competency-sect set to a non-zero value (1, 2, 4 or 5) and use-behavior should be false.
General Availability – Admin Opt-Ins
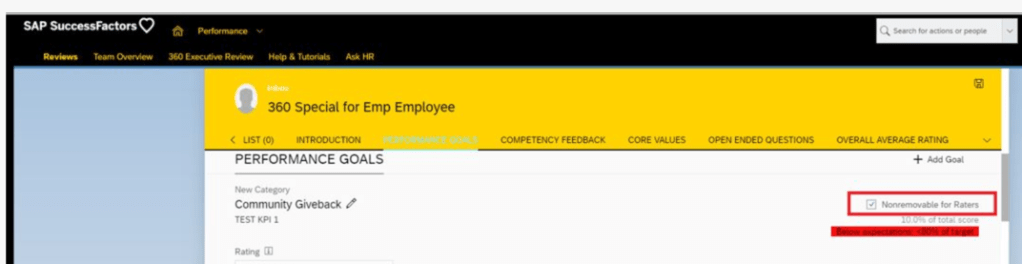
Hide the Nonremovable Checkbox in 360 Reviews – SAP Fiori Version
You can now hide the Nonremovable for Raters checkbox on a 360 Reviews form if it’s not needed.
Nonremovable by Raters Checkbox
In the advanced settings of the 360 form template, enable the Hide the Nonremovable checkbox on a form in the Modify stage.
Previously, the checkbox always appeared on a form, even if a rater was not permitted to use it for editing linked skills.
Deprecation of 360 Reviews v11 Version
November 18, 2022 is the end of maintenance for 360 Reviews v11 and will be deleted on May 20, 2023.
360 Reviews – SAP Fiori Version has been Generally Available and now includes the majority of features and functions that were available in 360 Reviews v11.
It is recommended if you’re using 360 Reviews v11 Version to migrate to 360 Reviews – SAP Fiori Version.
Goal Management
General Availability – Universal Updates
There are no universal updates for Goal Management.
General Availability – Admin Opt-Ins
Create and Edit Goals in Non-Goal Management Modules
When the latest Goal Management is enabled, you can try out the latest Goal Management to create and edit goals through an embedded dialog.
When you create or edit a goal in the following modules, you’ll be prompted with a dialog with brand new UIs offered by the latest Goal Management:
Career Development
Continuous Performance Management
360- Multi-Rater
People Profile
Performance Management
Succession
Goal Creation
Calibration
General Availability – Universal Updates
There are several universal updates for a calibration session.
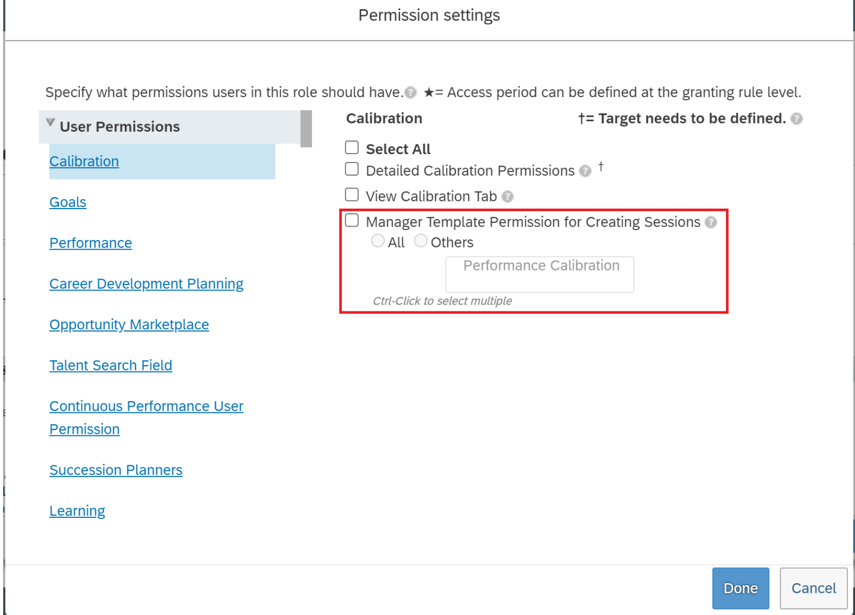
Manager Template Permission for Creating Calibration Sessions
It is now possible to identify which calibration templates managers can access when they create calibration sessions. The new permission, Manager Template Permission for Creating Sessions, is added under User Permissions >Calibration for a permission role.
Permission for Manager Calibration Sessions
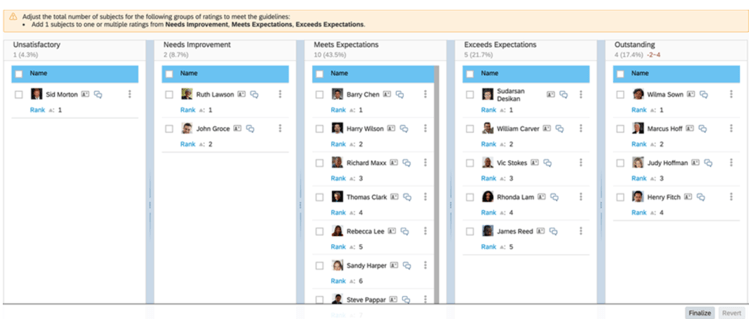
Total of Expected Number of Subjects Equals Actual Number of Subjects
Logic has been enhanced for subject distribution in scenarios where the guidelines are defined with rating groups or when not all ratings have a distribution guideline.
When the guidelines are defined with rating groups or only part of the ratings have distribution guideline, but these are not met:
Ratings are included once in the guidelines
All guidelines are defined with “=” operator
Total of distribution guidelines is 100%
The system sums up the decimal parts and distributes the whole numbers to the ratings if there are decimal parts in the calculated results. This is done to ensure the total number of expected subjects for all ratings is equal to the actual number of subjects in the session.
Enhancement to Guidelines Enforcement
Distribution guidelines have been enhanced to support more guideline scenarios. Finalizing sessions individually, enforcement is now supported in three more guideline scenarios.
Distribution Guidelines are set in the Data tab of Manage Calibration Templates.
The enhancement only applies to finalizing sessions individually.
Guideline is defined in a rating group when there is one more than one rating
Guideline is defined with a rating range with an operator other than “=”
Not all ratings have a guideline
When the distribution of subjects doesn’t meet the guidelines for any these scenarios, the session cannot be finalized.
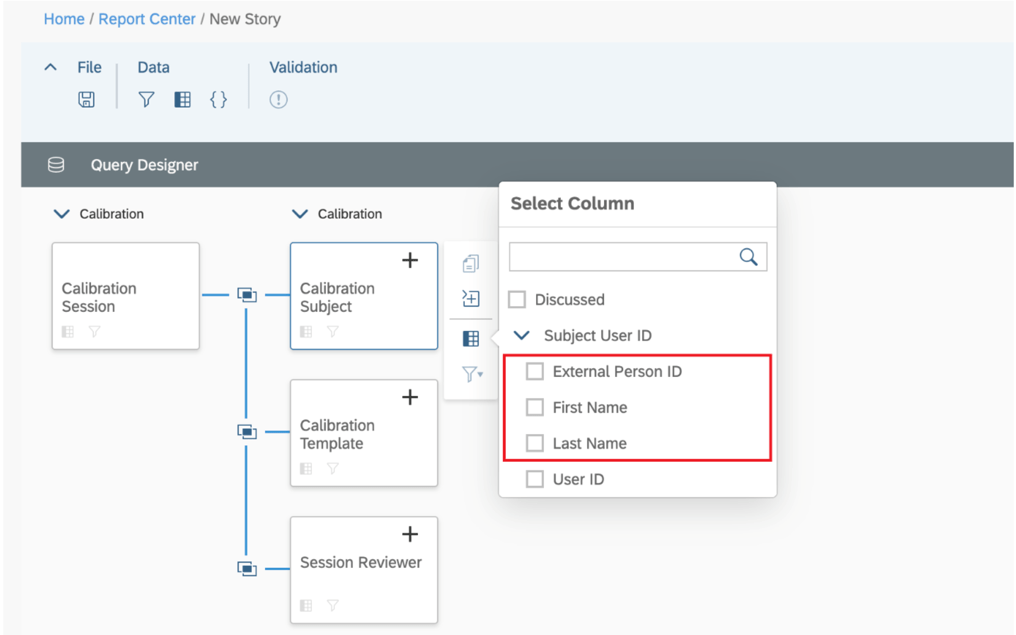
More User Information of Calibration Subject Available in Story Reports
You can now include the name and external user ID of a session subject in a Story report. The first and last names and external user ID are supported in the auto-joins for calibration subjects. This makes it easier to get calibration subject information.
Subject Name Columns
General Availability – Admin Opt-Ins
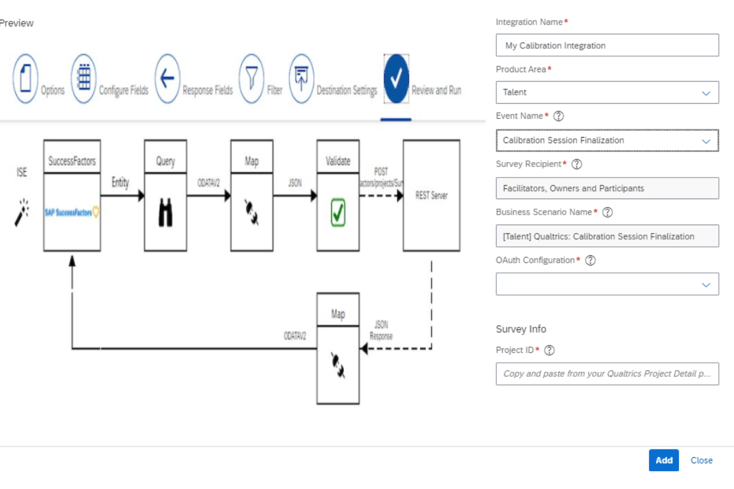
Qualtrics Feedback Opportunity for Calibration Session Finalization
Manage Qualtrics Integrations in the Admin Center now includes the Calibration Session Finalization option in the Event Name field’s drop-down list for Talent.
Calibration Session Finalization
Intelligent Services events can be used to send employee information to Qualtrics so when an employee finalizes a calibration session, a Qualtrics feedback survey may be sent via email.
Calibration, Intelligent Services and Integration Center must be enabled and a Qualtrics Employee Experience license for Lifecycle projects is required.
Continuous Performance Management (CPM)
The legacy version of Continuous Performance Management (CPM) will reach End of Maintenance on May 20, 2022 and will be retired as of May 19, 2023.
The latest version of CPM, initially released in 2H 2020 is available in the Upgrade Center. If no action is taken, your company will be automatically upgraded to the latest version after the retirement date.
In Conclusion
We have now covered the highlights of the PM related updates for 1H 2022. See our blog for 1H 2022 Career Development release features.
For your convenience, we’ve summarized the highlights of what’s new for 2021 Performance Management below.
The updates for Performance Management are primarily targeted for 360 Reviews so we will start with those. The PM form updates will be discussed after these features have been reviewed. Calibration updates can be found in our separate blog here.
What’s New for 360 Forms – Fiori Version
Here are the 10 universal updates made for the Fiori version of 360 forms to provide the same features that are available 360 Reviews v11.
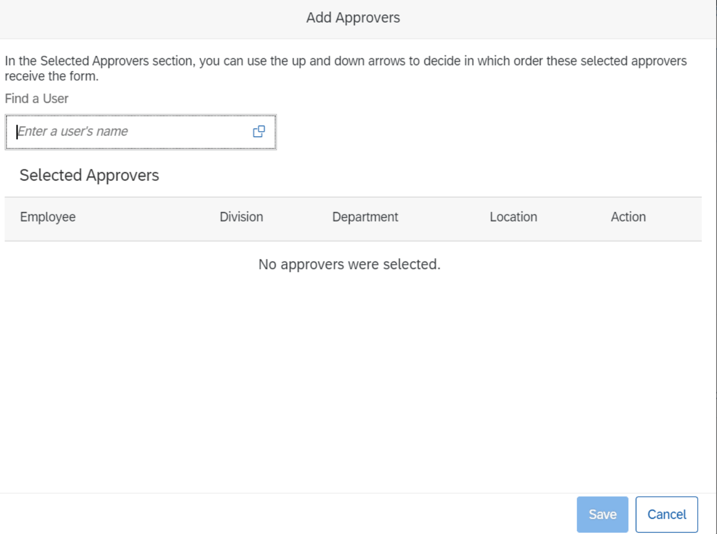
Add Approvers in 360 Reviews
Approvers may now be added in the Modify stage.
Development Goal Section Available in 360 Reviews
A development goal section may be added to a 360 Review form template. These enables employees the opportunity to add and edit development goals.
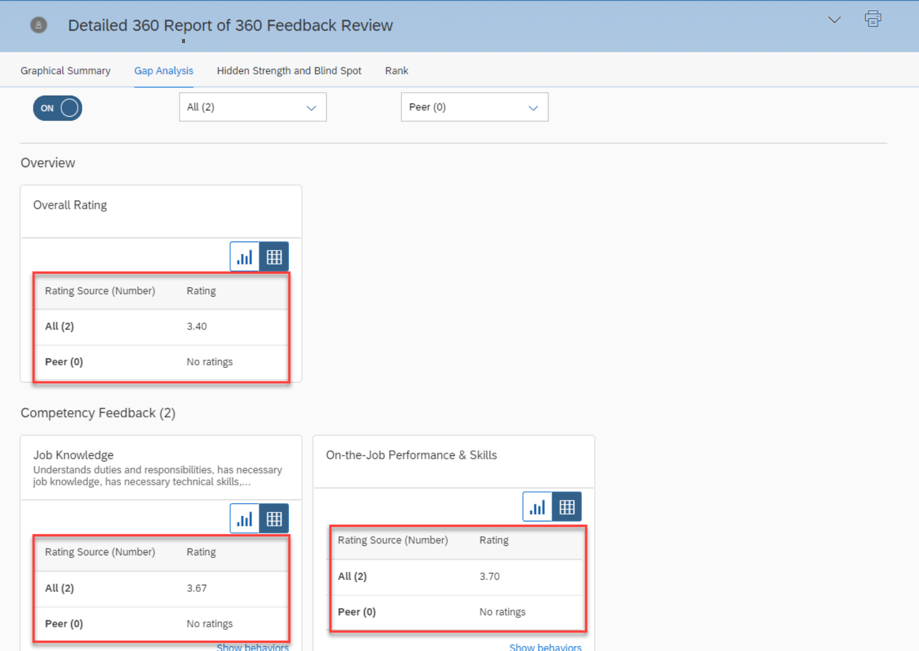
Display a Data Table for a Chart
Within a 360 Executive Review and Detailed 360 Report, a user may select the table icon on a chart to see a data table. This provides text equivalents for non-text content.
Display External Users in Search Results When Adding Participants
It is now possible to add external users as participants without having to disable the system setting Hide External Users from search results.
EZ Rater Available in 360 Reviews
When enabled, the EZ Rater option provides a more condensed list view for rating goal and competencies.
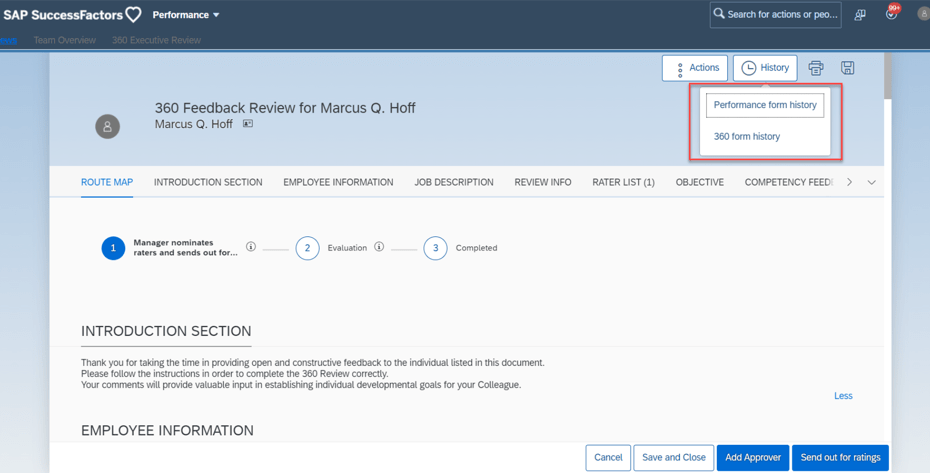
Form History Available in 360 Reviews
Prior performance and 360 forms are now available within a 360 Review. The History button will display options to view either form type if available.
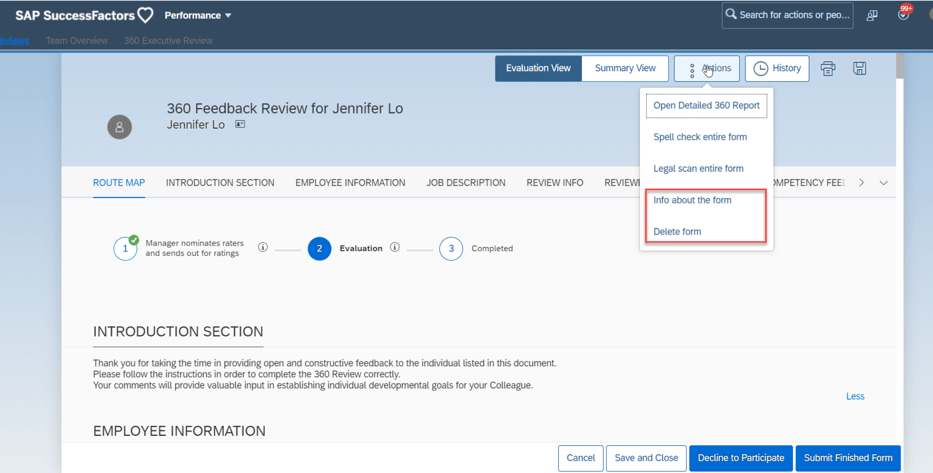
More Form Actions Available in 360 Reviews
Additional action options are now available for 360 forms. Information about the form may be viewed and the form may be deleted.
Print Preview Available in 360 Reviews
When the user clicks the Print button, a popup displays a preview of the form. This provides the user the opportunity to select the entire form or selected sections to print.
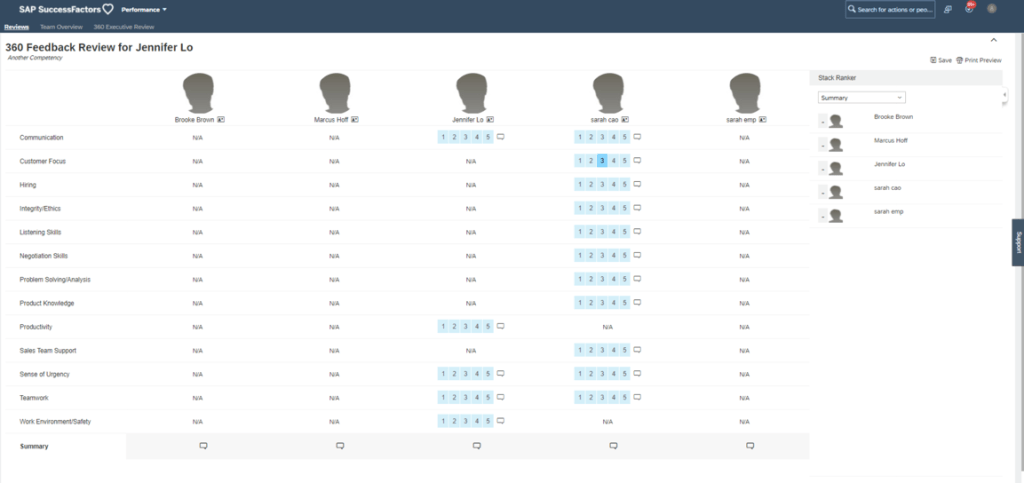
Stack Ranker Available in 360 Reviews
Stack Ranker can be enabled which allows side by side ranking of employee competencies. Ratings may be modified and comments added.
Section Descriptions Fully Displayed by Default
Now section descriptions are fully displayed by default and can be collapsed. Clicking Show Less to hide content. Previously sections were collapsed and the user had to click Show More to see the content.
What’s New for PM Forms
There are 5 universal updates for PM forms.
Customized Weighted Rating Supported in Import Overall Scores
Previously it was only possible to import overall scores into the Objective Competency Summary, and Performance Potential Summary, and Summary sections. The new release enables you to update overall scores for the Customized Weighted Rating section.
On the import file, use <PERFORMANCE> rating in the CSV file. The rating field is also used to update the Summary and Performance Potential section overall rating. If there is more than one PERFORMANCE rating, there is a priority for updating. The section order for uploading from high to low is:
Customized Weighted Rating
Performance Potential Summary
Summary
Deep Link to Performance Management Forms
There is now a deeplink available to access a performance form: /sf/openFormByDocId
New OData V2 API Entity FormCustomizedWeightedRatingSection
There is a new OData V2 API Entity: FormCustomizedWeightedRatingSection. It can be used to get the Customized Weighted Rating section details of a performance form in order to update the manual ratings section of the performance form.
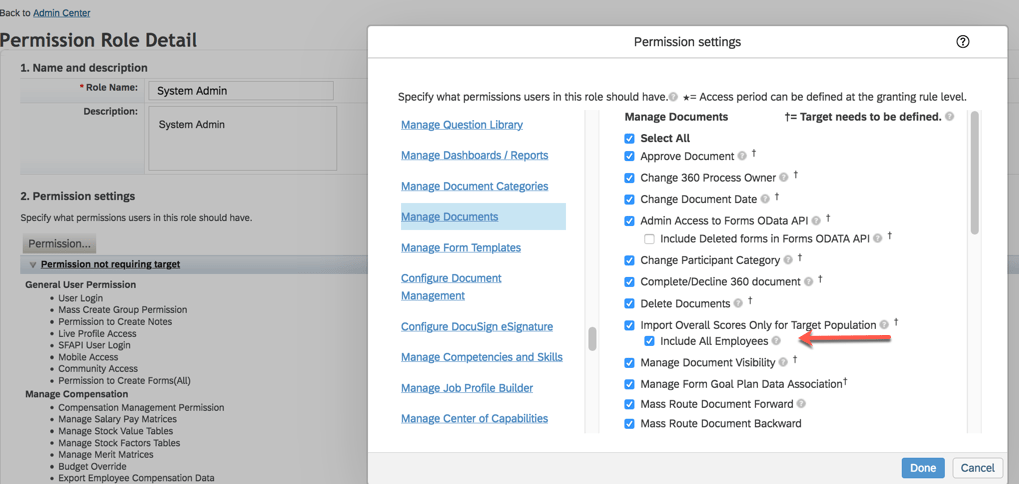
Target Population in Role-Based Permissions for Import Overall Scores
This update pertains to the Customized Weighting Rating import that we just covered. Role based permissions may now be used to restrict users to importing scores for only their target population.
Select a role in Manage Permission Roles. Go to Permission>Administrator Permissions>Manage Document and select “Import Overall Scores Only for Target Population” and “Include All Employees” which allows granted users to update manual overall scores for all employees.
Live Profile Section Deleted
A Live Profile section can no longer be added to PM forms. Information in the existing section is no longer available. A link to People Profile can be used on the form instead.
What’s New in Continuous Performance Management (CPM)
There are some new early adapter features for the latest version of Continuous Performance Management (CPM). They are admin opt-in or opt-out features. We won’t cover these here since the latest version is not widely enabled. When the latest version of CPM is enabled, these email reminder notifications will become obsolete: Conduct 1:1 Meeting, Update Status, along with Activity and Achievement reminder notifications.
The latest version will handle notifications differently since multiple roles can be used and meeting channels can be created. Requests and meeting notifications can be created for anyone in the user’s meeting channel.
We have now covered the highlights of the PM related updates for H1 2021. See our blog for Calibration release features.
Highlights are identified by module and the type of change.
Universal- for modules enabled, universal means no steps are required to have access to the new functionality. These features are automatically made available.
Admin Opt-In – the admin must enable the new feature, usually in Admin Tools
Admin Opt-Out – the admin must disable the new feature, usually in Admin Tools
Provisioning Opt-In and Opt-Out require a Partner or Product Support request
For your convenience, we’ve summarized the highlights of what’s new for 2H 2021 Performance Management below.
Performance Management
There is not much in the way of new functionality, just one universal update.
General Availability – Universal Updates
Configuration Center Support For Performance Management Form Templates
You can now view, download, and transport Performance Management form templates across tenants using Configuration Center. Prior to this release, only Feature Configuration was available under General Configuration for Performance Management. Now System Configuration and Manage Templates are available.
New PM Configuration In Configuration Center
General Availability – Admin Opt-Ins
The admin opt-ins require the latest version of the home page.
PM Related Updates “For You Today” Section of the Latest Home Page
When the latest home page is used, a “For You Today’ card will appear for PM tasks.
You can enable to-do tasks on the latest home page in the Upgrade Center.
The tasks are:
“Review Employee Performance” task available for managers
“Review Employee Performance” task available for employees
To give managers a view of the form that need their review, cards are grouped into Direct Reports, Matrix Reports, and Other on the stack view. An example is shown below.
For You Today Performance Tasks
Users can go directly to the performance review forms from this card to complete the tasks.
Goal Management
There is one universal update for Goal Management. The majority of the new functionality is for the latest version of Goal Management. With each release more and more features become available.
General Availability – Universal Updates
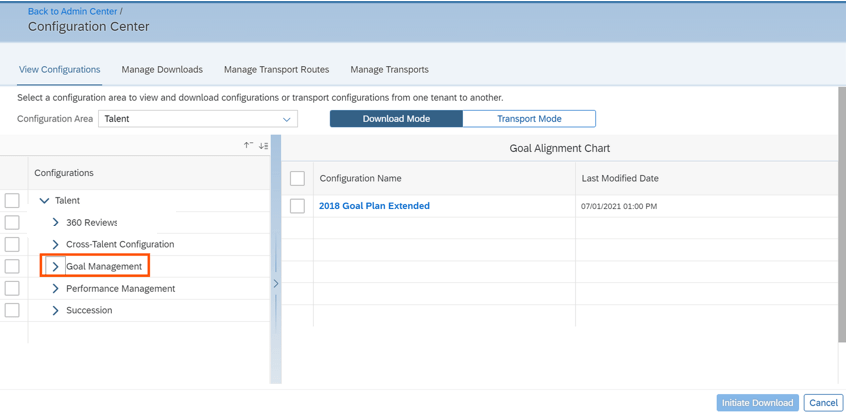
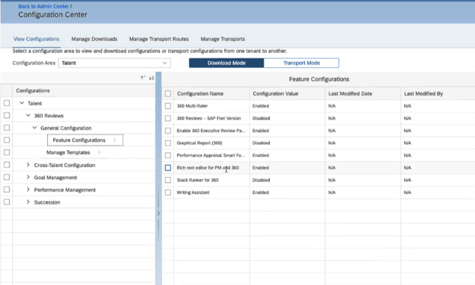
View, download, and transport Goal Management configurations using Configuration Center.
It is now possible to use ConfigurationCenter for Goal Management to view configurations, download configurations, and transport configurations across tenants. Configuration Center permission is required.
The view feature enables the admin to view configuration as well as see the username who made changes with a date and timestamp.
The download feature is useful to take a backup of your application’s configurations as well as for troubleshooting by an Implementation Partner or Customer Support.
The export feature can be used to export configuration in order to copy from the preview system to production.
With this release, after selecting the Talent configuration area, Goal Management is visible. The admin can then select the features to download.
Goal Management in Configuration Center
After selection, the admin goes to the “Transport Mode” tab to initiate the download process.
Upon completion, the configuration bundles is downloaded in ZIP format. Configuration types are available as separate files.
Latest Goal Management
With each release, the latest version of Goal Management has functionality added that is already available in the current version,
Now supported in the latest version of Goal Management:
Beta Goal Import
Changing goal plan states in Goals
User search
Matrix relationships
Now available in the latest version of Goal Management:
Spell Check
Legal Scan
Advanced user search by criteria
We will look at the new supported functions that are available for those using the latest Goal Management. We will start with the universal updates.
Early Adopters – Universal Updates
Mass Import Personal Goals in Latest Goal Management
It is now possible to use the “Import Performance Goals” for the latest version of Goal Management.
Change Goal Plan States in Latest Goal Management
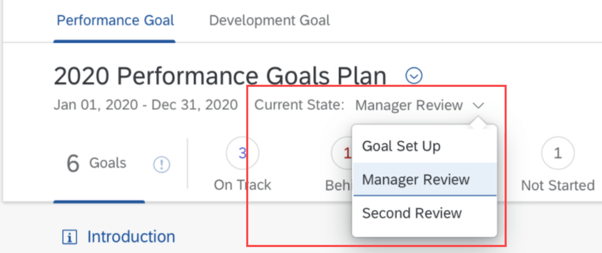
It is now possible to update the goal plan state in the latest version of Goal Management. The ability to lock and unlock goal plans will be available and provides visibility of the goal plan state using the latest version of GM.
Goal plan states are used to control the action and field permissions before and after a goal plan is approved. Users with the “change-state” permission in the goal plan XML can now change the goal plan state in a more straightforward manner.
An example using goal plan states in the latest version of a goal plan is shown below. The current state has a dropdown list.
Latest Goal Management Goal Plan Current State
In addition, employees will be able to receive email notifications when their goal plan state changes. The notifications will include who changed the goal plan state and what the current goal plan state is.
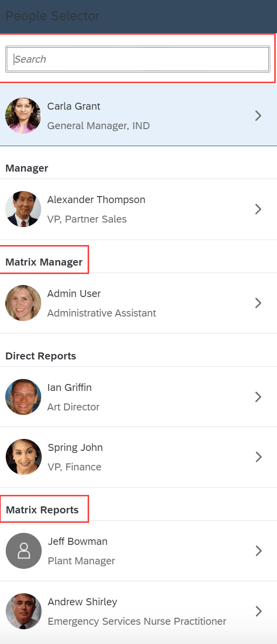
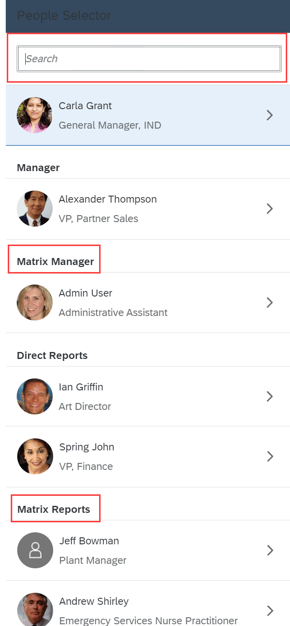
Enhanced People Selector in Latest Goal Management
When using the latest version of goals management, the people selector will include matrix manager and matrix reports. If these matrix roles have permission, they will have access to view goal plans.
An example of the people selector in a goal plan is shown below.
People Selector with Matrix Manager and Reports
If these matrix roles have permission, they will have access to view goal plans.
360 Reviews
General Availability – Universal Updates
View, download, and transport 360 Reviews configurations using Configuration Center
Similar to the Goal Management being available in Configuration Center, it is now possible to use ConfigurationCenter for 360 Reviews to view configurations, download configurations, and transport configurations across tenants. Configuration Center permission is required cross tenants.
Before this release, 360 was not available in Configuration Center Now when selecting the Talent configuration area, 360 is visible. The admin can then select the features to download fro the Transport Mode tab.
360 in Configuration Center
Add External Participants When Users Have No Search Permissions
Users without permission to search for external users may now add them as form participants by email address. Users can enter the email address of an external user in the “Add a New External Participant” dialog box.
If the external user already exists in the system, the First Name and Last Name fields are automatically filled and users can select “Add” to add the external user as a participant.
An example is shown below.
Add External Participant
General Availability – Admin Opt-Ins
360 Reviews Tasks on the Latest Home Page
When the latest home page is used, a “For You Today’ card will appear for 360 Review tasks:
“Complete 360 Evaluation task” available for managers
“Complete Your 360 Evaluation task” available for employees
Found on the latest Home Page, for any 360 forms for an employee, manager or raters, there is a card to prompt the user to review and complete the 360 Reviews form in the Performance inbox.
For You Today Card for 360
Users can go directly to the 360 review form from this card.
Calibration
General Availability – Universal Updates
There is a universal update for a calibration session.
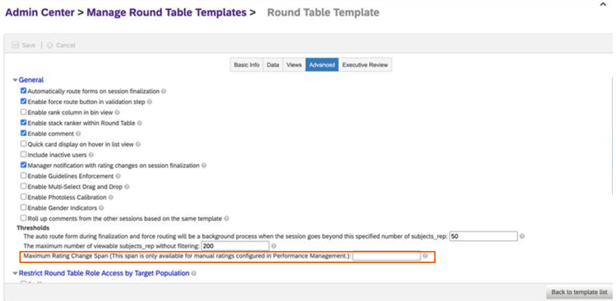
Set max rating change span
In “Manage Calibration Templates”, if your data source is “Performance”, it is now possible to set a maximum rating change span. This setting can be found on the “Advanced” tab.
Once the span is set, if you make rating changes in the session, the following rules apply:
If the rating change made doesn’t exceed the maximum rating change span, the rating will be changed
If the rating change exceeds the maximum rating change span, an error message displays and the rating reverts to the original rating.
Shown below is the Calibration Template “Advanced Settings” tab.
Set Maximum Rating Change Span
Continuous Performance Management (CPM)
There are only admin opt-ins for this release of Continuous Performance Management.
General Availability – Admin Opt-Ins
New Qualtrics Survey for Continuous Performance Management
It is possible to integrate Qualtrics surveys with Continuous Performance Management. This integration allows you to collect feedback from employees after 1:1 sessions with their managers.
To use this feature:
CPM must be enabled
Qualtrics license for website and app feedback projects required
“Manage Qualtrics Integrations” feature is enabled in Upgrade Center
The Qualtrics account is used to create the survey and view survey feedback.
An employee will be prompted to complete the survey. An example is shown below.
Start Survey within CPM
The user will see questions to answer.
Survey Questions
Once completed, the admin may view the survey feedback.
Early Adopter – Admin Add -Ins
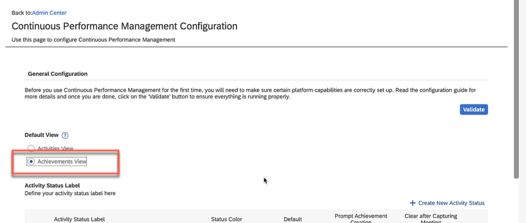
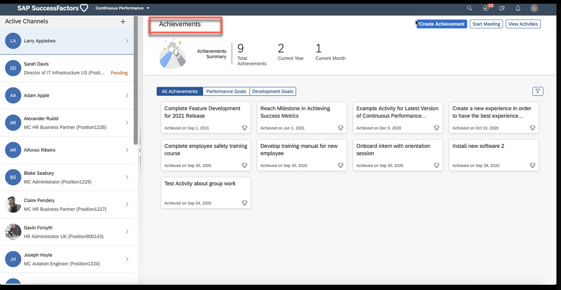
Enhanced Achievement Experience for Continuous Performance Management
This feature is only available if the latest version of CPM is used.
Achievements can be the default view on the CPM landing page, which enables quick access to achievements. The admin would have to select “Achievements view” as the default on the “Continuous Performance Management Configuration” page. An example is shown below.
Set Default View
When a user accesses CPM, the default view will now be the Achievements tab.
Achievements tab default view
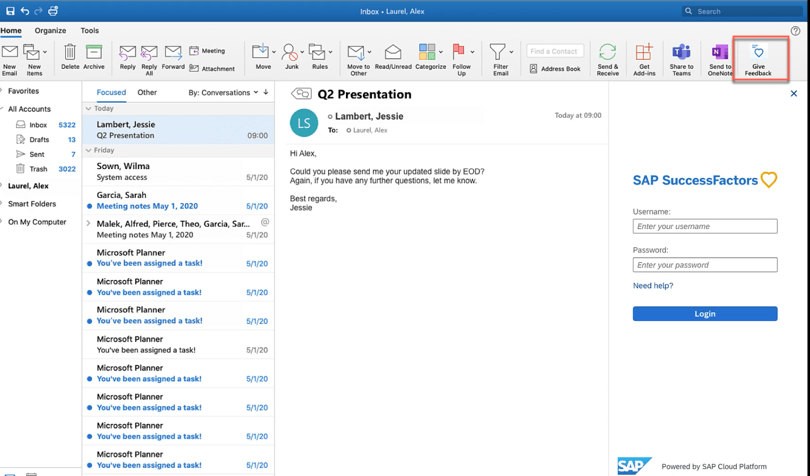
Feedback Integration with Microsoft Outlook
Continuous feedback may be enabled from a Microsoft Outlook add-in to make giving feedback easier.
In order to use this feature:
Latest version of CPM must be enabled
SAP SuccessFactors user attributes are mapped to Microsoft Active Directory
Continuous Feedback outlook integration is enabled and the manifest file downloaded
SAP SuccessFactors user attributes mapped to Microsoft Active Directory.
The employee will see an option to give feedback.
CPM Feedback within OutlookStart Giving Feedback
The feedback questions display and enable the employee to provide feedback.
Feedback Questions
Upon submission, a confirmation message displays. An example is shown below.
Completion of Providing Feedback
Depreciation
Deprecation of 360 Reviews v11 Version
November 18, 2022 is the end of maintenance for 360 Reviews v11 and will be deleted on May 20, 2023.
We have now covered the highlights of the PM related updates for 2H 2021. See our blogfor 2H 2021 Career Development release features.
There are not a lot of new features for Career Development in this release. There are some updates for Mentoring and for early adopters, the latest version of Goal Management and Career Explorer have new functionality.
For your convenience, we’ve summarized the highlights of what’s new for 2H 2021 Career Development below.
Mentoring
General Availability – Universal Updates
The universal updates for Mentoring relate to mentoring email notifications.
Improved Email Notifications
With the new release, there are changes to some of the mentoring email notifications. Some links have been added or removed and some of the messages have been made more concise.
The mentor invitation email notification has been updated. Now there is a link that goes directly to the mentoring program to accept the invitation to participate. An example is shown below.
Mentor Invitation to Participate
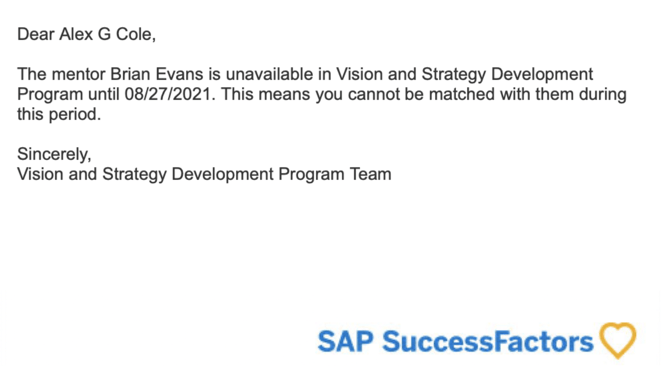
The program link has been removed from the email notification that goes out to pending mentees when their requested mentor becomes unavailable. Here is an example of the new email notification.
Mentor Unavailable Notification
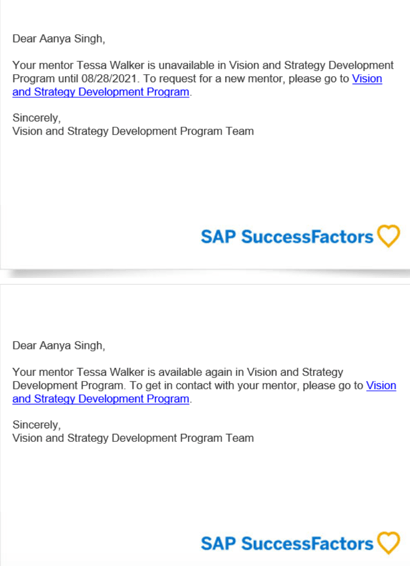
Stop Email Notifications to Matched Mentees About Mentor Availability
Currently any mentee that is linked to a mentor will received an email notification when the mentor becomes unavailable as a recommended mentor for new mentees.
Similarly, when the mentor becomes available again, the mentees already in a relationship with a mentor would be notified. An example is shown below.
Emails to Current Mentees regarding Mentor Availability
Sending a notification to existing mentees when their mentor becomes unavailable caused confusion. It was not clear to existing mentees that their mentor was still available to them.
Mentees already accepted by a mentor will no longer be notified when the mentor becomes available or unavailable as a recommended mentor to others joining the program. The existing mentees will still have the mentor relationship but any employees searching for a mentor will not see the unavailable mentor to select from.
General Availability – Admin Opt-Ins
If you are using the latest Home Page, managers will be able to approve or decline employee requests to be a mentor. A new approval card will show on the home page which identifies when the request was submitted and identifies the mentoring program. The manager can approve or reject the request directly from this card.
An example is shown below.
Mentor Approval Card
Latest Version Development Goal Plan
Early Adopter – Universal Updates
For early adopters using the latest version of Goal Management there a few new features that we will discuss briefly.
Mass Import Personal Goals
For early adopters using the Latest Goal Management, it is now possible to mass import personal goals into development plan through Admin Center. This functionality was not available previously for the latest version of goal management.
Improved People Selector
Users with the appropriate role based permissions will be able to search for people by name and access their goal plans.
People Selector will now include additional hierarchical relationships: a user’s matrix manager and matrix reports.
Improved People Selector
Career Explorer
Early Adopter – Universal Updates
Career Explorer is only available for customers in an Early Adopter Care (EAC) program.
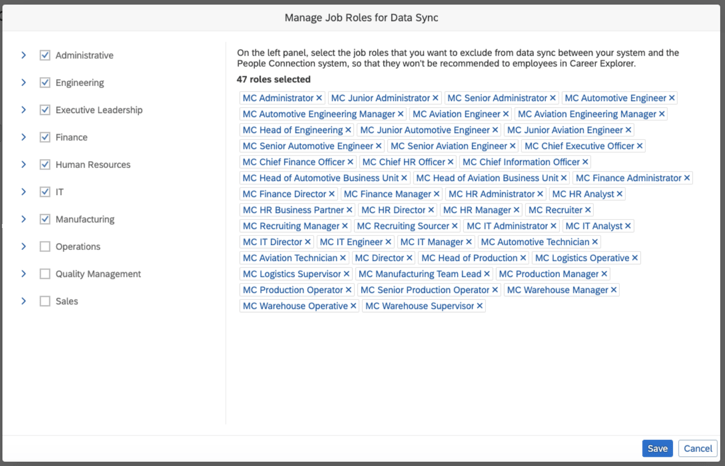
Exclude Job Roles from Data Sync
With the new release, there is a universal feature that allows job roles to be excluded from data sync between your system and the People Connection. This means those job roles will not be recommended to employees in Career Explorer.
Accessed from Admin Center, go to “Manage People Connection Integration”. Select “Manage Job Roles for Data Sync”.
The new “Manage Job Roles for Data Sync” screen is seen below.
Select Job Roles to Exclude
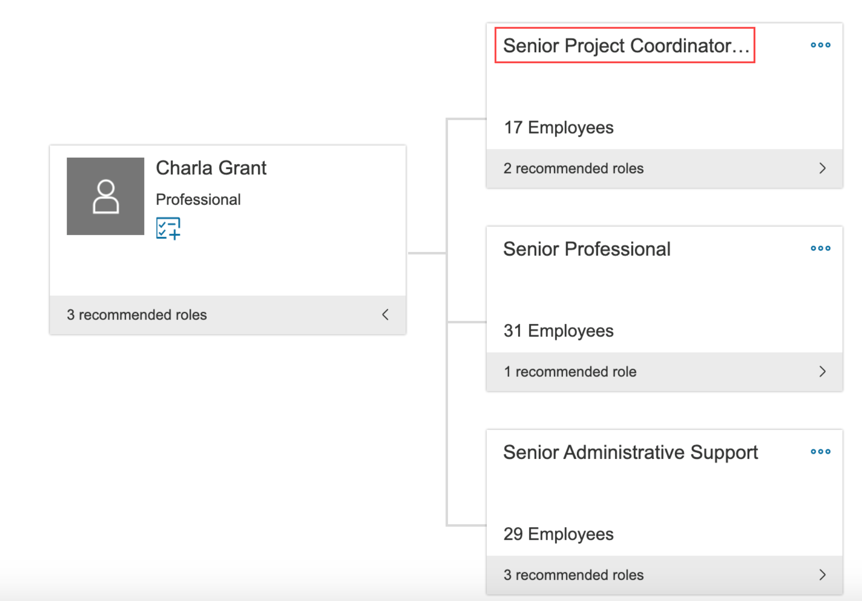
Display Long Job Role Names in Recommended Role Card
Currently, long job role names will truncate in the recommended role card as seen below.
Truncate Job Role Names
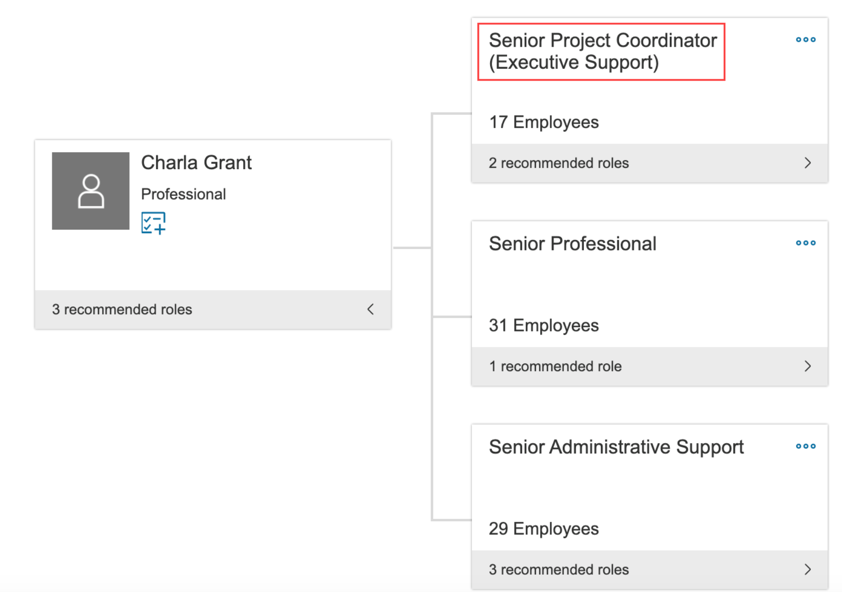
With the new release, longer names of job roles can be displayed in full using two lines as seen below.
Complete Job Role Names
We have now covered the highlights of the Career Development related updates for 2H 2021. See our blog for 2H 2021 PM release features.
There are five universal updates related to Mentoring and one for Development Goals. Let’s take a look!
Mentoring
The mentoring features are related to the mentor program sign up process and are designed to improve the user experience.
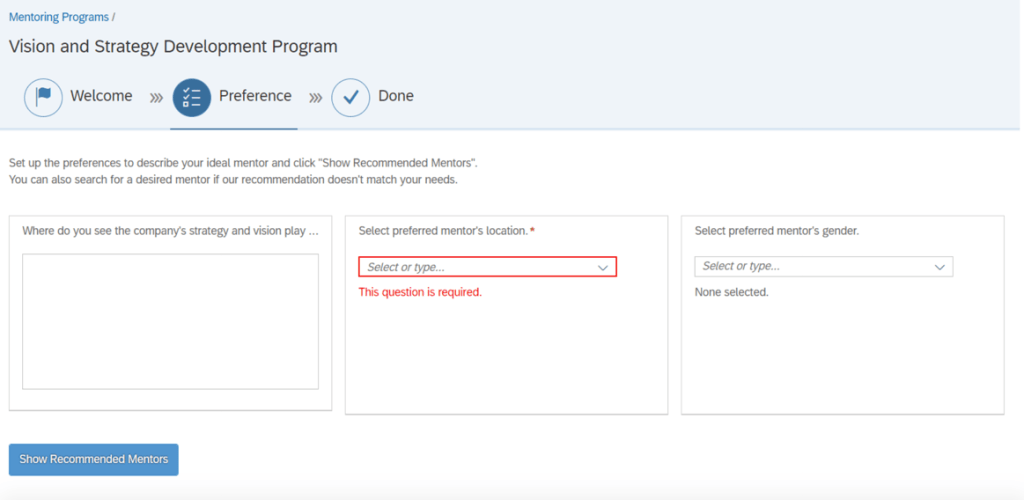
Key Questions Indicated
In the sign up sheet, required entries are noted by a red asterisk. This ensures the mentees complete these fields prior to looking at the recommended mentors. Answering the key questions will improve the recommended mentors match.
Answers to questions will be saved but preferred mentors are not saved.
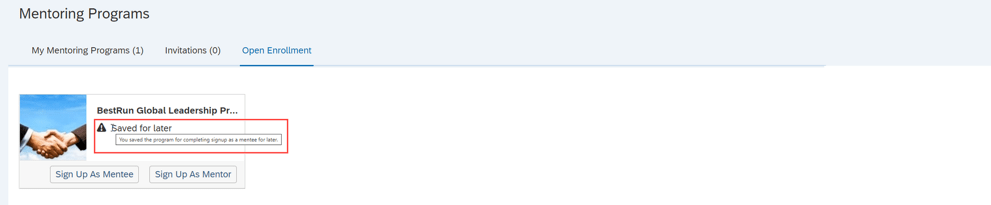
Save Sign Up Program to Complete Later
There may be times when an employee starts to enroll in a mentoring program but is not ready to commit. Maybe they need to consider their mentoring preferences further or need to check in with their manager first. The employee may start to fill out the sign up form, save it and come back to it later to make any updates prior to signing up.
There will be a “Save for Later” button that will display within the program sign up page.
Once saved, the program will appear on either the Invitations or Open Enrollment tab, whichever is applicable.
The program visible on the tab and can be easily be identified with an icon and “Saved for later” text.
Identify Mentor Requests
While filling out the sign up form, mentors that are selected from the recommended list will display a green check mark on the mentor cards.
Confirm Sign up
A mentee will see a confirmation popup when they are completing a program sign up. This gives the mentee the opportunity to confirm signing up for a mentor program. By clicking the “Complete Signup” button, the mentee is enrolled and mentor requests are submitted.
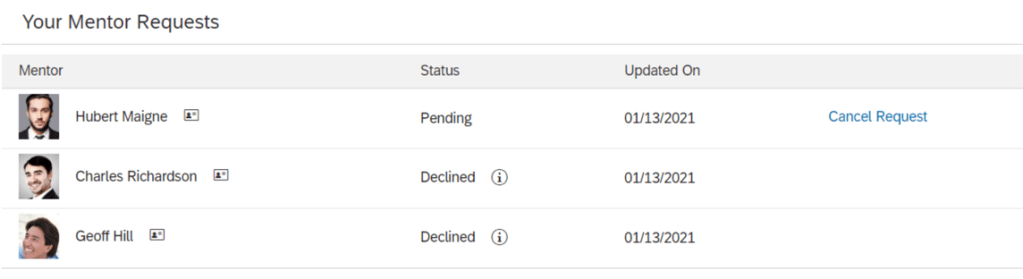
Your Mentor Requests
The Mentoring Page will contain a new section that tracks any mentor requests that a mentee has made. The “Your Mentor Requests” section allows a mentee to see the status of their mentor requests. Pending requests will appear as well as any declined requests and reasons. This feature is only applicable to open enrollment and unsupervised programs. Supervised programs rely on a matching program instead.
Mentees may also cancel any pending mentor requests.
Admin Opt-Ins for Mentoring
There is one admin opt-in available to for Mentoring.
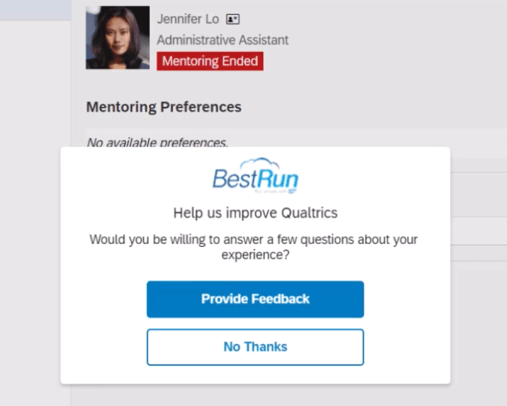
Qualtrics Surveys for End of Mentoring Relationships
Qualtrics Surveys may now be used with Mentoring. The survey can be used when a mentor program participant opts to end the mentoring relationship. Based on how the program was configured, either the mentor or the mentee may cancel the mentoring relationship. A survey will pop up after a participant ends the mentoring relationship.
An email survey is sent to the other participant in the mentor relationship.
The feedback provided in the survey results are seen by the program owner and may be helpful when designing new mentoring programs.
In order to take advantage of this feature, Manage Qualtrics Integrations from the SAP SuccessFactors Admin Center needs to be set up.
Development Goals
Learning OData V4 Service
There is a new Learning OData V4 service. When using transcript or legacy learning activities, learning activities may be created and updated in mass to be associated with development goals and competencies.
For your convenience, we’ve summarized the highlights of the 7 new universal features for 2021 Calibration along with the an admin opt-in. Let’s start with the universal features.
Universal
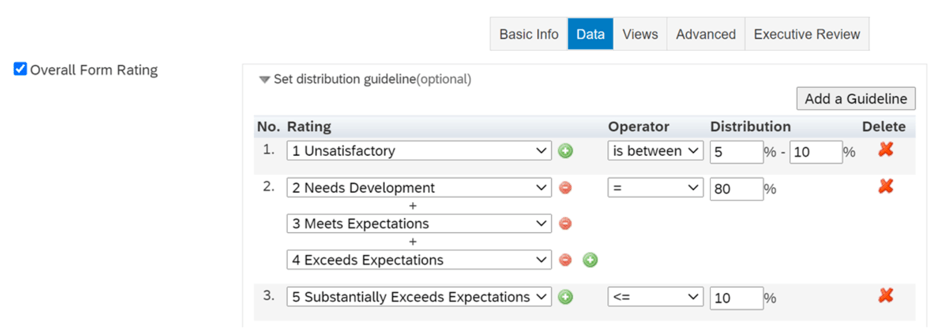
Distribution Range and Group of Ratings in Guidelines
When defining your Calibration template and Performance was selected as the data source on the Data tab, previously an individual percentage could be set for each rating with one rating in a guideline.
It is now possible to create a distribution range for ratings including a group of ratings in a guideline.
In addition to an individual rating, a group of ratings can be used when creating a guideline. As an added bonus, more operators besides “=” can be used:
<
<=
>
>=
is between
This allows you to set a distribution range for ratings and also include a group of ratings in a guideline with different operators.
Group Ratings and Distribution Ranges in Bin View
Here is a feature that works with the new distribution ranges and groups of ratings in guidelines. When a guideline includes an individual rating with a distribution range, in Bin View, you can see the number of subjects in a range that can be added or removed from the bin to meet the guidelines. A warning message will display above the bins if a guideline includes a group of ratings.
You may modify the total number of subjects for groups of ratings to meet the guidelines. You may also adjust the number of subjects displayed as a range within a bin.
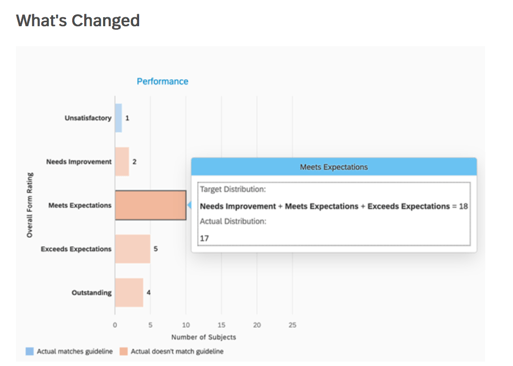
Dashboard and Executive Review Bar Charts
Working in tandem with the new distribution range and groups of ratings that can be configured in guidelines, there is a new UI for bar charts for the Dashboard view and the Executive Review view. The bar charts identify actual distribution for each rating from the rating scale. Blue and orange bars are used to identify the distribution that matches or does not match the guideline.
Hover over the chart to see target vs. actual distribution if any of these conditions are met:
A rating appears more than once in multiple guidelines.
Not all ratings are configured in all guidelines.
There is more than one rating in a guideline.
There is more than “equal” configured in a guideline.
When none of these conditions are met, the bar charts will still display the actual distribution and the guideline.
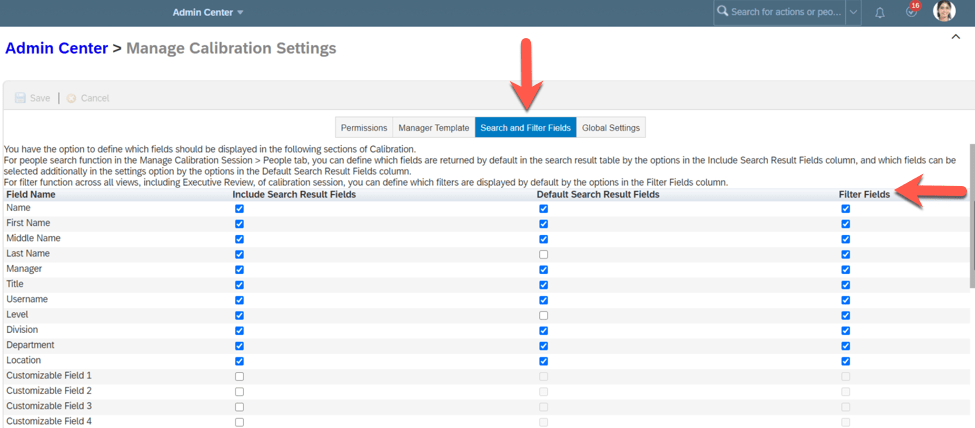
Filters in Manage Calibration Settings
Within Manage Calibration Settings, the “Search Results Fields” tab has been relabeled as “Search and Filter Fields”.
On this tab, the existing columns has been relabeled:
“Include Field” is now “Include Search Results Fields”
“Make Default” is now “Default Search Results Fields”
There is a new column, “Filter Fields”, applies to all views of a calibration session and allows you to identify the default filters.
There are also new filter fields: Name, First Name, Middle Name, Last Name, Title, Username, Email, Gender, Level, andStatus.
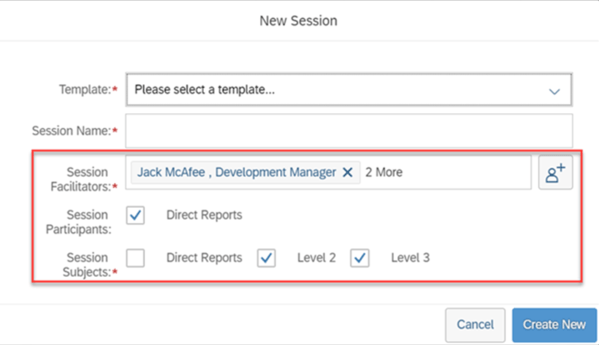
Manager Created Calibration Sessions
It is now easier for a manager to create his team calibration session. Previously a manager could identify the template, session name and number of reporting levels when creating the session. Now the manager has more options. Session co-facilitators may be chosen, the default co-facilitators changed and the direct reports may also be participants rather than just subjects. The default co-facilitators option will only appear if the admin opt-in on Manage Calibration Settings is used. It will be explained in the admin opt-in section at the end of this blog.
Deep Links to Performance Management
Within a calibration session view, it is now possible to use a deep link to view a performance form:
/sf/viewPMFormFromCAL
Also to use a deep link to edit a performance form:
/sf/editPMFormFromCAL
Appending the deep link to the application server address will go to a Performance Management form in calibration views as well.
My Jobs Downloads
Previously Calibration reports could be downloaded from the Scheduled Reports page in Classic View. Reports may now be downloaded from My Jobs page within Report Center. This eliminates the need to switch to Classic View prior to downloading.
A report with multiple files can be downloaded in a compressed .zip file or downloaded individually.
Admin Opt-In
There is one admin opt-in for Calibration which we touched upon when looking at manager created calibration sessions.
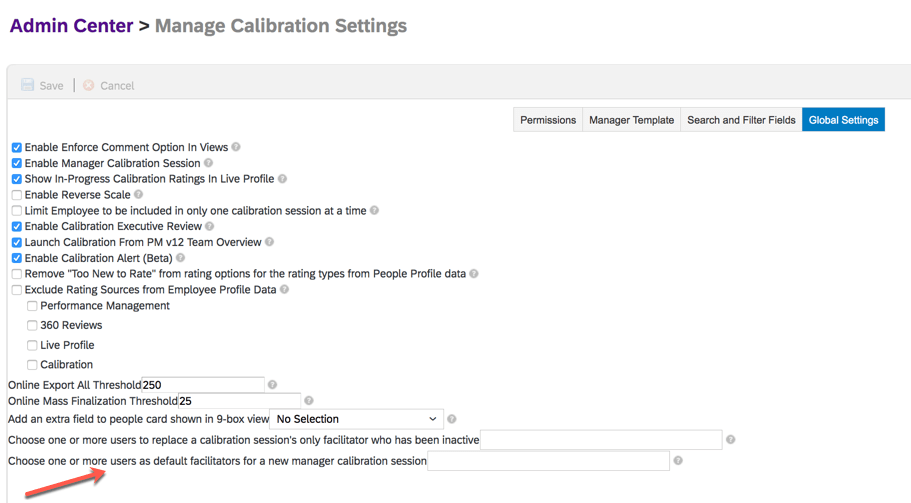
Specify Default Facilitators for Manager-Initiated Calibration Sessions
A manager initiated calibration session can now have default facilitators. To set this up, a user who has access to Manage Calibration Settings would go to the Global tab and use the setting: Choose one or more users as default facilitators for a new manager calibration session to identify active users to default as facilitators.
This can be useful to specify an HR manager to act as a co-facilitator in order to access a manager initiated session.
When creating a session, the New Session dialog window will display the default facilitators but can be edited by the manager.
We have now reviewed what is coming soon for Calibration.
SAP SuccessFactors Job Profile Builder (JPB) is a tool used to create and maintain job profiles associated to job roles. Job profile content can be used when creating job requisitions but it can be used for much more. JPB is integrated with many HCM modules and the key that ties all of these modules to Job Profile Builder is job roles.
The job profile components can be used in many modules. These components are useful in many areas of SuccessFactors including:
Performance Management
Career Development
Succession
Employee Profile
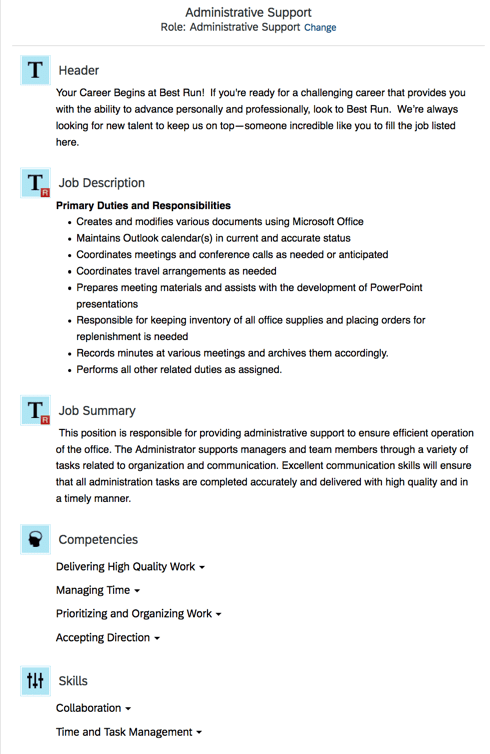
First, let’s look at a job profile. Job Profiles are tied to job roles within a job family. The profile can include education, skills and competencies to associate with a job role. This information can get pulled into a req and the position associated with a job will inherit its properties.
An example of a job profile is shown below.
Job Profile
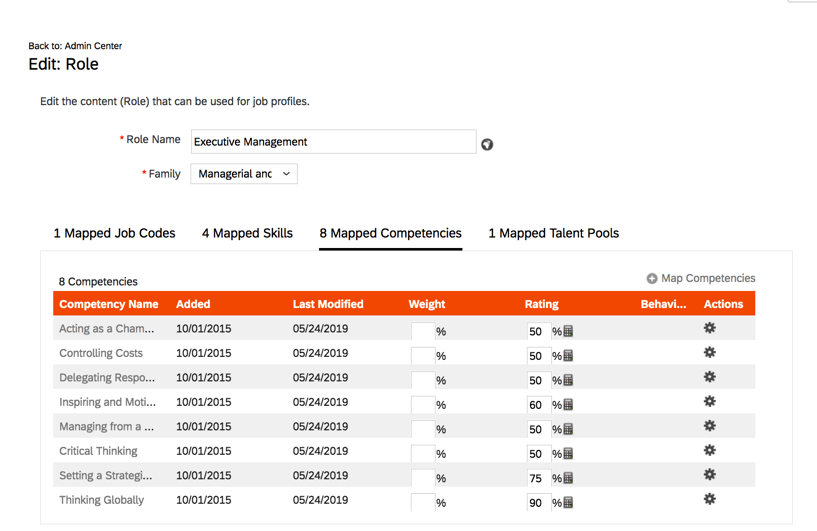
Competencies are a very critical component of a job role. The competencies are selected from a competency library, most notably the SuccessFactors 2.1 Competency Library. Once the job roles are created, competencies are selected to map to roles. Positions associated with a job will then have these competences that can included as requirements on a job req or a way for an employee to track progress on goals.
As you see below, for a role, a competency library is selected and then competencies can be added.
Mapping Competencies to a Job Role
Job codes, skills, competencies and talent pools can be mapped to a job role. Job codes associated with the roles will inherit the skills and competencies. An example is shown below.
The job role below has a job code, 8 competencies, 4 skills and a talent pool mapped to it.
Job Role with Mappings
This means that all positions associated with a job code will then have the associate skills and competencies.
Performance Management Any job related competencies can be included on performance form template. This allows an employee to be rated on their job specific competencies.
When a form is generated, all competencies associated with the employee’s role will be pulled in when a performance form is generated.
Role Competencies on PM Form
Development Goal Plans
Development goals can have have competencies added. This is especially useful when using Career Worksheet which we will look at next,
Competencies on Development Goal
Career Worksheet The Career Worksheet is a component of Career Development and is used by an employee to discover development opportunities based on roles that may wish to grow in to. The Career Worksheet is also dependent on job roles and their job role definitions, mapped competencies and expected competency proficiency ratings.
Job profiles will appear throughout the career worksheet, when browsing roles, viewing suggested roles, viewing career paths to name a few.
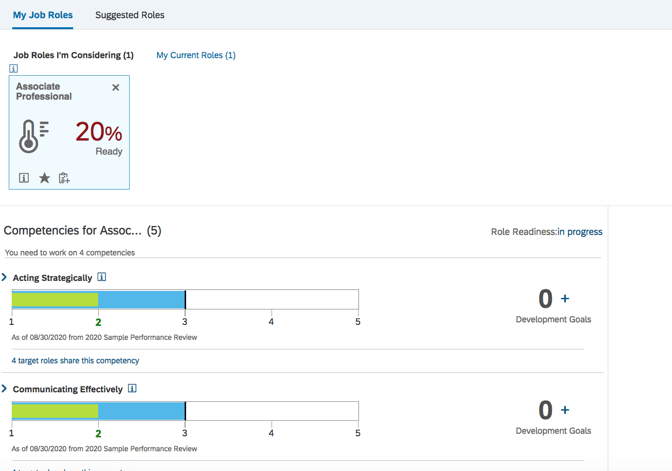
The employee selects future or targeted roles to view along with the job role’s associated competencies. The worksheet identifies competency gaps which highlight development areas that the employee needs to work on. The worksheet also illustrates how ready an employee is for the targeted role based on their competency proficiency. The worksheet may also be used to view career paths and suggested future roles.
Competency mappings to roles are the sole source of competencies listed on the career worksheet. Only ratings from completed forms are displayed in the career worksheet.
A job role will require a number of competencies and each competency should have an expected proficiency level rating. An employee’s readiness for the role depends on whether the employee’s proficiency rating for the competencies meets the expected ratings.
The system uses the Career Worksheet readiness calculation to compute a competency match score which compares the employee’s competency rating with the expected rating for the role.
An employee can browse career paths and suggested roles from their Career Worksheet. Employees can proactively prepare for that next step. By discovering the competencies and skills needed to exceed in a job role, the employee can create development goals that align with a targeted role. This gives employees a sense of empowerment to develop skills, behaviors and competencies to prepare for future roles.
Suggested Roles
Suggested roles can be based on career paths or through an algorithm based on a set of criteria. The suggested roles can be a combination of competencies, targeted roles, career path and roles selected by peer. Clicking within any role will will display the job profile, Selecting a role will add it to the employee’s career worksheet in order gauge their readiness for the role.
Suggested Roles
Clicking the plus sign will add the role the employee’s career worksheet.
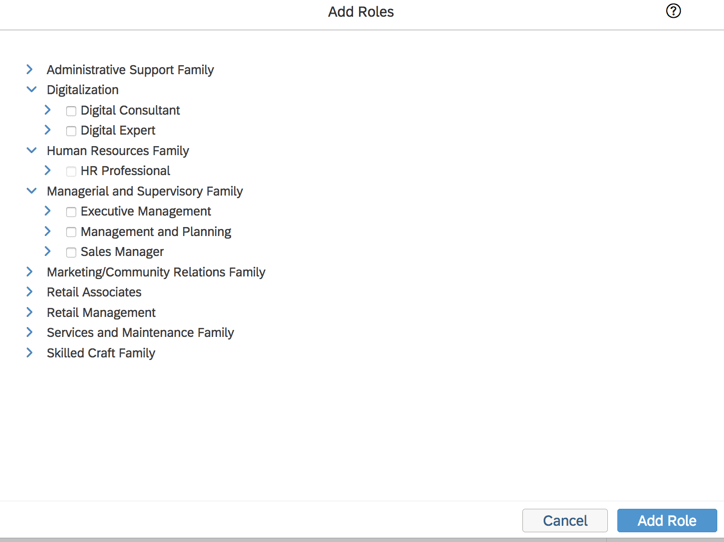
The employee can view job roles based on job family. Selecting any will add the role to career worksheet.
View
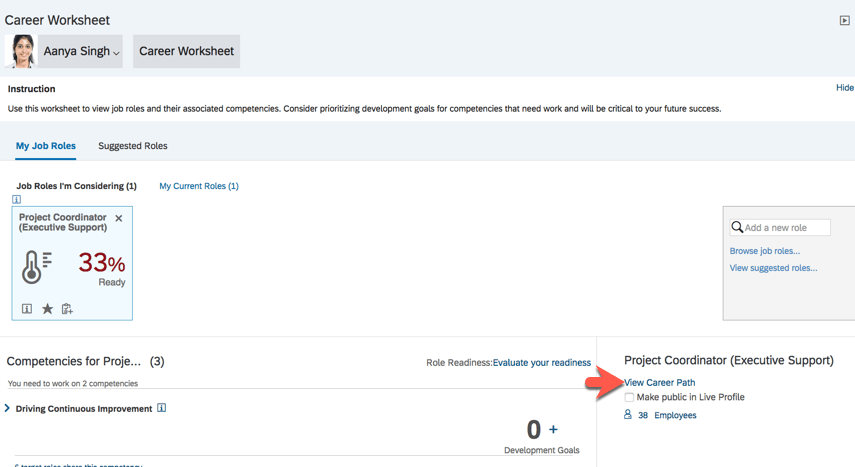
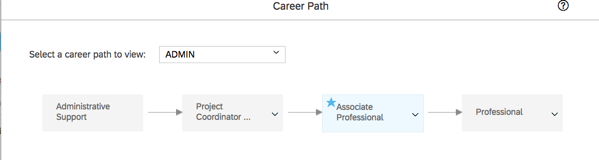
Career Path
Once a target role is selected, the career path for the role can be viewed. This gives the employee a chance to see the job role progression. Job profiles for the roles in the path may be viewed as well.
On the Career Worksheet, the job profile of a targeted role may be viewed.
Career Path for Target Role
All of the job roles that have been configured for a career path will display. The targeted role will be highlighted. Clicking on the information icon give the employee a view of the job profile which can be used to help them decide if that is a job they may like to grow into.
Job Profile
Role Readiness Form
The Role Readiness form is launched from the Career Worksheet by the employee and is used to rate how proficient they are in the competencies needed for any future roles that they selected. The form is used to help employees plan their career development and identify areas of development needed for the future roles.
Role Readiness Form
Readiness Meter
Once the form has been completed, the readiness meter on the career worksheet will show how ready the employee is for the targeted role.
Readiness Meter
Gap Graphs
There is a gap graph for each competency comparing the last competency rating of record for the employee with the expected rating for that role. All job roles mapped to a competency will be included. The graph shows the actual competency rating from the latest rating form against the expected rating for the competency.
For any large gaps for the competencies, the employee may decide to add a development goal to help them become more proficient. This will add the development goal to their development plan. The development goal will also show the linked competencies.
Succession
Job roles can be tied to talent pools. When a talent pool is mapped to a job role, all positions tied to the job code will then become members of the talent pool. Talent pools associated with a position display in the position card when accessed from the Succession Org Chart or Position Tile view.
An employee’s talent card will also show the talent pools their position is associated with as seen below.
Talent Pool on Talent Card
The Position card will also show talent pool successors.
Position and role information may be viewed as well. Within the Succession Org Chart, when viewing a position, the associated job role details may be viewed. Clicking ‘View Role Details’ will open the job profile associated with the role.
Role Details
Employee Profile
The skill profile is linked to JPB.
Employees can add skills whick can be used for employee development and succession planning,
Skill Profile
Conclusion
I hope you can see that Job Profile Builder can be used beyond Recruitment. The job profiles created can be extremely useful in developing the people within your organization and not just for finding new talent.
For more information on the Job Profile Builder and Talent Management Integrations, check out our book here!