With the SAP SuccessFactors First Half 2020 release there are six updates in Succession. There are four new features and two enhancements. Let’s start with Talent Pools.
Talent Pools
There are two new features and some minor enhancements for Talent Pools.
The two new features are:
View Nomination History for Talent Pools
View Talent Pool Nominations in People Profile and Talent Cards without Talent Pool Object Level Permission
The Talent Pool enhancements involve filter fields and the Nomination Table.
Now let’s look closer at each starting with what’s new for Talent Pools.
View Nomination History for Talent Pools
This new universal feature permits those with Talent Pool permission to see nomination changes for nominees within a Talent Pool.
In prior releases, there was no nomination history available to view within a talent pool. Now users with Talent Pool role-based permissions with assigned target populations may see the nomination history for employees in a talent pool.
Within a talent pool, there is new icon used to view nomination history for each nominee. The example shown below identifies the icon which displays on the top right side of the talent pool table.
View Nomination History Icon
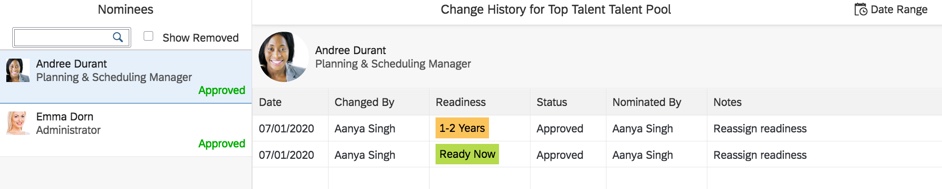
Talent pool nominees that have nomination change history for this pool will display in the “Nominees” section that displays on the left side of the page. Click on any nominee name from this column and their nomination change history for this talent pool will display.
An example is displayed below.
Talent Pool Nominees with Nomination Changes
The name of the user that made the change will display along with the change date. The readiness, status, nomination source and notes for each change are displayed as well.
Approved and Removed nominees will display their nomination history. You must click the checkbox for “Show Removed” in the nominees section to see any employees removed from the talent pool. Both Approved and Removed nominees will display as seen below. The default view is approved nominees.
Approved and Removed Nominees with Nomination Change History
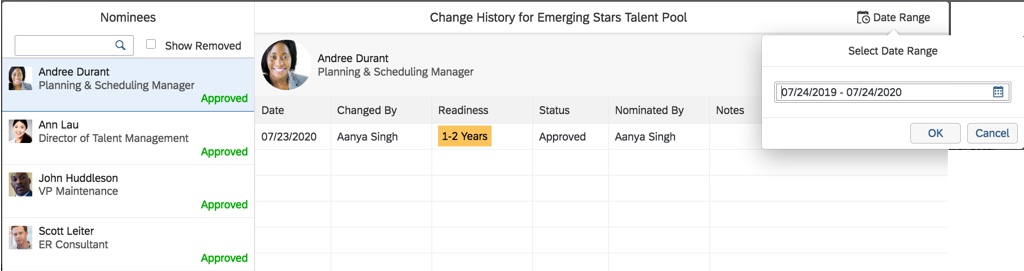
To see the nominee’s talent pool history for another date range, click the “Date Range” calendar icon that is available on this screen. An example is shown below.
Modify Date Range for Nomination History
The default date range is one year from the current date. The date range may be modified and then the nomination history will display for the new date range
We will now look at the other new feature for Talent Pools.
View Talent Pool Nominations in People Profile and Talent Cards without Talent Pool Object Level Permission
It is now possible to enable users without Talent Pool object level permission to view Talent Pool nominations of employees in People Profile and Talent Card.
This new feature may be used to enable managers to see this information for their direct reports in People Profile and Talent Card.
This is a provisioning opt-in. The setting to enable is “View Talent Pool nominations in People Profile and Talent Card without having the Talent Pool object level permission“.
Provisioning Opt-In
When enabled, users without Talent Pool object level permission may view Talent Pool nominations for employees within:
Nomination Block in People Profile
Nominations section of Talent Card
In addition to these two new features, there is also an enhancement for Talent Pools that we will look at next.
Talent Pool Enhancements
There are a few enhancements to talent pools. Let’s open a talent pool to see what’s changed.
Talent Pool Nomination Table View
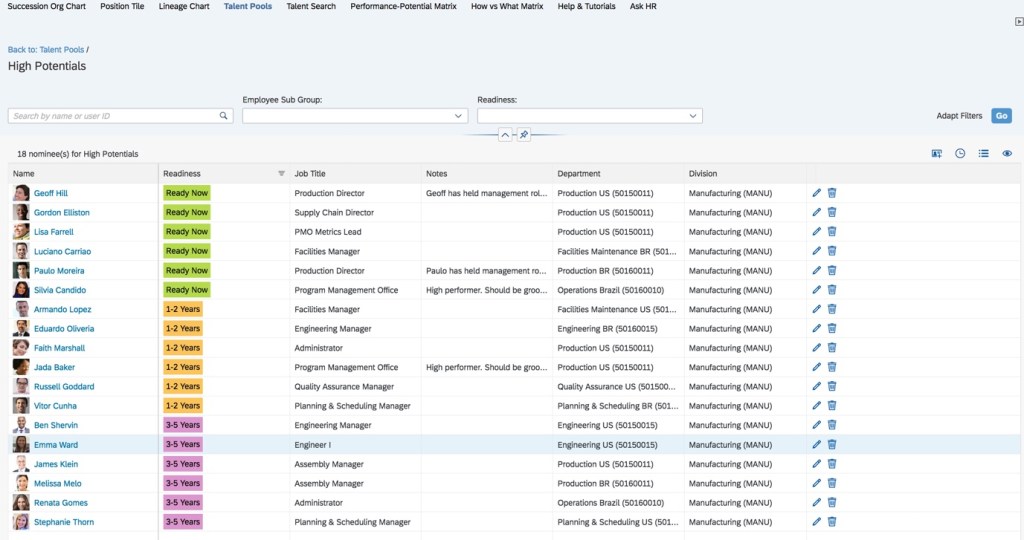
First, there are more lines available in a talent pool nomination table view as seen below. This update also includes making the line width consistent with tables in other modules.
Updated Nomination Table for a Talent Pool
Notes Column Placement
There is an additional display field option as well. Users may modify the position of the Notes column. Let’s see how it’s done.
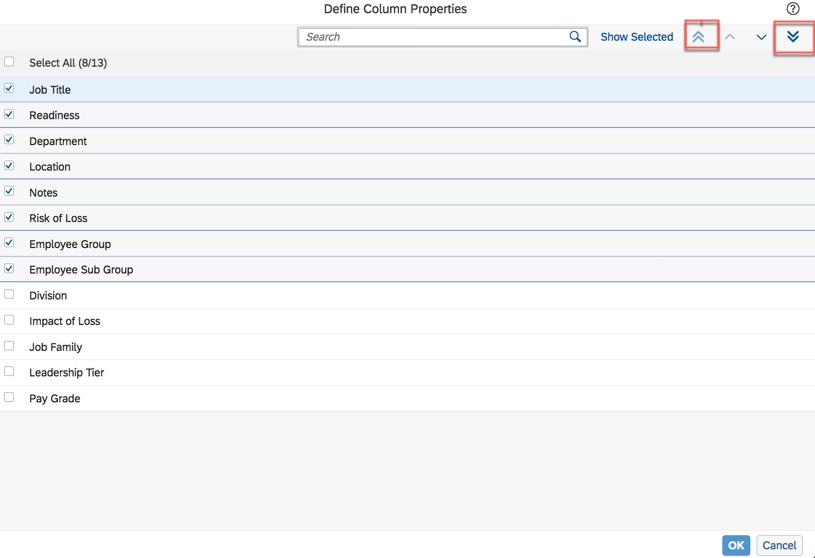
Within the talent pool, click on the “Define Column Properties” icon as noted below.
Define Column Properties Icon
A pop up displays the available fields that may be included in the talent pool view. When the cursor is place on “Notes“, the upward and downward arrows may be used to change placement of this field.
Define Talent Pool Column Properties
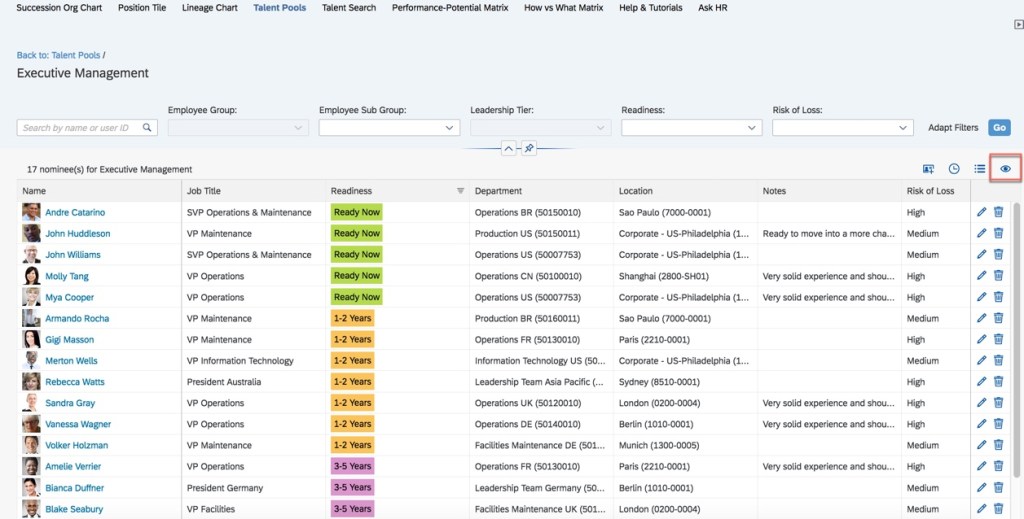
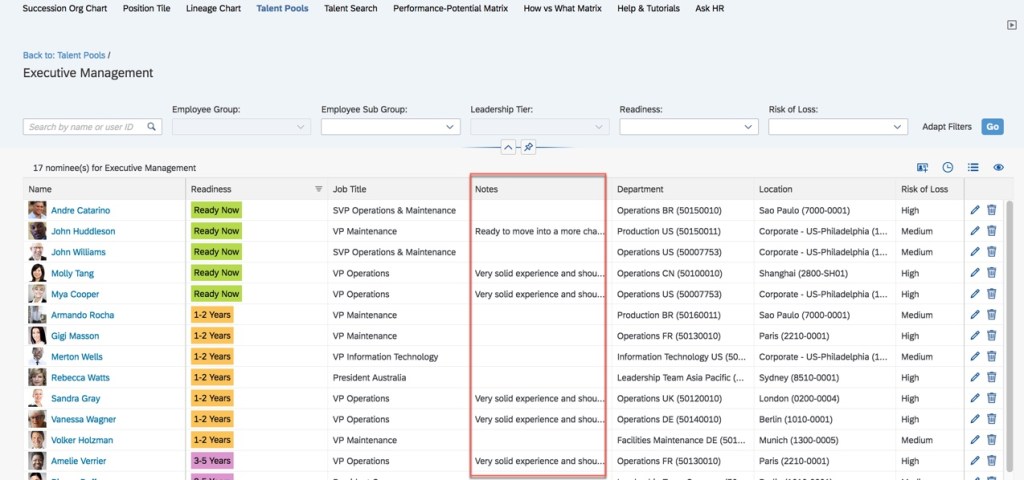
Clicking “OK” and the nominations in the Talent Pool will now reflect the changed column order as seen in the figure below.
Nomination Table with Updated Notes Column Placement
The final enhancement to Talent Pools involves selected filters.
Talent Pool Filters
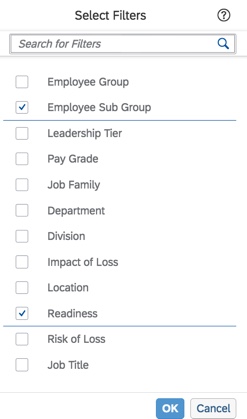
First, the selected filters can now be automatically cleared after all nominees are deleted from a Talent Pool. Looking at the example below, the filters were defined by clicking “Adapt Filters“.
Select Fields to Appear on Filter Bar
Here is where the filters are defined. The fields to use as filters are selected and will appear on the filter bar within a talent pool.
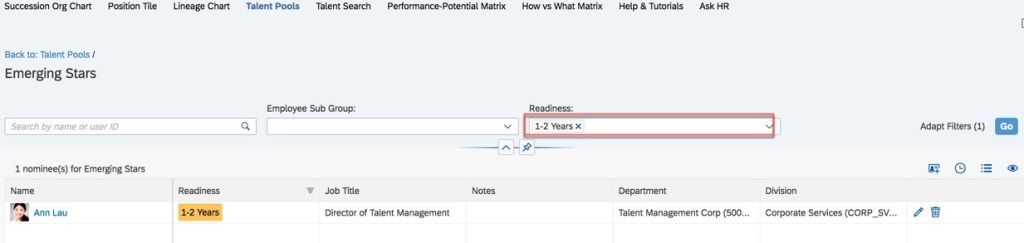
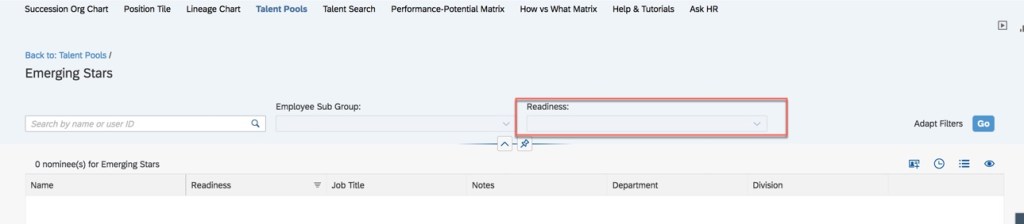
In the example shown below, there is a filter to display nominees with a readiness of 1 to 2 years.
Talent Pool Before Nominee Deletion
After the final nominee is deleted from the talent pool, the readiness filter is cleared as seen below.
We have now seen all of the updates for Talent Pools. Let’s see what else is new in Succession.
Exclude Nominees from Seeing Themselves within a Succession Plan
This is an admin opt-in setting that when enabled, prevents users nominated as successors to see themselves in a succession plan. This will also prevent them from nominating themselves. This means that users with permission to do Succession Planning for certain positions won’t see themselves within the succession plans of those positions.
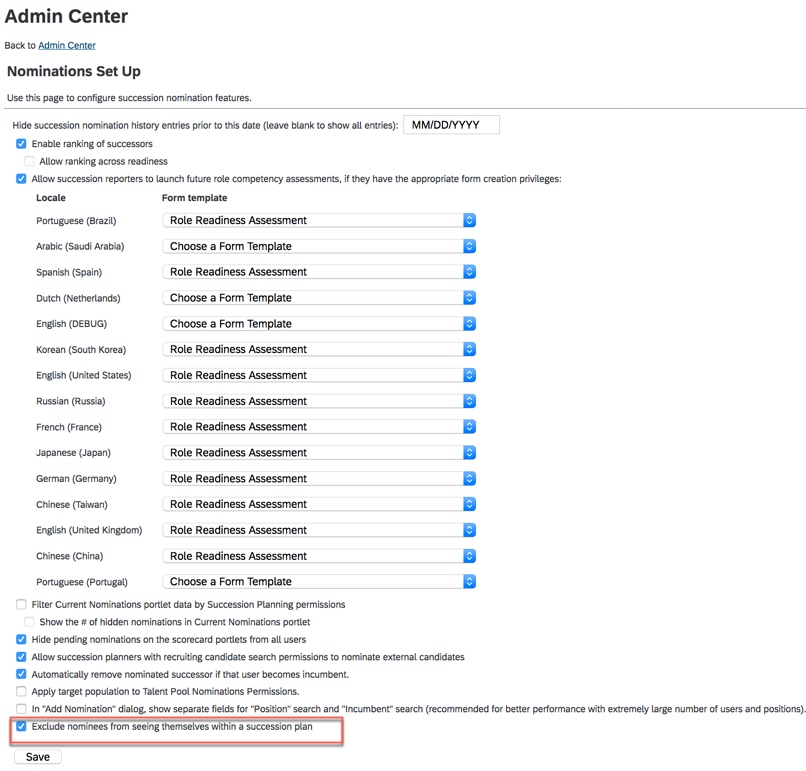
Let’s see how to enable this feature. Go to “Nominations Set Up”. Scroll to the very bottom of the screen and enable “Exclude nominees from seeing themselves within a succession plan”. The “Nomination Set Up” page is shown below.
Nomination Set Up Feature to Enable
This exclusion prevents nominees from nominating themselves. Additionally, the nominees would not see themselves in Succession Org Chart, Position Tiles, Lineage Chart, Talent card, People Profile, Presentation and Nomination History from position card. A Talent Search would not display them or a list that they are a part of.
There is one additional feature that we will now explore.
New OData API Function Imports for Succession
There are two new OData API Function Imports for Succession:
approveSuccessors
rejectSuccessors
These function imports may be used to approve or reject nominees that are in a pending status.
In prior releases, third-party applications could only read the Succession nominations in Pending Approval status.
The two new function imports allows third-party applications to write the approval steps of the nomination workflow.
The role-based permissions needed for both function imports is: Succession Planners>Succession Approval Permission.
Approve Nominees in Pending Status
Pending status for approvals are:
Change Pending
Pending
Approval Pending
Parameters for approval and rejection are nomineeIds (mandatory) and comment (optional).
Now we have seen what’s new in Succession, let’s see the final enhancement.
Picklist Label Enhancements for Matrix Grid Report and Talent Pools Overview Page
In previous releases, picklists used for filter fields in the Matrix Grid Reports and Talent Pool Nominations overview page showed option IDs rather than labels.
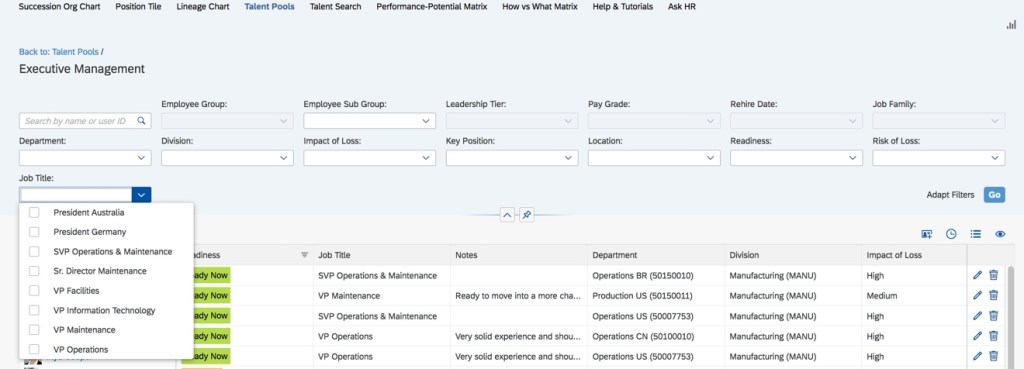
Matrix grid reports support custom filters and these filters may be associated with a picklist. If this is the case, the picklist labels will be displayed in the customizable fields. Picklists that are used for filter fields of the Matrix Grid Reports and Talent Pools nominations overview page will now show labels instead of option IDs. A custom picklist with values for a talent pool filter is shown below.
Talent Pool Filter with Values
These fields also remember the picklist labels that were chosen the last time.
Wrap Up
We have now seen the new features and functionality for the Succession module. Check out my blogs on Highlight of 1H 2020 Release Updates for Calibration and Career Development too.
Compensation Statements may be the most critical aspect to a successful Compensation implementation. Statements are typically the only visibility employees have to the Compensation module and are important in not only communicating final payments to employees but also in letting them know of any other company directives and overall business results.
Working in Compensation for over 15 years, I have configured a lot of compensation statements. Sure, custom statements in XSL can be created to meet all of the customer’s wildest dreams, but this may not always be needed or possible as customers might be restrained by budget, time, or expertise in maintaining year over year. Standard delivered statements can be used for compensation, templates, variable pay templates, or a combination.
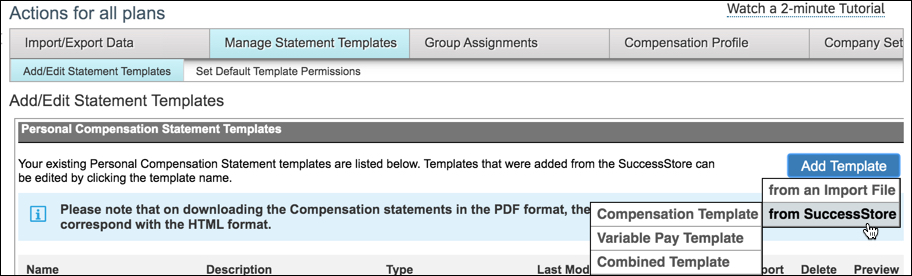
Admin Center –> Compensation –> Actions for All Plans –> Manage Statement Templates –> Add Template –> from SuccessStore –> choose template type
My Top 10 List on how to optimize standard compensation statements:
1. Gather statement requirements early
Statements are often thought of as an end of the process final product. While they are just that, you will find that if you include statements as part of the early requirements discussion along with the design of the compensation plans, you will end up with a better final product.
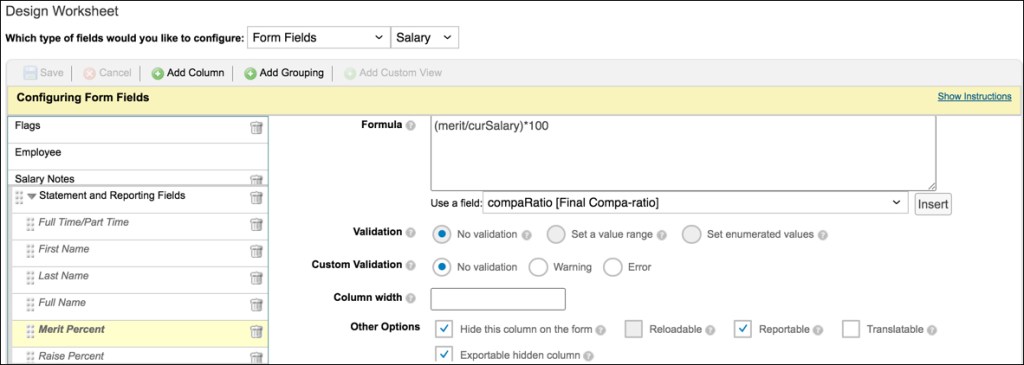
In order to pull fields of information into the statements, they must be a field in the plan template(s) you are referencing. You can include extra indicative data or calculated fields (such as Merit Percent) or fields that show final values rounded (such as New Annual Salary) in case your customer wants to show nice rounded numbers to the employees. These fields do not need to be made visible during planning, but can be hidden so they are available for display in the statement.
Example of a custom field marked hidden during planning but that can be pulled into the statement
2. Take advantage of statement suppression
In 2019, SuccessFactors enhanced the compensation module to allow for statement suppression. Gone are the days of having to generate and recall statements for employees that you wouldn’t need to communicate awards to.
To start, create a custom column in your template to control the suppression based on the customer’s desired logic. For example, to suppress a statement because of a low rating the custom column could include the formula if(pmRating<2, “FALSE”, “TRUE”). Employees with the value “TRUE” will have statements generated, those with a value of “FALSE” will be suppressed.
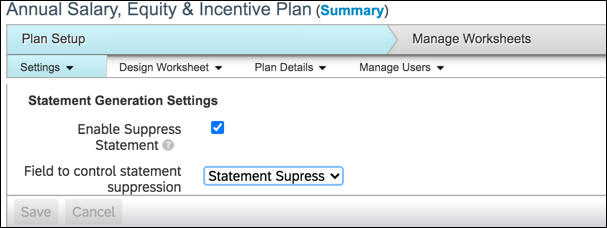
Enable the setting from Plan Setup –> Settings. Select the box for Enable Statement Suppression and use the drop down to select the custom column you have created with your statement suppression logic. When statements are generated, the job status report will list the names whose statements have been suppressed.
Admin Center –> Compensation –> select template –> Plan Setup –> Settings –> Statement Generation Settings
3. Make use of sections and conditional formatting for the right side data fields
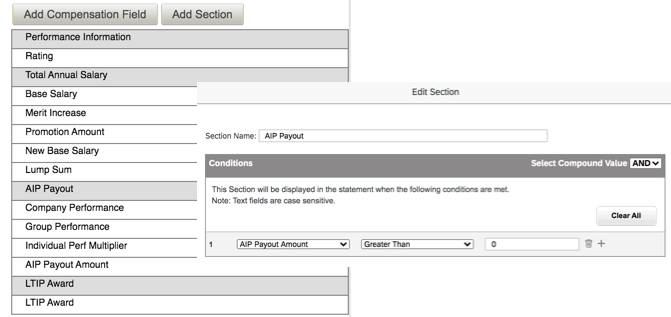
Group fields of data under Sections to consolidate Performance, Merit, Bonus, and Equity fields depending on the templates used in the statement. Conditional formatting can be added to suppress these groups for instance if the customer wishes to suppress the merit section if the employee had zero for their merit award. Conditional formatting can also be done on the field level in cases where customers wish to show the merit section for example to show salary information but not show the merit award field if amount = 0. This also allows for fields such as promotion or lump sum to only show if applicable to the employee.
Example of using sections to group similar compensation fields and adding conditional formatting to a section to suppress if the customer does not wish to show in various scenarios
4. Get the most out of the left side text and logo
Most of the time, the company logo being used throughout the SuccessFactors tool can be used as the logo in the statement as well. If the customer wants a custom logo, plan for this early as it can take time to the custom logo URL setup and to make sure the look and feel is right. Encourage the customer to use their standard logo if possible for a standard compensation statement.
Make use of font sizes and typographical emphasis to draw attention to key elements. Typically I use the small size font throughout for text sections. These text sections can be dragged and dropped depending on the order they should appear.
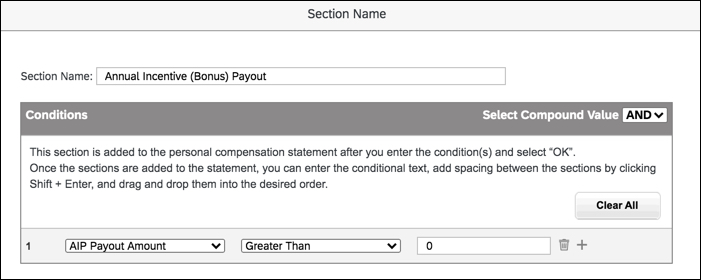
Conditional formatting can be added here as well to suppress the text section for instance if the customer wishes to only show the section if the amount is greater than 0. The conditional formatting on the left and right side should be configured together so that the logic aligns.
Typically customers can use the left side text to add in text that is applicable to all employees such as overall company results and any disclaimers that are needed around payment dates and rounding rules.
Example of using conditional formatting to only show text sections if conditions apply
5. Keep the statement to 1 page if possible
Keep in mind the more text and fields you add, the longer the statement becomes. Most customers like to see a concise one page statement.
The Signature section is not really needed as you can add this to a text box above if the signature is pretty straightforward. The section itself even with no text configured in it can cause the statement to push to the next page as it shows below the text and data sections, even if it just shows a blank second page. This section cannot be removed, but you can trick the system into shortening it significantly if you simply add a few spaces.
Example of suppressing the signature section by simply adding a few blank spaces
6. Multi-language requirements aren’t necessarily a show stopper
Standard statements do not typically support multi-language requirements. You can however do a workaround and create translated standard statements using the English version as a baseline for the fields and input the required language into the text boxes and field names. If you have a requirement to translate the plan templates, you have a good start to the translations already for the fields. This process can be tedious, so make sure to have a pretty finalized English version before you start creating additional versions in other languages.
Example of a translated standard statement into French
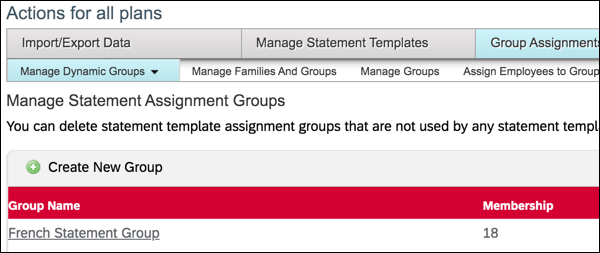
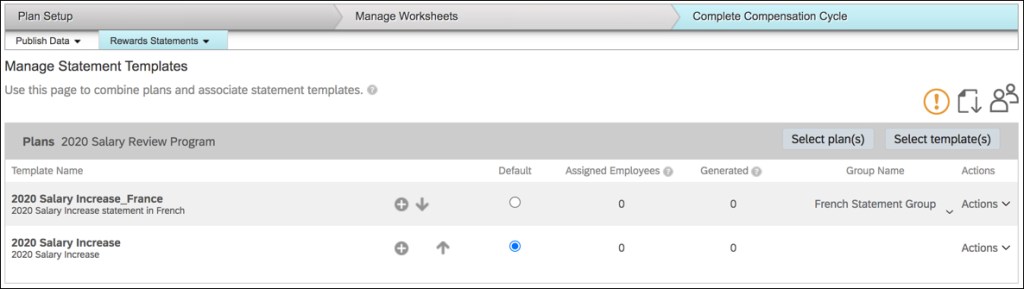
You can then configure statement groups to tie the translated statements to the groups of employees that need the statement in non-English languages.
Actions for all plans –> Group Assignments –> Manage Dynamic Group –> Manage Statement Assignment Groups –> Create New Group using required criteriaAdmin Center –> Compensation –> select template –> Complete Compensation Cycle –> Rewards Statements –> Manage Statement Templates –> Add translated statement templates and associated groups
7. Figure out the roles that will be involved in communicating statements
Planners are typically responsible for communicating the awards to their employees. They can download statements in several ways from their Completed worksheets or within the People Profile if permissions have been set. Additionally, check with your customer if they wish for the employees themselves to have access to their own statements. If this is the case, typically this is a task scheduled out a few weeks from the initial conversations with managers to open access to employees.
SuccessFactors recently added the ability to download statements directly from Executive Review. This allows higher level managers as well as HR managers (assuming role based permissions have been granted to allow access to Executive Review) to be able to download their span of control using the Bulk Print Statements button. The icon for bulk download now only appears if the employees have a generated statements based on the filters in Executive Review. In the previous version, the icon was displayed even if statements weren’t generated from recently filtered list.
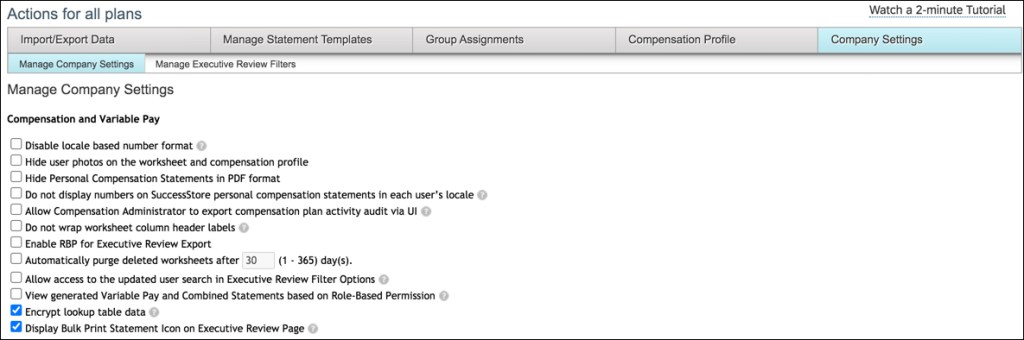
To activate statement printing from Executive Review, these settings should be established in Company Settings: Disable Hide Personal Compensation Statements in PDF Format & Enable Display Bulk Print Statement Icon on Executive Review
8. Test early and often
In addition to gathering statement requirements early, plan to test the statements early as well. Ideally the statement would be part of the early iteration reviews to gather feedback before the frenzy of planning occurs. Create examples of statements to show all the different variations that are possible with the customer such as merit only, merit and lump sum, lump sum only, etc. If you wait until the planning is occurring in Production, you are no longer able to add or edit fields that customers may request in the statement.
Also test the role based permissions and the process for how and when the various roles would download the statements. This will prevent any headaches down the road when the timing is tight to review and open statement access to HR, managers, and/or employees in Production.
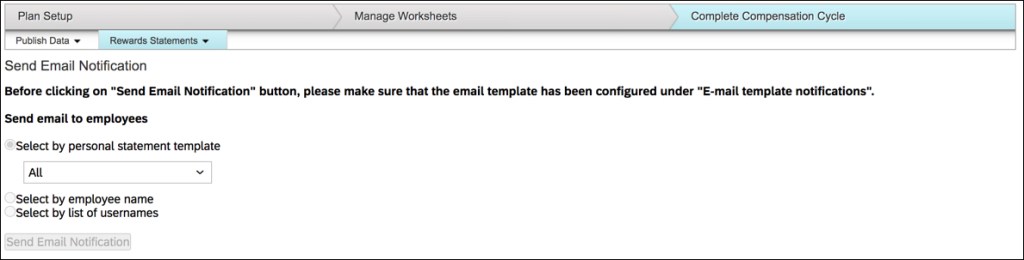
9. Make use of standard Email Notifications
If the employees will be able to access their own statements, there is a standard email notification that can be sent. The email text can be setup in E-Mail Notification Template Settings. This will allow for Compensation Administrators to send specific text to employees or groups of employees letting them know that their statements are available and how to navigate in the system to find them.
Validate any final changes with the customer. Company numbers and final performance may come in just prior to statement generation so an additional validation of the text sections especially is suggested.
You can recreate the statements in each environment, but I suggest to make all changes in the lowest environment and then download and upload them instead. This takes away some flexibility in making last minute changes in Production but keeps the environments consistent and encourages testing to be done in the lower environments before moving to Production.
An employee is empowered to manage their career through the use of the SuccessFactors Career Worksheet. The Career Worksheet, a component of the Career Development module, allows an employee to view details about job roles that interest them, see the role’s associated competencies and select a targeted or future role. Once selected, a role readiness assessment form can be initiated to measure how ready an employee is for the potential future role.
The Role Readiness Assessment form, accessed from the Career Worksheet will identify competency gaps for the target role and help an employee plan development steps to prepare for the role. The employee’s proficiency for each of the role’s competencies is rated and an overall role readiness rating is calculated based on the employee’s actual competency ratings against the expected competency ratings for the role.
Before we look what is required to set up the Role Readiness Assessment form, let’s confirm that you are using development goals with competencies, Job Profile Builder (JPB), and the Career Worksheet. The remainder of this post is based on these assumptions.
Career Development Planning Settings in Provisioning
Before outlining the permissions needed for the Role Readiness Assessment form, let’s review the settings that are required for Career Development Planning.
To get started, you will need Provisioning access. Within Company Settings in the Goal Frameworks section, Goal Management Suite (Total Goal Management) and My Goals Tab should be enabled.
Goal permissions
Under Career & Development Planning in the Goal Frameworks section, enable CDP Full (Development Plan) which also enables Development Plan V12. Enable Career Worksheet which also enables Career Worksheet V12. Enable Career Path V2 as well so that Career Paths may be created and used by employees with the Career Worksheet.
CDP settings to enable
After enabling the Goal Frameworks settings, make sure Verions 12 UI framework (Revolution), Enable Generic Objects, and Enable the Attachment Manager are set as well.
Provisioning Settings for Job Profile Builder
The Role Readiness Assessment form relies on competencies linked to job roles. Competencies should be mapped to job roles using Job Profile Builder. There are some additional settings needed in Company Settings in order to use Job Profile Builder in the instance.
JDM v2.0 /Skills Management should be enabled.
JDM V.2-0 enabled in Provisioning
In order to use Job Profile Builder, the Competency Library Management Suite should not be enabled.
Competency Library Management Suite not enabled
A competency library which contains all of the competencies used for your organization is required. This is critical for the Role Readiness Assessment form to work. The form rates competencies linked to a role, therefore job roles must be linked to competencies in a competency library. Make sure there is a competency library in use. The SuccessFactors Competency Library 2.1 has the expanded list of competencies or you may create a custom competency library.
Competency Library
Career Development Templates in Provisioning
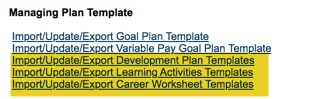
Three of the four templates used within the Career Development module may be found in Provisioning under Managing Plan Template: Development Plan, Learning Activities, and Career Worksheet.
Templates within Managing Plan Template in Company Settings
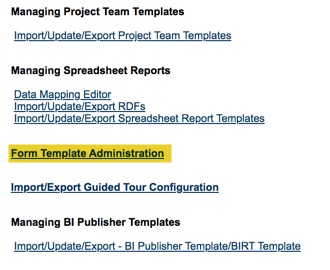
The fourth template, used for the Role Readiness Assessment form is found under Form Template Administration.
PM forms are found within Form Template Administration
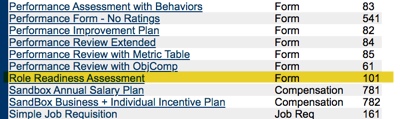
Click on the link to see all of the existing templates. Scroll through the listing of form templates to find the standard Role Readiness Assessment template.
Role Readiness Assessment template within Form Template Administration
Career Worksheet V12 must be enabled and there should be a Career Worksheet template in order to see the standard Role Readiness Assessment template.
Career Worksheet Template in Provisioning must be present
Role Based Permissions for the Admin Role
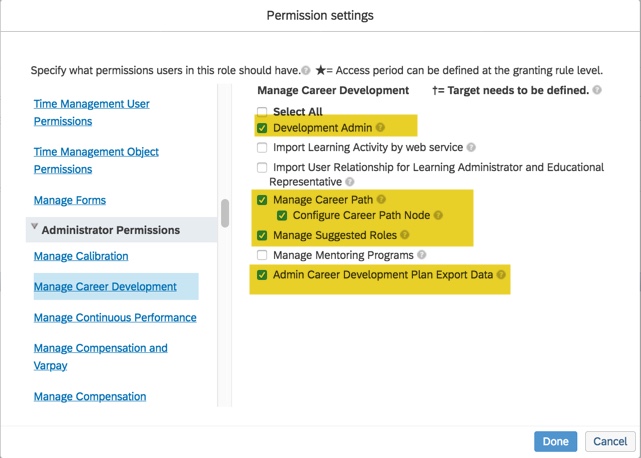
There are some role based permissions in the instance that must be set up for the system or HR administrator and employee roles. The admin role will need to manage and configure various features for Career Development Planning. In the instance, go to Manage Permission Roles. For the admin role, select Manage Career Development under the Administrator Permissions section.
CDP Permissions for Admin Role
To manage the Career Worksheet, Development Admin and Manage Career Path permissions are needed. Admin Career Development Plan Export Data permission is optional.
The admin role requires Job Profile Builder access in order to configure job profiles and map job roles and competencies to the profiles.
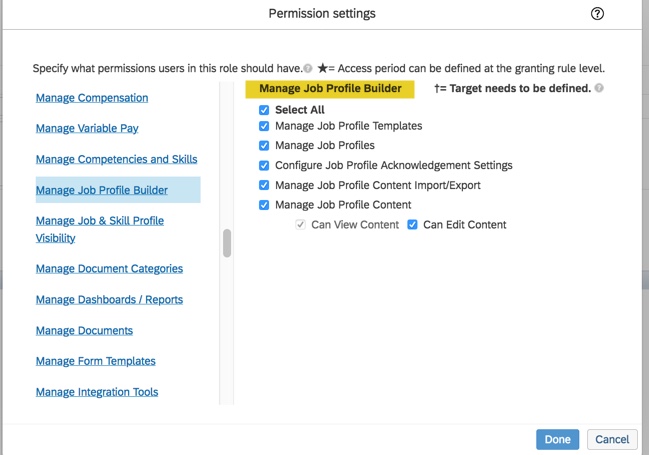
JPB Permissions
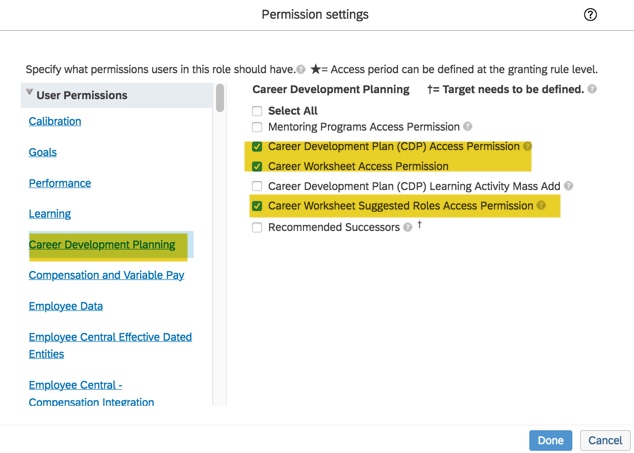
Access is also needed for components of Career Development Planning: development plan, Career Worksheet and suggested roles for the worksheet.
CDP permissions for the admin role
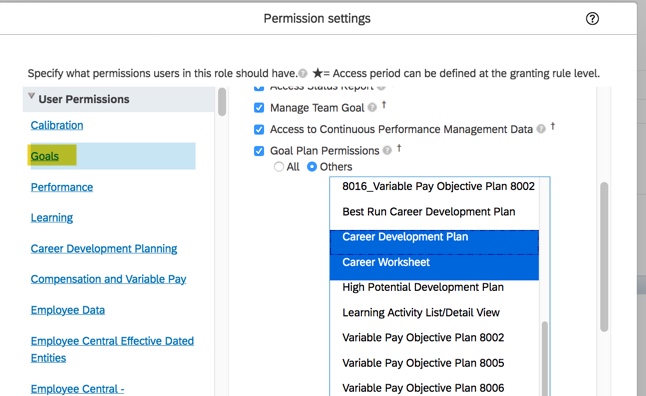
Under User Permissions>Goals, the admin role will also need access to the Career Development Plan and the Career Worksheet.
Goal Plan Permissions
Role Based Permissions for the Employee Role
The employee role needs to have permissions set up to be able to access the Role Readiness Assessment form. A link within the Career Worksheet will open the role readiness assessment form, bypassing the usual form creation steps.
Link to the Role Readiness Assessment Form
There are some role based permissions that need to be set up for the employee role for this link to work.
Grant “Permission to Create Forms” for the Role Readiness Assessment template
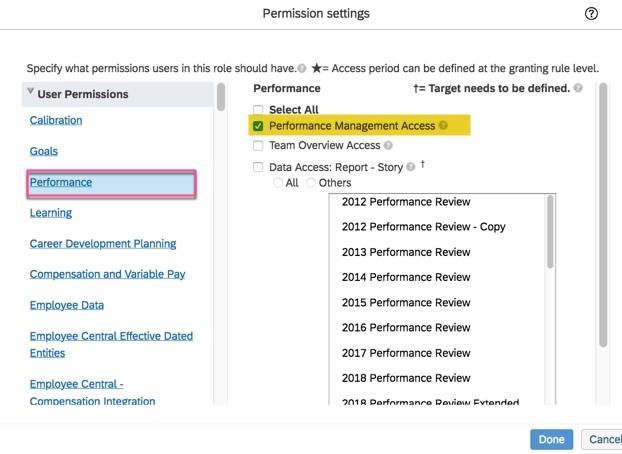
The employee role will need Performance Management Access under Performance User Permissions.
Permission needed for Performance Management Access
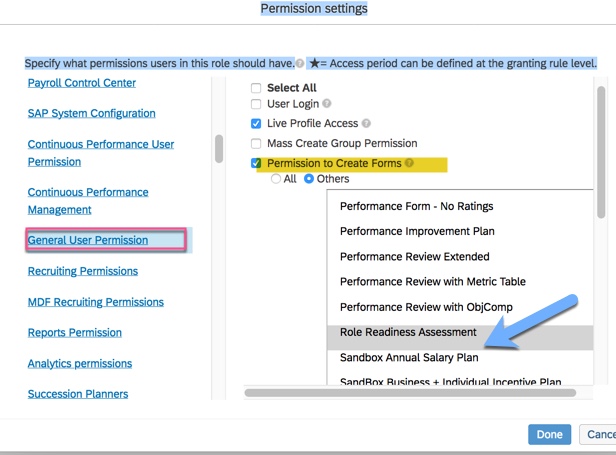
The employee role will also need Permission to Create Forms which is found in the General User Permission section. Select the Others radio button and select the Role Readiness Assessment form.
Employee role will need permission to create the Role Readiness Assessment form
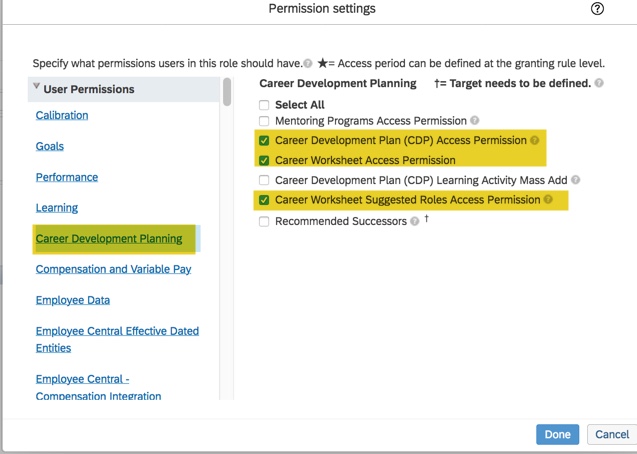
This permission is in addition to CDP permissions that should be set for access to development plans, the Career Worksheet and Career Paths.
CDP Permissions
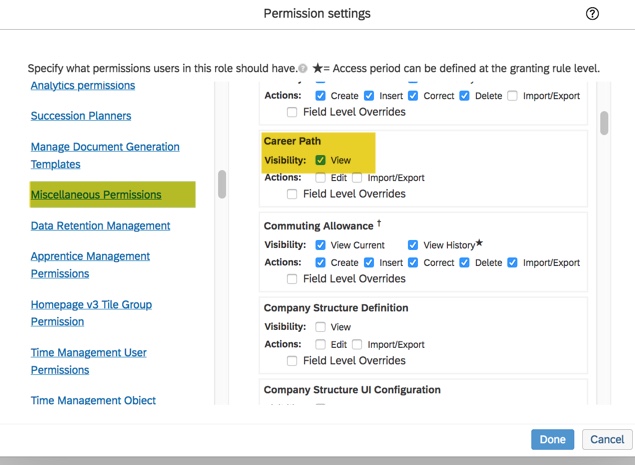
The employee role will need access to view the Career Path. This permission will allow the user to browse career paths from the Career Worksheet.
Permission to view Career Path
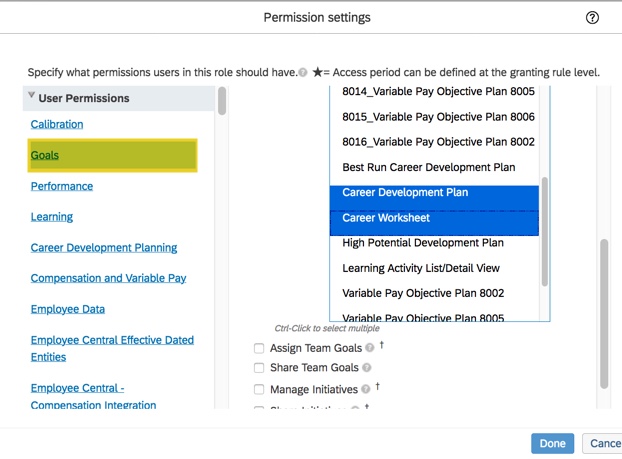
Under User Permissions>Goals, the employee role will also need access to the Career Development Plan and the Career Worksheet.
Goals Permissions
Competency Expected Ratings Set Up
Now that the employee role permissions are set, we will look at the competencies for a job role and how they are rated on the form. The goal of the Role Readiness Assessment form is to rate the employee’s mastery of the competencies needed for the targeted role.
It is within Job Profile Content where roles should be linked to competencies from the competency library.
Mapping competencies to a role
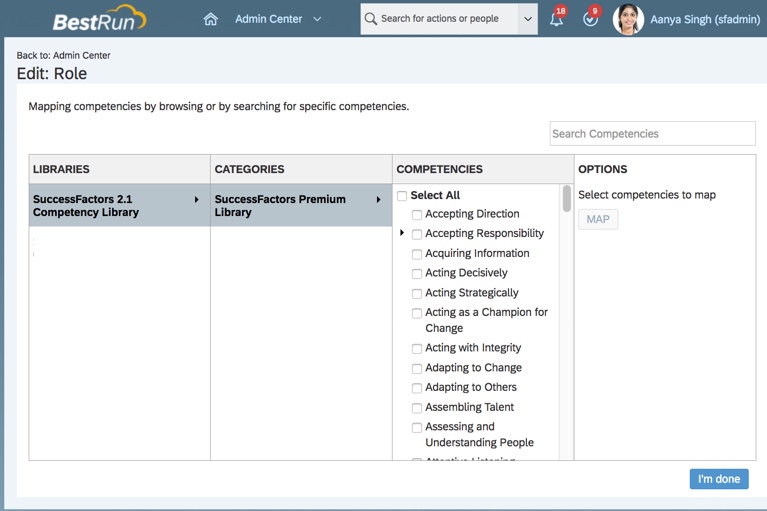
When mapping the competencies to a role, you will see the competency library to select from.
Select competencies in library to map to role
The system uses a calculation to compute a competency score which will demonstrate how ready an employee is for the targeted role. The role readiness calculation relies on an expected rating for each competency for a role. The readiness score is based on a comparison between the employee’s actual competency rating with the expected competency rating. Rating the roles’ competencies also identify areas of development that are needed in order to succeed in a future role.
The expected rating is configured within Job Profile Builder on the job role’s mapped competencies. The admin defines the expected competency ratings for each job role.
Assigning Expected Ratings to Role Competencies
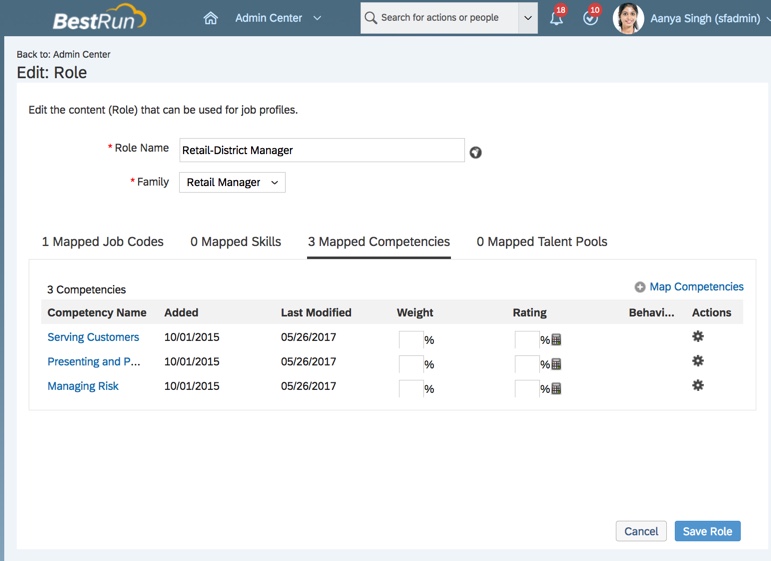
In order to set the expected ratings for each competency on a job profile (a job role is attached to a profile), go to Manage Job Profile Content>Set Up Families and Roles.
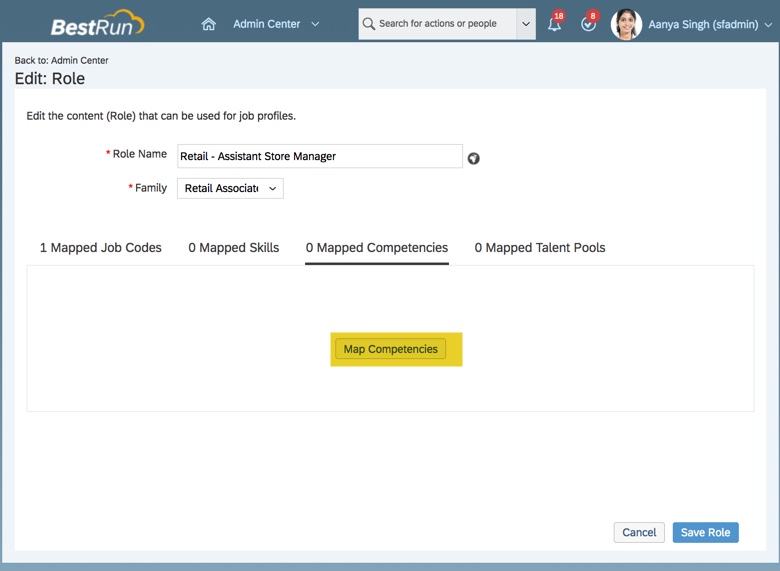
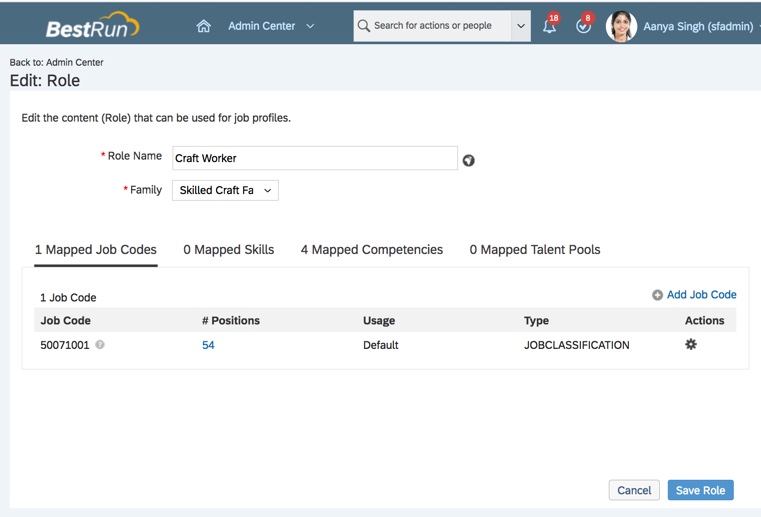
A job role is associated with a job profile. Select a role to update by clicking on the role name. The content of the role will now be editable.
Role in Edit mode
The screen will have tabs for mapped job codes, mapped skills, mapped competencies and mapped talent pools. Each tab will include a count for the mappings.
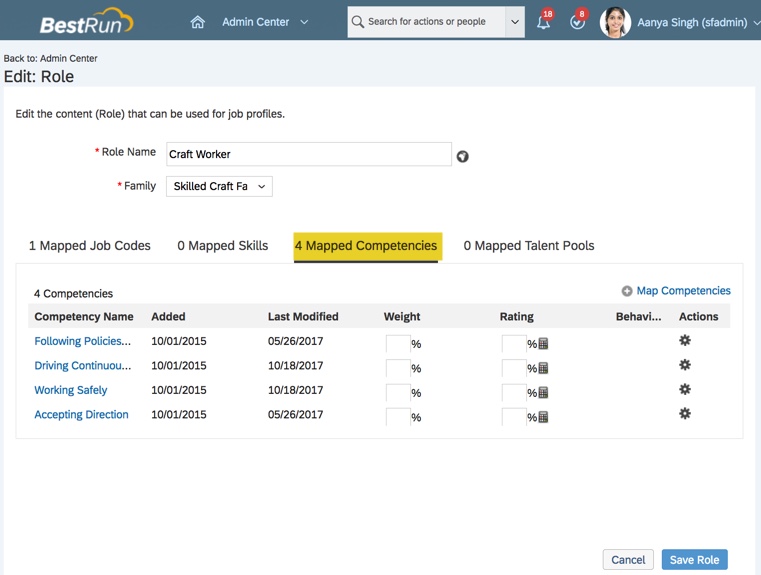
Go to the Mapped Competencies tab. Any competencies that are mapped to the job role will display. Competencies must be mapped to a role in order for the Role Readiness Assessment to work. If a role does not have competencies and it is selected as a target role, the Role Readiness Assessment form will not have any competencies to rate. So be sure to map competencies to each role.
Mapped Competencies for Role
The Rating column that is needs populated for each competency mapped to a role. The rating column is used to add the expected ratings and % weight for each competency. To create the expecting rating for a competency, click on the calculator icon in the Rating column.
Select icon to set rating
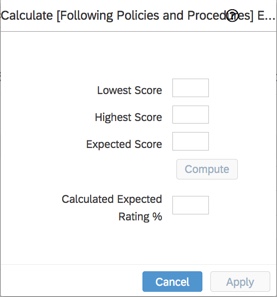
Scores are entered on the pop up to determine the expected rating % for the competency.
Enter lowest, highest and expected scores for a competency
Based on the rating scale used on the Role Readiness Assessment form, enter the lowest and highest scores in the rating range along with the expected proficiency rating. In this example, the readiness scale has scores 1 to 5 with 1 being the lowest score and 5 being the highest score.
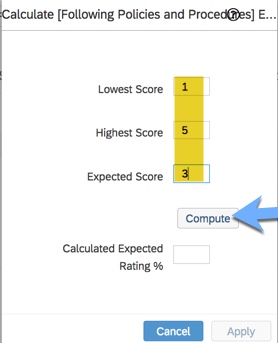
Compute becomes active once the scores are entered
Assign an expected score. This would represent proficiency needed to succeed in this competency. The Compute button becomes active once the 3 scores are populated. Click on the Compute button and the calculated expected rating % is computed. Click the Apply button to finalize the calculation.
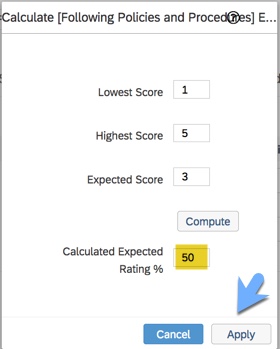
Click Apply button to confirm rating
After computing, the calculated expected rating % is populated for the competency. In this example, using a rating scale of 1-5, the expected rating is 50% of the highest score.
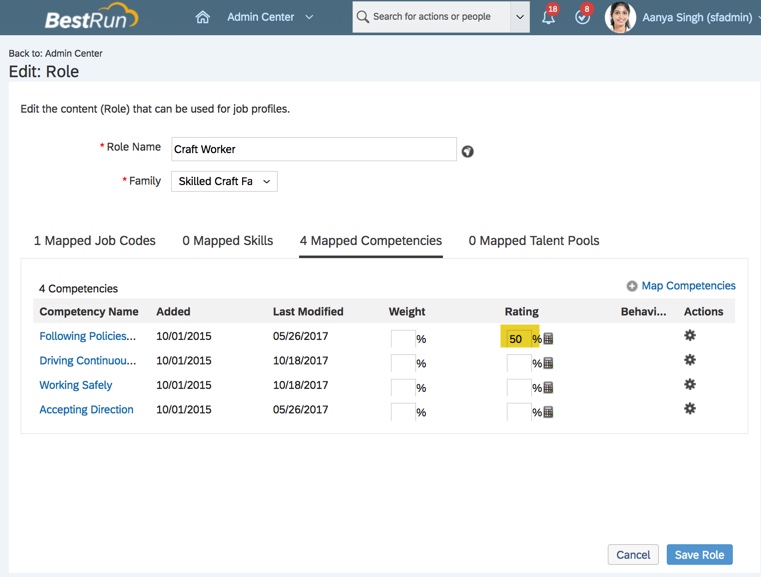
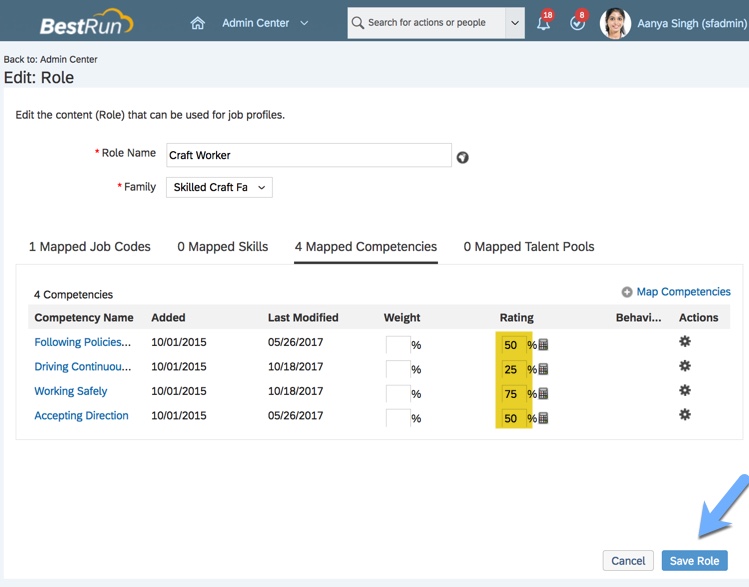
After applying the calculation, back on the Edit: Role screen, the rating % is populated.
Expected rating set for a competency
Continue to create the expected rating for each competency for the role. Once all of the ratings are populated, save the role.
Save Role to apply expected ratings for each competency
You may also fill in the weight column to identify how much weight each competency holds. If left blank, the competencies are weighted equally in the overall readiness calculation.
You will need to identify the competencies mapped to every role and setting the expected rating for each.
Targeted Job Roles without Mapped Competencies
As mentioned earlier, Job profiles (with associated role) need to have mapped competencies in order for the Role Readiness Assessment form to work properly.
To better explain why this is critical, here are 2 examples.
Example #1: Role without competencies.
Within Manage Job Profile Content>Set Up Families and Roles, here is a job role that has no mapped competencies.
Role with no competencies
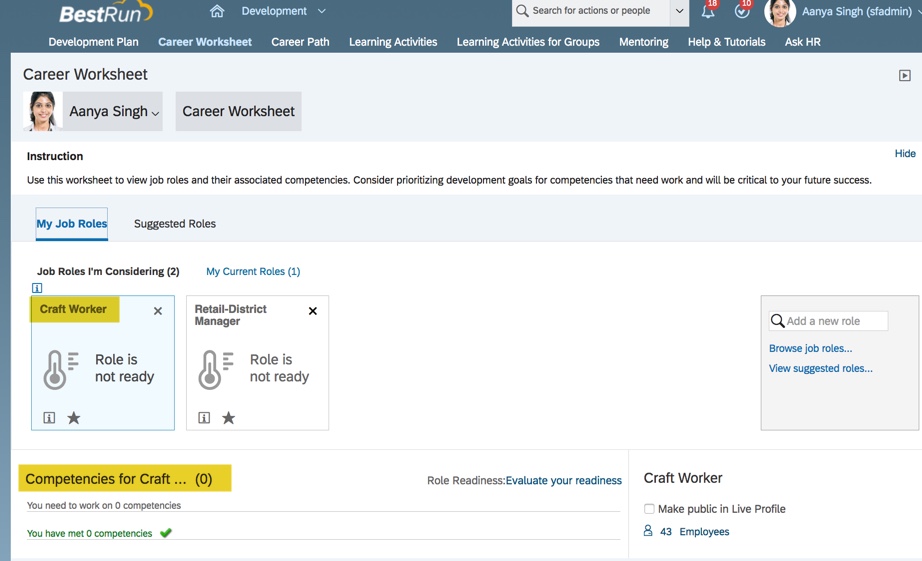
When this role is selected in the Career Worksheet, there are no competencies listed.
Targeted role without competencies on Career Worksheet
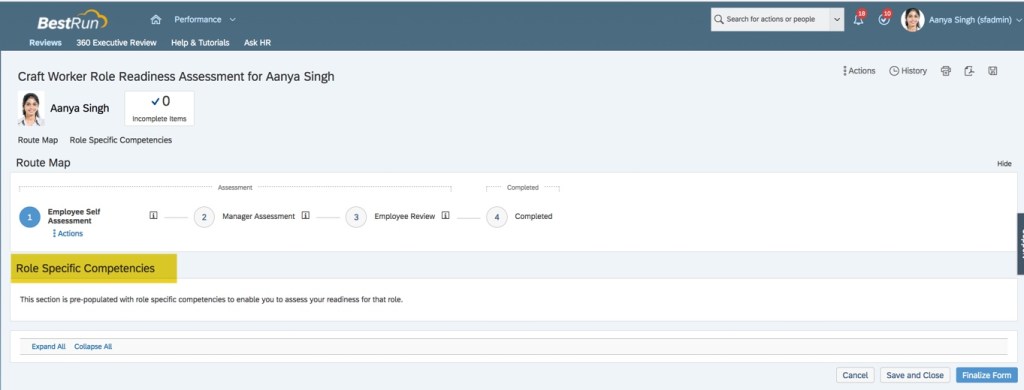
And when the employee selects the target role to evaluate their readiness, the form will have no competencies to rate.
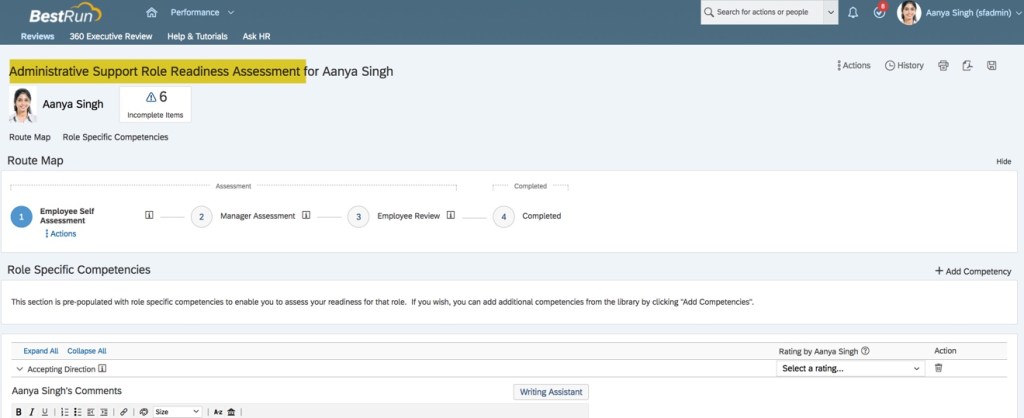
Role Readiness Assessment form without mapped competencies
If the role does not have competencies, it is impossible to evaluate an employee’s readiness for the role. The readiness meter will not calculate readiness for the role and there will be no gap graphs since there are no competencies.
Targeted Roles with Mapped Competencies but no Expected Ratings
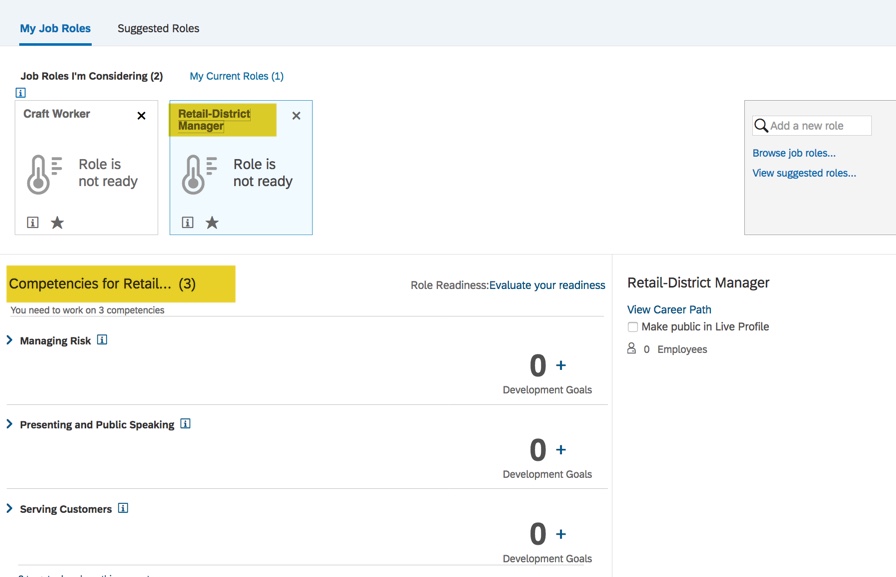
Example #2: Job role has mapped competencies but no expected ratings
If a job role does have mapped competencies but the expected ratings are not set, there will be issues as well.
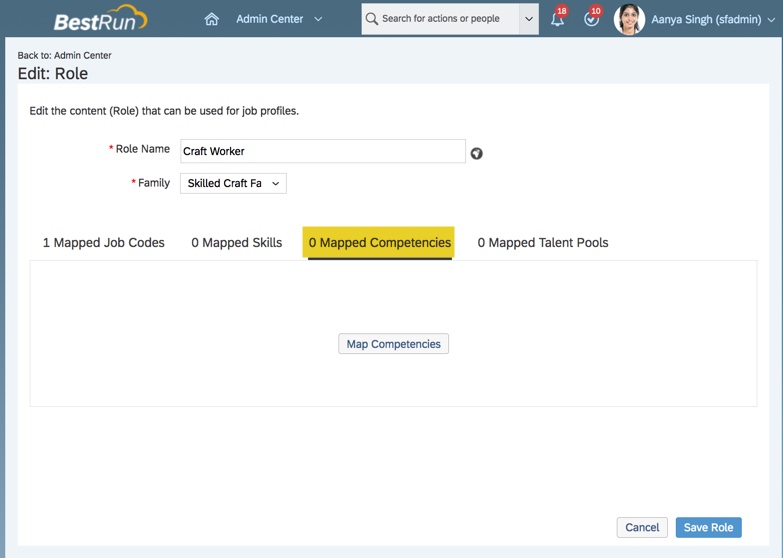
Here is a job role with mapped competencies. However, the role does not have any expected ratings set for the competencies; the rating column for each competency is blank.
Roles has mapped competencies but no ratings
If an employee selects this role to evaluate in the Career Worksheet, the three competencies are listed for the role.
Targeted role with competencies
So this part works correctly; the competencies display for the target role.
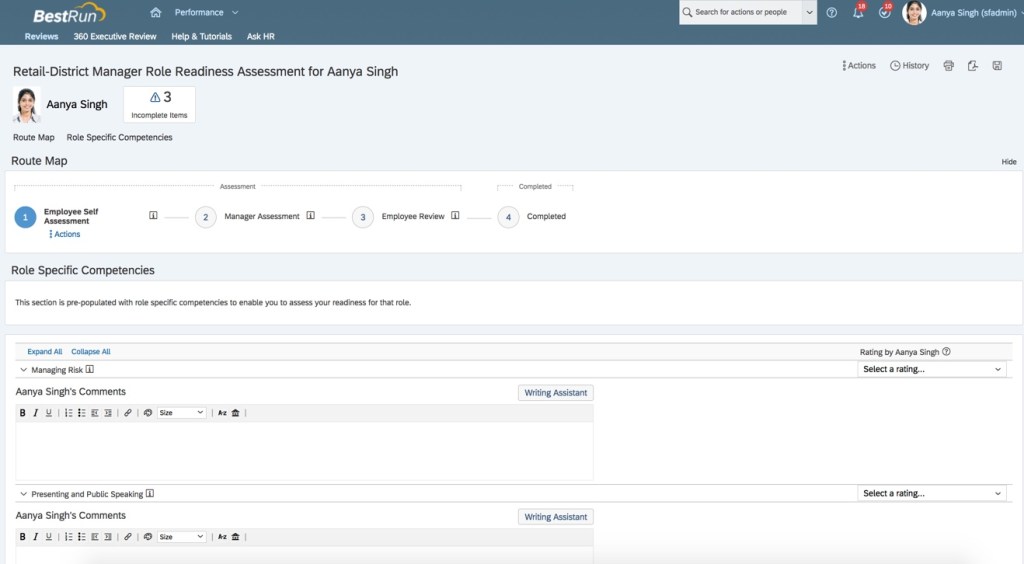
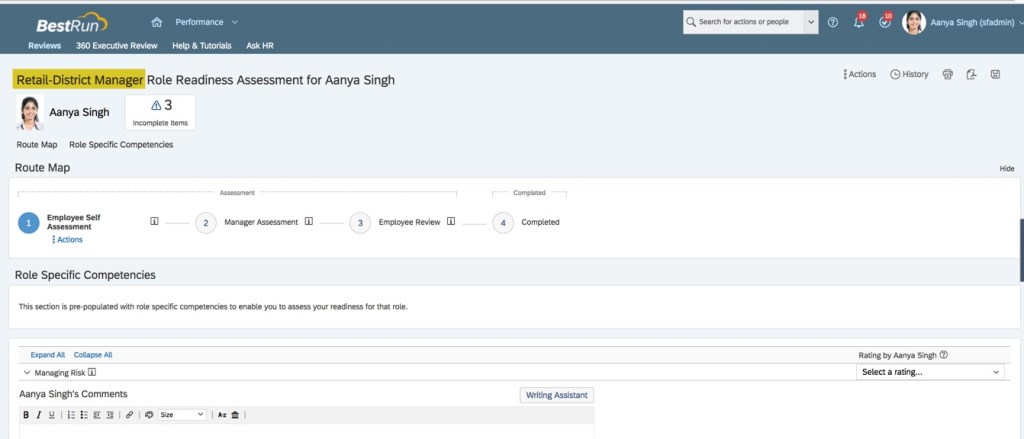
And the employee can go into the Role Readiness Assessment form and is able to rate on each of the competencies.
Role Readiness Assessment form with competencies
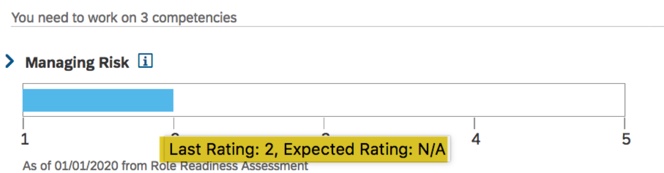
The issue occurs back on the Career Worksheet upon form completion. The Readiness Meter for the role has not calculated the readiness percentage. The calculation needs expected ratings and without them there is no readiness. So “Role is not ready” will display instead of a readiness percentage.
Readiness Meter does not show readiness %
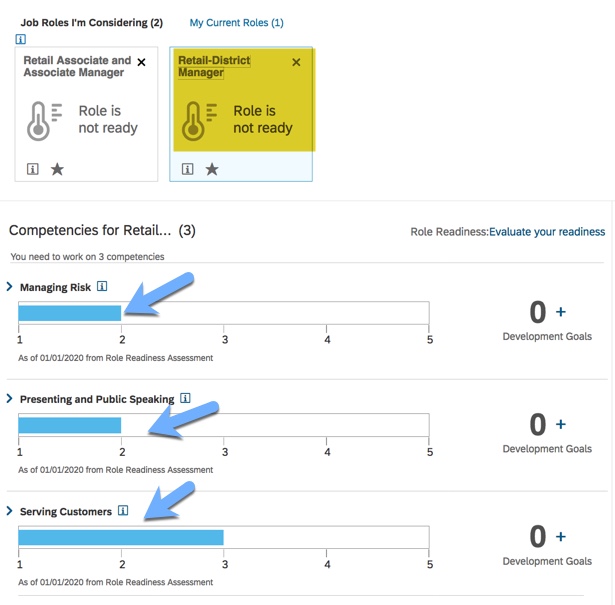
In addition, the gap graph for each competency only shows the actual rating and not the expected rating.
No expected rating on gap graph
Without expected ratings for each competency, the gap graph will only display the actual competency rating.
Hopefully these examples point out the pitfalls of not having mapped competencies for roles as well as roles having mapped competencies but no expected competency ratings.
Other things to consider
If any of the roles being considered have mutual competencies, the readiness meter will populate for all of them after a role assessment is completed. In other words, if an employee has selected a few targeted roles that share a competency, when a role readiness assessment form is completed for one of the roles, the readiness meter will calculate readiness for any other targeted role that has the competency. Since expected ratings can vary by role, the same competency might display different gap values for different roles.
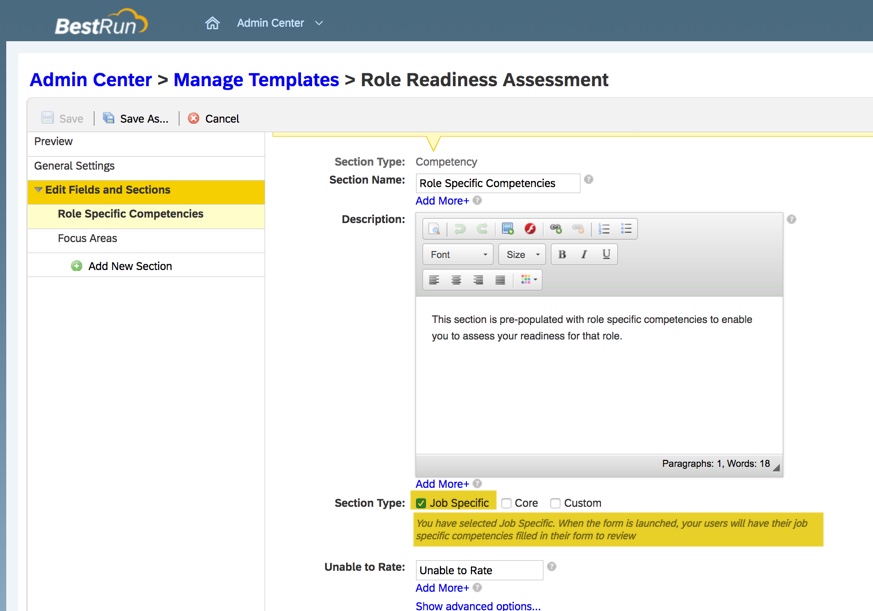
The form should be configured to auto-populate all of the competencies for the role. The form template should show that the competencies are job specific.
To use job specific competencies in form
This can be set in the template in the instance by selecting Job Specific.
Selecting Job Specific Competencies to appear on the form
Ratings Calculation
Role readiness may be calculated in one of two ways:
Summing up the number of competencies for the role
Averaging out the competency readiness
Summing
Role readiness can be calculated as the percentage ratio between employees’ ready competencies and the total of required competencies for the role. Each expected rating met is worth a full point and each rating not met is worth zero.
The calculation would look like this:
(number of competencies the employee is ready for)/(total number of required competencies) * 100%.
To be “ready” for a competency, the system checks the employee’s current rating and the expected rating. If the current rating is equal to or greater than the expected rating, the employee is considered ready for this competency. The competency is then assigned a value of 1.
The system will then count up all the “ready” competencies to use in the calculation.
Here is an example. The targeted role has 5 competencies, each with an expected rating of 4. The employee has competency ratings below the expected ratings for 3 of the 5 competencies. The equation would be: (2/5) * 100%. The readiness for the role would be 40%. This percentage would appear on the readiness meter for the role on the Career Worksheet once the form is completed.
Averaging
A new option introduced in 2018 is a proportional calculation in which each competency rating is weighted as a percentage of the expected rating. A readiness score calculated proportionally may be more accurate in showing how close an employee is to full role readiness.
In this method, the readiness for each competency is determined and then an average is calculated for the role readiness percentage.
The system identifies readiness for each competency:
100% for any current rating that meets or exceeds the expected rating.
0% for no current rating for competency
0 for no expected competency rating
when current rating is less than the expected rating, readiness is determined by calculation: (current rating – lowest rating in scale)/(expected rating – lowest rating in scale) * 100%
Once a percent readiness is determined for the role, the percentages are tallied. The sum is then divided by the total of competencies for the role.
To use the average calculation method, the Career Worksheet XML must contain the following switch:
If no switch configuration is added, the default calculation for role readiness is summing.
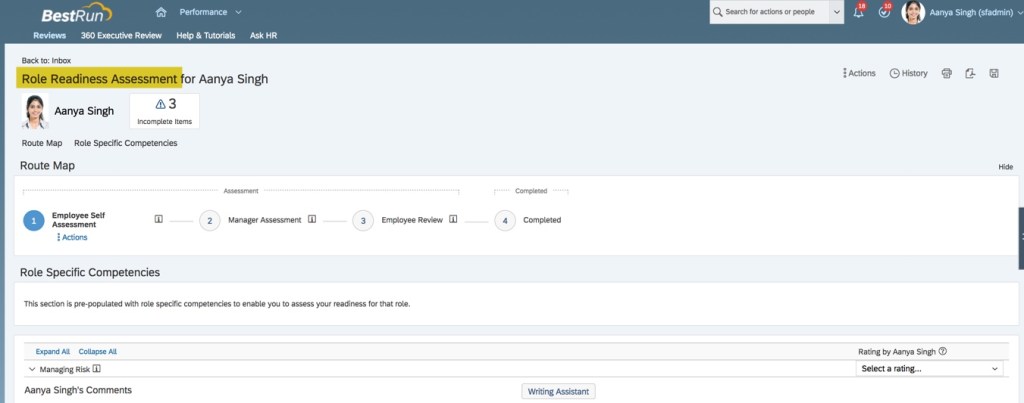
Display Targeted Role Name in Title of Role Readiness Assessment form
The title of the self-assessment form contains the targeted role name.
Form with targeted role name in title
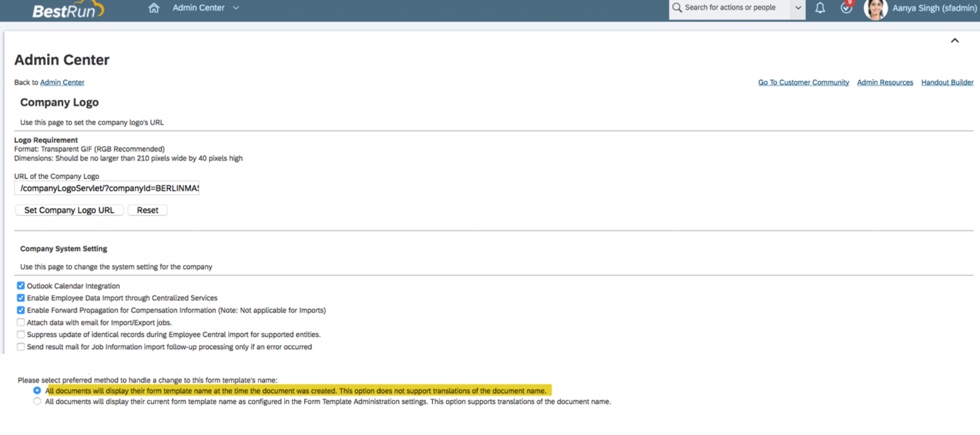
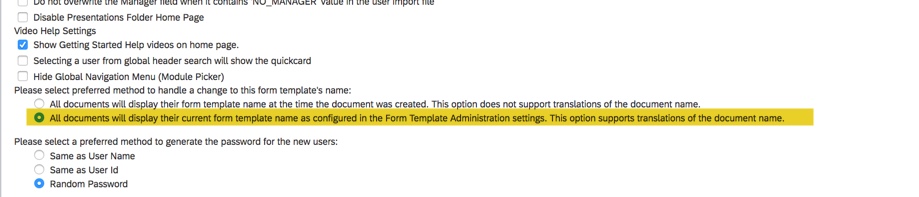
This occurs when the Company System and Logo Settings have “All documents will display their form template name at the time the document was created.” enabled. This option does not support translations of the document name.
Setting for role name on form
If “All documents will display their current form template name as configured in the Form Administration settings. This option supports translations of the document name.” is enabled, the form will not contain the target role name.
Setting to omit role name on form
When form is run with this setting, the targeted title is omitted.
Form without role name displayed in title
Troubleshooting: Evaluate your readiness link not appearing on Career Worksheet
After setting up the Role Readiness Assessment template the Evaluate your readiness link is not visible on the Career Worksheet. Here are some possible reasons for not seeing the link:
The Role Readiness Assessment form has not been configured in the Career Worksheet template (it needs to be configured for each locale). In order for the link from the Career Worksheet to the Role Readiness Assessment to work, the readiness form template ID must be identified in the Career Worksheet XML.
Employee role does not have the “Performance Management Access” permission in RBP and/or does not have “Permission to Create Forms” for the assessment template that was configured.
Proxying as the employee and trying to launch the Role Readiness Assessment form. This is a self-assessment function and the action is not supported by proxy feature. So, the “Evaluate your Readiness” link will only appear to the logged-in user directly (it will not appear if you are proxying as the user).
Tag for Role Readiness Assessment template
When the form is used in multiple languages, there needs to be one entry for each.
Troubleshooting: Role Readiness Percentages Not Appearing on Career Worksheet
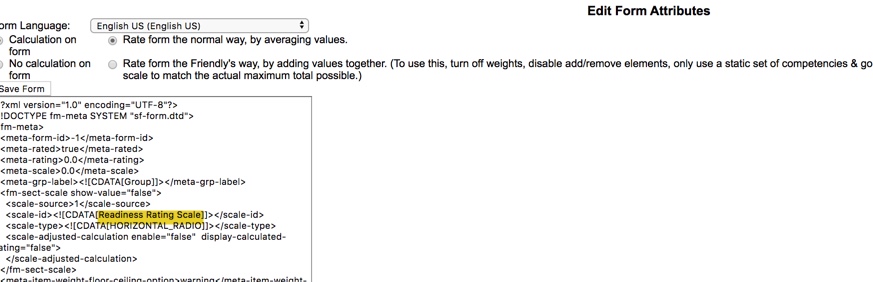
Once the Role Readiness Assessment is complete, the role readiness percentages should appear for each targeted role. If the percentages do not appear, make sure the same rating scale is used for the Role Readiness Assessment and the Career Worksheet.
Readiness Scale referenced in Career Worksheet XML
Make sure the rating scale referenced in the career worksheet XML is the same as the role readiness template rating scale. Otherwise, once role readiness form is done, the percentages will not display.
Readiness Scale referenced in Role Readiness Assessment XML
Launching Role Readiness Assessment for Current Role
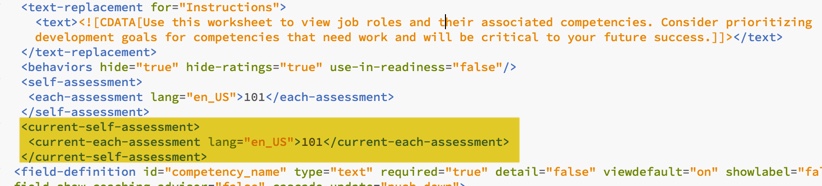
The Career Worksheet XML can be configured to allow employees to launch the Role Readiness Assessment form for their current role. This is accomplished with the following switch added to the Career Worksheet XML.
Create a current-self-assessment tag making sure to identify the form to use.
Tag to identify form to open
After the updated Career Worksheet XML is imported in Provisioning, the Current Roles tab will contain a link to evaluate readiness.
Current Roles tab now has link to evaluate readiness
Click the link to open the form for the current role.
Role Readiness Assessment for Current Role
Some final reminders
Competency ratings are not differentiated by role; if current and targeted role share a competency, rating will apply to both.
Do not calculate an overall performance rating with the form.
If a competency is defined in a specific language but the employee signs into the system in a different language, that competency will not appear in the form.
Competency ratings are not differentiated by role; if current and targeted role share a competency, rating will apply to both roles.
When employees open the Career Worksheet, the role readiness shown in the worksheet is always calculated based on the latest ratings.
Route the form to the manager for a final rating, do not have the employee enter the rating of record.
Only ratings from completed forms are displayed in the Career Worksheet.
Do you need help setting up the Role Readiness form or your SuccessFactors Career Development Implementation? Contact us at: info@worklogix.com