In this release, we saw a wide range of enhancements across the Talent modules – some specific to Succession and others that lay across the modules but help out succession planners. Let’s take a look at what’s new in the Succession module below!
Succession Management Specific Changes
Let’s start with what’s new just for Succession Management before we take a look at some general talent improvements that are relevant to Succession.
Nomination History
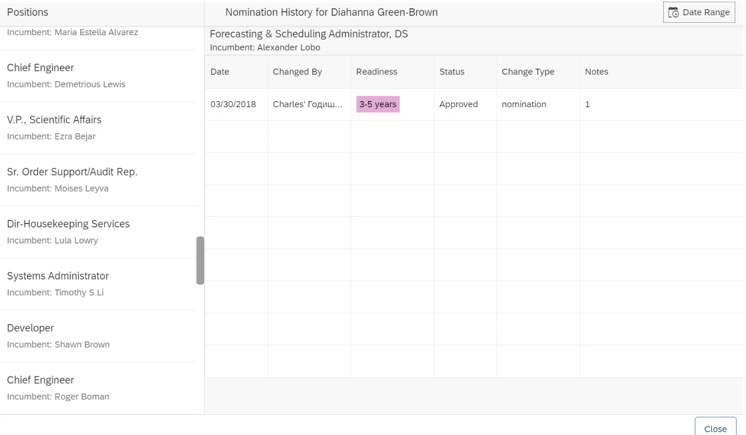
The main new feature exclusive to Succession Management is the ability to view nomination history in the talent card and in the people profile. Users will with Succession Planning permission can click a history icon on these screens to see a list of positions for which the employee has been nominated and information about the nomination history for each including the date, nominator, readiness level, status, change type, and notes. The information includes deleted nominations as well.
Nomination History View
Hide Pending Nominations for Talent Pools
Succession configurators have had the ability to hide pending nominations from succession planners for some time now, but the ability was only extended to position nominations. Now, this feature works for talent pool nominations as well. This configuration setting remains in the same in Admin Center -> Nomination Setup.
Form-Based Nomination Deleted
Another update specific to succession with this release is that form-based succession nomination will be completely deleted as of May 21,2021. This was a legacy method of approving nominations – if you never used it, then don’t worry because no action is required. If you are still using forms to approve nominations, you have little time left to switch to the newer permission-based method!
General Talent Management Updates Relevant to Succession
There are also numerous updates across the talent modules in general that affect not only Succession, but also Performance, Goals, Development, and/or Calibration. Let’s take a look at these briefly below.
Editing Talent Info Directly on a Talent Card
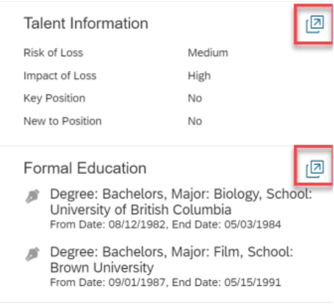
It seems like every customer for whom I’ve implemented Succession has asked why they need to switch between the employee profile view and other views to edit talent information. Why can’t customers just change the information right on the talent card that shows up across the different views that contain the talent card? This way data like impact of loss or risk of loss can be updated when the user has the contextual information they need to make the decision. Well now, customers can!
Users can now click the icon shown below to open a popup that allows these fields to be changed.
Editing Information on a Talent Card
My Jobs Downloads
Previously Succession (and other talent reports) could be downloaded from the Scheduled Reports page in Classic View. Reports may now be downloaded from My Jobs page within Report Center. This eliminates the need to switch to Classic View prior to downloading.
A report with multiple files can be downloaded in a compressed .zip file or downloaded individually.
Numerous Calibration Session Improvements
There are a variety of calibration session feature that have been added/updated as well. For example specifying default facilitators or allowing managers to more easily create calibration sessions for their teams. For more information on these improvements, check out our blog on What’s in in H1 2021 SAP SuccessFactors Calibration Release.
That’s a Wrap!
That’s all of the updates for H1 2021! We hope you found this blog informative!
There are five universal updates related to Mentoring and one for Development Goals. Let’s take a look!
Mentoring
The mentoring features are related to the mentor program sign up process and are designed to improve the user experience.
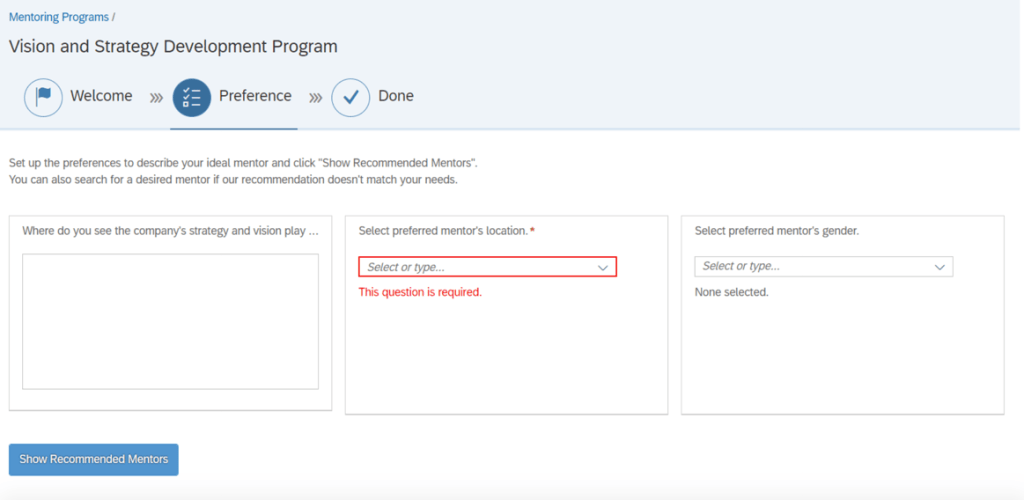
Key Questions Indicated
In the sign up sheet, required entries are noted by a red asterisk. This ensures the mentees complete these fields prior to looking at the recommended mentors. Answering the key questions will improve the recommended mentors match.
Answers to questions will be saved but preferred mentors are not saved.
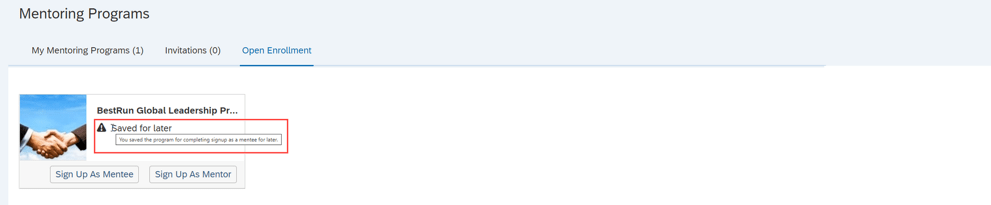
Save Sign Up Program to Complete Later
There may be times when an employee starts to enroll in a mentoring program but is not ready to commit. Maybe they need to consider their mentoring preferences further or need to check in with their manager first. The employee may start to fill out the sign up form, save it and come back to it later to make any updates prior to signing up.
There will be a “Save for Later” button that will display within the program sign up page.
Once saved, the program will appear on either the Invitations or Open Enrollment tab, whichever is applicable.
The program visible on the tab and can be easily be identified with an icon and “Saved for later” text.
Identify Mentor Requests
While filling out the sign up form, mentors that are selected from the recommended list will display a green check mark on the mentor cards.
Confirm Sign up
A mentee will see a confirmation popup when they are completing a program sign up. This gives the mentee the opportunity to confirm signing up for a mentor program. By clicking the “Complete Signup” button, the mentee is enrolled and mentor requests are submitted.
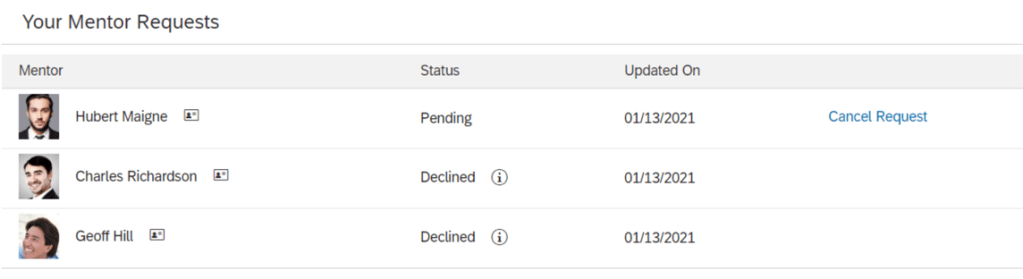
Your Mentor Requests
The Mentoring Page will contain a new section that tracks any mentor requests that a mentee has made. The “Your Mentor Requests” section allows a mentee to see the status of their mentor requests. Pending requests will appear as well as any declined requests and reasons. This feature is only applicable to open enrollment and unsupervised programs. Supervised programs rely on a matching program instead.
Mentees may also cancel any pending mentor requests.
Admin Opt-Ins for Mentoring
There is one admin opt-in available to for Mentoring.
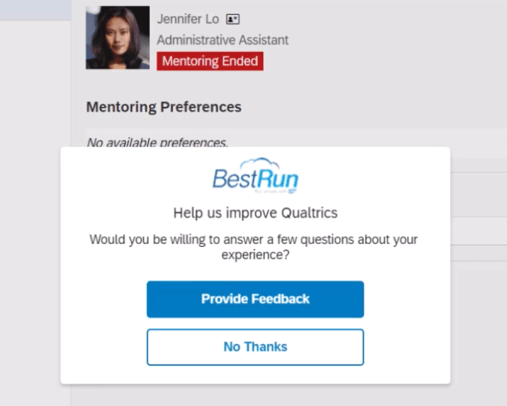
Qualtrics Surveys for End of Mentoring Relationships
Qualtrics Surveys may now be used with Mentoring. The survey can be used when a mentor program participant opts to end the mentoring relationship. Based on how the program was configured, either the mentor or the mentee may cancel the mentoring relationship. A survey will pop up after a participant ends the mentoring relationship.
An email survey is sent to the other participant in the mentor relationship.
The feedback provided in the survey results are seen by the program owner and may be helpful when designing new mentoring programs.
In order to take advantage of this feature, Manage Qualtrics Integrations from the SAP SuccessFactors Admin Center needs to be set up.
Development Goals
Learning OData V4 Service
There is a new Learning OData V4 service. When using transcript or legacy learning activities, learning activities may be created and updated in mass to be associated with development goals and competencies.
For your convenience, we’ve summarized the highlights of the 7 new universal features for 2021 Calibration along with the an admin opt-in. Let’s start with the universal features.
Universal
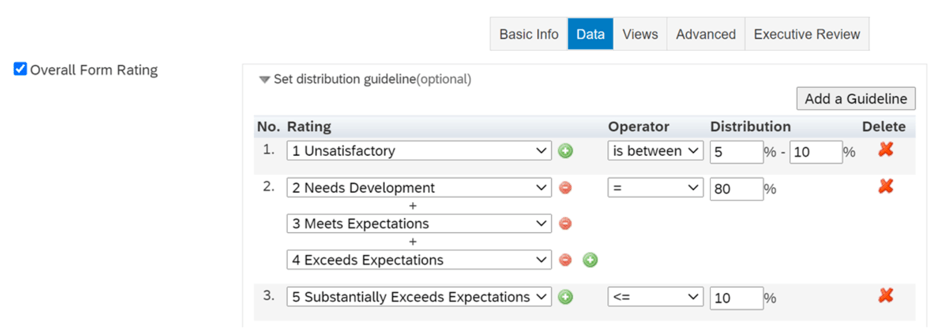
Distribution Range and Group of Ratings in Guidelines
When defining your Calibration template and Performance was selected as the data source on the Data tab, previously an individual percentage could be set for each rating with one rating in a guideline.
It is now possible to create a distribution range for ratings including a group of ratings in a guideline.
In addition to an individual rating, a group of ratings can be used when creating a guideline. As an added bonus, more operators besides “=” can be used:
<
<=
>
>=
is between
This allows you to set a distribution range for ratings and also include a group of ratings in a guideline with different operators.
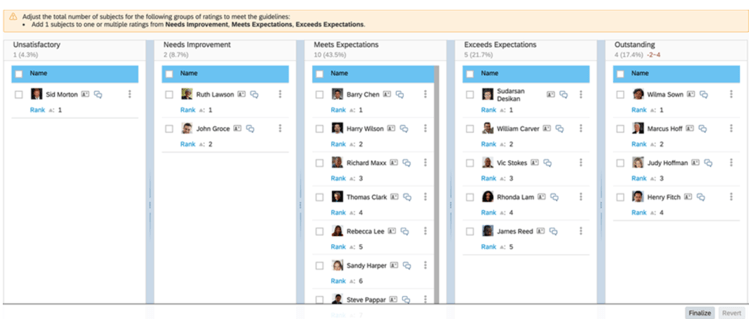
Group Ratings and Distribution Ranges in Bin View
Here is a feature that works with the new distribution ranges and groups of ratings in guidelines. When a guideline includes an individual rating with a distribution range, in Bin View, you can see the number of subjects in a range that can be added or removed from the bin to meet the guidelines. A warning message will display above the bins if a guideline includes a group of ratings.
You may modify the total number of subjects for groups of ratings to meet the guidelines. You may also adjust the number of subjects displayed as a range within a bin.
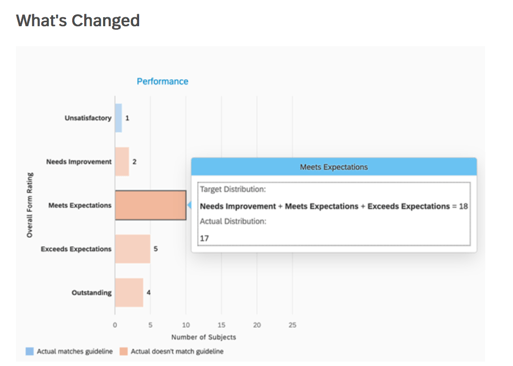
Dashboard and Executive Review Bar Charts
Working in tandem with the new distribution range and groups of ratings that can be configured in guidelines, there is a new UI for bar charts for the Dashboard view and the Executive Review view. The bar charts identify actual distribution for each rating from the rating scale. Blue and orange bars are used to identify the distribution that matches or does not match the guideline.
Hover over the chart to see target vs. actual distribution if any of these conditions are met:
A rating appears more than once in multiple guidelines.
Not all ratings are configured in all guidelines.
There is more than one rating in a guideline.
There is more than “equal” configured in a guideline.
When none of these conditions are met, the bar charts will still display the actual distribution and the guideline.
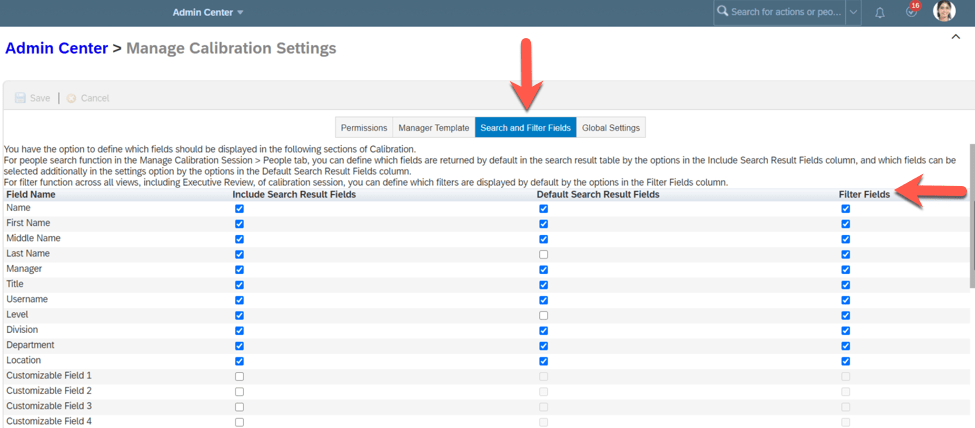
Filters in Manage Calibration Settings
Within Manage Calibration Settings, the “Search Results Fields” tab has been relabeled as “Search and Filter Fields”.
On this tab, the existing columns has been relabeled:
“Include Field” is now “Include Search Results Fields”
“Make Default” is now “Default Search Results Fields”
There is a new column, “Filter Fields”, applies to all views of a calibration session and allows you to identify the default filters.
There are also new filter fields: Name, First Name, Middle Name, Last Name, Title, Username, Email, Gender, Level, andStatus.
Manager Created Calibration Sessions
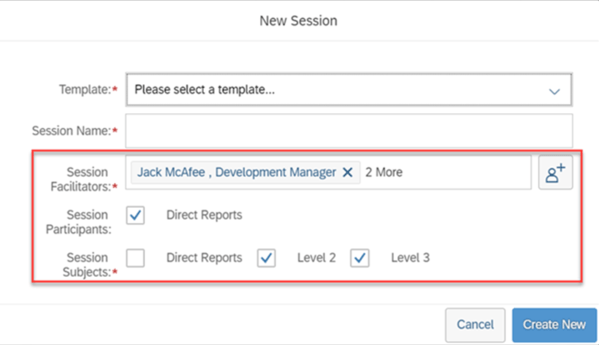
It is now easier for a manager to create his team calibration session. Previously a manager could identify the template, session name and number of reporting levels when creating the session. Now the manager has more options. Session co-facilitators may be chosen, the default co-facilitators changed and the direct reports may also be participants rather than just subjects. The default co-facilitators option will only appear if the admin opt-in on Manage Calibration Settings is used. It will be explained in the admin opt-in section at the end of this blog.
Deep Links to Performance Management
Within a calibration session view, it is now possible to use a deep link to view a performance form:
/sf/viewPMFormFromCAL
Also to use a deep link to edit a performance form:
/sf/editPMFormFromCAL
Appending the deep link to the application server address will go to a Performance Management form in calibration views as well.
My Jobs Downloads
Previously Calibration reports could be downloaded from the Scheduled Reports page in Classic View. Reports may now be downloaded from My Jobs page within Report Center. This eliminates the need to switch to Classic View prior to downloading.
A report with multiple files can be downloaded in a compressed .zip file or downloaded individually.
Admin Opt-In
There is one admin opt-in for Calibration which we touched upon when looking at manager created calibration sessions.
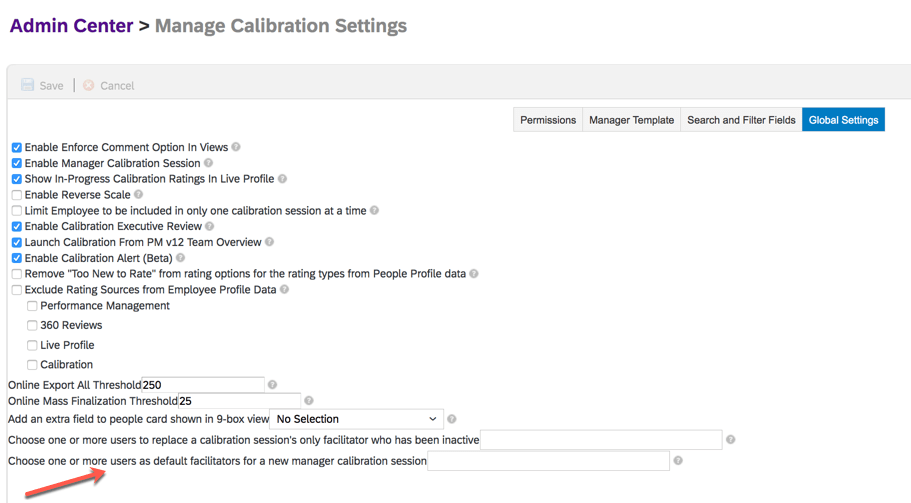
Specify Default Facilitators for Manager-Initiated Calibration Sessions
A manager initiated calibration session can now have default facilitators. To set this up, a user who has access to Manage Calibration Settings would go to the Global tab and use the setting: Choose one or more users as default facilitators for a new manager calibration session to identify active users to default as facilitators.
This can be useful to specify an HR manager to act as a co-facilitator in order to access a manager initiated session.
When creating a session, the New Session dialog window will display the default facilitators but can be edited by the manager.
We have now reviewed what is coming soon for Calibration.
SAP SuccessFactors Job Profile Builder (JPB) is a tool used to create and maintain job profiles associated to job roles. Job profile content can be used when creating job requisitions but it can be used for much more. JPB is integrated with many HCM modules and the key that ties all of these modules to Job Profile Builder is job roles.
The job profile components can be used in many modules. These components are useful in many areas of SuccessFactors including:
Performance Management
Career Development
Succession
Employee Profile
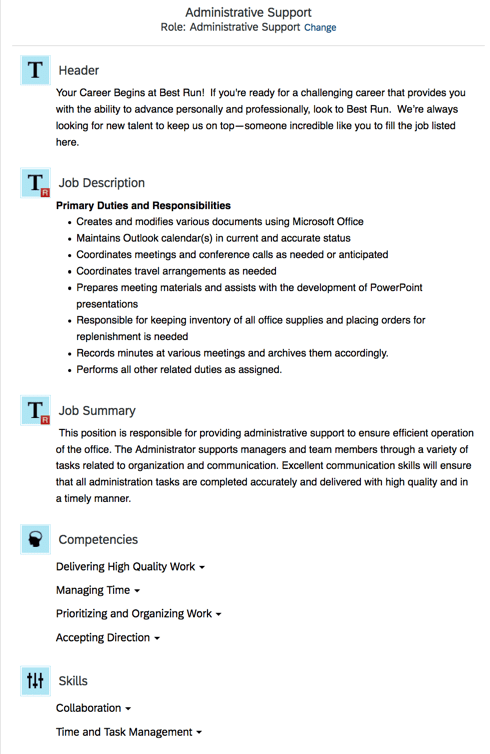
First, let’s look at a job profile. Job Profiles are tied to job roles within a job family. The profile can include education, skills and competencies to associate with a job role. This information can get pulled into a req and the position associated with a job will inherit its properties.
An example of a job profile is shown below.
Job Profile
Competencies are a very critical component of a job role. The competencies are selected from a competency library, most notably the SuccessFactors 2.1 Competency Library. Once the job roles are created, competencies are selected to map to roles. Positions associated with a job will then have these competences that can included as requirements on a job req or a way for an employee to track progress on goals.
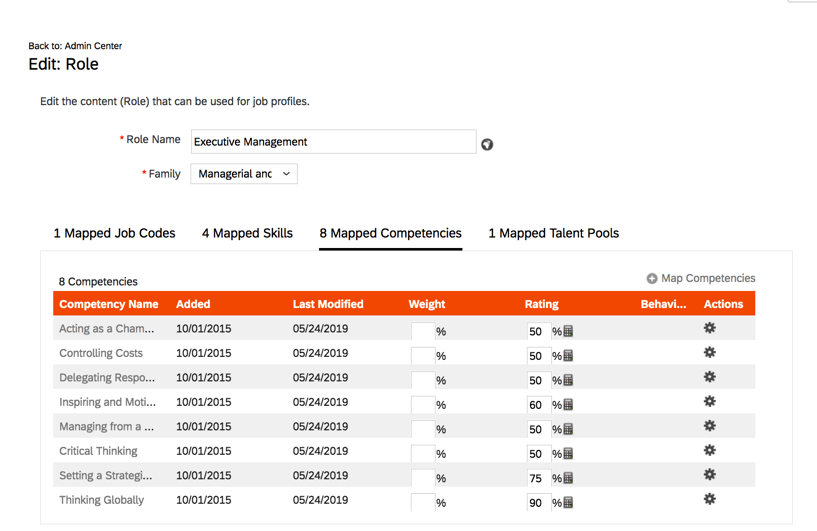
As you see below, for a role, a competency library is selected and then competencies can be added.
Mapping Competencies to a Job Role
Job codes, skills, competencies and talent pools can be mapped to a job role. Job codes associated with the roles will inherit the skills and competencies. An example is shown below.
The job role below has a job code, 8 competencies, 4 skills and a talent pool mapped to it.
Job Role with Mappings
This means that all positions associated with a job code will then have the associate skills and competencies.
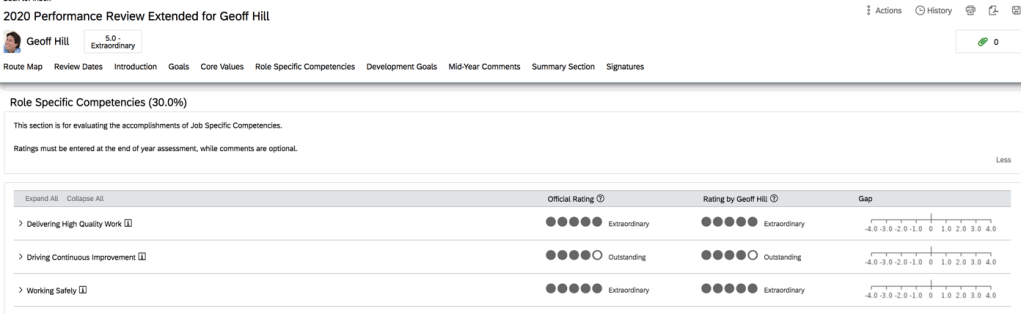
Performance Management Any job related competencies can be included on performance form template. This allows an employee to be rated on their job specific competencies.
When a form is generated, all competencies associated with the employee’s role will be pulled in when a performance form is generated.
Role Competencies on PM Form
Development Goal Plans
Development goals can have have competencies added. This is especially useful when using Career Worksheet which we will look at next,
Competencies on Development Goal
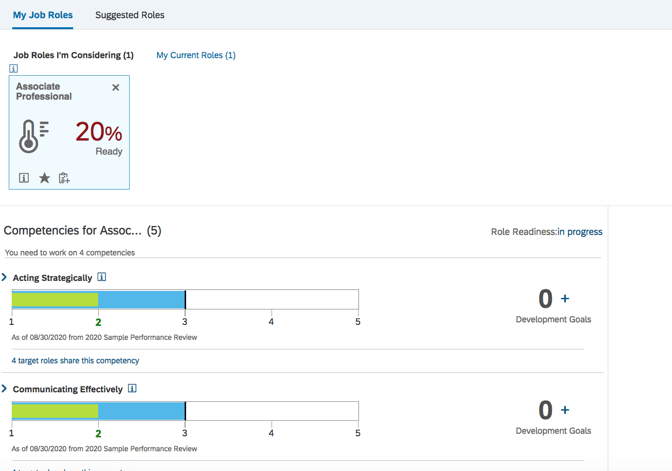
Career Worksheet The Career Worksheet is a component of Career Development and is used by an employee to discover development opportunities based on roles that may wish to grow in to. The Career Worksheet is also dependent on job roles and their job role definitions, mapped competencies and expected competency proficiency ratings.
Job profiles will appear throughout the career worksheet, when browsing roles, viewing suggested roles, viewing career paths to name a few.
The employee selects future or targeted roles to view along with the job role’s associated competencies. The worksheet identifies competency gaps which highlight development areas that the employee needs to work on. The worksheet also illustrates how ready an employee is for the targeted role based on their competency proficiency. The worksheet may also be used to view career paths and suggested future roles.
Competency mappings to roles are the sole source of competencies listed on the career worksheet. Only ratings from completed forms are displayed in the career worksheet.
A job role will require a number of competencies and each competency should have an expected proficiency level rating. An employee’s readiness for the role depends on whether the employee’s proficiency rating for the competencies meets the expected ratings.
The system uses the Career Worksheet readiness calculation to compute a competency match score which compares the employee’s competency rating with the expected rating for the role.
An employee can browse career paths and suggested roles from their Career Worksheet. Employees can proactively prepare for that next step. By discovering the competencies and skills needed to exceed in a job role, the employee can create development goals that align with a targeted role. This gives employees a sense of empowerment to develop skills, behaviors and competencies to prepare for future roles.
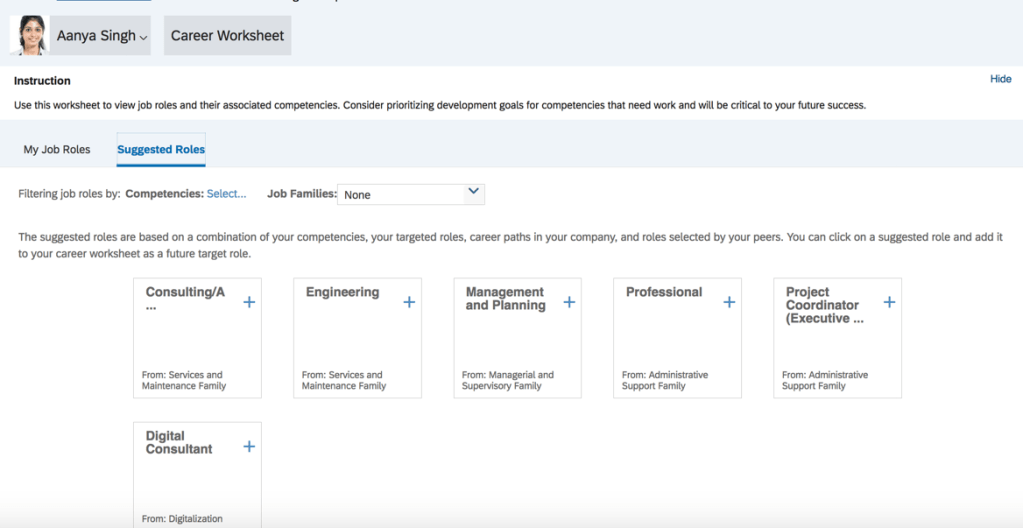
Suggested Roles
Suggested roles can be based on career paths or through an algorithm based on a set of criteria. The suggested roles can be a combination of competencies, targeted roles, career path and roles selected by peer. Clicking within any role will will display the job profile, Selecting a role will add it to the employee’s career worksheet in order gauge their readiness for the role.
Suggested Roles
Clicking the plus sign will add the role the employee’s career worksheet.
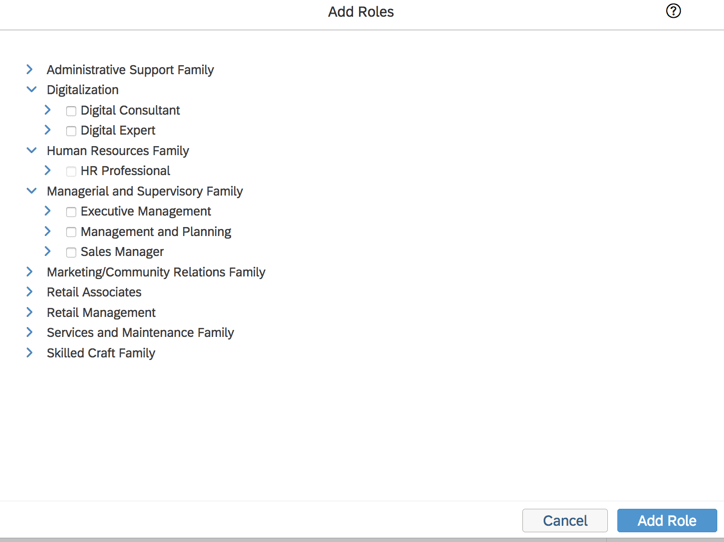
The employee can view job roles based on job family. Selecting any will add the role to career worksheet.
View
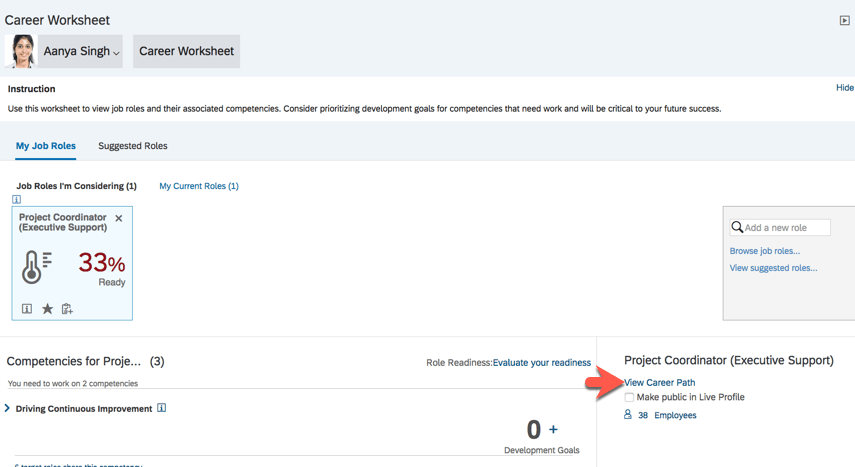
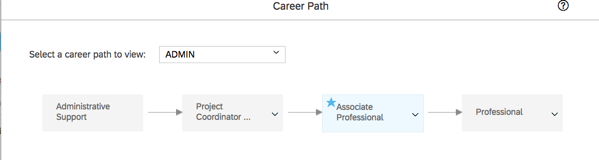
Career Path
Once a target role is selected, the career path for the role can be viewed. This gives the employee a chance to see the job role progression. Job profiles for the roles in the path may be viewed as well.
On the Career Worksheet, the job profile of a targeted role may be viewed.
Career Path for Target Role
All of the job roles that have been configured for a career path will display. The targeted role will be highlighted. Clicking on the information icon give the employee a view of the job profile which can be used to help them decide if that is a job they may like to grow into.
Job Profile
Role Readiness Form
The Role Readiness form is launched from the Career Worksheet by the employee and is used to rate how proficient they are in the competencies needed for any future roles that they selected. The form is used to help employees plan their career development and identify areas of development needed for the future roles.
Role Readiness Form
Readiness Meter
Once the form has been completed, the readiness meter on the career worksheet will show how ready the employee is for the targeted role.
Readiness Meter
Gap Graphs
There is a gap graph for each competency comparing the last competency rating of record for the employee with the expected rating for that role. All job roles mapped to a competency will be included. The graph shows the actual competency rating from the latest rating form against the expected rating for the competency.
For any large gaps for the competencies, the employee may decide to add a development goal to help them become more proficient. This will add the development goal to their development plan. The development goal will also show the linked competencies.
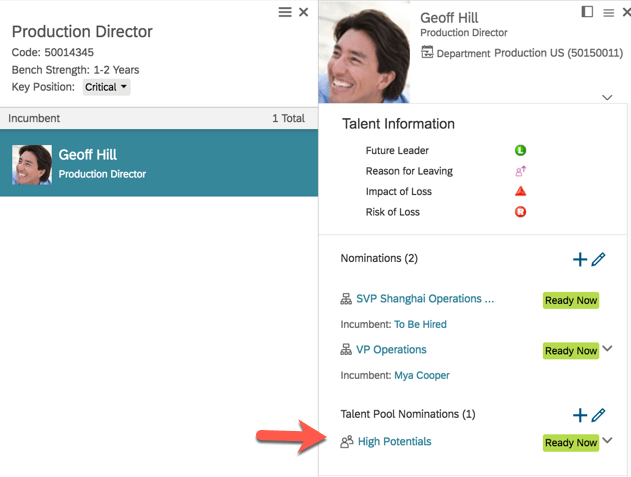
Succession
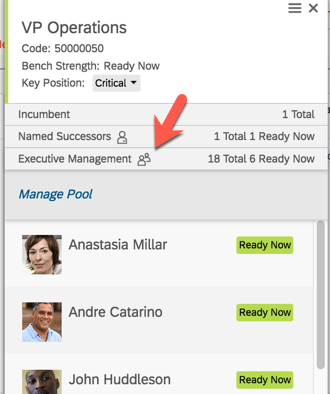
Job roles can be tied to talent pools. When a talent pool is mapped to a job role, all positions tied to the job code will then become members of the talent pool. Talent pools associated with a position display in the position card when accessed from the Succession Org Chart or Position Tile view.
An employee’s talent card will also show the talent pools their position is associated with as seen below.
Talent Pool on Talent Card
The Position card will also show talent pool successors.
Position and role information may be viewed as well. Within the Succession Org Chart, when viewing a position, the associated job role details may be viewed. Clicking ‘View Role Details’ will open the job profile associated with the role.
Role Details
Employee Profile
The skill profile is linked to JPB.
Employees can add skills whick can be used for employee development and succession planning,
Skill Profile
Conclusion
I hope you can see that Job Profile Builder can be used beyond Recruitment. The job profiles created can be extremely useful in developing the people within your organization and not just for finding new talent.
For more information on the Job Profile Builder and Talent Management Integrations, check out our book here!
The Job Profile Builder is a valuable tool that helps companies categorize their positions into groups of jobs. Each job profile contains descriptions of what functions that job performs, qualifications needed to perform the job, etc. For more information on the Job Profile Builder in general, see our article Job Profile Builder: An Introduction.
In this article, we go into further detail on how to catalog skills within job profiles. As a company explores what jobs to create and how to catalog their jobs, one of the most important distinguishing characteristics to identify those jobs are the skills and qualifications needed for the job.
Adding Skills in Manage Job Profile Content
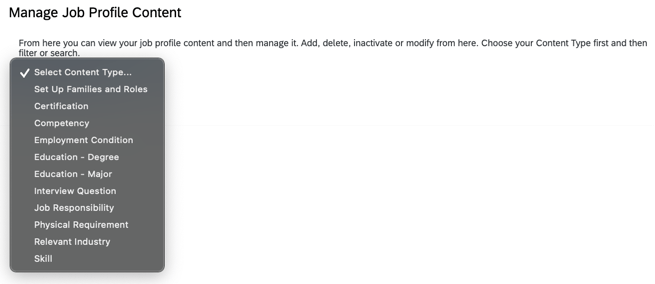
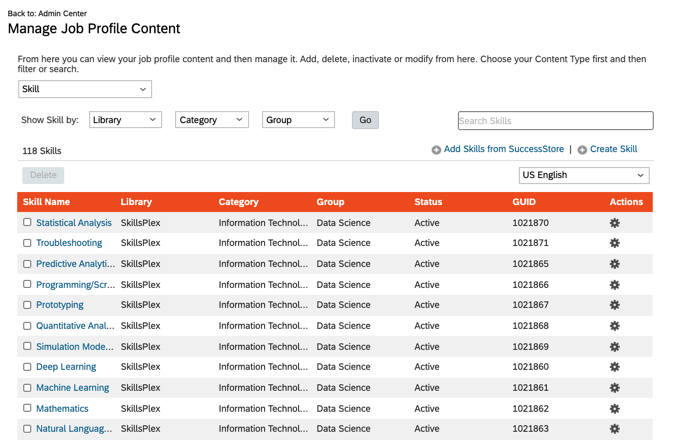
The list of available skills for jobs in SAP SuccessFactors are defined in the “Manage Job Profile Content” screen (just type “Manage Job Profile Content” in the search bar and if you have admin access and the screen name will come up for you to select). You can see in the screenshot below the list of available types of content SAP allows you to create slot populate on a job profile.
Types of Job Profile Content
You can edit the list of available items within each of the categories shown above. Some of these categories are pretty obvious on how to populate with options. For example “Education – Degree” and “Education – Major” would pretty obviously contain lists of degrees and majors that are relevant to the company. The same can be said for certifications and interview questions. Interview questions you create here will show to recruiters. Certifications is where you would list of the certifications relevant to your company’s industry. However, some of these other items can be a little more difficult to understand. A prime examples is “Skill”. This is a very broad term. So how do we go about creating a list of available skills?
If you click “Skill” from the drop down shown above, you will see a list of the skills currently cataloged in your system as shown below.
Job Profile Content Skills View
Now, we will take a look at how to add a skill from the library as a demonstration of what makes for a good skill in the SAP SuccessFactors Job Profile Builder. From the screen shown above, we can click the “Add Skills from SuccessStore” link. The screen will update as shown below.
Adding a SuccessStore skill based on job family and role
There are two ways to browse through the catalog of skills. The first way shown above is through families and roles. This method associates the skills to a particular role within the standard SuccessStore catalog. You can learn more about job families and roles in Job Profile Builder: An Introduction. We recommend that if you want to add skills for a standard role within the catalog, that you add them from the “Set up Families and Roles” screen instead as shown below. This will actually add the role and family itself along with the skills instead of just the skill with no role.
Adding all mapped skills when adding a Job Role
The second way to add skills is shown below is to browse through skills that are not assigned to a particular job role but are organized through categories and groups by choosing “Unassigned Skills Browsed by Category” in the drop down in the upper left corner of the screen. You can simply think of categories and groups as two levels of organization to catalog your skills: categories being the highest level which contain groups and groups containing the individual skills. To choose a skill, click a category and then a group, and then click the name of skill(s) you want to add and click “add” as shown below. It might seem a little confusing as to why SAP created both a role taxonomy and a skill category taxonomy to search through skills, but when you consider that not everyone uses the standard roles library from the SuccessStore it makes sense to have another way to categorize skills.
Adding a SuccessStore skill based on Category and Group
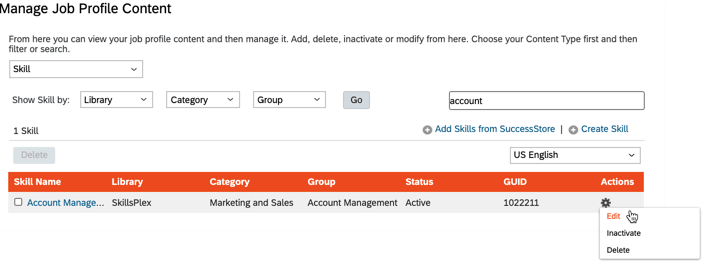
When you return to the main screen as shown below, you will see the skill added to your local catalog of skills. You can then click the gear icon and choose “Edit” to look at the specific contents of the skill.
Selecting a skill in your library to edit
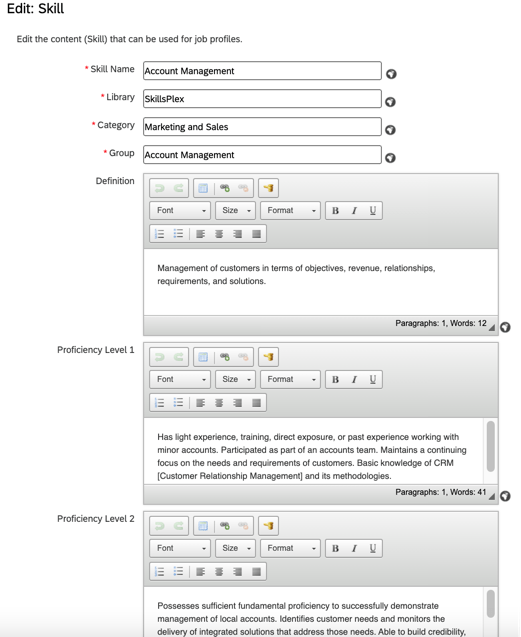
Here in the “Edit: Skill” screen shown below you can see all the predefined content for the skill from the SuccessStore. SAP SuccessFactors skills consist of a skill name, a library name, a category, and a group to help organize the skill into a taxonomy. Getting into the detail of the specific skill, we see the definition and then 5 different proficiency levels (1 being the most basic and 5 being the most advanced – this scale is pre-set and cannot be changed). Looking at the fields and values on this screen, you can start to get an idea of how skills can be useful to define exactly what skills are required and at what specific level and what criteria define that level when interviewing someone for a job posting or guiding someone towards promotion or working with someone to remediate job performance. Now that you have a good understanding of what a skill looks like, you can continue to add or edit skills in the screen shown above. To add a skill from scratch, click the “Create Skill” link in the upper right corner of the screen. This will also take you to the screen shown below but with all the fields blank.
Creating and editing skills
Adding Skills to Job Profiles
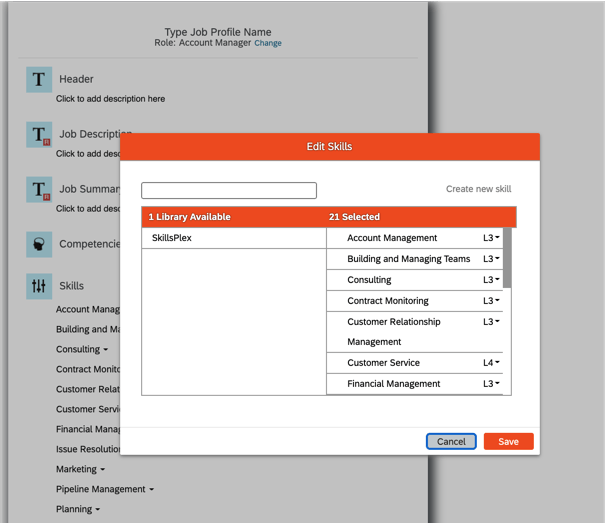
Once we have a list of skills defined, we can start to add them to our individual job profiles (or if you downloaded the predefined skills when you downloaded the SuccessStore job family and role, the skill will already be there when you create the profile). For info on how to create a job profile see Job Profile Builder: An Introduction. You can see in the screenshot below, when we look at an existing job profile or create a new one in the “Manage Job Profiles” screen, the skills show up in the area specified for Skills in the job profile template. You can mouse over the skills section to add or edit skills. For each skill added you will also need to specify the proficiency level expected for the job. So for example we have added the “Account Manager” role and all associated skills to our library in one of our earlier screenshots. When we create a new profile for the role, the skill “Account Management” is automatically added at level 3 proficiency, “Building and Managing Teams” at level 3, etc.
Skill assignments within a job profile
Conclusion
By now you should have a good understanding of what Job Profile Builder Skills are and how to create them on your own, pull standard skills from the SuccessStore library, and add them to a profile. With some good examples shown here and available on the SuccessStore, you should be able to start building your own library of skills specific to your company needs and associate them to your job profiles and roles. Adding these skills can be valuable for recruiters looking for guidance on what to look for in a candidate, or for employees looking to develop themselves for their next role.
For more information on the job profile builder and other talent management modules, check out our book here!
Do you need help setting up your Job Profile Builder? Contact us at info@worklogix.com.
In the previous two calibration related blogs, we learned how to configure the Calibration module in Provisioning, and we reviewed how to set up role-based permission, created a calibration template and defined the calibration settings.
Here we will explore the various ways to create a calibration session. We will see how an admin may create one or more calibration sessions using the “Manage Calibration Sessions” tool. We will also learn how an admin may create multiple sessions using the “Mass Create Calibration Sessions” tool. We will also review the methods a manager may use to create their own calibration session.
What is a Calibration Session?
Before we begin, let’s have a quick refresher. A calibration session is a forum where managers convene to discuss the performance of their employees to achieve agreement on fair, objective performance ratings. The session is used to compare performance ratings for those being calibrated, make changes to ratings, add comments, and review the outcomes of a given calibration cycle.
Manage Calibration Sessions
We will begin by looking at the options found within “Manage Calibration Sessions”. This role-based permission is granted to the admin role and to any role that will be responsible for creating or editing calibration sessions. An example of the overview screen is shown below. Here new calibration sessions may be created, and existing sessions may be edited, cloned, deleted, or exported.
Manage Calibration Session Overview
For existing sessions, the name of each session displays with its associated calibration template, the session status, the number of subjects and participants and name of the facilitator. The session statuses include the following:
Set up – session has been created and validated but it has not been activated yet.
In Progress – session is activated, session is open and not finalized yet.
Approving – phase between In Progress and Approved. Finalize button has been clicked but finalization has not completed yet.
Approved – session is finalized, ratings are approved and session is complete.
Deactivated – an In Progress session that has been stopped. Deactivating a session allows for changes to be made. Sessions must be reactivated to return to In Progress status.
It may be helpful to understand what validating and activating mean as well. After a session is created, it must be validated. The validation process checks to make sure subjects have performance forms and the forms are in the calibration step. If validation is successful, the session may be activated. Activating a session makes it ready for the facilitators, owners and participants to access the session to begin the calibration process.
There are also export, filter and search options. One or multiple sessions may be exported to an Excel workbook. There is a record for each subject which contains basic information about the session. The filter option is helpful to find a specific session when an organization has a large number of calibration sessions. Sessions can be filtered by name, status, facilitator or number of subjects or participants. There is also a search option, the admin can quickly find a session by typing a part of a calibration session name in the search box.
Create a Calibration Session
During the session creation process, you will identify the time-frame the session is applicable to and identify the calibration template being used. You will also designate users to:
Run the session (Facilitator)
Act as back-up (Co-facilitator)
Own the session (Owner)
Provide input (Participant)
Be calibrated (Subject)
Have access to all session data for a calibration template (Executive Reviewer)
The creation process involves three tabs: Basic Info, People and Validation.
A new session may be created by clicking on the Create New button or cloning an existing session. Cloning a session will create a copy of an existing session that you may use as a starting point to rename and make updates to.
Basic Info Tab
The Basic Info tab is shown in the example below.
Create Calibration Session – Basic Info
The Basic Info tab is used to name the session, identify the calibration template to associate the session with and to select the session owners and facilitators. Required fields are the session name, associated calibration template, and session owner(s).
A session owner would be a manager with more than two levels reporting to them. A session may have multiple owners. The default setting is “Select subjects and participants automatically according to the owners.” When designating an owner, the direct reports of the owner automatically become the participants of the calibration session. Additionally, the direct reports to the participants become the subjects of the calibration session.
This setting will add the participants and subjects to the People list in the second tab. Participants would be all users one level down from the owner. Subjects would include all users two levels down from the owner.
The admin’s username defaults as the facilitator but this may be changed. A second name added becomes the co-facilitator although a co-facilitator is not required.
It is possible to upload one attachment which would be visible in the calibration session. Rating descriptions or distribution guidelines are examples of attachments that could be used.
Planned activation date is the date that the session is activated and ready for use. Session date is the start date of the calibration session and location is the where the session will take place. These three fields are optional. Save the tab with your entries and then go to the People tab.
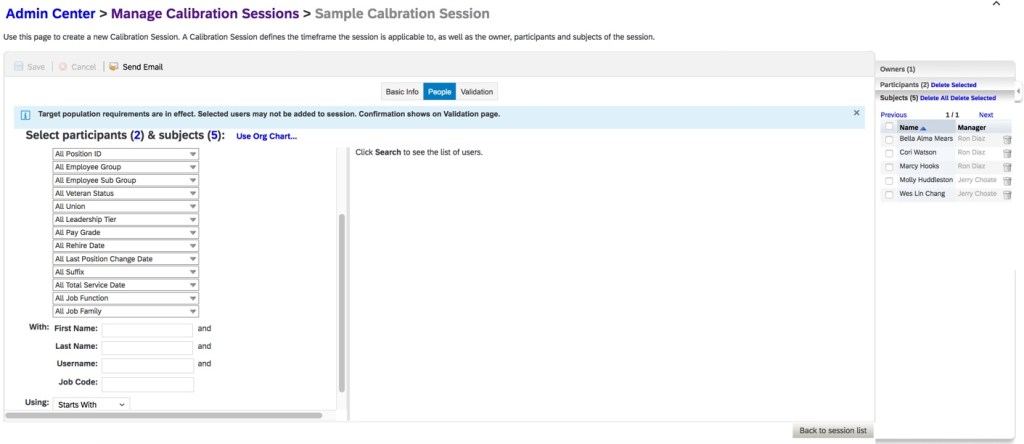
People Tab
The People tab is used to add or edit participants and subjects for the session. The People tab is divided into three sections: User Search, Search Results and Session Members as seen in the example below. If the “Select subjects and participants automatically according to the owners” option was checked on the Basic Info tab, the session members will be populated in the far-right panel as seen in the example below.
People Tab
However, any of these names may be removed or additional ones added. To add additional session subjects or participants, you may find names using a search by filter, group or org chart.
Search by Filter is the default search. The standard filters are Division, Department, Location, Name, Username and Job Code. The custom calibration filters added to the data model will be available as filter fields as well. The search results display in the middle section of the tab.
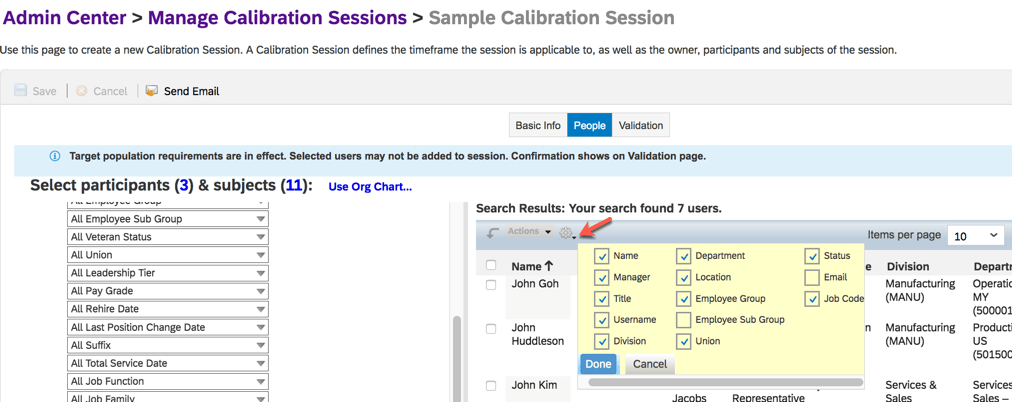
Any employee that displays in the search results can be added as a participant of the session. The role-based permission for the user that is creating the session may only add subjects that are in the role’s target population. An example of the People tab is shown below.
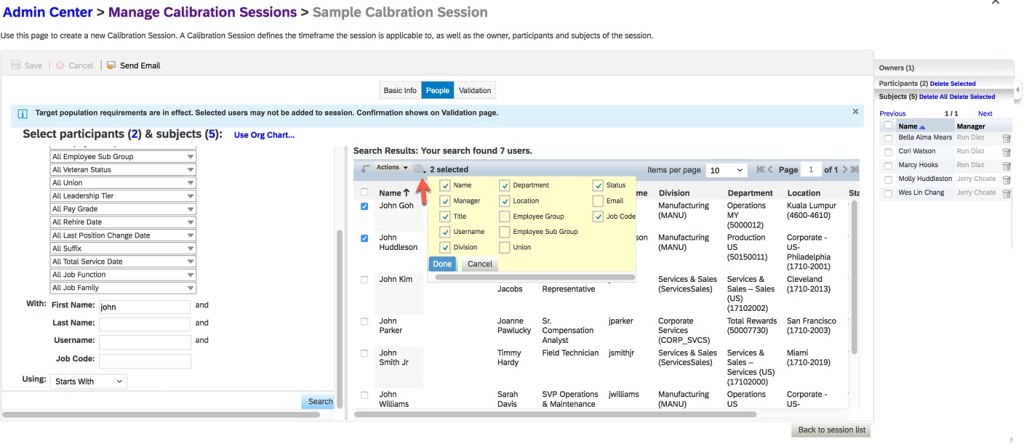
Based on the selections that had been made on the Search Results Fields tab on “Manage Calibration Settings”, the search results section may have additional display fields available by clicking on the wheel icon. The fields selected will then display as additional columns. Any of the default return fields may be deselected as well.
Display Options
Select a user in the search results section and click the “Actions” dropdown listing to add the name to the participants or subjects. This will populate the session members list in the far-right panel of the tab. An example is shown below.
Add Subjects or Participants
The session member panel displays the owners, participants and subjects. You may select one, many or all to names to remove from the session. An example is shown below.
Owners, Participants and Subjects
There is also a Send E-mail button on the People tab. Clicking this button will display a screen to create an e-mail. The owners and participant names default into the “send to” address but the entries may be modified. There is also a subject and message area.
Validation Tab
After entering the session info on the Basic Info tab, selecting who will be part of the calibration session on the People tab and saving the session, the session must be validated. This takes place on the third tab called Validation. This step must be completed in order to make the session ready for calibration.
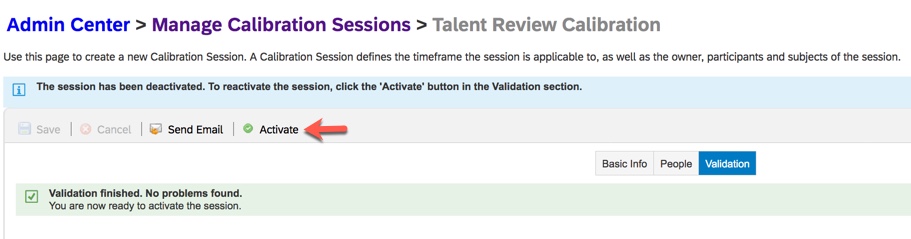
On the Validation tab, the system completes a series of checks that includes verifying that every subject has a performance form and that each form is in the calibration step. Any errors are displayed and must be resolved before activating the session. Warning messages will not prevent validation. If validation fails because forms have not been routed to the calibration step yet, there will be a button that displays to move the forms to the calibration step. Once the forms have been routed and there are no other issues, “Validation finished. No problems found.” message will display and the Activate button will be active as seen in the example below.
Validation Tab
Activating a session makes it available for the calibration session to begin. After clicking the Activate button, a confirmation popup displays to verify activation. Once activated, an e-mail may be sent to the facilitator, owner and session participants. The recipients, the pre-populated e-mail subject and message may be modified prior to sending. The session status is now “In Progress”. The session is now available to all of the participants for review. The facilitator would be able to start the calibration session as well.
This method of creating and activating calibration sessions is manageable when there are only a small number of sessions to create. We will look at another tool that the admin may use to create, validate and activate calibration sessions in bulk.
Mass Create Calibration Sessions
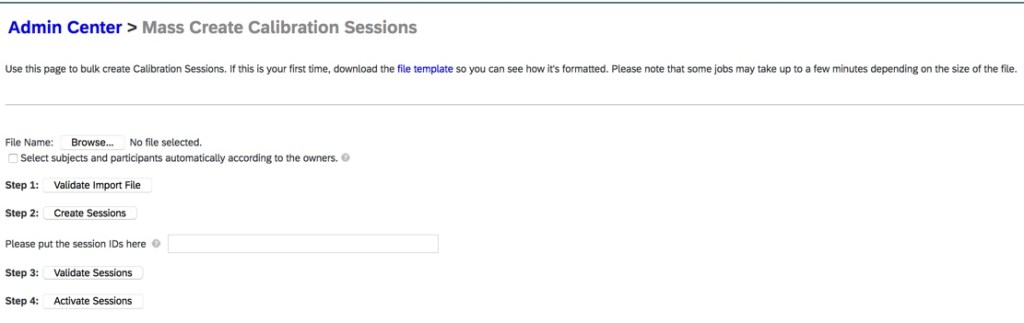
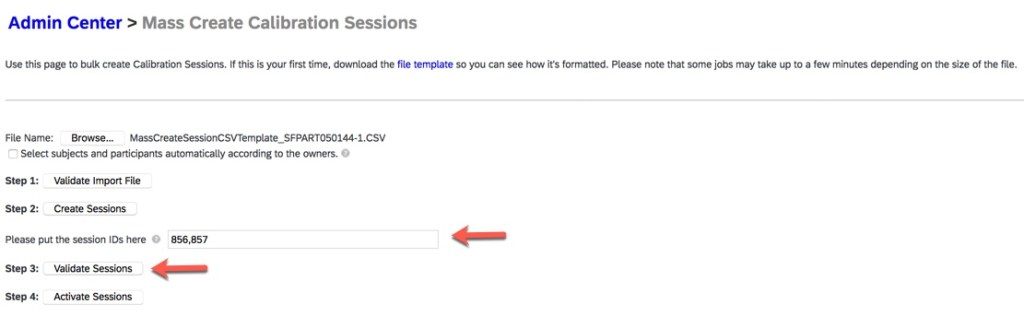
There is a function that enables the admin to create multiple calibration sessions at once. In addition, these multiple sessions may be validated and activated in mass. The “Mass Create Calibration Sessions” tool is used. Using this feature assumes that the calibration settings have already been configured and the calibration template created. An example is shown below.
Mass Create Calibration Sessions
There are four steps to perform on this screen: validate the import file, create sessions, validate sessions and activate sessions. The admin will receive an email after each step with with any errors or warnings. If there are any errors, they must be corrected before moving on the next step.
Step 1: Validate Import File
To start, the calibration file template must be downloaded. The template provides the file layout used to create the calibration sessions. Click “file template” seen in the introductory text at the top of the screen and open the CSV file. An example of the file is shown below.
Template to Upload Sessions
The file columns represent the same fields that are used when creating a calibration session manually via Manage Calibration Session. Create a row on the file for each calibration session that you wish to create. Similar to creating the calibration session manually, the same fields are required: session name, the calibration template associated with the session, and the session owner.
There are some fields that are worth mentioning.
If the Facilitator field is left blank, the system defaults the facilitator to the person who uploaded the file. If you wish to list a facilitator and co-facilitator, list each username in the same row separated by the bar delimiter “|”.
The Session Owner field contains the username of the session owner. If there are multiple owners, list each in the same cell separated by the bar delimiter.
If populating the date fields, the date format is based on the localized format of the user uploading the file. The file needs to use CVS format when uploading.
There is a checkbox option, “Select subjects and participants automatically according to the owners.” This is the same option available when creating a session manually. By enabling this option, all of the managers reporting to the owner identified on the file become participants in the session. Individual contributors reporting to the participants become the subjects. Enabling this option eliminates the need to individually identify the participants and subjects to include in a session. Therefore, no entries are added in the participants and subjects columns.
The file may also contain rows for sessions that are not based on the owner’s org hierarchy. In this case, the participants and subjects must be entered on the file in the appropriate columns.
For each session, enter all of the participants in one cell separated by the bar delimiter. Similarly, enter all of the subjects in one cell separated by the bar delimiter. Continue to add rows to the file for each unique calibration session you wish to create. You may create sessions that use different calibration templates. An example of a file to load is shown below.
Sample Import File
Once the file is populated and saved, it must be uploaded and validated. The file needs to use CSV format when uploading. The validation checks for formatting issues or missing fields. An example of importing the file is shown below.
Import Mass Create Sessions File
After the file is validated, the admin will receive an e-mail with the status of the import. For issues, the e-mail will contain validation errors. If there were any errors, the file must be corrected, saved, uploaded and validated again.
Step 2: Create Sessions
Once the file is validated successfully, the sessions may be created. The admin will need to return to the Mass Create Calibration Sessions tool to create the sessions. Make sure the file name is listed and click on the step 2 button, Create Sessions. The admin will receive an e-mail upon completion. If there are no errors, the sessions have been created and the status of each calibration session is now “Setup”. In the e-mail, the session ID for each session is listed and will need to be referenced when validating the sessions in step 3. An example is shown below.
Mass Create Job Status E-mail
If there are errors, make the corrections, save the file and repeat the step until it is successful.
Step 3: Validation Sessions
The admin will need to return to the Mass Create Calibration Sessions tool to validate the sessions. Make sure the file name is listed along with the session IDs from the e-mail from step 2. Click on the step 3 button, Validate Sessions. An example is shown below.
Validate Mass Sessions
The validation that occurs after the sessions are created checks the permissions, ensures that the subjects have forms, the forms are at the calibration step, and there are no inactive users. The admin will receive an e-mail with the status of the sessions. If there are no errors, the session is ready to be activated. Only Setup or Deactivated status sessions may be validated.
Step 4: Activate Sessions
The admin will need to return to the Mass Create Calibration Sessions tool to activate the sessions. Make sure the file name is listed and click on the step 4 button, Activate Sessions. The admin will receive an email that shows if activation was successful. If so, the status for the sessions is “In Progress” and calibration sessions may begin.
Mass Delete Calibration Sessions
In a situation where calibration sessions need to be recreated, the existing sessions must first be deleted. It is possible to delete the sessions in bulk. Facilitators and co-facilitators may delete sessions as long as these calibration roles have the delete permissions. The permissions to delete In Progress sessions and Approved sessions was set on the Permissions tab in Manage Calibration Settings. Multiple sessions may be deleted at once by using the path Home menu and selecting Calibration. All the sessions that the facilitator has permission will display. An example is shown below.
Delete Sessions
To mass delete sessions, the facilitator may select any or all sessions and click the trash can icon on the top right side of the screen. Any sessions that cannot be deleted due to permissions will be listed in the confirmation popup. Any of the other sessions may be deleted, upon confirmation, the sessions are deleted and removed from the session list.
The facilitator may also use Manage Calibration Sessions to delete multiple sessions as shown below. However, each session must be selected and deleted individually. Sessions in any status may be deleted.
Delete Session using Manage Calibration Sessions
Manager Create Session
There is an option to permit managers to create calibration sessions for their own teams. “Enable Manager Calibration Session” would have to be enabled on the Global Settings tab of “Manage Calibration Settings” in order for this to work.
The manager would navigate to the Calibration page from the home menu. As seen in the example below, the manager would see a “Create New” button to start a session directly on the Calibration sessions screen.
Manager Create Session from Calibration
The manager would have to select the calibration template that is linked to the performance form to be calibrated, name the session and identify the number of levels to include. If the user is a high level manger, he will be prompted on how many levels to include in the session. For a manager with direct reports only, the only level option will be “Direct Reports“. An example is shown below.
Create Session
In order for a session to be created, all of the subjects must have the performance form associated with calibration template launched and each form must be in the calibration step. Otherwise an error message will popup. Using this method relies upon an admin creating the forms associated with the calibration template and routed the forms to the calibration step if necessary. If the forms are created and in the calibration step, the manager will go directly into the calibration session.
The manager will also have the ability to delete their session by going back to the Sessions tab in Calibration.
Manger Create from Team Overview
There is an additional feature that permits managers to create calibration sessions in the Team Overview page of Performance Management. This feature only permits sessions to be created for a manager’s direct reports.
The following are required to use this feature:
“Enable Team Overview Access Permission” is enabled in “Performance Management Feature Settings”.
Manager role has permission for Team Overview Access.
“Launch Calibration From PMv12 Team Overview” is enabled on the Global Settings tab of “Manage Calibration Settings”.
“Manager Template” tab of “Manage Calibration Settings” identified the calibration template to use in PMv12 Team Overview page.
PM form being calibrated is associated with the calibration template in the Data tab of “Manage Calibration Templates”.
Performance forms have to be in the calibration step which is identical to the process for a manager creating a session directly in “Calibration”. The manager would go to Performance>Team Overview. The Calibration button will appear on the top right side of the screen as shown in the example below.
Create Calibration Sessions via Team Overview
Clicking the “Calibration” button will open the calibration session. If forms are not yet in the calibration step, an error message will display. The manager would need to go back into the performance forms to complete the review step and submit them before the calibration session may be created. This could also be accomplished in Team Overview.
Wrap Up
We have now seen the methods to create and delete calibration sessions by both an admin and a manager. In the next blog in the Calibration series, we will walk through the steps of a calibration session.
What is the Metadata Framework (MDF) in SAP SuccessFactors? If you’ve been introduced to SAP SuccessFactors, chances are you’ve heard the term “Metadata Framework”. But you may not know the details of what the Metadata framework is exactly. This quick blog will help you understand what comprises the “Metadata Framework”.
To get started, let’s examine the name “Metadata Framework”. “Meta” refers to a greek origin word meaning “beyond”. So the word “Metadata” refers to data beyond the data. Or in other words, Metadata is data about the data. Metadata is data that describes what type of data it is (e.g. a number, or text, or a drop down) how the data looks (e.g. how it is formatted such as a date formatted as 12-31-20 vs. December 31, 2020), what its limits are (e.g. 256 characters long), etc . As the picture at the top of the blog post suggests, a framework is the structure laid out in the initial stages of building a structure. So the “Metadata Framework” is a way to lay out the structure of data in SAP SuccessFactors.
So how do we go about laying out the data structure of SAP SuccessFactors? If you have admin access in the system, you can navigate to the “Configure Object Definitions” screen as shown in the example below. Think of an “Object” as a collection of fields that describe, define, and/or belong to a “thing” in your database/system. Objects could be a chair, a dog, a car, a person or the example below, a position. This screen demonstrates the power of the MDF because you can create objects (as seen in the upper right hand corner under “Create New”, or you can edit existing objects. This ability to create and edit objects lets you store any type of information! In our example, we chose “Object Definition” in the “Search” field and then chose “Position” so we can see how the position object has been defined. You can see below some basic data about the object in general at the top such as whether it is active or not, whether version history is kept on the MDF definition, etc. Below that begins a list of fields within the object and associated attributes of each field such as its technical identifier, length, the type of field it is, etc. Scrolling further down we can even set rules for what happens when a new object is created (such as pre-populating fields) or validation rules to help with data integrity to check fields before the object is saved. We can edit this definition of the overall object and the fields within the object by clicking “Take Action” and then “Make Correction”. Taking a look at the screenshot below, you can start to get a sense of what the MDF is all about.
Configure Object Definitions Screen
It is important to note that not all data in SAP SuccessFactors uses the metadata framework. Most Employee Central data is stored in the MDF–but not all. SAP is working on moving the final few pieces into the MDF within the next few releases. Most of the Talent modules and Recruiting still also reside outside of the MDF. However, as new functionality is built, it is created using the MDF wherever practical.
We hope you enjoyed this quick tour of the MDF! You should now have a basic understanding of what the MDF is and how to configure it. Do you need more help with the MDF? Contact us at info@worklogix.com.
As year-end approaches, it is common for many companies to take a second look at their employee performance and goal setting processes. In the past few weeks, I’ve been helping multiple companies revamp their employee performance processes. While some are just tweaking current forms and processes, others are considering including a new and often enlightening process – 360 evaluations.
What is a 360 evaluation?
The idea behind a 360 evaluation is to get a picture of how others view your performance from all angles. This means that in addition to getting feedback from your manager (top down), you also get feedback from your own direct reports (bottom-up), peers (side), and even external sources (vendors, business partners, customers, etc.).
Why do companies implement 360 evaluations?
Receiving feedback from a variety of sources helps create a more complete picture of how an employee is performing and/or perceived to be performing from different angles. 360 evaluations can help uncover trends and gaps in these different angles. For example, a manager may consider an employee a top performer, but when feedback is asked from peers or external sources on an anonymous basis, the employee might get different feedback (“He’s always on top of his own tasks, but sometimes at the expense of the team as a whole when we need his support”). Similarly, an employee may not be considered a top performer by a manager, but feedback from others could reveal a lot of solid performance feedback into which the manager never previously had sight (E.g. “She’s been so helpful in getting my career on the right path and helping me with work tasks at the expense of her own!”). Allowing this feedback to come to light can help employees and managers work to truly improve employee performance. We’ll take a look in a moment at how SAP SuccessFactors 360 evaluations aid in attaining this kind of feedback.
Walk-through of a 360 form in SAP SuccessFactors
360 forms are launched just like performance forms are. However, it is important to note that 360 forms use a separate screen for launching (don’t worry, this screen pretty much works the same as the other launch forms screen you are used to. After picking a target population, the admin can launch just like a normal performance form.
Search bar showing separate launch screen for 360 forms
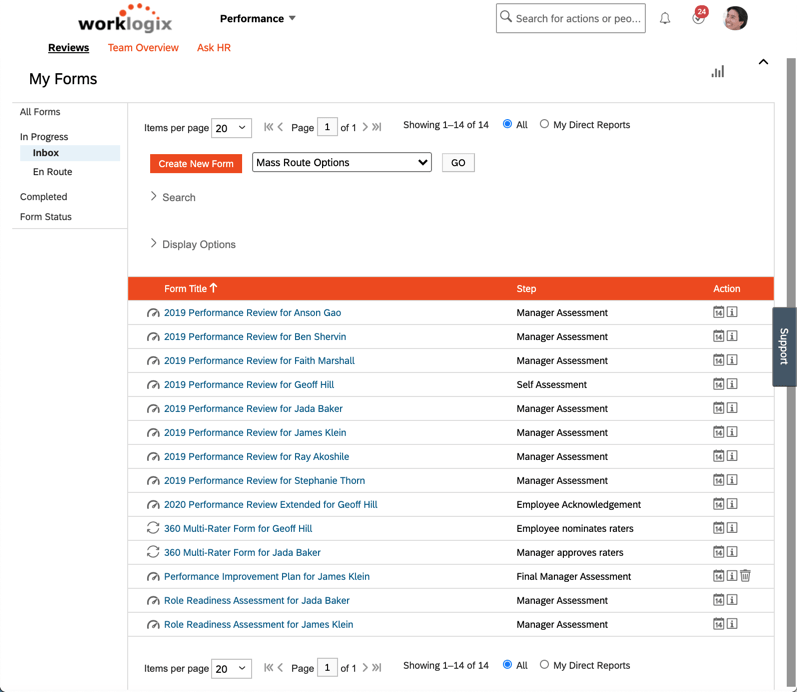
360 forms will also show up in the performance inbox like other performance forms, but with a different icon. It is important to recognize that 360 forms use a template type than regular performance forms and get treated slightly differently in these respects.
View of Performance Inbox with both 360 and regular performance reviews
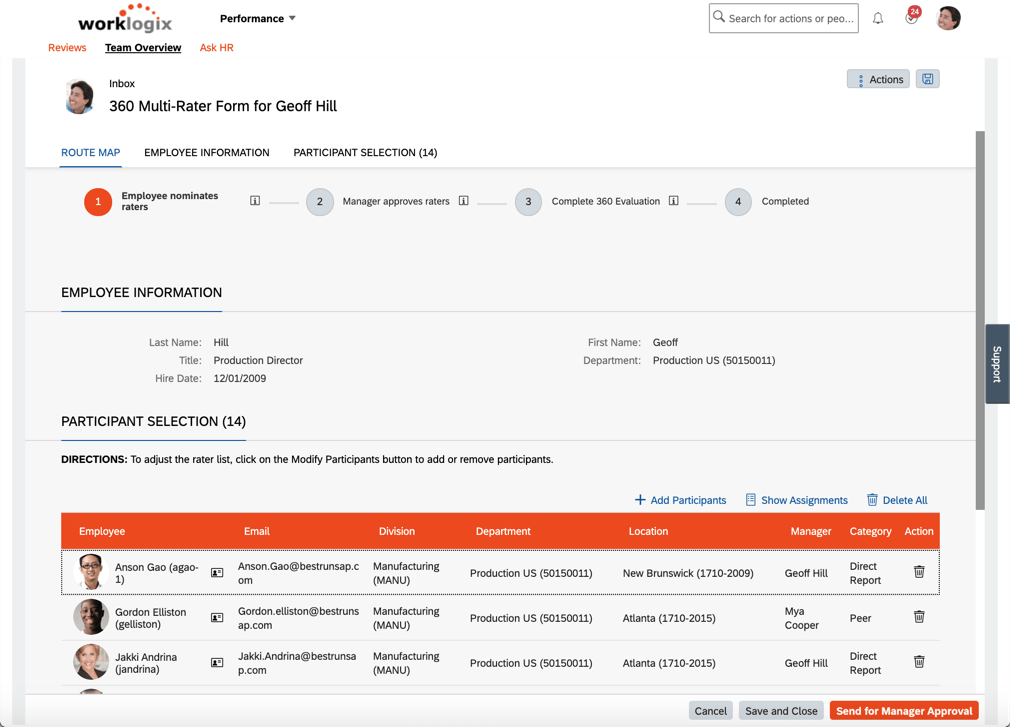
Once the first person in the route map gets the form (in this case the employee), they need to choose who will be involved in the evaluation. The system can be configured to default in people for categories like direct reports, manager, and peers.
Employee nominates raters step of 360 review
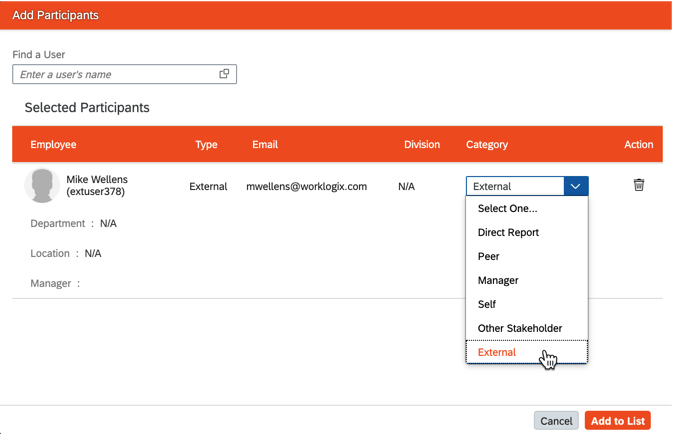
Users also have the option to add external participants as shown below by simply providing a first name, last name, and email and then choosing in what category the person should be included.
Adding an external participant
Once the user is finished adding participants, there is usually an approval step prior to the evaluations being sent out. Evaluations can be designed using sections similar to those you are used to seeing in a standard performance review form. There are sections for objectives, competencies, as well as an introduction and a section for the subject’s information. Unlike regular performance forms that can be configured heavily on the online editor in “Manage Templates”, 360 forms can only be fully setup by partners or SAP (though much of the config is done in the online editor).
For internal participants, the evaluation is sent to the user’s performance inbox like the typical performance reviews where they can then open the form as shown below.
360 Review Form Sent to Evaluator
In the case of external participants, after approval of the evaluators, an email is sent with a link that allows external users to access the form. This can be a security consideration for some organizations since the link is only as secure as the receiving email system.
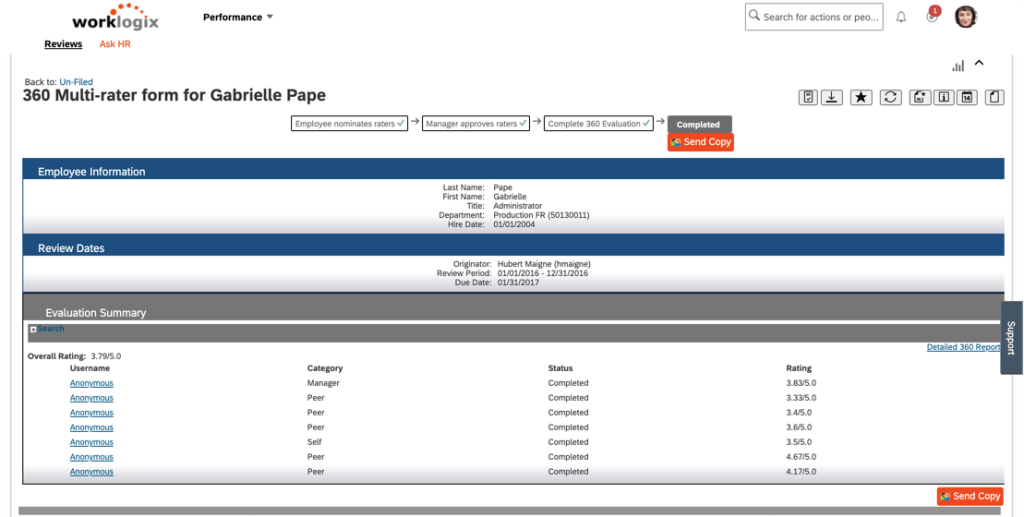
After all evaluations have been completed, the form is put in the completed status and the employee / manger / etc can view the results depending on permission settings. You can see an example completed performance form below.
Completed Review showing Anonymous ratings
One key advantage of the 360 form in SuccessFactors over the typical annual performance review is that the 360 feedback comments and ratings can be made anonymous. Obviously the user would know who their manager is, or they might be able to derive who the other evaluators are based on category if there are only one or two – so the forms allow you to configure minimum counts in each category as well as rollups to combine categories to help keep anonymity. The user can click on the link for each reviewer to see the details of each review and create an HTML or PDF printout of the details as shown below.
Printed Detail of Individual Review Feedback
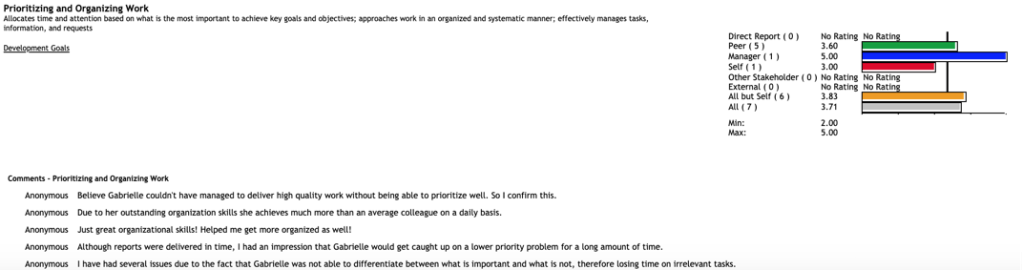
The form also has a nice detailed report showing the combined feedback comments and overall ratings by category. This can help the employee and manager understand where any gaps between self and manager evaluation ratings may exist along with other types of ratings from other categories. For examplem we can see below there is a large gap between the manager’s perception and the employee and other’s perception of “Prioritizing and Organizing Work”. Perhaps the manager is getting too much priority and the employee needs to focus on the work the team as a whole needs completed!
Wrap Up
After this quick walkthrough, hopefully you can now see the advantage of 360 forms as an insightful tool to get employee performance feedback from a variety of sources and understand what a typical end-to-end 360 process looks like.
For more information about 360 forms and other talent management modules in SAP SuccessFactors, check out our book here!
Do you need help implementing or changing your 360 form or other performance and goals processes? Contact us at info@worklogix.com.
With so many jobs lost, we all need to hunker down and concentrate on keeping our current jobs until things get better right? Nothing could be further from the truth!
Realizing the Need
Just last week, I had a call with a customer who wanted to re-examine their Succession Management process. They had the system set up. They didn’t really use it. Then COVID hit. Like many companies, the organization underwent a lot of changes and left a lot of resource gaps. Now they are realizing they could have been better prepared and are looking to quickly ramp back up their succession process. They are not alone.
Throughout this year, I’ve had the pleasure of serving on HR.com‘s advisory board for Internal Mobility, Succession, and Career Development. The organization just recently published the results of the cross-industry study we board members helped create. From what I see, the survey results are consistent with what I am seeing in the example I described above. Let’s take a closer look at the facts!
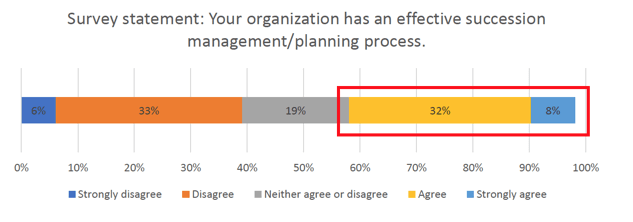
First off, most organizations recognize they don’t have an effective succession management and/or planning process in place. In addition to only 40% of companies agreeing or strongly agreeing that their process is effective as shown below, another survey question revealed that only 26% have a succession management system in place.
Source: HR.com’s Internal Mobility Webinar Nov 5, 2020
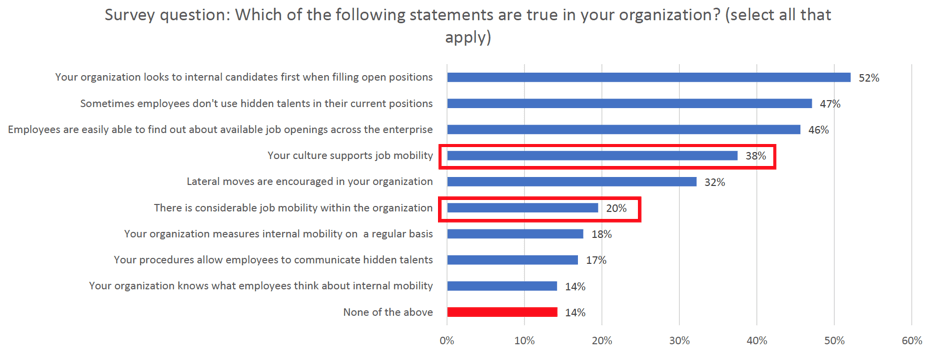
Furthermore, the survey also found that only about 1 in 5 companies have considerable job mobility within the organization.
Source: HR.com’s Internal Mobility Webinar Nov 5, 2020
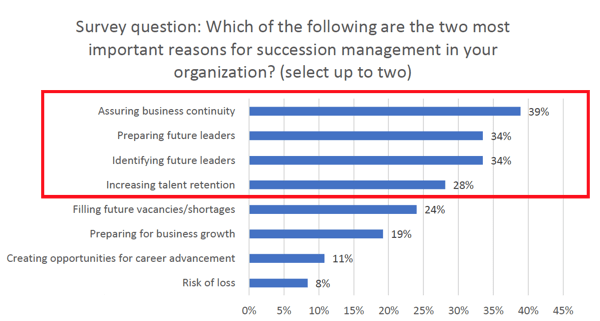
At the same time, companies realize that business continuity (e.g. keeping the lights on!) is the most important reason to promote succession management and internal mobility.
Source: HR.com’s Internal Mobility Webinar Nov 5, 2020
Recognizing The Gap
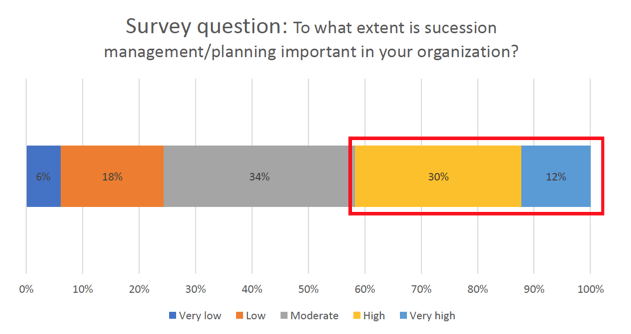
So let’s get this straight, companies recognize that Succession and Internal Mobility are important, but they don’t currently have good systems and processes in place to support them. So why don’t more companies get their Succession Management systems and processes up and running? The problem is, most organizations don’t consider Succession Management important to the organization.
Source: HR.com’s Internal Mobility Webinar Nov 5, 2020
The gap here is that the process really is important for the reasons these companies have already realize and just not acted up (remember what we said about keeping the lights on?). And many companies right now are starting to realize this the hard way during COVID as employees leave both voluntarily and involuntarily and large resource gaps are being felt because of this process gap. I can only attribute this trend to “perception” since the facts point to a real need here. I think it is time to end this perception!
Is It Worth The Investment?
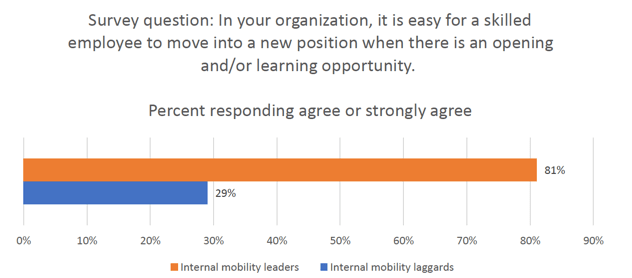
If I invest in a Succession and Development Management strategy, is it really going to work? The answer is “Yes!” The survey found overwhelmingly that those organizations who are internal mobility leaders, it is easier for employees to move to new positions. Making it easy for employees to move from one position to another makes it easier to fill critical roles with people your organization already knows and trusts rather than going through the expense and risk of recruiting externally (which many companies are still unable to do at all at the moment with some still experiencing hiring freezes).
Source: HR.com’s Internal Mobility Webinar Nov 5, 2020
OK, I get it, I need Succession and Internal Mobility! How do I get started?
There’s a ton of ways! We’ve talked a lot about Succession Management – which involves tagging which roles are critical to the organization and identifying how to fill those roles. This can help you define who to develop and what they need to develop. But of course, that means investing in employee development itself! Not surprisingly, the survey found a similar trend here. Almost half of companies reported they did not have a development process or program!
Source: HR.com’s Internal Mobility Webinar Nov 5, 2020
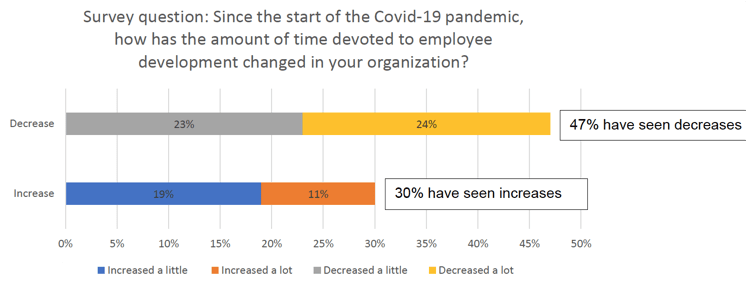
What’s more frightening, is that during the Pandemic, when the concentration should be on developing the fewer employees many companies are trying to make more effective, the opposite seems to be happening. 47% of companies saw decreases in employee development.
Source: HR.com’s Internal Mobility Webinar Nov 5, 2020
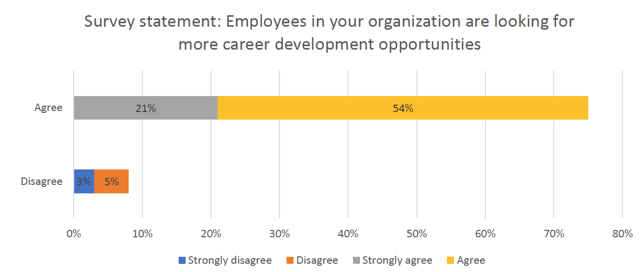
At the same time, employee demand for development opportunities has increased! 75% of companies saw that employees are looking for development opportunities!
Source: HR.com’s Internal Mobility Webinar Nov 5, 2020
Once again, there is a huge disconnect which helps explain further why many company strategies are out of alignment with the needs. Only once employees are able to develop their skills and competencies in order to meet the needs of critical roles will they will be ready to start filling those critical roles.
There are a lot of specific strategies companies are using the promote internal mobility and fill their succession management strategies. To find out more information about the different approaches companies are taking to implement their Succession and Development Strategies, you can download the full survey at HR.com or contact info@worklogix.com to talk more about your strategy!
For more information about Succession Management and other talent management modules in SAP SuccessFactors, check out our book here!
Companies are hiring! A recent LinkedIn article shows that individual companies are now hiring 10,000s of new employees. This is great news for the economy. We at Worklogix have also seen customers gearing up their recruiting systems. But all this renewed activity in the “New Normal” raises the question “How do we keep everyone safe during the process without sacrificing the candidate experience?” In this blog we share how we’ve helped customers expand their recruiting capabilities with SAP SuccessFactors technology to keep candidates and current employees safe.
Engagement
Just because there are more people looking for jobs doesn’t mean engagement needs to go down. Quite the opposite–it means now is your chance to engage the most people to get the best talent! If your company isn’t hiring yet, it makes the challenge even more important because without any postings, you’ll need to come up with creative ways to keep people checking back in with your career site. We’ve helped companies integrate with tools like chatbots that interact with candidates to document their interests and create talent profiles that can be used to trigger email updates. If you are wondering how to create talent pools and target them with email campaigns within SAP SuccessFactors, checkout our other blog article “Actively Engage Prospective Candidates with SAP SuccessFactors Recruiting CRM Features“. Email campaign content can range from virtual career fair announcements and updates on postings, to videos featuring real managers describing why they like working for the company and what they are looking for in a good candidate.
Automated Assessments
Assessment Status and Scores showing within Candidate Overview Screen in SuccessFactors
Even prior to COVID-19, we’ve been helping customers sift through 1,000s of candidates with automated assessments. With more unemployed people seeking jobs, there is increasing pressure to comb through even more candidates per posting. Automated assessments can take the form of surveys or even Artificial Intelligence. For example, we’ve help customers automatically send out 3rd party survey assessments immediately upon applying or at other stages in the recruiting process. From there, the candidate can either be automatically disqualified or be sorted into different statuses and/or given a rating to easily compare against others. Assessment status and scores can also be integrated directly into the SuccessFactors user interfac as shown in the screenshot above and even sorted in descending order for maximum visual efficiency for recruiters. We’ve also worked with cutting edge vendors to give candidate similar ratings based on resume and candidate profile content using AI technology.
One-Way Interviewing / Virtual Interviewing
As in-person interviewing takes on new risk, many are turning to one-way interviewing and/or virtual interviewing. We’ve helped customers setup their SAP SuccessFactors systems to automatically trigger 3rd party video interviewing systems when placed in an interview status. Typically, after the status trigger, the candidate gets an email with instructions, perhaps to download an app on their phone. In a one-way interview scenario, candidates are prompted with specific questions and are allowed to record an audio or audio/video segment answering each question. The recruiter then receives the segments in the vendor system and can even get automated system feedback on how the candidate answered. The advantage here in addition to not having to meet in person is there’s no need to work out scheduling issues and the candidate can often re-record until they are satisfied with the answer they have provided. Two-way interview automations often take the form of automated scheduling systems ending in a virtual conference call.
Will I have to work on site once I get the Job?
Depending on the position, this is probably a question on many candidates’ minds when applying to a new position, and one that recruiters should be prepared to answer with confidence. At Worklogix, we’ve helped companies flagging their positions to denote how critical being “in-person” is to the role and even denote what kind of proximity to other people or exposure risk the role may require. By expanding position objects in the SuccessFactors MDF and linking the field to the requisition, recruiters can post positions and communicate with candidates clearly about the on-site expectations of the role are.
Automated Drug Screening and Background Checks
While some companies may choose to forego drug screenings, others like those subject to DOT regulations have no choice. A recent SHRM article talks about the pros and cons and realities of drug testing during COVID. The question seems to be, are we doing more harm by not conducting screenings designed to provide a safe work environment for employees? Giving candidates options might help here. We’ve helped many customers setup automations with a variety of background check & drug screening vendors. Some of these vendors allow candidates to choose from a variety of facilities that may have different safety options candidates can choose from and feel more comfortable. In a typical automation scenario, the candidate is moved to a background screening status in SuccessFactors which triggers a call to the vendor, which in turn sends an email to the candidate to provide needed information and choose a drug screening facility. Results can also be shown directly in the SuccessFactors UI similar to assessment results.
Delaying I-9 Verification
Once a candidate is ready to hire, companies can also delay unneeded on-site attendance by delaying I-9 verification. As you may be aware, the Department of Homeland Security has delayed the need to verify employee work authorization documents. You can read the updates from DHS here. To comply for this, SAP has made updates to the existing Onboarding 1.0 process. You can read the full SAP note on the COVID-19 onboarding process here. For Onboarding 2.0, the US forms will be out as part of the H2 2020 release.
Wrapping up
Online engagement using chatbots and email campaigns, automated assessments, virtual interviewing, flagging positions for work conditions, automated background checks, and I-9 updates are just a few examples of how company recruiting initiatives are working to make the recruiting and onboarding process both safe and efficient during COVID-19.