
In the previous two calibration related blogs, we learned how to configure the Calibration module in Provisioning, and we reviewed how to set up role-based permission, created a calibration template and defined the calibration settings.
Here we will explore the various ways to create a calibration session. We will see how an admin may create one or more calibration sessions using the “Manage Calibration Sessions” tool. We will also learn how an admin may create multiple sessions using the “Mass Create Calibration Sessions” tool. We will also review the methods a manager may use to create their own calibration session.
What is a Calibration Session?
Before we begin, let’s have a quick refresher. A calibration session is a forum where managers convene to discuss the performance of their employees to achieve agreement on fair, objective performance ratings. The session is used to compare performance ratings for those being calibrated, make changes to ratings, add comments, and review the outcomes of a given calibration cycle.
Manage Calibration Sessions
We will begin by looking at the options found within “Manage Calibration Sessions”. This role-based permission is granted to the admin role and to any role that will be responsible for creating or editing calibration sessions. An example of the overview screen is shown below. Here new calibration sessions may be created, and existing sessions may be edited, cloned, deleted, or exported.

For existing sessions, the name of each session displays with its associated calibration template, the session status, the number of subjects and participants and name of the facilitator. The session statuses include the following:
- Set up – session has been created and validated but it has not been activated yet.
- In Progress – session is activated, session is open and not finalized yet.
- Approving – phase between In Progress and Approved. Finalize button has been clicked but finalization has not completed yet.
- Approved – session is finalized, ratings are approved and session is complete.
- Deactivated – an In Progress session that has been stopped. Deactivating a session allows for changes to be made. Sessions must be reactivated to return to In Progress status.
It may be helpful to understand what validating and activating mean as well. After a session is created, it must be validated. The validation process checks to make sure subjects have performance forms and the forms are in the calibration step. If validation is successful, the session may be activated. Activating a session makes it ready for the facilitators, owners and participants to access the session to begin the calibration process.
There are also export, filter and search options. One or multiple sessions may be exported to an Excel workbook. There is a record for each subject which contains basic information about the session. The filter option is helpful to find a specific session when an organization has a large number of calibration sessions. Sessions can be filtered by name, status, facilitator or number of subjects or participants. There is also a search option, the admin can quickly find a session by typing a part of a calibration session name in the search box.
Create a Calibration Session
During the session creation process, you will identify the time-frame the session is applicable to and identify the calibration template being used. You will also designate users to:
- Run the session (Facilitator)
- Act as back-up (Co-facilitator)
- Own the session (Owner)
- Provide input (Participant)
- Be calibrated (Subject)
- Have access to all session data for a calibration template (Executive Reviewer)
The creation process involves three tabs: Basic Info, People and Validation.
A new session may be created by clicking on the Create New button or cloning an existing session. Cloning a session will create a copy of an existing session that you may use as a starting point to rename and make updates to.
Basic Info Tab
The Basic Info tab is shown in the example below.

The Basic Info tab is used to name the session, identify the calibration template to associate the session with and to select the session owners and facilitators. Required fields are the session name, associated calibration template, and session owner(s).
A session owner would be a manager with more than two levels reporting to them. A session may have multiple owners. The default setting is “Select subjects and participants automatically according to the owners.” When designating an owner, the direct reports of the owner automatically become the participants of the calibration session. Additionally, the direct reports to the participants become the subjects of the calibration session.
This setting will add the participants and subjects to the People list in the second tab. Participants would be all users one level down from the owner. Subjects would include all users two levels down from the owner.
The admin’s username defaults as the facilitator but this may be changed. A second name added becomes the co-facilitator although a co-facilitator is not required.
It is possible to upload one attachment which would be visible in the calibration session. Rating descriptions or distribution guidelines are examples of attachments that could be used.
Planned activation date is the date that the session is activated and ready for use. Session date is the start date of the calibration session and location is the where the session will take place. These three fields are optional. Save the tab with your entries and then go to the People tab.
People Tab
The People tab is used to add or edit participants and subjects for the session. The People tab is divided into three sections: User Search, Search Results and Session Members as seen in the example below. If the “Select subjects and participants automatically according to the owners” option was checked on the Basic Info tab, the session members will be populated in the far-right panel as seen in the example below.
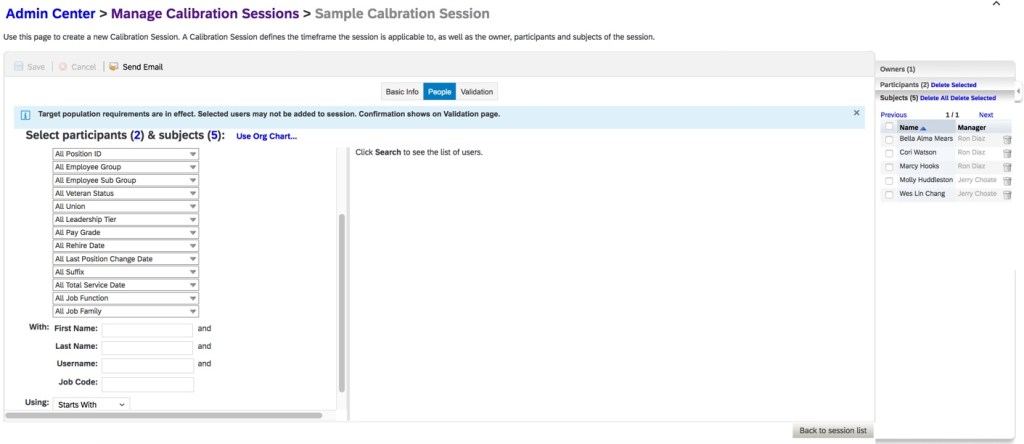
However, any of these names may be removed or additional ones added. To add additional session subjects or participants, you may find names using a search by filter, group or org chart.
Search by Filter is the default search. The standard filters are Division, Department, Location, Name, Username and Job Code. The custom calibration filters added to the data model will be available as filter fields as well. The search results display in the middle section of the tab.
Any employee that displays in the search results can be added as a participant of the session. The role-based permission for the user that is creating the session may only add subjects that are in the role’s target population. An example of the People tab is shown below.
Based on the selections that had been made on the Search Results Fields tab on “Manage Calibration Settings”, the search results section may have additional display fields available by clicking on the wheel icon. The fields selected will then display as additional columns. Any of the default return fields may be deselected as well.
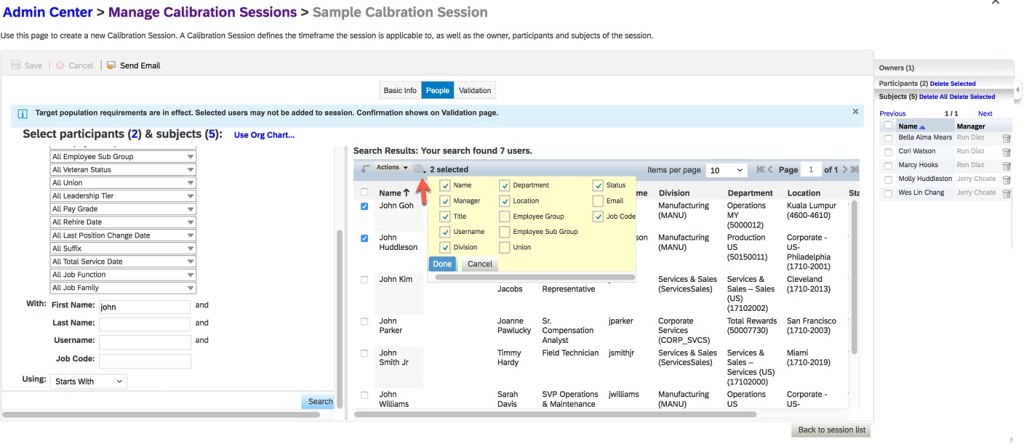
Select a user in the search results section and click the “Actions” dropdown listing to add the name to the participants or subjects. This will populate the session members list in the far-right panel of the tab. An example is shown below.

The session member panel displays the owners, participants and subjects. You may select one, many or all to names to remove from the session. An example is shown below.

There is also a Send E-mail button on the People tab. Clicking this button will display a screen to create an e-mail. The owners and participant names default into the “send to” address but the entries may be modified. There is also a subject and message area.
Validation Tab
After entering the session info on the Basic Info tab, selecting who will be part of the calibration session on the People tab and saving the session, the session must be validated. This takes place on the third tab called Validation. This step must be completed in order to make the session ready for calibration.
On the Validation tab, the system completes a series of checks that includes verifying that every subject has a performance form and that each form is in the calibration step. Any errors are displayed and must be resolved before activating the session. Warning messages will not prevent validation. If validation fails because forms have not been routed to the calibration step yet, there will be a button that displays to move the forms to the calibration step. Once the forms have been routed and there are no other issues, “Validation finished. No problems found.” message will display and the Activate button will be active as seen in the example below.
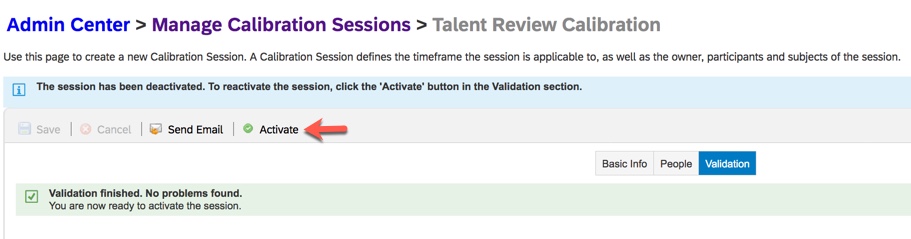
Activating a session makes it available for the calibration session to begin. After clicking the Activate button, a confirmation popup displays to verify activation. Once activated, an e-mail may be sent to the facilitator, owner and session participants. The recipients, the pre-populated e-mail subject and message may be modified prior to sending. The session status is now “In Progress”. The session is now available to all of the participants for review. The facilitator would be able to start the calibration session as well.
This method of creating and activating calibration sessions is manageable when there are only a small number of sessions to create. We will look at another tool that the admin may use to create, validate and activate calibration sessions in bulk.
Mass Create Calibration Sessions
There is a function that enables the admin to create multiple calibration sessions at once. In addition, these multiple sessions may be validated and activated in mass. The “Mass Create Calibration Sessions” tool is used. Using this feature assumes that the calibration settings have already been configured and the calibration template created. An example is shown below.
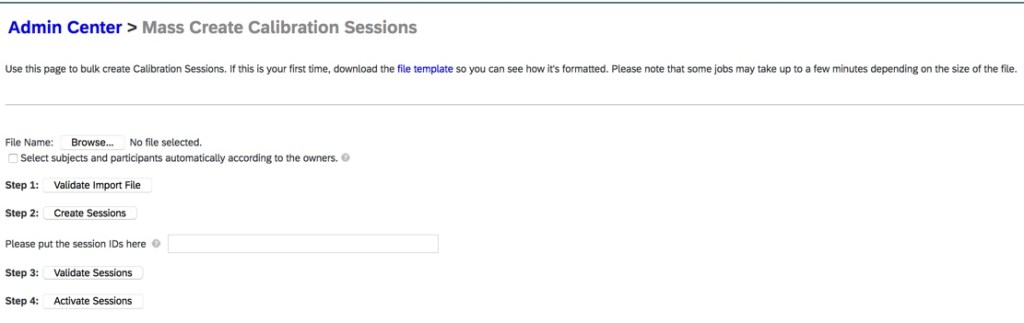
There are four steps to perform on this screen: validate the import file, create sessions, validate sessions and activate sessions. The admin will receive an email after each step with with any errors or warnings. If there are any errors, they must be corrected before moving on the next step.
Step 1: Validate Import File
To start, the calibration file template must be downloaded. The template provides the file layout used to create the calibration sessions. Click “file template” seen in the introductory text at the top of the screen and open the CSV file. An example of the file is shown below.

The file columns represent the same fields that are used when creating a calibration session manually via Manage Calibration Session. Create a row on the file for each calibration session that you wish to create. Similar to creating the calibration session manually, the same fields are required: session name, the calibration template associated with the session, and the session owner.
There are some fields that are worth mentioning.
If the Facilitator field is left blank, the system defaults the facilitator to the person who uploaded the file. If you wish to list a facilitator and co-facilitator, list each username in the same row separated by the bar delimiter “|”.
The Session Owner field contains the username of the session owner. If there are multiple owners, list each in the same cell separated by the bar delimiter.
If populating the date fields, the date format is based on the localized format of the user uploading the file. The file needs to use CVS format when uploading.
There is a checkbox option, “Select subjects and participants automatically according to the owners.” This is the same option available when creating a session manually. By enabling this option, all of the managers reporting to the owner identified on the file become participants in the session. Individual contributors reporting to the participants become the subjects. Enabling this option eliminates the need to individually identify the participants and subjects to include in a session. Therefore, no entries are added in the participants and subjects columns.
The file may also contain rows for sessions that are not based on the owner’s org hierarchy. In this case, the participants and subjects must be entered on the file in the appropriate columns.
For each session, enter all of the participants in one cell separated by the bar delimiter. Similarly, enter all of the subjects in one cell separated by the bar delimiter. Continue to add rows to the file for each unique calibration session you wish to create. You may create sessions that use different calibration templates. An example of a file to load is shown below.

Once the file is populated and saved, it must be uploaded and validated. The file needs to use CSV format when uploading. The validation checks for formatting issues or missing fields. An example of importing the file is shown below.

After the file is validated, the admin will receive an e-mail with the status of the import. For issues, the e-mail will contain validation errors. If there were any errors, the file must be corrected, saved, uploaded and validated again.
Step 2: Create Sessions
Once the file is validated successfully, the sessions may be created. The admin will need to return to the Mass Create Calibration Sessions tool to create the sessions. Make sure the file name is listed and click on the step 2 button, Create Sessions. The admin will receive an e-mail upon completion. If there are no errors, the sessions have been created and the status of each calibration session is now “Setup”. In the e-mail, the session ID for each session is listed and will need to be referenced when validating the sessions in step 3. An example is shown below.

If there are errors, make the corrections, save the file and repeat the step until it is successful.
Step 3: Validation Sessions
The admin will need to return to the Mass Create Calibration Sessions tool to validate the sessions. Make sure the file name is listed along with the session IDs from the e-mail from step 2. Click on the step 3 button, Validate Sessions. An example is shown below.
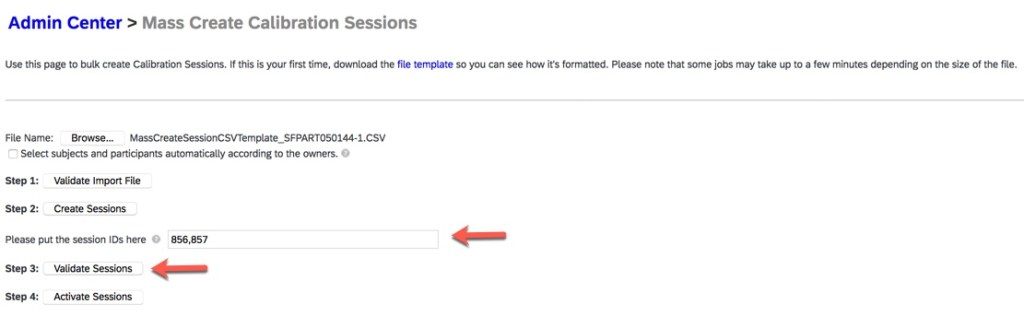
The validation that occurs after the sessions are created checks the permissions, ensures that the subjects have forms, the forms are at the calibration step, and there are no inactive users. The admin will receive an e-mail with the status of the sessions. If there are no errors, the session is ready to be activated. Only Setup or Deactivated status sessions may be validated.
Step 4: Activate Sessions
The admin will need to return to the Mass Create Calibration Sessions tool to activate the sessions. Make sure the file name is listed and click on the step 4 button, Activate Sessions. The admin will receive an email that shows if activation was successful. If so, the status for the sessions is “In Progress” and calibration sessions may begin.
Mass Delete Calibration Sessions
In a situation where calibration sessions need to be recreated, the existing sessions must first be deleted. It is possible to delete the sessions in bulk. Facilitators and co-facilitators may delete sessions as long as these calibration roles have the delete permissions. The permissions to delete In Progress sessions and Approved sessions was set on the Permissions tab in Manage Calibration Settings. Multiple sessions may be deleted at once by using the path Home menu and selecting Calibration. All the sessions that the facilitator has permission will display. An example is shown below.

To mass delete sessions, the facilitator may select any or all sessions and click the trash can icon on the top right side of the screen. Any sessions that cannot be deleted due to permissions will be listed in the confirmation popup. Any of the other sessions may be deleted, upon confirmation, the sessions are deleted and removed from the session list.
The facilitator may also use Manage Calibration Sessions to delete multiple sessions as shown below. However, each session must be selected and deleted individually. Sessions in any status may be deleted.

Manager Create Session
There is an option to permit managers to create calibration sessions for their own teams. “Enable Manager Calibration Session” would have to be enabled on the Global Settings tab of “Manage Calibration Settings” in order for this to work.
The manager would navigate to the Calibration page from the home menu. As seen in the example below, the manager would see a “Create New” button to start a session directly on the Calibration sessions screen.

The manager would have to select the calibration template that is linked to the performance form to be calibrated, name the session and identify the number of levels to include. If the user is a high level manger, he will be prompted on how many levels to include in the session. For a manager with direct reports only, the only level option will be “Direct Reports“. An example is shown below.

In order for a session to be created, all of the subjects must have the performance form associated with calibration template launched and each form must be in the calibration step. Otherwise an error message will popup. Using this method relies upon an admin creating the forms associated with the calibration template and routed the forms to the calibration step if necessary. If the forms are created and in the calibration step, the manager will go directly into the calibration session.
The manager will also have the ability to delete their session by going back to the Sessions tab in Calibration.
Manger Create from Team Overview
There is an additional feature that permits managers to create calibration sessions in the Team Overview page of Performance Management. This feature only permits sessions to be created for a manager’s direct reports.
The following are required to use this feature:
- “Enable Team Overview Access Permission” is enabled in “Performance Management Feature Settings”.
- Manager role has permission for Team Overview Access.
- “Launch Calibration From PMv12 Team Overview” is enabled on the Global Settings tab of “Manage Calibration Settings”.
- “Manager Template” tab of “Manage Calibration Settings” identified the calibration template to use in PMv12 Team Overview page.
- PM form being calibrated is associated with the calibration template in the Data tab of “Manage Calibration Templates”.
Performance forms have to be in the calibration step which is identical to the process for a manager creating a session directly in “Calibration”. The manager would go to Performance>Team Overview. The Calibration button will appear on the top right side of the screen as shown in the example below.

Clicking the “Calibration” button will open the calibration session. If forms are not yet in the calibration step, an error message will display. The manager would need to go back into the performance forms to complete the review step and submit them before the calibration session may be created. This could also be accomplished in Team Overview.
Wrap Up
We have now seen the methods to create and delete calibration sessions by both an admin and a manager. In the next blog in the Calibration series, we will walk through the steps of a calibration session.

Leave a comment