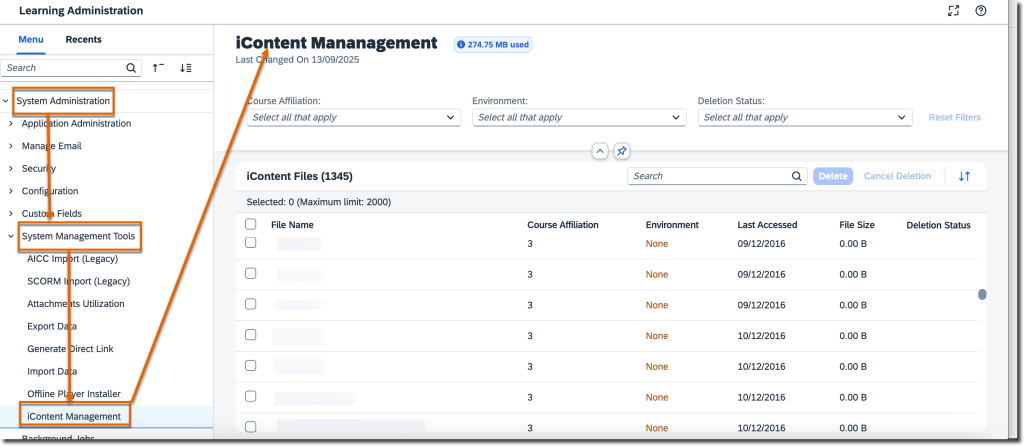
A new iContent Management page allows admins to identify and bulk delete unused files from iContent servers. You can schedule deletion jobs, view usage, and manage associated courses efficiently. Only one deletion job can be scheduled at a time and must be planned 30 days in advance. This helps optimize storage and maintain cleaner repositories while ensuring admins can revise or reactivate impacted courses as needed.
Change Assignment Due Dates from Team View
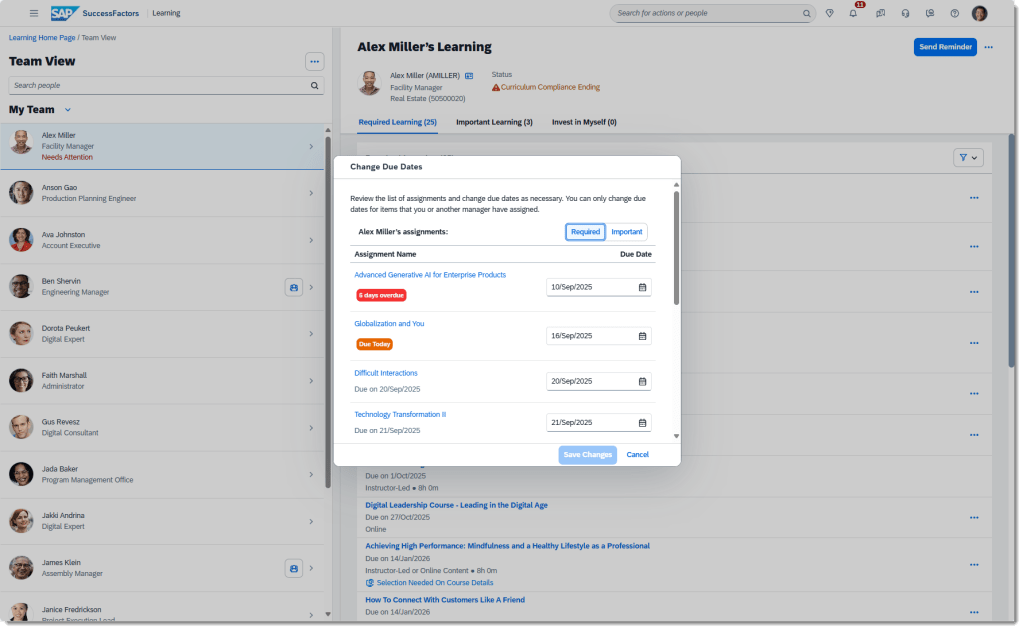
Managers can now change due dates for manager-assigned learning items directly from the Team View page—individually or in bulk. The new Change Due Dates dialog provides a quick way to update deadlines with real‑time status updates. This improvement streamlines manager oversight and supports better learner compliance.
Class Withdrawal from Team View
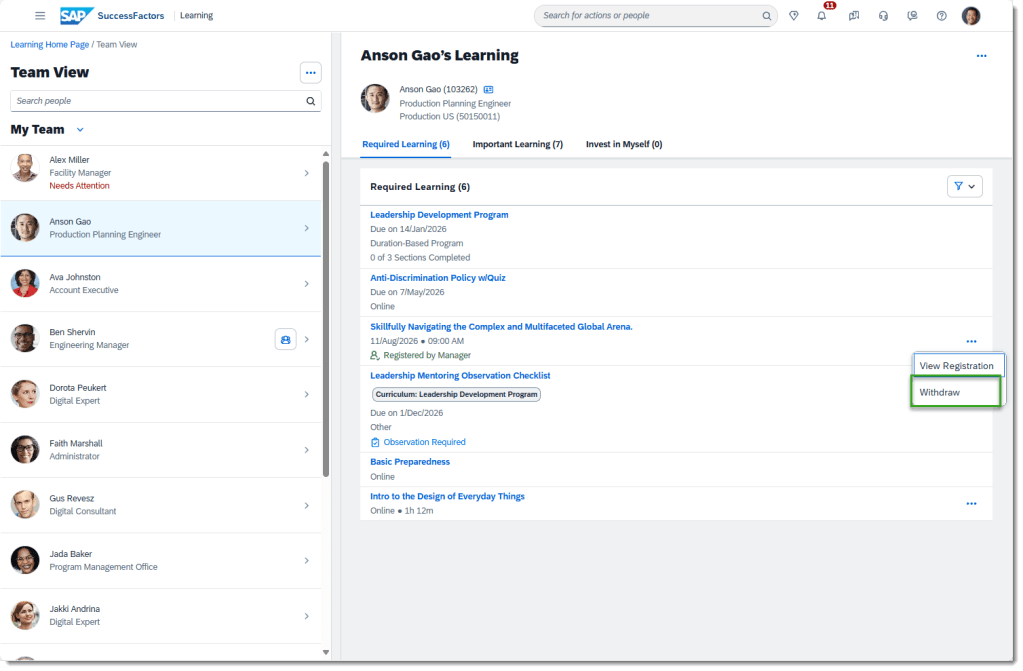
Managers can withdraw learners from classes seamlessly via Team View. Using the More Actions menu or directly on the Class Details page, managers can execute withdrawals without relying on bulk tools, improving flexibility and speed.
Employments Tab Visibility with System Default Role
The Employments tab is now visible on the User page when using system default roles that include the new View User Employment permission. This supports upcoming person‑centric experience enhancements. (Note: System default roles are for testing only.)
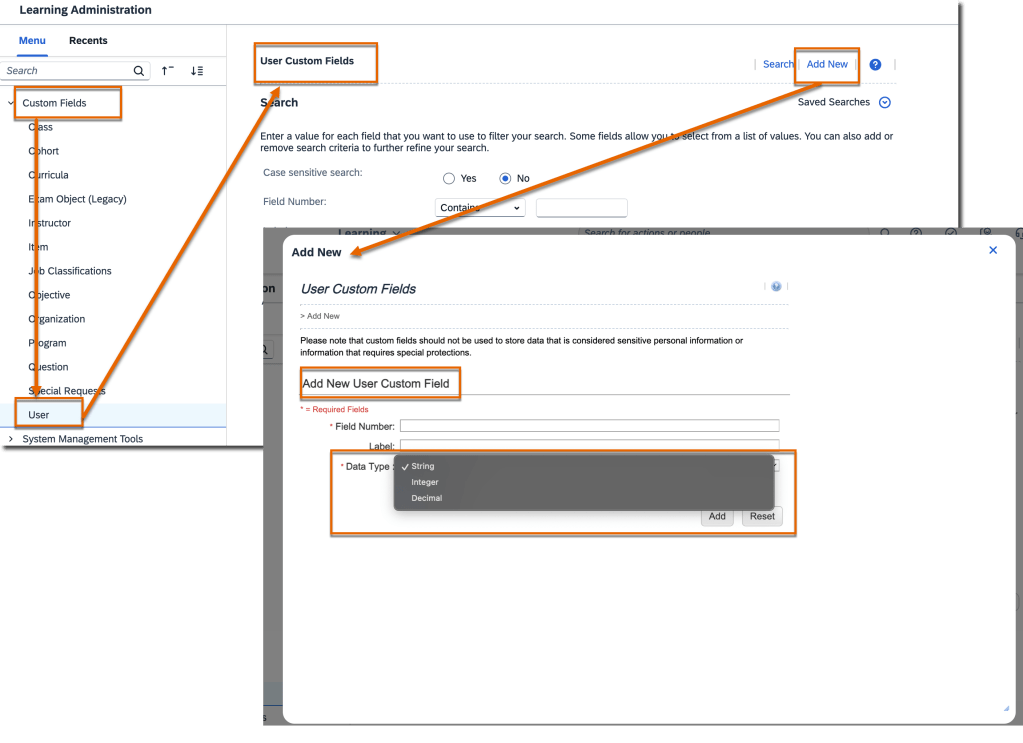
Integer & Decimal Custom Fields for User Entity
Admins can now create integer and decimal custom fields for the User entity, expanding options beyond string fields. These new types support assignment profiles, user search conditions, filters, and reporting—enabling more precise data management and dynamic rule configurations.
Universal Rollout of New Learning Home Page
The modern Learning home page is now mandatory for all customers. The legacy UI and toggle switch are fully retired, ensuring a unified, streamlined experience across all learners. vSaaS customers are excluded in this release and may continue using the toggle when enabled.
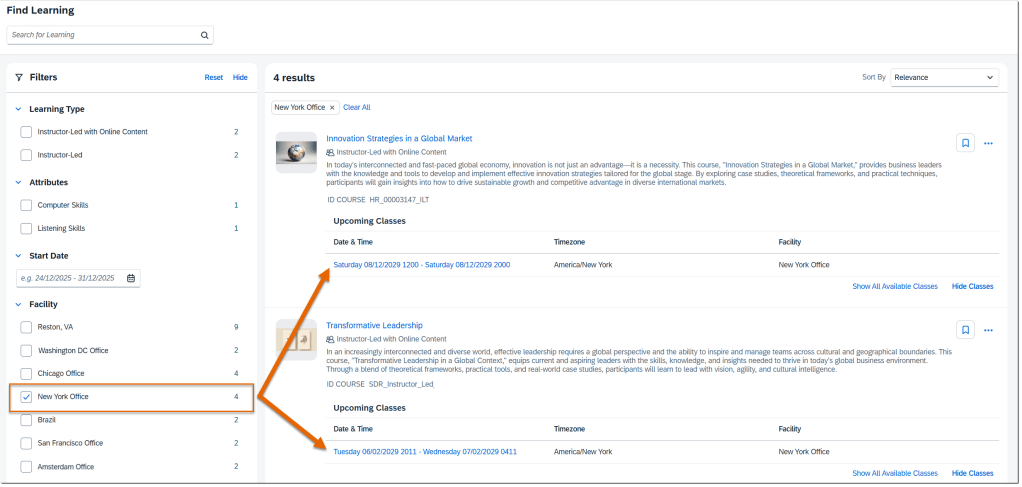
Upcoming Classes in Enhanced Search
Learners can now view and expand upcoming classes directly in enhanced search results. The list shows up to five classes sorted by date, updated dynamically when filters like Facility are applied. This replaces the old calendar view and allows quick comparison of class schedules and locations.
To Learn More
The 2H 2025 release for SAP SuccessFactors Learning includes 18 total enhancements, and this blog highlights only the most impactful updates. To explore the full list of changes—including technical notes, configuration details, and feature nuances—please visit the official release documentation using the link below:
For tips on how to manage a release, check out our blog here.
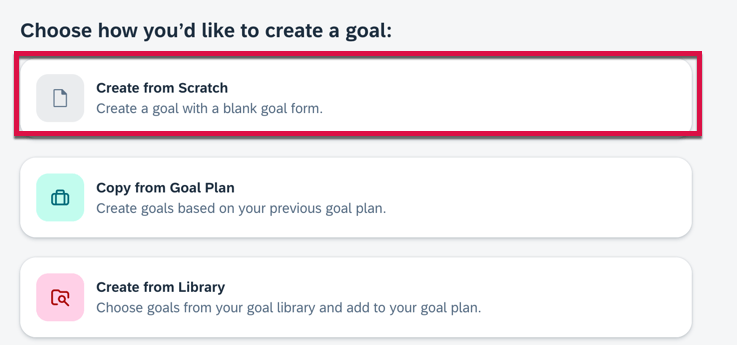
Hide “Create from Scratch” Option for Goal Creation
When creating on goal on a goal plan using the latest Goal Management, it is possible to create a performance goal from scratch, copy a goal from another goal plan or create a goal from a goal library. The options are shown below.
Create Goal Options
The Create from Scratch goal option for performance goals may be hidden. To hide this option, there is a switch to set in the goal plan template XML:
Once the switch is set to turn off this button, the option to create goals from scratch will no longer appear.
Copy Goals on Behalf of Others
In the latest Goal Management, managers can now go to a user’s goal plan and copy personal goals on the user’s behalf. The Copy from Goal Plan option is available only for the latest goal plan.
Configuration Requirements
Using the latest Goal Management
The TGM/CDP Goal Transfer Wizard feature is enabled
Users are assigned more than one goal plans
The create permission for goals is granted in the goal plan template XML
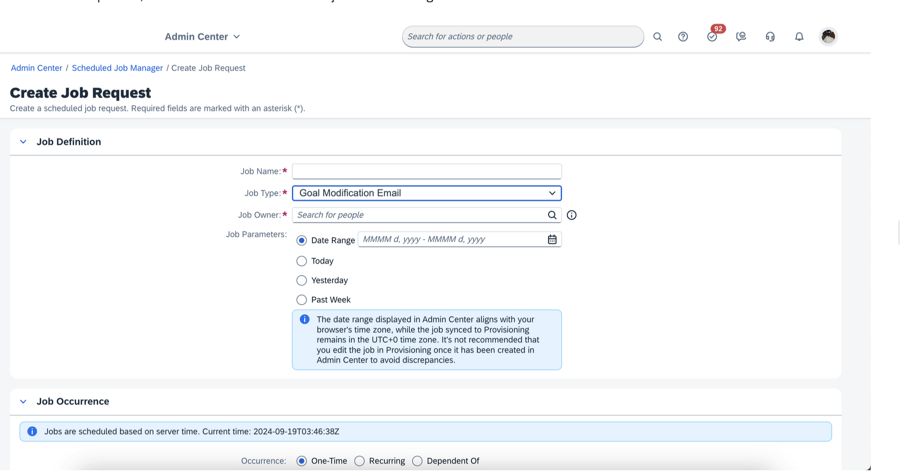
Goal Modification Email Notification Jobs in Admin Center
You can now create a job request for the goal modification email in Scheduled Job Manager. It no longer has to be set up in Provisioning.
Create Goal Modification Notification
The date range displayed in Admin Center aligns with your browser’s time zone, but the job synced to Provisioning remains in the UTC+0 time zone.
Link and Unalign Goals
In the latest Goal Management, It is now possible for users to link their performance goals with another user’s goals or unalign goals In their own goal plan:
Choose the Link Goal option on a goal card and follow the on-screen instructions.
Go to another user’s goal plan, choose the Link with Mine option on a goal card, and complete the linking steps.
Goal Plan Template Cascade/Align Permissions
In the goal plan template XML:
Grant cascade-align permission for roles to link goals
Grant unalign-parent or unalign-child permission for roles to unalign goals
Minor Enhancements for latest Goal Management
Some enhancements for the latest Goal Management have been added to make it easier to use.
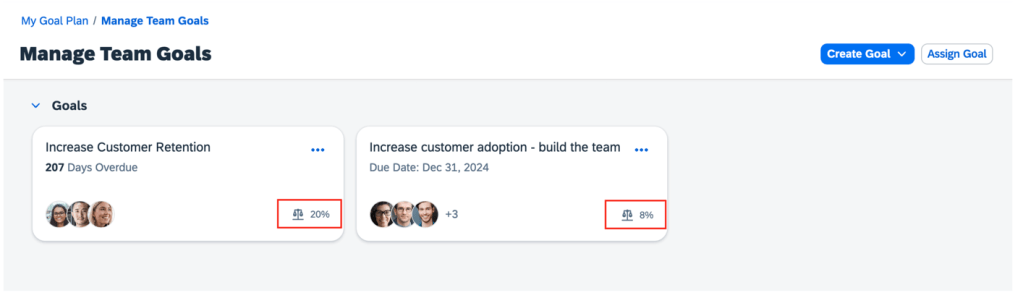
Weights for Team Goals on Goal Cards
Weights are now displayed for team goals on goal cards.
Weights on Team Goals
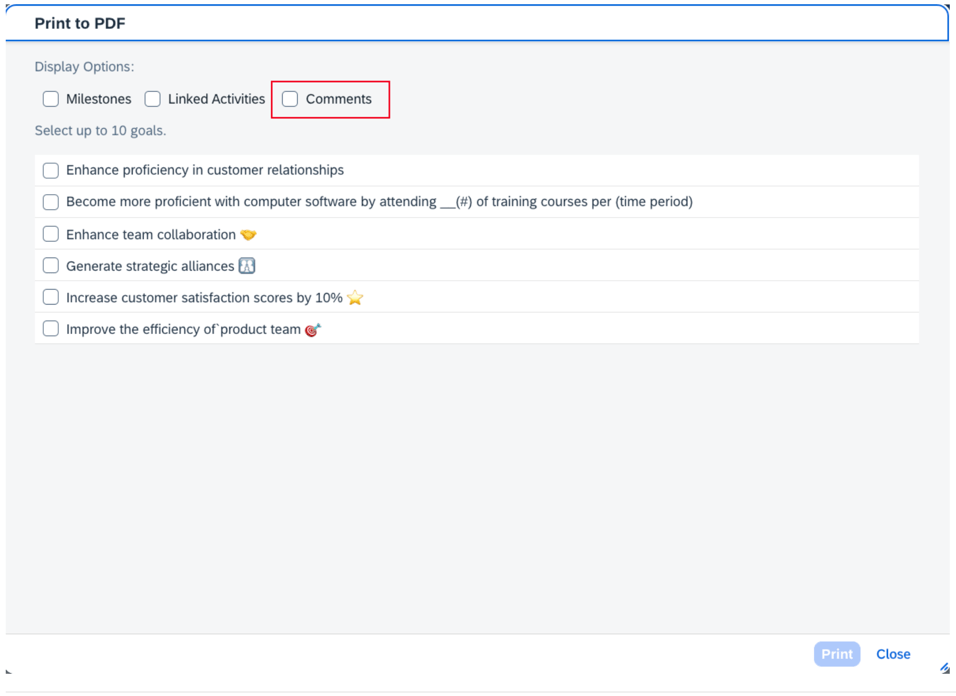
Comments on PDF
Users can now include comments in the PDF output for goals.
Print Comments
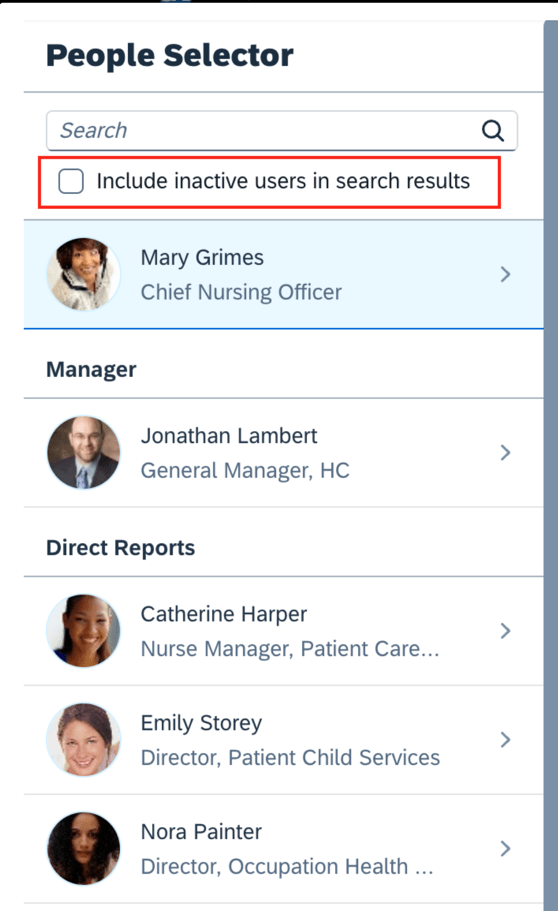
Inactive Users in People Search for Goal Plans
Inactive users may now be included in search results in People Selector and their goals may be edited.
Search for inactive users
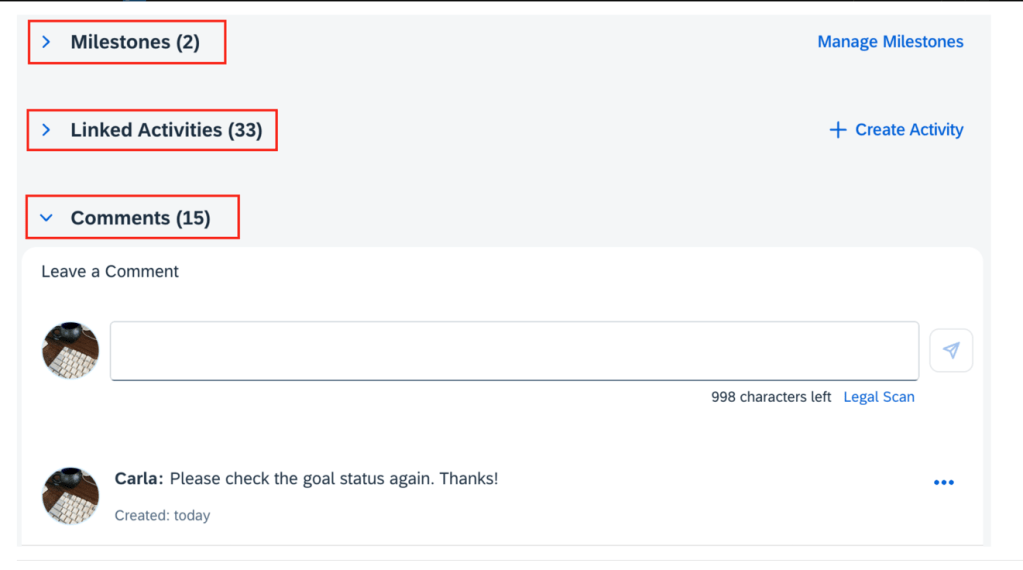
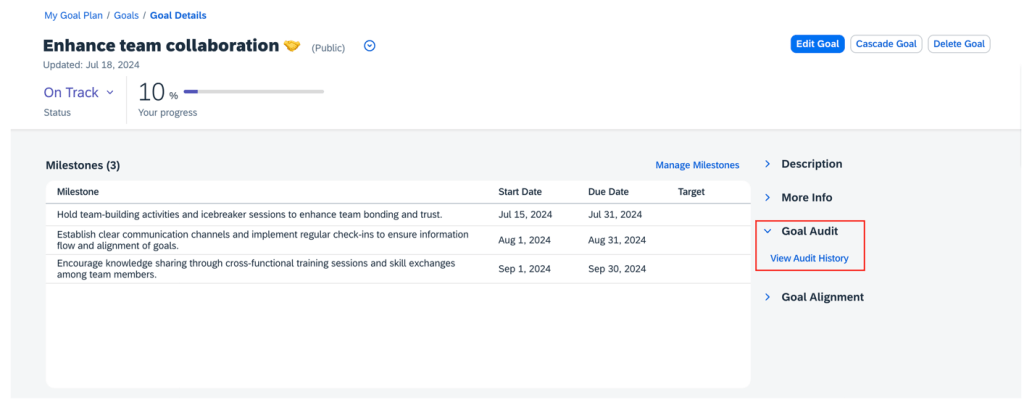
Goal Details Page Updates
There are enhancements to the goal details page.
The left-hand sections of the goal details page can be collapsed.
Collapse Goal Sections
Audit history is now a new section on the right side of the page instead of a button to click to view the audit history.
Audit History in Right Panel
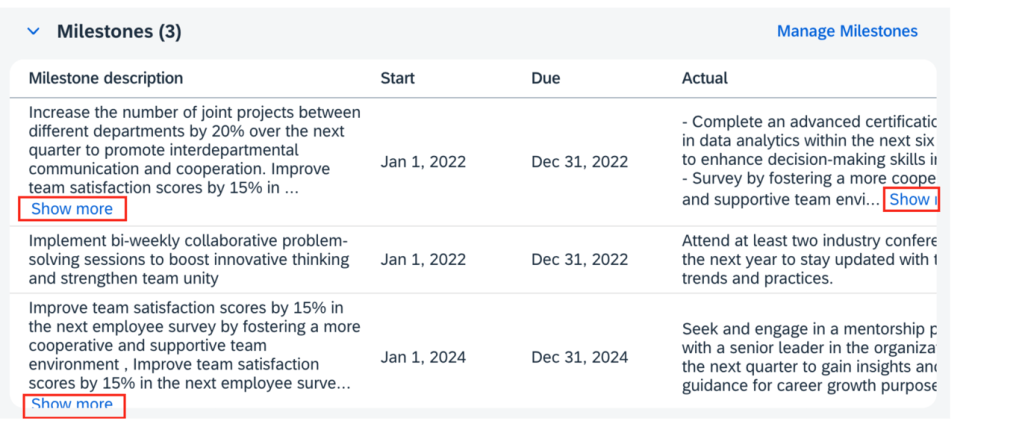
All milestone fields are visible and the milestone table can be scrolled horizontally.
Milestone Fields
For milestones, the Show more button expands to display all of the content of the milestone fields that are configured as textarea type. This eliminates the need to click the Manage Milestones button to see all the text.
Show more for Milestones
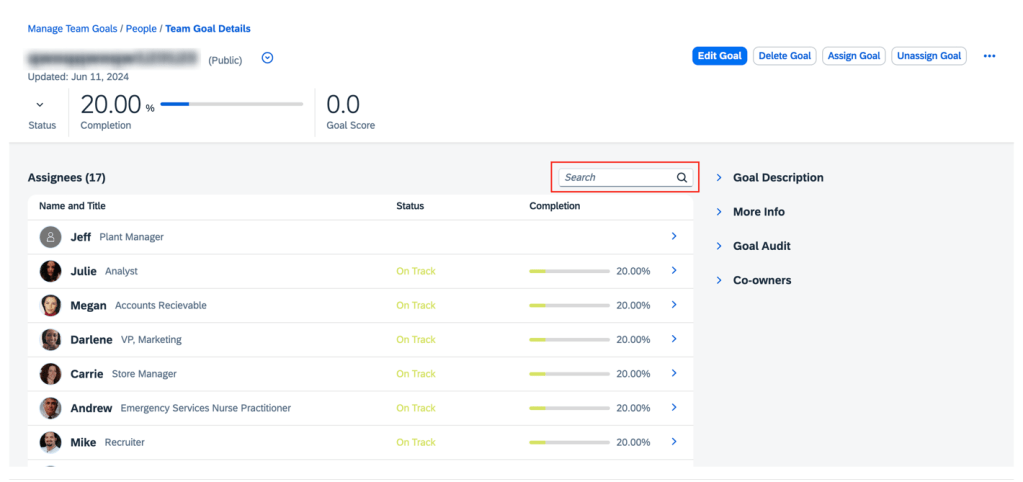
Users can now search for assignees on the Team Goal Details page.
Assignee Search on Team Goals Page
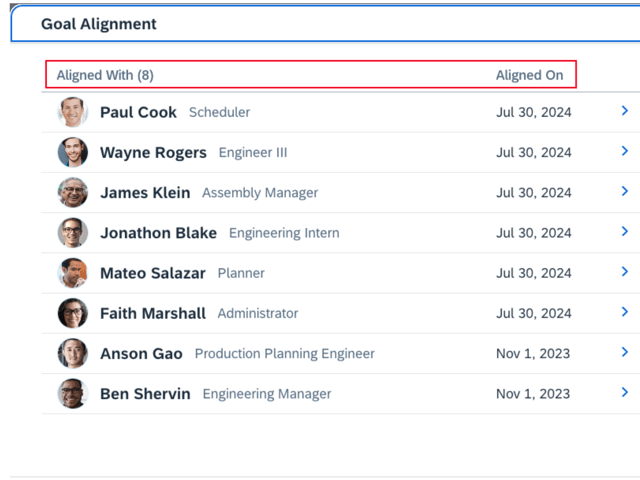
On the Goal Alignment pop up, headers have been updated to show Aligned With with a count and the aligned on date.
Goal Alignment Headers
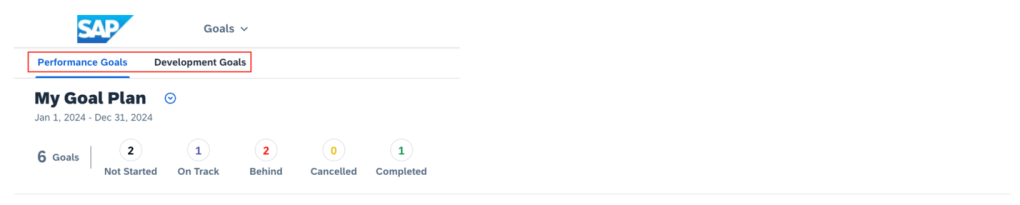
On the landing page, the tab names for Performance goals and Development goals now use the plural form.
Goal Tab Names
There is no limit to the number of goals that can be displayed in the personal and team goal list views.
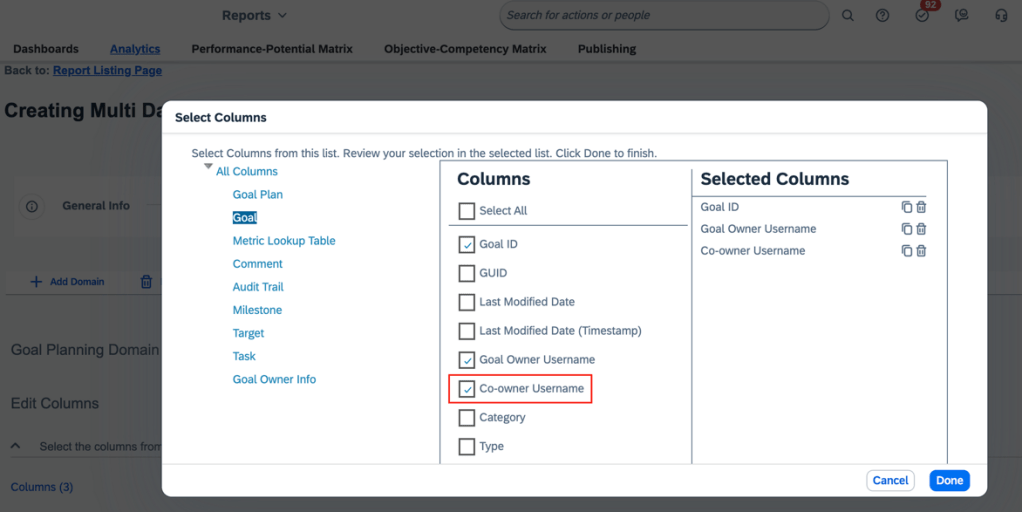
When creating reports for master team goals, there is a new Co-owner Username column. This is available in both Story reports and Table reports.
New Column for Reporting
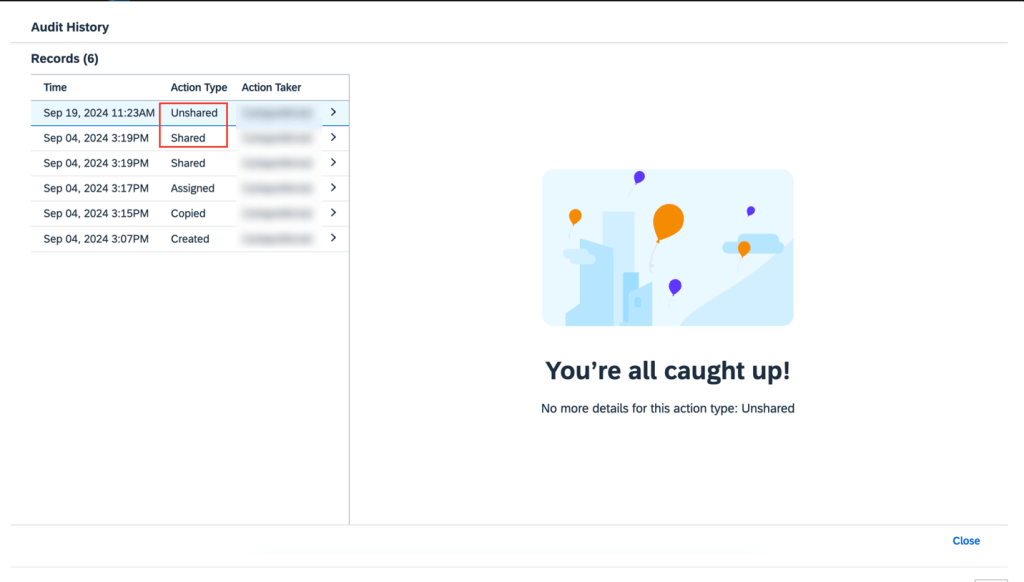
In audit history, “Shared” and “Unshared” are now supported as new action types for team goals.
New Action Types for Team Goals
Roll-up Calculation for Cascaded and Linked Goals
Roll-up calculations can now be used for cascaded and linked goals in the latest Goal Management.
Bizx-actual, bizx-target, and bizx-pos fields can be set to average or sum using the rollup-calc-type attribute.The sum or average values for these fields are automatically calculated across cascaded and linked goals based on your configuration. These values are then reflected in source goal details.
When a parent goal is cascaded or linked, two audit records are generated for it, one record indicates the action type (“Cascaded” or “Linked,”) while the other record shows “Modified” due to changes in the roll-up fields.
AI-Assisted Goal Creation Enhancements
If you have purchased the AI units license, have enabled the latest Goal Management, and have assisted goal creation is enabled and properly configured, you will experience a more engaging AI-assisted goal creation experience.
Updates include:
Updated AI tag: On the goal creation page, the tag for fields with content generated by AI is now “AI-generated content”, replacing the previous “AI-enhanced content”.
Improved content comparison: the Compare Generated Content page has been eliminated. It is replaced by the AI-assisted writing tool to enhance content at the field level.
Enhanced prompt template: The prompt template automatically applies goal plan configurations, such as start, due, and maxlength, to AI-generated goals.
Custom fields: Custom fields of text and textarea types are now supported for performance goals. You specify the context by providing meaningful text for <field-description>. This allow AI to generate more better suggestions for your goals.
For tips on how to manage a release, check out our blog here.
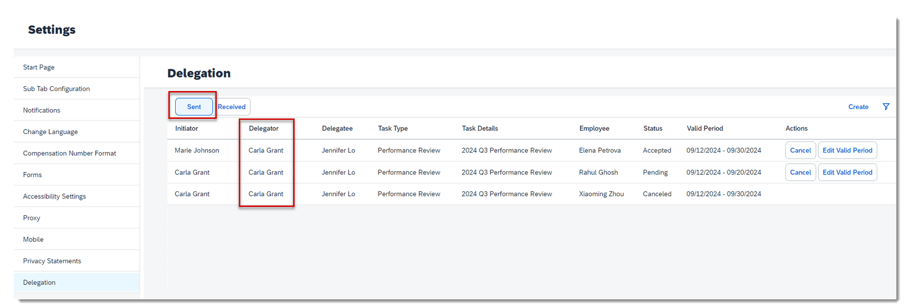
Delegation Available for Performance Reviews
Managers can now delegate their performance review tasks to others for a specific time period. It also allows administrators to create delegations on behalf of managers.
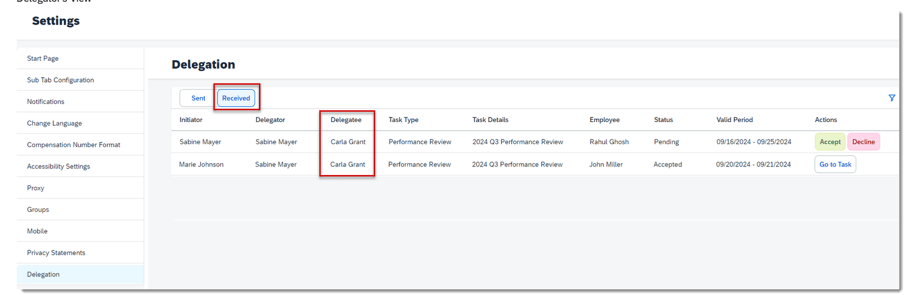
From Settings, go to the Delegation tab, this will display a Delegation page where a user can:
Create a delegation request for themselves
View and manage the delegations they created and those created by administrators on their behalf
Accept or decline the delegation requests they received
Go to the delegated task they accepted
Delegation will not display on the side panel if the user does not have the permission to use it.
A Sent and Received tab will be visible.
Delegations Page
On the view for the delegatee, they can see any delegation requests and accept or decline requests.
Delegation Requests Received
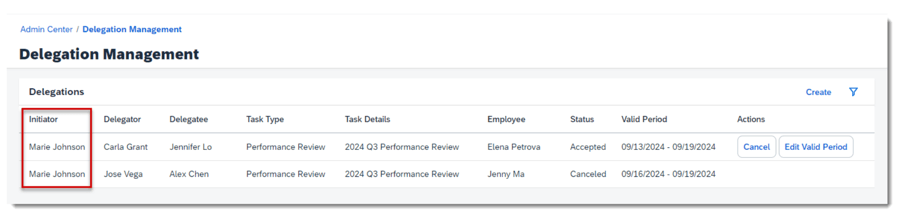
On the Admin Center Delegation Management page, an administrator can:
Create a delegation request for users
View and manage the delegations they created on others’ behalf
Admin Features
Delegation Steps
Create Delegation – a request to delegate is initiated by a manager or an admin. The validity period and form template must be identified in the request.
Respond to Delegation – the delegatee receives a notification to act as a delegate. Within Settings, clicking the Delegation tab, details about the request are shown and they may choose to accept or decline the request. The requestor is notified of their decision.
Perform Delegated Task – a Go to Task button is visible on the Delegation page during the validity period. The delegatee can perform the action on the form. The original manager sees the form in their inbox as read-only.
Edit or Cancel Delegation – The delegator may edit the validity period of the delegation or cancel the request.
Complete Delegated Task – The delegatee completes the task and the form moves to the next step in the route map.
Delegation Related Email Notifications
Email notifications are automatically generated in the following steps of the delegation process:
Delegation Created/Pending Action notification goes to the delegatee
Delegation Accepted or Declined notification goes to the delegator and delegatee
Delegation Canceled Manually notification goes to the delegator and delegatee
Delegation Request Auto-Canceled due to Inactivity notification goes to the delegator and delegatee
Delegation Expired notification goes to the delegator and delegatee
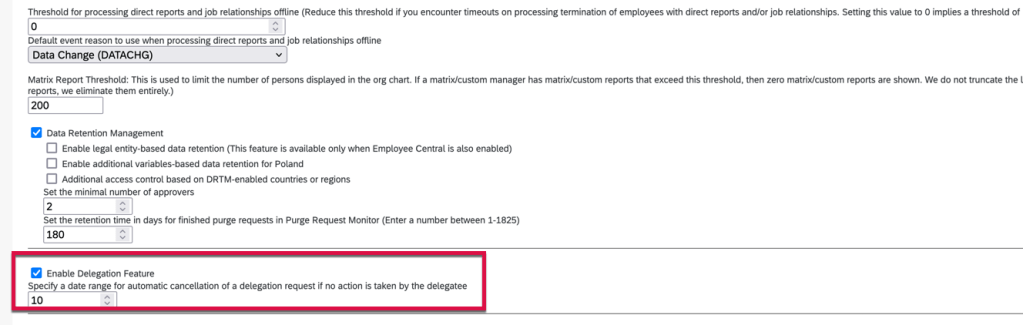
Requirements for Delegation
Delegation must be enabled within Company System and Logo Settings. A number of days to automatically cancel a delegation request if no action is taken by the delegatee must be set as well.
Enable Delegation in Company System and Logo Settings
Permissions for Delegating Performance Review Tasks
To allow all managers to delegate, permissions need to be added to their role. If you wish to allow administrators to delegate on manager’s behalf, the admin role will need additional permissions as well.
First let’s review the various roles in a delegation scenario.
Initiators: managers and administrators
Delegators: managers
Delegatees: managers’ peers and those directly above them
Employees: managers’ direct reports
Based on the roles, we will need to add delegation permissions to the various permission roles.
User Permissions >Delegation>Create Delegation Based on Form Templates
Delegators Role:
User Permissions >Delegation>Delegator-Delegatee Relationship, defines who can be selected as the delegatees of a delegator during the delegation creation process.
User Permissions >Delegation>Delegator-Employee Relationship, defines who can be selected as the delegatees of a delegator during the delegation creation process.
Create Performance Reviewer (Delegation) Role
A permission role needs to be created as well, this allows users can access the Performance Management forms delegated to them from the Delegation page. Do not assign the role. It’s expected to be inactive.
Required to allow access of forms from the delegation page:
User Permissions>General User Permission>User Login
User Permissions>Performance>Performance Management Access
Optional
To add, edit or delete goals on the PM form: User Permissions>Goals>Goal Plan Permissions
To view People Profile blocks through links on the form: User Permissions>Employee Data>View (identify the elements to view)
To restrict access to inactive users’ forms: User Permissions>Performance>Restrict Data Access of Inactive Users’ Forms
Delegation Role with Required Permissions
When the delegatee goes to their delegated form, the system automatically grants them the role’s permissions, with the form subject (employee) being the target population.
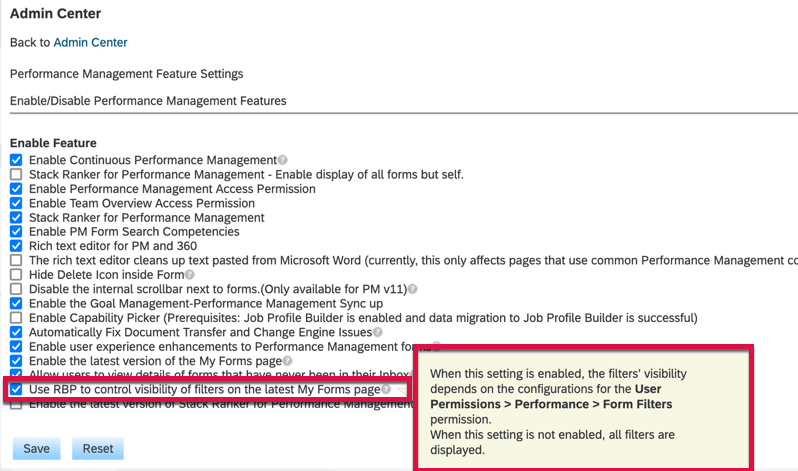
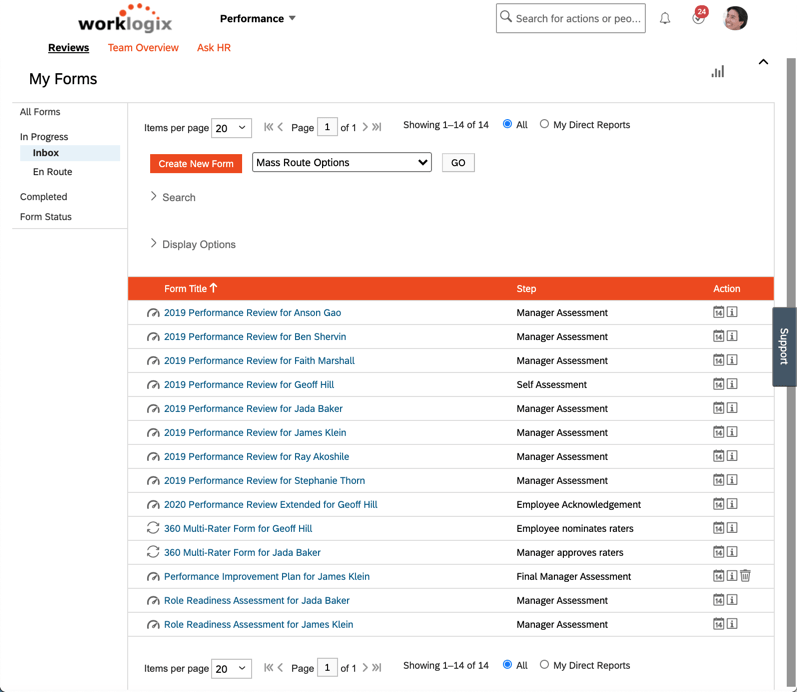
Enhancement to the Latest My Forms Page for PM Forms
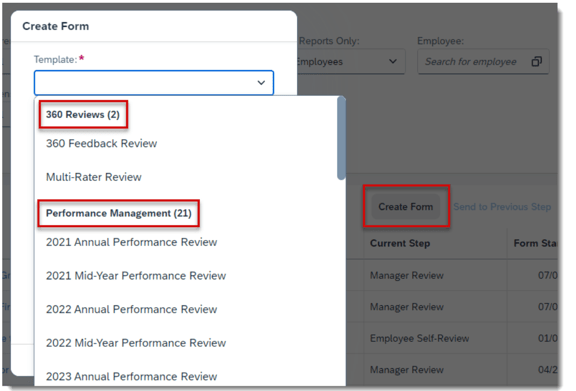
If you are using the latest My Forms Page, there are some improvements for the user’s experience. The My Forms page has updates to form creation, form lists and filters.
Form Creation
The Create Form button is now only visible for users that have permission to create at least one PM or 360 form.
The dropdown list of forms is now grouped by under 360 Reviews and Performance Management. Each heading lists the number of forms available for the category.
Create Form Templates
Form Lists
The number of forms is included in the forms list title.
Form List View with Number of Forms
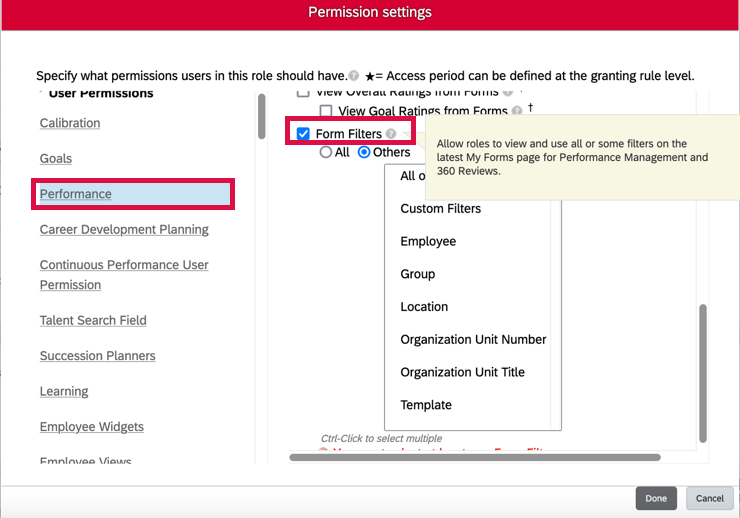
Filters
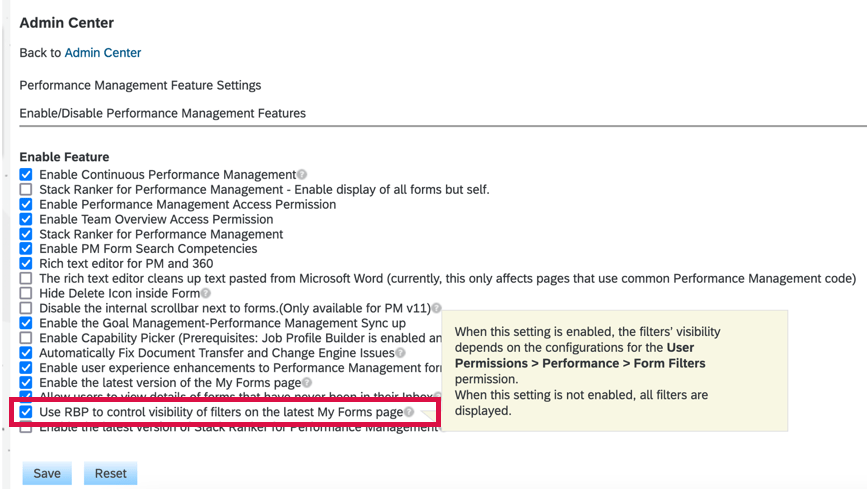
Standard and custom filter visibility can be controlled by role. All filters display by default but can be hidden using role based permissions. Enable Use RBP to control visibility of filters on the latest My Forms page in Performance Management Feature Settings.
Performance Management Feature Settings
Then, grant users the User Permissions Performance Form Filters permission to show all or certain filters to them.
Form Filter Permissions
A All or Reports Only filter is available for users with direct reports, matrix reports or HR reports
The Template filter is now dynamic and changes based on templates of forms in a folder, previously all templates were listed
There is a reset button to clear filters
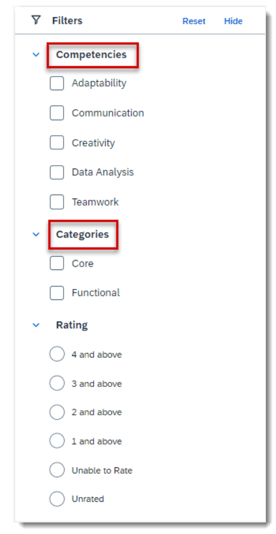
Filters
Performance Management Text Changes
If you aren’t using Talent Intelligence Hub, the filters have been renamed from Attributes to Competencies and Tags to Categories.
For tips on how to manage a release, check out our blog here.
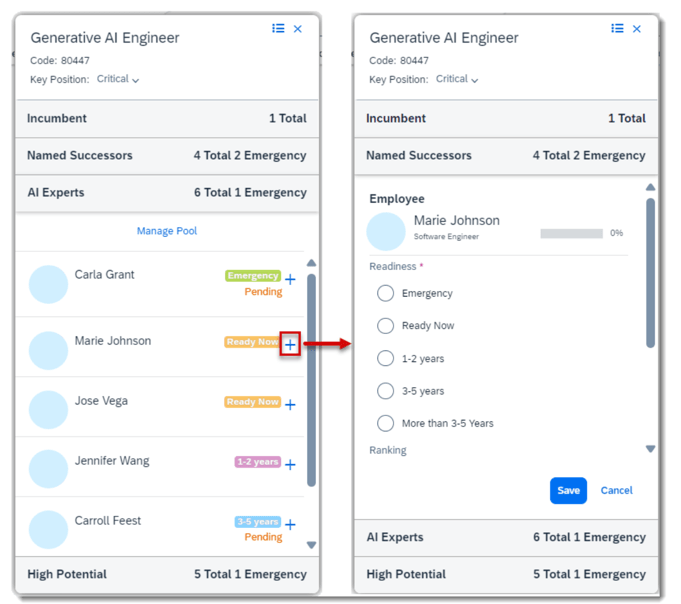
Easier Experience of Nominating Talent Pool Members to a Position
Succession planners can now add successors directly from the talent pool sections on the position card in the Succession Org Chart or in the Position Tile view. This applies to positions associated with talent pools.
Before the latest release, the user had to navigate to the employee’s talent card to begin the nomination process, including searching for the position. Now when the user selects the “Add as successor” button for a member of a talent pool, the Named Successors section expands to view more details before nominating the employee to the position.
Add a Successor from a Talent Card
Succession Text Changes
There are some minor visual changes for Succession. Previously the search box in Talent Search didn’t have a label. Now the search box is labeled Keywords: and the placeholder text has been changed to Enter your keywords.
Updated Talent Search
On the details page of a talent pool, the field to filter the talent pool nominees did not have a label and was in the same line as other filters. Now it is labeled Nominee with Search for nominee in the placeholder text.
Talent Pool Nominees Filter
Now, this field is labeled as Nominee and has placeholder text and it is now placed above other filters.
Succession Notification Card Available in Microsoft Teams
If you are using the integration of SAP SuccessFactors and Microsoft 365, there is a new notification card available for users to review and approve pending nominations to a talent pool.
For tips on how to manage a release, check out our blog here.
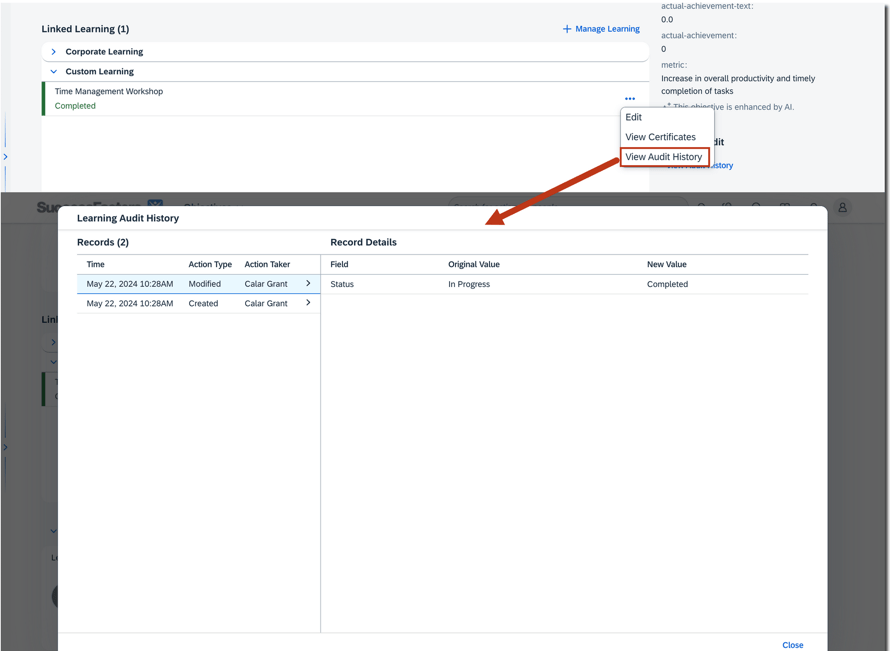
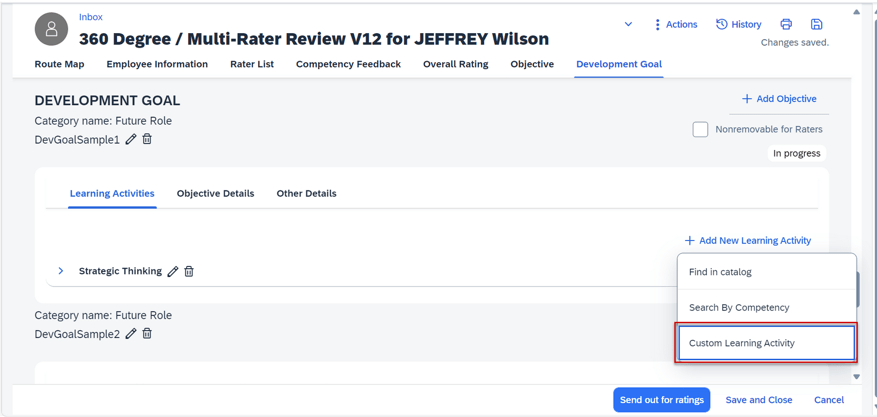
Enhancement to latest Development Goals
Users can now view audit history for custom learning activities linked to development goals. Certificates may be uploaded to custom learning activities as well.
Adding or editing a custom learning activity generates an audit history record. The learning activity history shows the type of change, the date of the change, the before and after values of any changed fields, and who made the change. However, a custom learning activity linked to a development goal is not logged in the learning activity’s audit history.
Linked Learning Activity History
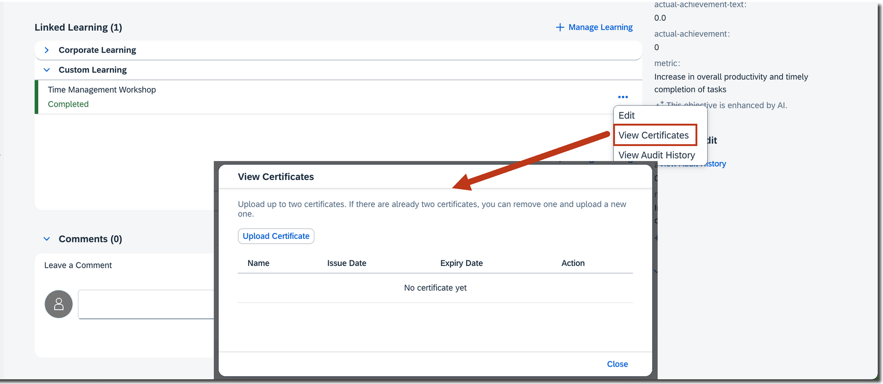
Users can upload certificates to a completed custom learning activity, providing the Certifications field is configured in the learning activity template.
View and Upload Certificates
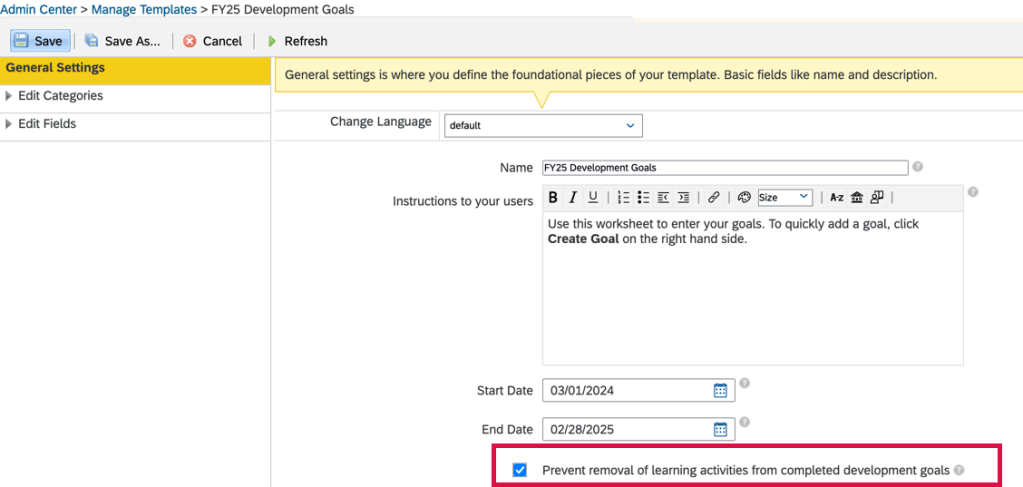
Prevent Removal of Learning Activities from completed Development Goals
In the latest version of Development Goals, it is now possible to prevent users from removing learning activities after their development goals are completed.
In the General Settings of the development goal plan templates in Manage Templates, you will now see an option to prevent the removal of learning activities from completed development goals.
Prevent Learning Activity Removal in Manage Templates
Updates for Career Worksheet
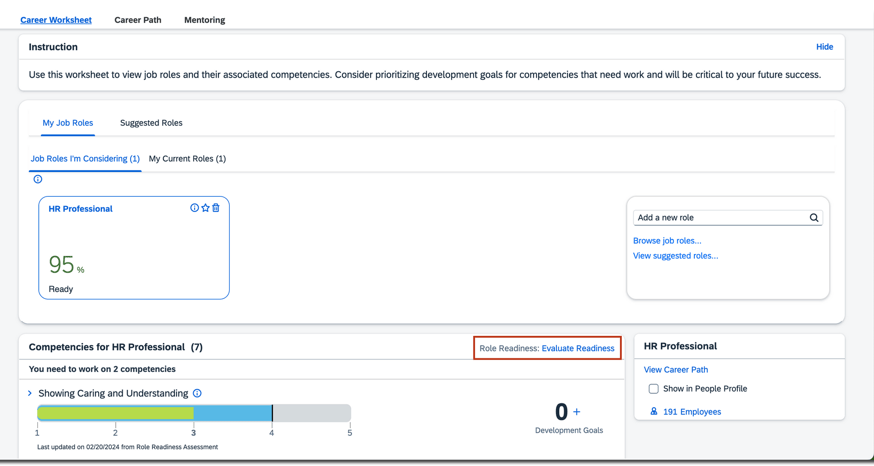
Allow More Roles to Launch Role Readiness Forms in Career Worksheet
If you are still using the legacy version of Career Worksheet, the template can now be configured to allow more roles to launch the Role Readiness form. Up until now, only an employee could launch the form for themselves.
Launching Role Readiness Form
The <permission for=”launch-assessment-form”> setting has to be added in the Career Worksheet template with the roles identified that can launch the Role Readiness form.
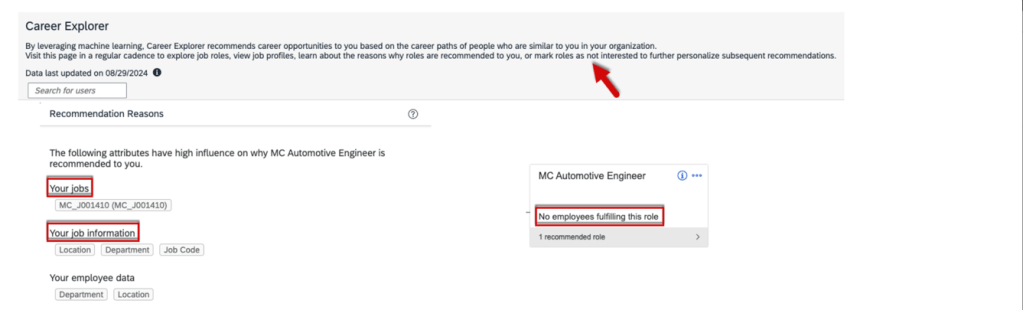
Minor Visual Changes for Career Explorer
There are some visual updates made for Career Explorer that are shown below.
The messages on the page description has been enhanced.
Page Description Messages
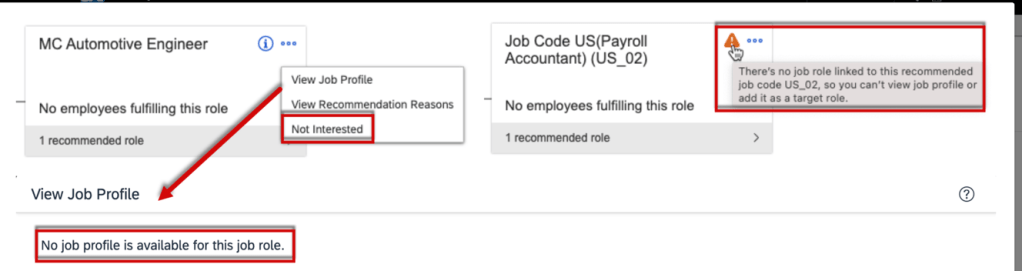
The Remove Role button is now labeled Not Interested and is now located in the more actions list on the role card.
If there is no job role linked to a job code, the info icon on the role card has been changed to a warning icon, and the tooltip has been changed to There’s no job role linked to this recommended job code, so you can’t view job profile or add it as a target role.
If there is no job profile defined for a job role, the message is: No job profile is available for this job role. However, users can still add the role as a target role in the View Job Profile dialog.
Text Changes for Career Explorer
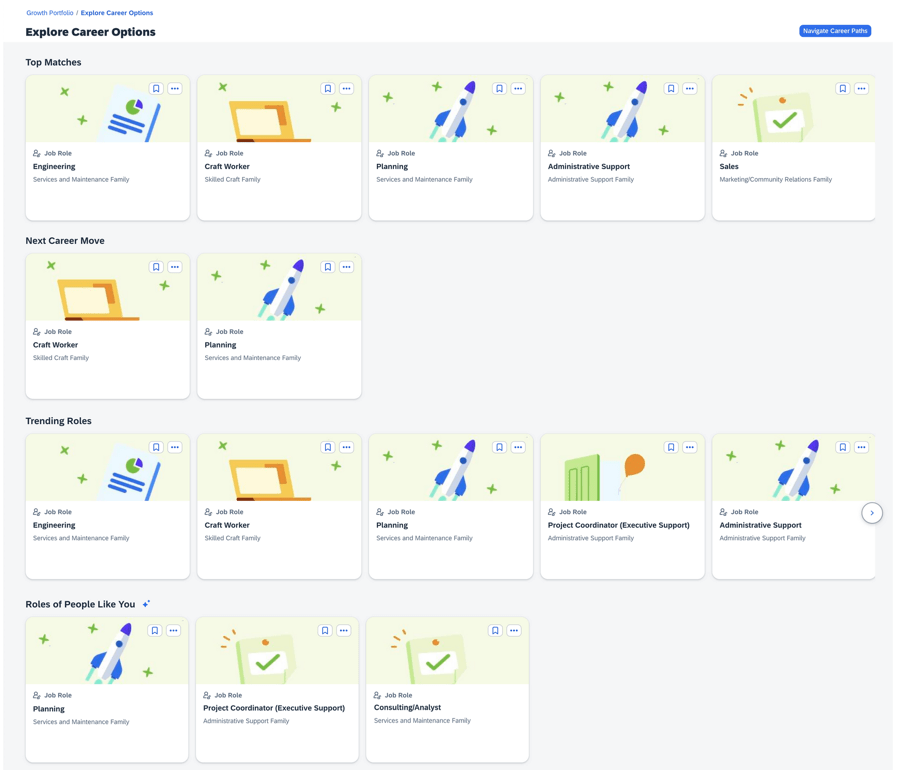
Explore Recommended Roles in latest Career Worksheet
Users can now see recommended roles in both card and chart views.
In Growth Portfolio, select Explore Career Options which opens a page of recommendations.
Career Explorer
The page has four sections which are shown below.
Top Matches – the systems suggests matches based on:
Skill and attribute ratings
Skills and attributes that are associated with a core or critical tag in Growth Portfolio or marked as Passionate
Next Career Move – displays the next role in the Career Path
Trending Roles – suggests roles with open positions
Roles of People Like You – suggests roles from Career Explorer, if enabled
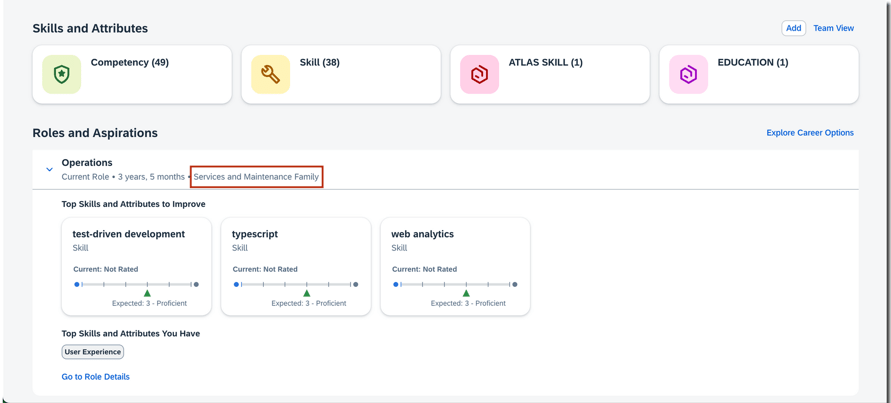
View More Role Information in latest Career Worksheet
In the latest Career Worksheet, employees have greater visibility into their current, target and recommended roles. Information about job family, incumbents, and organizational career paths are now available.
On the Growth Portfolio page, there is a Roles and Aspirations section where job family information is displayed.
Roles and Aspirations section of Growth Portfolio
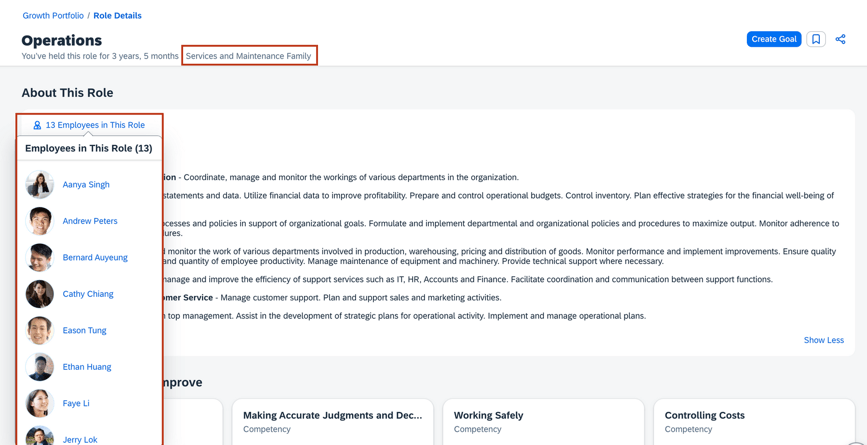
On the Role Details page, this information is also available. Here they can also view the number of current employees in the About This Role section. A list of employees in this role displays when the user clicks on the [Number] Employees in This Role. If there are more than 20 employees, users can choose A View All option that appears and the entire list is shown on the Directory Search page.
Role Details page
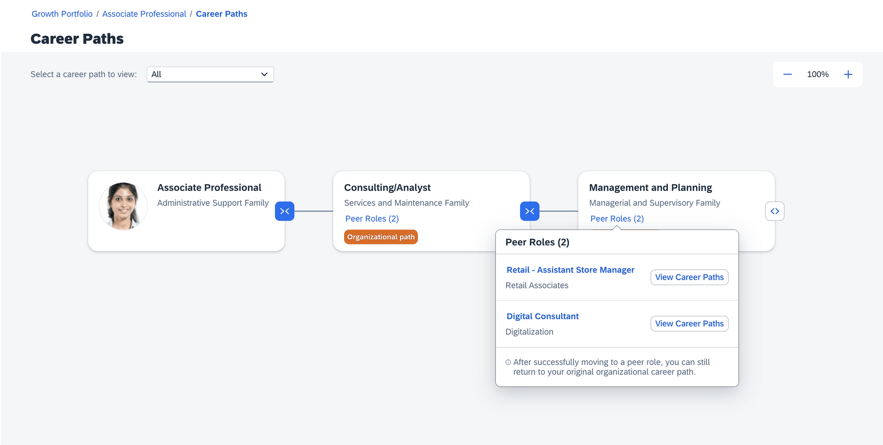
Similar to the legacy Career Worksheet, the latest version now also allows the user to choose a career path, select a role card and see the details page of the selected role. A role’s peer roles can also be seen through the role card.
Roles Cards in a Career Path
Navigate Career Path
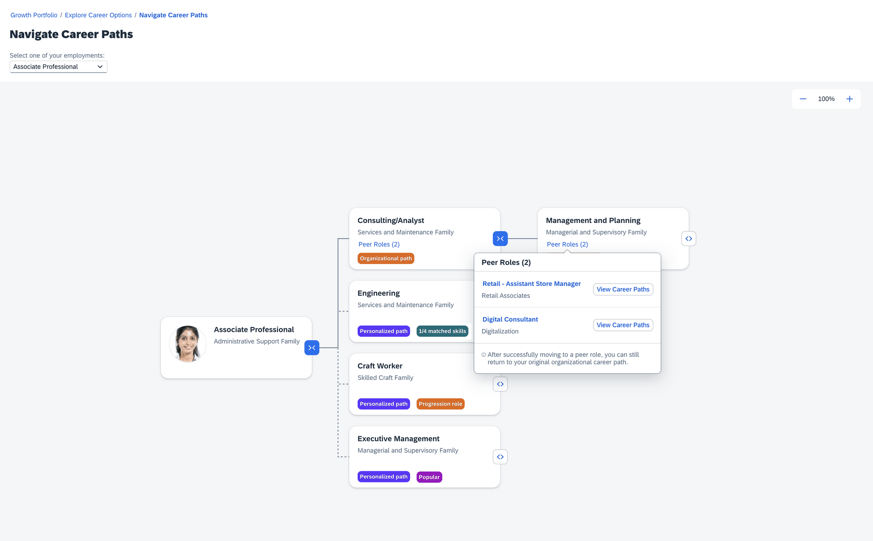
A chart view of recommended roles can be seen by selecting Navigate Career Paths on the Explore Career Options page.
Navigate Career Paths
The employee’s current role is the starting point. Recommended roles include organizational path roles from organizational career paths and personalized path roles that are tightly match with the employee.
There are organizational path and personal path role cards. The organizational path role cards show details on peer roles. The personalized path cards show why certain roles were recommended for them. Recommendation reasons can include same job family, popular role, progression role or open position.
The view also allows switching between current roles. For employees with more than one current role, they may select any of those roles to see the recommendations for that role.
Updates for Mentoring
There are some new features for Mentoring as well.
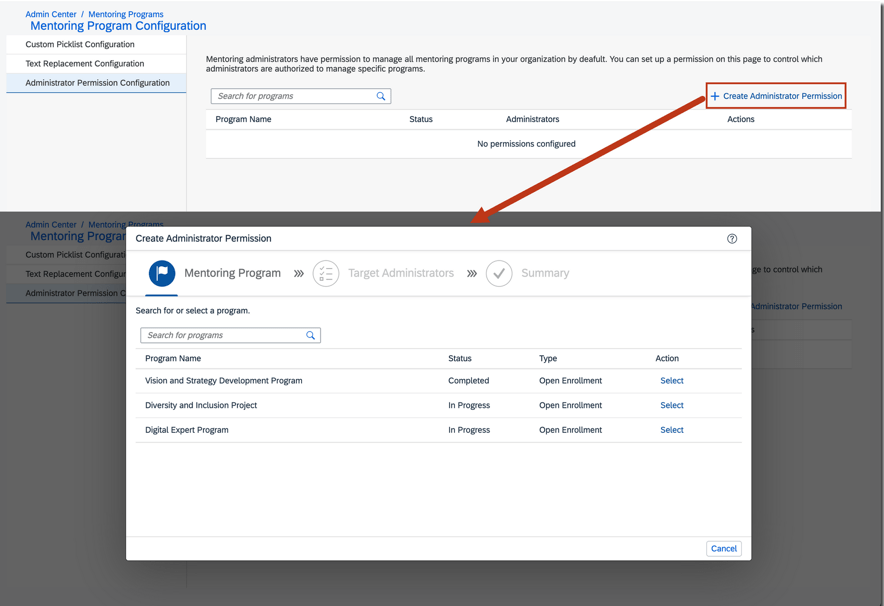
Manage Administrator Permissions for Mentoring Programs
It is now possible to limit which administrators can manage specific mentoring programs. Go to Manage Mentoring Programs. Within the Administrator Permission Configuration, select a mentoring program and the identify the target administrators who can manage it.
Mentoring Program Admin Permissions
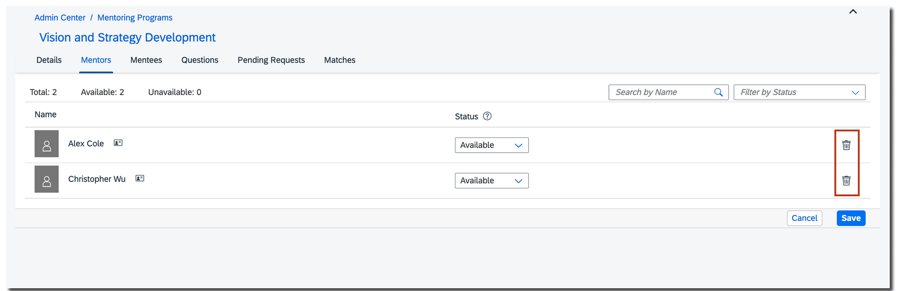
Change Participants in In-Progress Mentoring Programs
Program participants for in-progress open enrollment and unsupervised programs may now be added or removed by the mentoring admin or mentoring program owner.
Remove mentors from mentoring program
Mentors and mentees may also be added to in-progress unsupervised programs.
Mentoring Matched Date Now Available in Reporting
It is now possible to report on the matched date for mentors and mentees in mentoring programs in Table and Story reports. This is helpful to report on the duration of mentoring relationships.
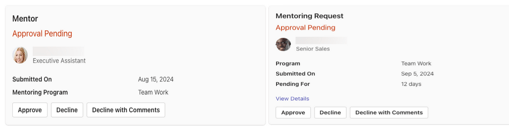
Mentoring Notification Cards Available in Microsoft Teams
If you are using the integration of SAP SuccessFactors and Microsoft 365, there are two new Mentoring notification card available for users.
Mentors are notified to approve or decline employee requests to be a mentor. Mentoring requests from a mentee can also received by a potential mentor.
Mentoring Notification Cards
Updates for AI
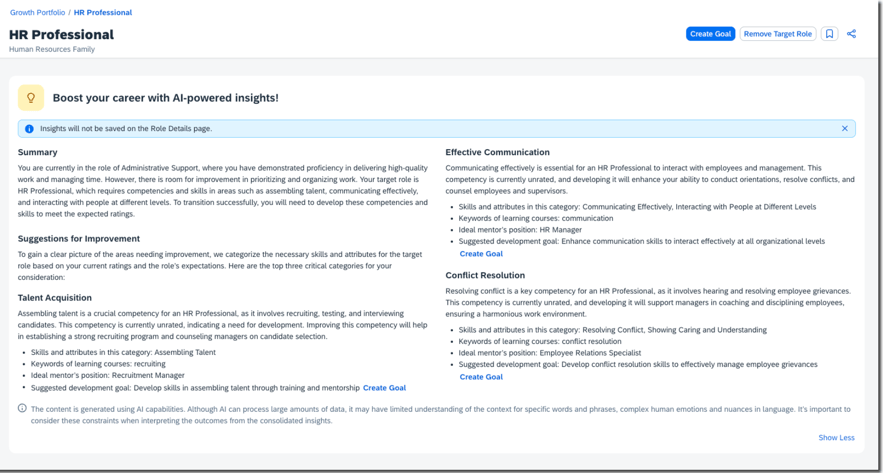
AI-Assisted Career Highlights
With the latest Development Goal and AI enabled, employees can see development actions they can take towards their target role.
Using the Generate button on the Boost your career with AI-powered insights! section of a target role’s details page you will see:
Summary which gives an overview of the employee’s current role and target role
Suggestions for Improvement which identifies three growth areas for skills and career development with suggestions for:
Skills and attributes in the category
Keywords of learning courses
Ideal mentor’s position
Suggested development goal with the ability to create a development goal
For tips on how to manage a release, check out our blog here.
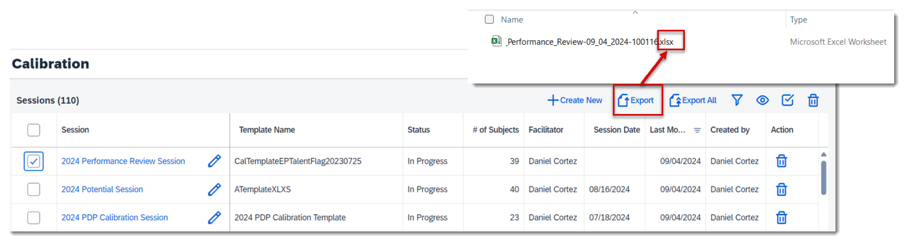
Export Calibration Sessions to an XLSX File
Before the latest release, a calibration sessions could only be exported to an XLS file with 256 columns. Now a session can be exported to a XLSX file which supports up to 16,384 columns.
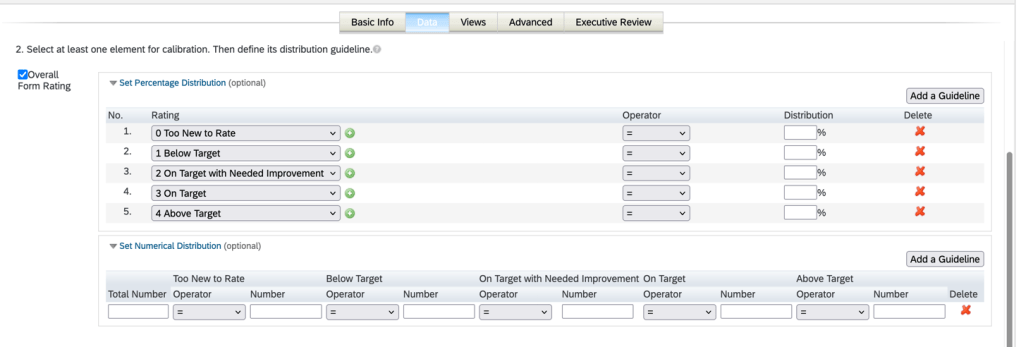
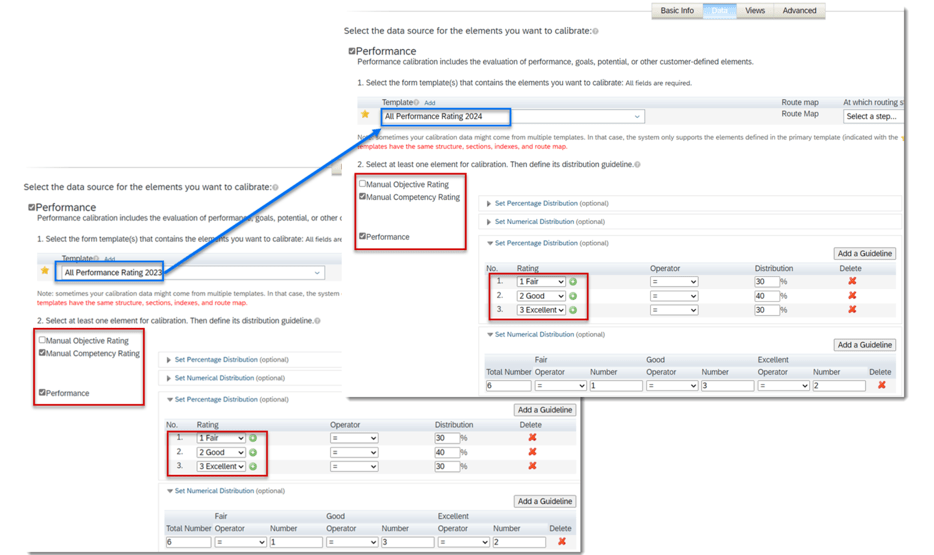
Set Numerical Distribution for Calibration Templates
Previously, distribution guidelines for ratings were percentage-based only. Now numerical distribution rating guidelines can also be set up in Calibration templates. A target number of subjects may be specified for each rating.
Numerical and percentage distribution guidelines in the Data tab of the calibration template under Admin Center >Manage Calibration Templates.
Setting Distribution Guidelines
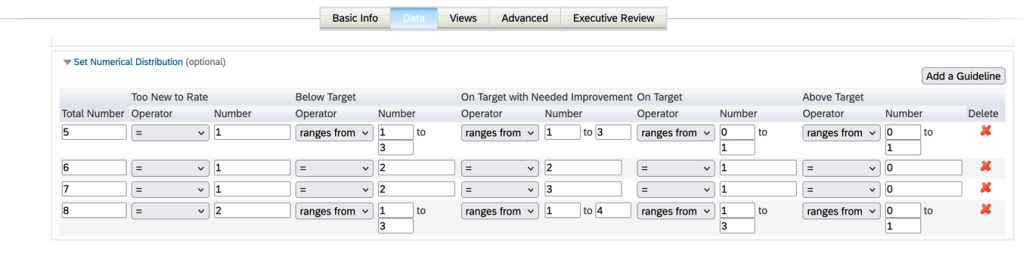
Things to note about numerical guidelines:
Numerical and percentage-based guidelines can be set for the same rating with the numerical guideline taking priority.
Several numerical distribution guidelines can be set for a rating, but for the same total number of subjects, you can have only one guideline.
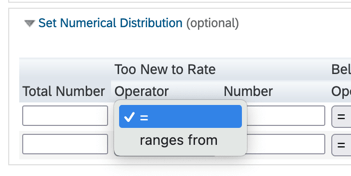
In each numeric guideline, a range may be set or the “equal” operator may be used
Numerical Distribution OperatorsNumerical Distribution Guidelines
When templates have identical rating types and scales, the configured distribution guidelines can be retained during template switching.
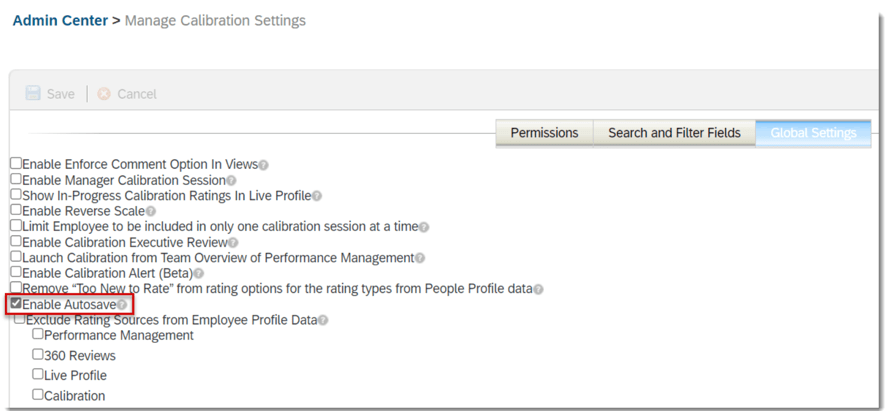
New Setting for Configuring Autosave
There is a new setting in the Manage Calibration Settings admin tool called Enable Autosave.
Enable Autosave
Changes made in a Calibration session are automatically saved after 30 seconds of inactivity. If this feature is disabled, users need to manually save any unsaved changes.
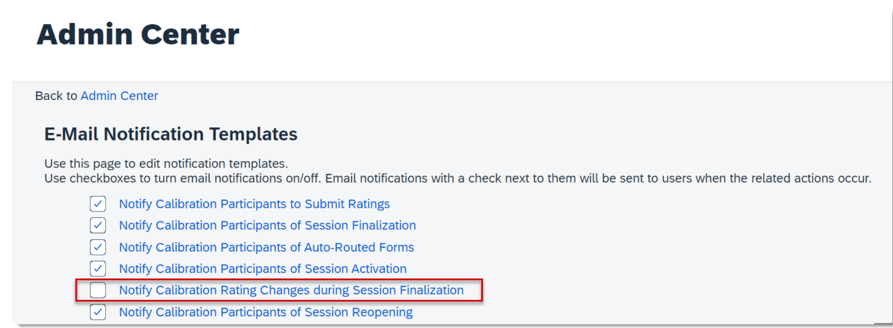
Turn Off Email Notification for Rating Changes during Session Finalization
It is now possible to turn off an the email notification Notify Calibration Rating Changes during Session Finalization.
When disabled, managers will no longer receive emails about changes to their employees’ ratings after sessions are finalized.
This setting is found under Admin Center>Email Notification Templates Settings.
Disable Rating Change Notification
Background Information Displayed for Concurrent Employment in Talent Card
Previously in a calibration session when viewing the talent card for employees with concurrent employments, only background information related to the corresponding user ID was shown. The background information was displayed based on persons for global assignment, but based on users for concurrent employment.
Now the background information is displayed based on persons for both concurrent employment and global assignment. The talent card now displays all records of background information about a person under each employment.
For tips on how to manage a release, check out our blog here.
Enhancements to the latest My Forms Page for 360 Reviews
There are some improvements for the user’s experience when using the latest My Forms page. The My Forms page has updates to form creation, form lists and filters which is also applicable to PM forms.
Form Creation
The Create Form button is now only visible for users that have permission to create at least one PM or 360 form.
The template dropdown list of forms is now grouped by two categories: 360 Reviews and Performance Management. Each heading lists the number of forms available for the category.
Create Form Template List
Form Lists
The number of forms is included in the forms list title.
Number of Forms
Filters
There are a few changes to the filters available on the My Forms page.
Limit Filter Visibility by Role
The standard and custom filters that are seen can be limited based on the user’s role. By default all the filters are shown but can be role based permissions can limit their visibility. To do this , enable Use RBP to control visibility of filters on the latest My Forms page in Performance Management Feature Settings.
Setting to Control Filters
Then by role, grant User Permissions>Performance>Form Filters permission to show all or specific filters.
Permission for Filters
All or Reports Only filter
This filter is only available for users with direct reports, matrix reports or HR reports.
The Template filter is now dynamic
Options for the Template filter are based on templates of forms in a folder.
Reset button to clear filters
The user can reset filters at any time.
These new features are shown below.
Filter Options
Custom Learning in 360 Review Forms
In conjunction with the latest Goal Management, custom learning activities can now be added, edited, or deleted on 360 Reviews forms.
Add custom learning activity
You must ensure that a development goal plan is linked to the form and the plan contains a learning activity template with custom learning activities.
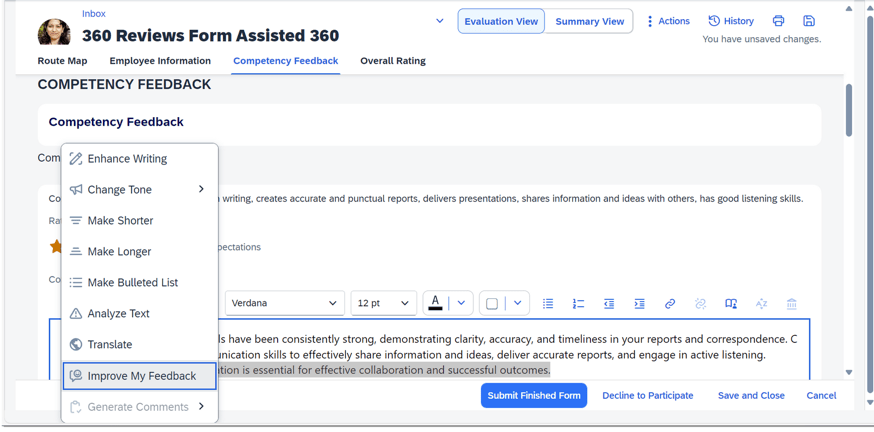
Enhanced AI-Assisted Writing in 360 Reviews
There is a AI-assisted writing tool to help generate comments and improve feedback. Both use the context menu of the tool.
To use this the following requirements must be met:
AI-Units license has been purchased
AI Services Administration Assisted Writing with Text Analyzer has been enabled in Admin Center
Consent given for the AI Usage Acknowledgment Statement
Improve My Feedback
When comments are entered, feedback can be provided in a more concise manner and is related to a competency rating or skill. The user can go through multiple iterations of the updated feedback to find the comments with the best fit.
Generate Comments
When there are no comments entered for a competency or skill, six topics are dynamically generated. The user can select one of the topics and have detailed competency or skill related comments created.
Improve My Feedback
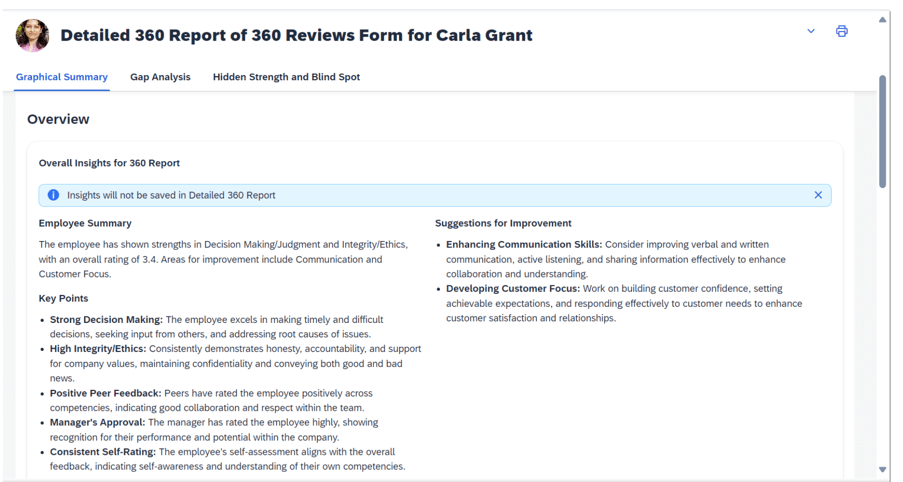
AI-Assisted Insights into Detailed 360 Reports
An additional feature when using AI is related to the Detailed 360 reports. A new Overall Insights for 360 Report section has been created. Here you will find a Generate Insights button. The insights relate to the overall form feedback as well as comments for specific competencies or skills.
Overall Insights
The overall insights contain the following:
Employee Summary which provides a high-level overview of the employee’s performance
Key Points to identify strengths and weaknesses of the employee
Suggestions for Improvement
Overall Insights
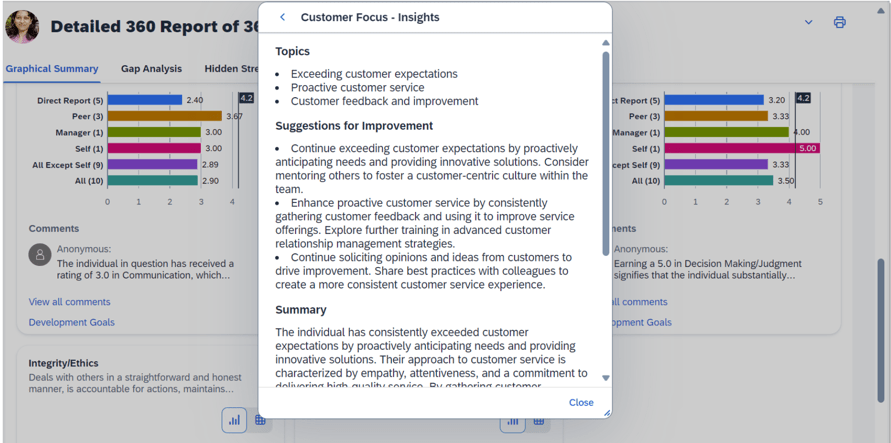
Analysis of Skills or Competencies
There is a View All Comments link which provides a summarized analysis for a skill or competency.
Sections include:
Key Topics
Growth Area Suggestions
Summary of performance based on ratings and comments
Skill or Competency Insight
This view provides more detail about a specific skill or competency and provides guidance for areas of growth.
In the previous two calibration related blogs, we learned how to configure the Calibration module in Provisioning, and we reviewed how to set up role-based permission, created a calibration template and defined the calibration settings.
Here we will explore the various ways to create a calibration session. We will see how an admin may create one or more calibration sessions using the “Manage Calibration Sessions” tool. We will also learn how an admin may create multiple sessions using the “Mass Create Calibration Sessions” tool. We will also review the methods a manager may use to create their own calibration session.
What is a Calibration Session?
Before we begin, let’s have a quick refresher. A calibration session is a forum where managers convene to discuss the performance of their employees to achieve agreement on fair, objective performance ratings. The session is used to compare performance ratings for those being calibrated, make changes to ratings, add comments, and review the outcomes of a given calibration cycle.
Manage Calibration Sessions
We will begin by looking at the options found within “Manage Calibration Sessions”. This role-based permission is granted to the admin role and to any role that will be responsible for creating or editing calibration sessions. An example of the overview screen is shown below. Here new calibration sessions may be created, and existing sessions may be edited, cloned, deleted, or exported.
Manage Calibration Session Overview
For existing sessions, the name of each session displays with its associated calibration template, the session status, the number of subjects and participants and name of the facilitator. The session statuses include the following:
Set up – session has been created and validated but it has not been activated yet.
In Progress – session is activated, session is open and not finalized yet.
Approving – phase between In Progress and Approved. Finalize button has been clicked but finalization has not completed yet.
Approved – session is finalized, ratings are approved and session is complete.
Deactivated – an In Progress session that has been stopped. Deactivating a session allows for changes to be made. Sessions must be reactivated to return to In Progress status.
It may be helpful to understand what validating and activating mean as well. After a session is created, it must be validated. The validation process checks to make sure subjects have performance forms and the forms are in the calibration step. If validation is successful, the session may be activated. Activating a session makes it ready for the facilitators, owners and participants to access the session to begin the calibration process.
There are also export, filter and search options. One or multiple sessions may be exported to an Excel workbook. There is a record for each subject which contains basic information about the session. The filter option is helpful to find a specific session when an organization has a large number of calibration sessions. Sessions can be filtered by name, status, facilitator or number of subjects or participants. There is also a search option, the admin can quickly find a session by typing a part of a calibration session name in the search box.
Create a Calibration Session
During the session creation process, you will identify the time-frame the session is applicable to and identify the calibration template being used. You will also designate users to:
Run the session (Facilitator)
Act as back-up (Co-facilitator)
Own the session (Owner)
Provide input (Participant)
Be calibrated (Subject)
Have access to all session data for a calibration template (Executive Reviewer)
The creation process involves three tabs: Basic Info, People and Validation.
A new session may be created by clicking on the Create New button or cloning an existing session. Cloning a session will create a copy of an existing session that you may use as a starting point to rename and make updates to.
Basic Info Tab
The Basic Info tab is shown in the example below.
Create Calibration Session – Basic Info
The Basic Info tab is used to name the session, identify the calibration template to associate the session with and to select the session owners and facilitators. Required fields are the session name, associated calibration template, and session owner(s).
A session owner would be a manager with more than two levels reporting to them. A session may have multiple owners. The default setting is “Select subjects and participants automatically according to the owners.” When designating an owner, the direct reports of the owner automatically become the participants of the calibration session. Additionally, the direct reports to the participants become the subjects of the calibration session.
This setting will add the participants and subjects to the People list in the second tab. Participants would be all users one level down from the owner. Subjects would include all users two levels down from the owner.
The admin’s username defaults as the facilitator but this may be changed. A second name added becomes the co-facilitator although a co-facilitator is not required.
It is possible to upload one attachment which would be visible in the calibration session. Rating descriptions or distribution guidelines are examples of attachments that could be used.
Planned activation date is the date that the session is activated and ready for use. Session date is the start date of the calibration session and location is the where the session will take place. These three fields are optional. Save the tab with your entries and then go to the People tab.
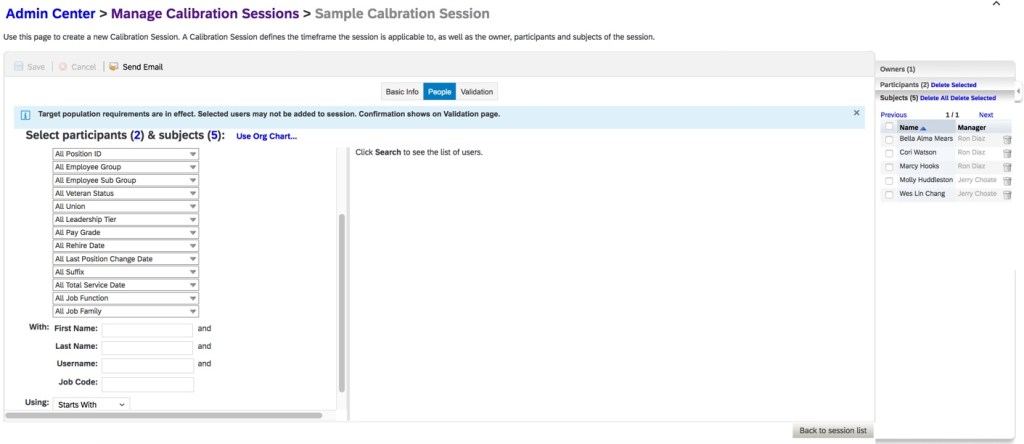
People Tab
The People tab is used to add or edit participants and subjects for the session. The People tab is divided into three sections: User Search, Search Results and Session Members as seen in the example below. If the “Select subjects and participants automatically according to the owners” option was checked on the Basic Info tab, the session members will be populated in the far-right panel as seen in the example below.
People Tab
However, any of these names may be removed or additional ones added. To add additional session subjects or participants, you may find names using a search by filter, group or org chart.
Search by Filter is the default search. The standard filters are Division, Department, Location, Name, Username and Job Code. The custom calibration filters added to the data model will be available as filter fields as well. The search results display in the middle section of the tab.
Any employee that displays in the search results can be added as a participant of the session. The role-based permission for the user that is creating the session may only add subjects that are in the role’s target population. An example of the People tab is shown below.
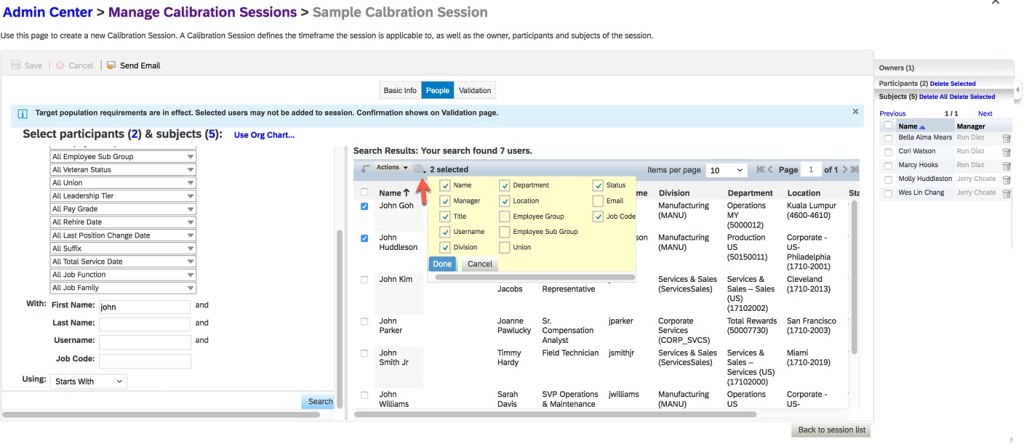
Based on the selections that had been made on the Search Results Fields tab on “Manage Calibration Settings”, the search results section may have additional display fields available by clicking on the wheel icon. The fields selected will then display as additional columns. Any of the default return fields may be deselected as well.
Display Options
Select a user in the search results section and click the “Actions” dropdown listing to add the name to the participants or subjects. This will populate the session members list in the far-right panel of the tab. An example is shown below.
Add Subjects or Participants
The session member panel displays the owners, participants and subjects. You may select one, many or all to names to remove from the session. An example is shown below.
Owners, Participants and Subjects
There is also a Send E-mail button on the People tab. Clicking this button will display a screen to create an e-mail. The owners and participant names default into the “send to” address but the entries may be modified. There is also a subject and message area.
Validation Tab
After entering the session info on the Basic Info tab, selecting who will be part of the calibration session on the People tab and saving the session, the session must be validated. This takes place on the third tab called Validation. This step must be completed in order to make the session ready for calibration.
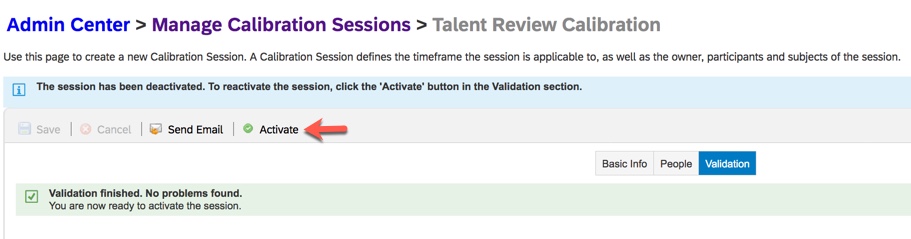
On the Validation tab, the system completes a series of checks that includes verifying that every subject has a performance form and that each form is in the calibration step. Any errors are displayed and must be resolved before activating the session. Warning messages will not prevent validation. If validation fails because forms have not been routed to the calibration step yet, there will be a button that displays to move the forms to the calibration step. Once the forms have been routed and there are no other issues, “Validation finished. No problems found.” message will display and the Activate button will be active as seen in the example below.
Validation Tab
Activating a session makes it available for the calibration session to begin. After clicking the Activate button, a confirmation popup displays to verify activation. Once activated, an e-mail may be sent to the facilitator, owner and session participants. The recipients, the pre-populated e-mail subject and message may be modified prior to sending. The session status is now “In Progress”. The session is now available to all of the participants for review. The facilitator would be able to start the calibration session as well.
This method of creating and activating calibration sessions is manageable when there are only a small number of sessions to create. We will look at another tool that the admin may use to create, validate and activate calibration sessions in bulk.
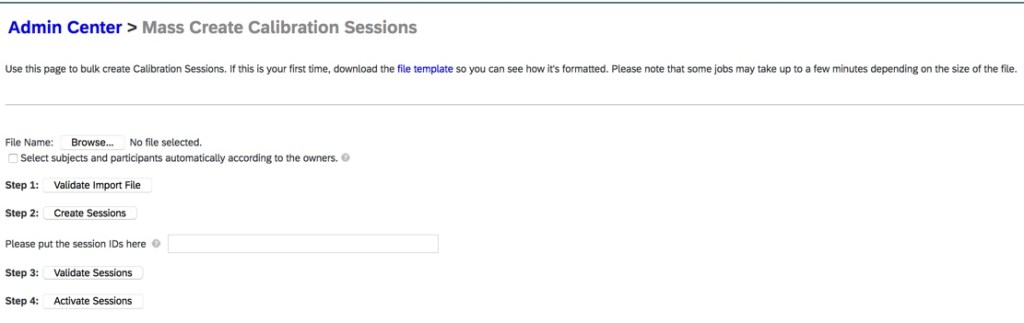
Mass Create Calibration Sessions
There is a function that enables the admin to create multiple calibration sessions at once. In addition, these multiple sessions may be validated and activated in mass. The “Mass Create Calibration Sessions” tool is used. Using this feature assumes that the calibration settings have already been configured and the calibration template created. An example is shown below.
Mass Create Calibration Sessions
There are four steps to perform on this screen: validate the import file, create sessions, validate sessions and activate sessions. The admin will receive an email after each step with with any errors or warnings. If there are any errors, they must be corrected before moving on the next step.
Step 1: Validate Import File
To start, the calibration file template must be downloaded. The template provides the file layout used to create the calibration sessions. Click “file template” seen in the introductory text at the top of the screen and open the CSV file. An example of the file is shown below.
Template to Upload Sessions
The file columns represent the same fields that are used when creating a calibration session manually via Manage Calibration Session. Create a row on the file for each calibration session that you wish to create. Similar to creating the calibration session manually, the same fields are required: session name, the calibration template associated with the session, and the session owner.
There are some fields that are worth mentioning.
If the Facilitator field is left blank, the system defaults the facilitator to the person who uploaded the file. If you wish to list a facilitator and co-facilitator, list each username in the same row separated by the bar delimiter “|”.
The Session Owner field contains the username of the session owner. If there are multiple owners, list each in the same cell separated by the bar delimiter.
If populating the date fields, the date format is based on the localized format of the user uploading the file. The file needs to use CVS format when uploading.
There is a checkbox option, “Select subjects and participants automatically according to the owners.” This is the same option available when creating a session manually. By enabling this option, all of the managers reporting to the owner identified on the file become participants in the session. Individual contributors reporting to the participants become the subjects. Enabling this option eliminates the need to individually identify the participants and subjects to include in a session. Therefore, no entries are added in the participants and subjects columns.
The file may also contain rows for sessions that are not based on the owner’s org hierarchy. In this case, the participants and subjects must be entered on the file in the appropriate columns.
For each session, enter all of the participants in one cell separated by the bar delimiter. Similarly, enter all of the subjects in one cell separated by the bar delimiter. Continue to add rows to the file for each unique calibration session you wish to create. You may create sessions that use different calibration templates. An example of a file to load is shown below.
Sample Import File
Once the file is populated and saved, it must be uploaded and validated. The file needs to use CSV format when uploading. The validation checks for formatting issues or missing fields. An example of importing the file is shown below.
Import Mass Create Sessions File
After the file is validated, the admin will receive an e-mail with the status of the import. For issues, the e-mail will contain validation errors. If there were any errors, the file must be corrected, saved, uploaded and validated again.
Step 2: Create Sessions
Once the file is validated successfully, the sessions may be created. The admin will need to return to the Mass Create Calibration Sessions tool to create the sessions. Make sure the file name is listed and click on the step 2 button, Create Sessions. The admin will receive an e-mail upon completion. If there are no errors, the sessions have been created and the status of each calibration session is now “Setup”. In the e-mail, the session ID for each session is listed and will need to be referenced when validating the sessions in step 3. An example is shown below.
Mass Create Job Status E-mail
If there are errors, make the corrections, save the file and repeat the step until it is successful.
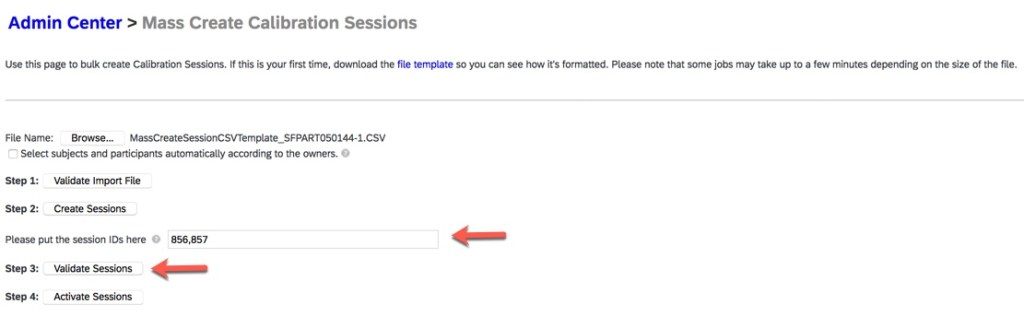
Step 3: Validation Sessions
The admin will need to return to the Mass Create Calibration Sessions tool to validate the sessions. Make sure the file name is listed along with the session IDs from the e-mail from step 2. Click on the step 3 button, Validate Sessions. An example is shown below.
Validate Mass Sessions
The validation that occurs after the sessions are created checks the permissions, ensures that the subjects have forms, the forms are at the calibration step, and there are no inactive users. The admin will receive an e-mail with the status of the sessions. If there are no errors, the session is ready to be activated. Only Setup or Deactivated status sessions may be validated.
Step 4: Activate Sessions
The admin will need to return to the Mass Create Calibration Sessions tool to activate the sessions. Make sure the file name is listed and click on the step 4 button, Activate Sessions. The admin will receive an email that shows if activation was successful. If so, the status for the sessions is “In Progress” and calibration sessions may begin.
Mass Delete Calibration Sessions
In a situation where calibration sessions need to be recreated, the existing sessions must first be deleted. It is possible to delete the sessions in bulk. Facilitators and co-facilitators may delete sessions as long as these calibration roles have the delete permissions. The permissions to delete In Progress sessions and Approved sessions was set on the Permissions tab in Manage Calibration Settings. Multiple sessions may be deleted at once by using the path Home menu and selecting Calibration. All the sessions that the facilitator has permission will display. An example is shown below.
Delete Sessions
To mass delete sessions, the facilitator may select any or all sessions and click the trash can icon on the top right side of the screen. Any sessions that cannot be deleted due to permissions will be listed in the confirmation popup. Any of the other sessions may be deleted, upon confirmation, the sessions are deleted and removed from the session list.
The facilitator may also use Manage Calibration Sessions to delete multiple sessions as shown below. However, each session must be selected and deleted individually. Sessions in any status may be deleted.
Delete Session using Manage Calibration Sessions
Manager Create Session
There is an option to permit managers to create calibration sessions for their own teams. “Enable Manager Calibration Session” would have to be enabled on the Global Settings tab of “Manage Calibration Settings” in order for this to work.
The manager would navigate to the Calibration page from the home menu. As seen in the example below, the manager would see a “Create New” button to start a session directly on the Calibration sessions screen.
Manager Create Session from Calibration
The manager would have to select the calibration template that is linked to the performance form to be calibrated, name the session and identify the number of levels to include. If the user is a high level manger, he will be prompted on how many levels to include in the session. For a manager with direct reports only, the only level option will be “Direct Reports“. An example is shown below.
Create Session
In order for a session to be created, all of the subjects must have the performance form associated with calibration template launched and each form must be in the calibration step. Otherwise an error message will popup. Using this method relies upon an admin creating the forms associated with the calibration template and routed the forms to the calibration step if necessary. If the forms are created and in the calibration step, the manager will go directly into the calibration session.
The manager will also have the ability to delete their session by going back to the Sessions tab in Calibration.
Manger Create from Team Overview
There is an additional feature that permits managers to create calibration sessions in the Team Overview page of Performance Management. This feature only permits sessions to be created for a manager’s direct reports.
The following are required to use this feature:
“Enable Team Overview Access Permission” is enabled in “Performance Management Feature Settings”.
Manager role has permission for Team Overview Access.
“Launch Calibration From PMv12 Team Overview” is enabled on the Global Settings tab of “Manage Calibration Settings”.
“Manager Template” tab of “Manage Calibration Settings” identified the calibration template to use in PMv12 Team Overview page.
PM form being calibrated is associated with the calibration template in the Data tab of “Manage Calibration Templates”.
Performance forms have to be in the calibration step which is identical to the process for a manager creating a session directly in “Calibration”. The manager would go to Performance>Team Overview. The Calibration button will appear on the top right side of the screen as shown in the example below.
Create Calibration Sessions via Team Overview
Clicking the “Calibration” button will open the calibration session. If forms are not yet in the calibration step, an error message will display. The manager would need to go back into the performance forms to complete the review step and submit them before the calibration session may be created. This could also be accomplished in Team Overview.
Wrap Up
We have now seen the methods to create and delete calibration sessions by both an admin and a manager. In the next blog in the Calibration series, we will walk through the steps of a calibration session.
What is the Metadata Framework (MDF) in SAP SuccessFactors? If you’ve been introduced to SAP SuccessFactors, chances are you’ve heard the term “Metadata Framework”. But you may not know the details of what the Metadata framework is exactly. This quick blog will help you understand what comprises the “Metadata Framework”.
To get started, let’s examine the name “Metadata Framework”. “Meta” refers to a greek origin word meaning “beyond”. So the word “Metadata” refers to data beyond the data. Or in other words, Metadata is data about the data. Metadata is data that describes what type of data it is (e.g. a number, or text, or a drop down) how the data looks (e.g. how it is formatted such as a date formatted as 12-31-20 vs. December 31, 2020), what its limits are (e.g. 256 characters long), etc . As the picture at the top of the blog post suggests, a framework is the structure laid out in the initial stages of building a structure. So the “Metadata Framework” is a way to lay out the structure of data in SAP SuccessFactors.
So how do we go about laying out the data structure of SAP SuccessFactors? If you have admin access in the system, you can navigate to the “Configure Object Definitions” screen as shown in the example below. Think of an “Object” as a collection of fields that describe, define, and/or belong to a “thing” in your database/system. Objects could be a chair, a dog, a car, a person or the example below, a position. This screen demonstrates the power of the MDF because you can create objects (as seen in the upper right hand corner under “Create New”, or you can edit existing objects. This ability to create and edit objects lets you store any type of information! In our example, we chose “Object Definition” in the “Search” field and then chose “Position” so we can see how the position object has been defined. You can see below some basic data about the object in general at the top such as whether it is active or not, whether version history is kept on the MDF definition, etc. Below that begins a list of fields within the object and associated attributes of each field such as its technical identifier, length, the type of field it is, etc. Scrolling further down we can even set rules for what happens when a new object is created (such as pre-populating fields) or validation rules to help with data integrity to check fields before the object is saved. We can edit this definition of the overall object and the fields within the object by clicking “Take Action” and then “Make Correction”. Taking a look at the screenshot below, you can start to get a sense of what the MDF is all about.
Configure Object Definitions Screen
It is important to note that not all data in SAP SuccessFactors uses the metadata framework. Most Employee Central data is stored in the MDF–but not all. SAP is working on moving the final few pieces into the MDF within the next few releases. Most of the Talent modules and Recruiting still also reside outside of the MDF. However, as new functionality is built, it is created using the MDF wherever practical.
We hope you enjoyed this quick tour of the MDF! You should now have a basic understanding of what the MDF is and how to configure it. Do you need more help with the MDF? Contact us at info@worklogix.com.
As year-end approaches, it is common for many companies to take a second look at their employee performance and goal setting processes. In the past few weeks, I’ve been helping multiple companies revamp their employee performance processes. While some are just tweaking current forms and processes, others are considering including a new and often enlightening process – 360 evaluations.
What is a 360 evaluation?
The idea behind a 360 evaluation is to get a picture of how others view your performance from all angles. This means that in addition to getting feedback from your manager (top down), you also get feedback from your own direct reports (bottom-up), peers (side), and even external sources (vendors, business partners, customers, etc.).
Why do companies implement 360 evaluations?
Receiving feedback from a variety of sources helps create a more complete picture of how an employee is performing and/or perceived to be performing from different angles. 360 evaluations can help uncover trends and gaps in these different angles. For example, a manager may consider an employee a top performer, but when feedback is asked from peers or external sources on an anonymous basis, the employee might get different feedback (“He’s always on top of his own tasks, but sometimes at the expense of the team as a whole when we need his support”). Similarly, an employee may not be considered a top performer by a manager, but feedback from others could reveal a lot of solid performance feedback into which the manager never previously had sight (E.g. “She’s been so helpful in getting my career on the right path and helping me with work tasks at the expense of her own!”). Allowing this feedback to come to light can help employees and managers work to truly improve employee performance. We’ll take a look in a moment at how SAP SuccessFactors 360 evaluations aid in attaining this kind of feedback.
Walk-through of a 360 form in SAP SuccessFactors
360 forms are launched just like performance forms are. However, it is important to note that 360 forms use a separate screen for launching (don’t worry, this screen pretty much works the same as the other launch forms screen you are used to. After picking a target population, the admin can launch just like a normal performance form.
Search bar showing separate launch screen for 360 forms
360 forms will also show up in the performance inbox like other performance forms, but with a different icon. It is important to recognize that 360 forms use a template type than regular performance forms and get treated slightly differently in these respects.
View of Performance Inbox with both 360 and regular performance reviews
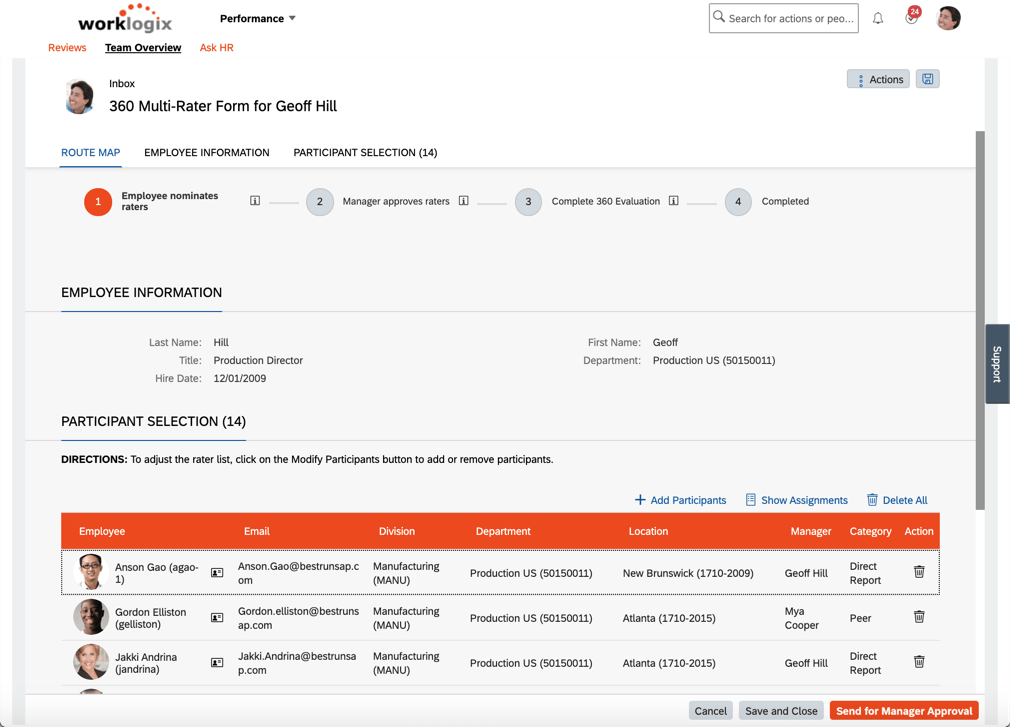
Once the first person in the route map gets the form (in this case the employee), they need to choose who will be involved in the evaluation. The system can be configured to default in people for categories like direct reports, manager, and peers.
Employee nominates raters step of 360 review
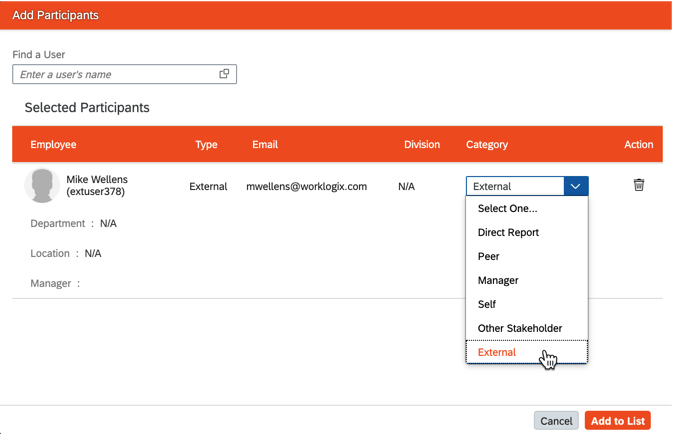
Users also have the option to add external participants as shown below by simply providing a first name, last name, and email and then choosing in what category the person should be included.
Adding an external participant
Once the user is finished adding participants, there is usually an approval step prior to the evaluations being sent out. Evaluations can be designed using sections similar to those you are used to seeing in a standard performance review form. There are sections for objectives, competencies, as well as an introduction and a section for the subject’s information. Unlike regular performance forms that can be configured heavily on the online editor in “Manage Templates”, 360 forms can only be fully setup by partners or SAP (though much of the config is done in the online editor).
For internal participants, the evaluation is sent to the user’s performance inbox like the typical performance reviews where they can then open the form as shown below.
360 Review Form Sent to Evaluator
In the case of external participants, after approval of the evaluators, an email is sent with a link that allows external users to access the form. This can be a security consideration for some organizations since the link is only as secure as the receiving email system.
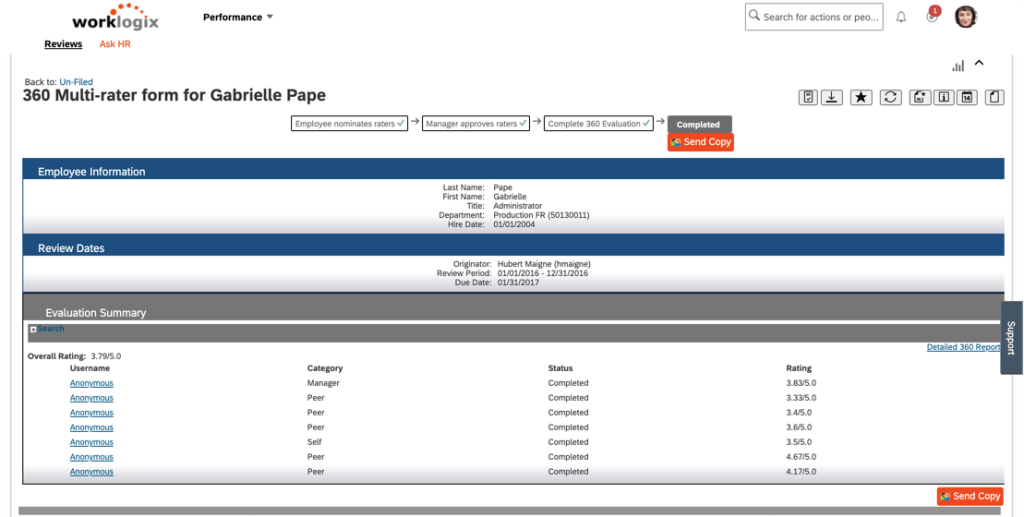
After all evaluations have been completed, the form is put in the completed status and the employee / manger / etc can view the results depending on permission settings. You can see an example completed performance form below.
Completed Review showing Anonymous ratings
One key advantage of the 360 form in SuccessFactors over the typical annual performance review is that the 360 feedback comments and ratings can be made anonymous. Obviously the user would know who their manager is, or they might be able to derive who the other evaluators are based on category if there are only one or two – so the forms allow you to configure minimum counts in each category as well as rollups to combine categories to help keep anonymity. The user can click on the link for each reviewer to see the details of each review and create an HTML or PDF printout of the details as shown below.
Printed Detail of Individual Review Feedback
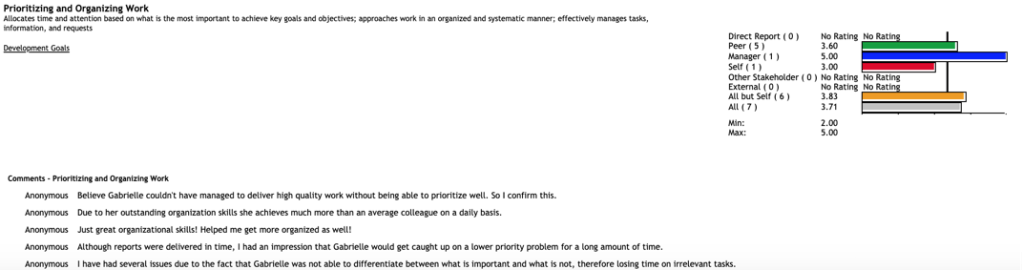
The form also has a nice detailed report showing the combined feedback comments and overall ratings by category. This can help the employee and manager understand where any gaps between self and manager evaluation ratings may exist along with other types of ratings from other categories. For examplem we can see below there is a large gap between the manager’s perception and the employee and other’s perception of “Prioritizing and Organizing Work”. Perhaps the manager is getting too much priority and the employee needs to focus on the work the team as a whole needs completed!
Wrap Up
After this quick walkthrough, hopefully you can now see the advantage of 360 forms as an insightful tool to get employee performance feedback from a variety of sources and understand what a typical end-to-end 360 process looks like.
For more information about 360 forms and other talent management modules in SAP SuccessFactors, check out our book here!
Do you need help implementing or changing your 360 form or other performance and goals processes? Contact us at info@worklogix.com.