

Are you having trouble achieving your recruiting metrics? Specifically – are you having a hard time getting enough candidates to fill out a full application on your recruiting site? Are candidates dropping mid application or just not bothering at all? Do you feel like people are interested in applying to jobs at your company but just don’t see the positions they want so they don’t bother? Are you looking to keep a growing number of potential candidates warm for when those positions are available? If you answered yes to any of these, you might try taking a look at SAP SuccessFactors’ new Recruiting Candidate Relationship Management (CRM) features!
The best news is that these features have been delivered free to all existing SAP SuccessFactors Recruiting Customers as of the Q2 2018 release.
What’s included?
SAP SuccessFactors Recruiting Candidate Relationship Management consist of these primary features:
- Data Capture Forms
- Talent Pools
- Email Campaigns
Data Capture Forms
The idea behind data capture forms is to gather information about prospective candidates without them actually applying for a specific position. It is a great way to see who is out there that may be interested in your company and positions you typically hire (but may not have available now). It could also be used for events like college recruiting or career fairs where prospective candidates are met that sound promising but aren’t quite a fit for a specific position or may not be able to fill out a full application at the moment. Directing them to a landing page on your recruiting website later, or even having them fill out the form on a table or mobile phone at the event would be a great way to capture their information for later follow-up.
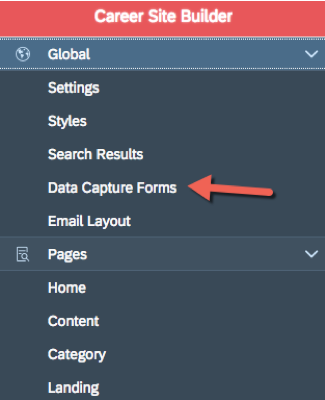
To create a data capture form, you will need access to the Career Site Builder (the “Manage Career Site Builder” permission). Once the feature is active it will appear in the “Global” menu of the Career Site Builder as shown in the screenshot below.
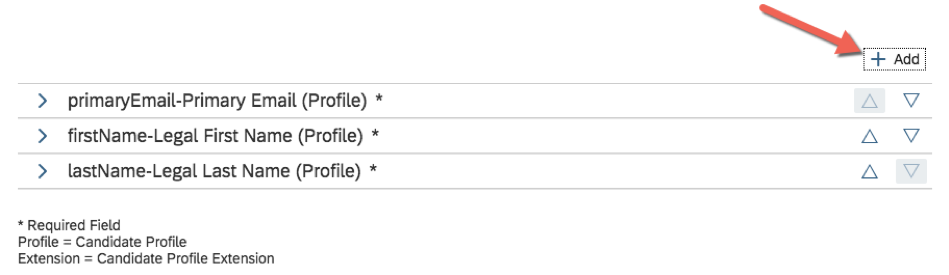
Once your click the menu item and create a new data capture form you will come to the below screen that allows you to choose what fields to capture. As users enter information they are really creating a recruiting candidate profile. At a minimum you will need first and last name as well as email to create a profile. You can add other fields by clicking the “+ Add” button as shown below.
Clicking “+ Add” will bring up a popup like the one below with just a few more fields out-of-the-boz. Most likely you will need to add more fields than what is available in this popup (for example, a drop down that asks what types of positions interest you, or another that asks how you heard about the company).

To add more fields to this popup so you can add them to the data capture form, you will need to have access to manage object definitions. If you are not familiar with the Metadata Framework (MDF) you might want someone familiar with this technology perform this part (I plan on writing another blog post on this, so check back soon!). In a nutshell, you will want to add whatever fields you need to the “Candidate Profile Extension” object definition. They will then show up in the popup above for you to add to your data capture form. As fields are added to the object definition and filled out by your candidates, they will show up on the candidate profile as shown in the screenshot below:

Clicking the “+” button will show all the fields you have added to the “Candidate Profile Extension” object definition (and any values your candidates have filled in) as shown below:

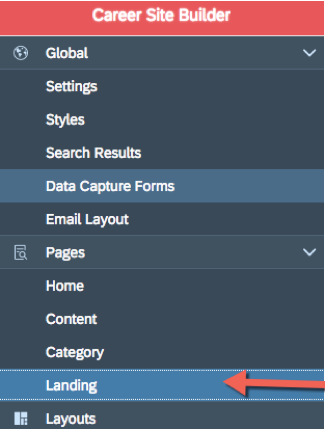
Once you have finished editing your “Candidate Profile Extension” object definition and have added any needed fields to your data capture form, you can design a landing page that includes your form. To create a landing page, click on the “Landing” menu item under “Pages” in the Career Site Builder.
You can create a landing page and add components to determine the page’s layout. Unlike other pages, you can add a special “Date Capture Form” component to the page and select the data capture form you have created. By adding the data capture form to a landing page you can now create a visually pleasing page that includes any branding, images, text, etc. you desire!

Once you have finished your page layout you can preview and/or publish your new page using the links at the top of the screen as shown below:

Talent Pools
The Talent Pools feature allows you to organize any candidates in your recruiting database such as those who have applied to positions or those who have filled out a data capture form. This can be a very powerful tool to help you strategize how to use the pool of people in. For example, you could create a pool of people you met at a particular event, or a group of alumni of a certain University, or people you think all have similar traits that make them qualified for a particular type of position.
Once the Talent Pools functionality is activated and permissions have been granted to use it, a “Talent Pools” menu item shows up in the navigation hierarchy under Recruiting -> Candidates -> Talent Pools as shown below:

You can create a new talent pool by clicking the “Create Talent Pool” link on the right-hand side of the screen. You will get a popup like the one below:
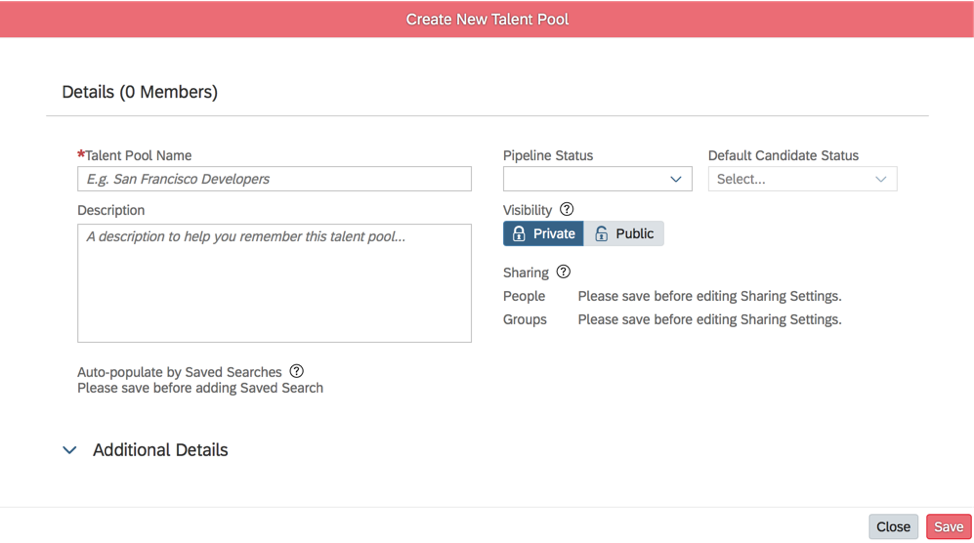
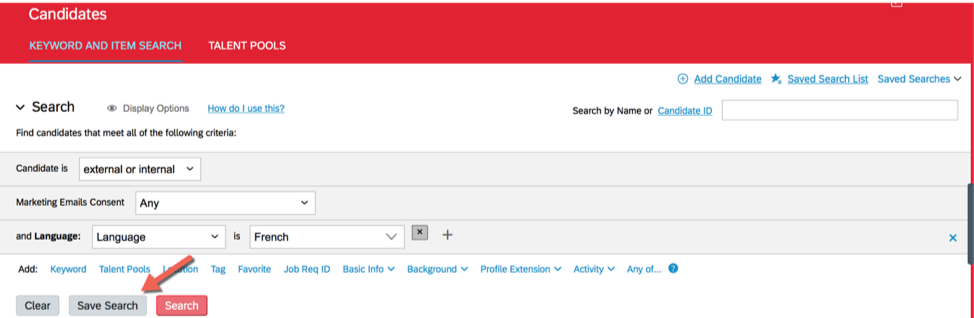
Here you can see many of the features of the Talent Pools functionality. For example, you can create a Talent Pipeline status and set a default candidate status. These statuses can allow you to track where you are in the process of attracting each of the candidates within the pool. You can also set the pool to be private only for your eyes or for a select group of people you choose, or make it visible to anyone with the Talent Pools permission. Finally, you can also set the talent pool to auto-populate overnight based on saved searches you have already created (note that you will need to have created the saved search prior to creating / editing the talent pool). To create a saved search, navigate to “Keyword and Item Search”, construct a search, and then click the “Save Search” button as shown below. For example, in the below search we are gathering all candidates who listed French as a language skill.
If you don’t want the system to auto-populate the talent pool for you overnight, you can also directly edit the pool and add candidates as you see fit in the candidate search area as shown below.

Email Campaigns
Now that you’ve captured a good collection of potential candidates and have them organized into pools of candidates, it is time to engage them! Email campaigns enable you to send mass emails out to select candidates from your candidate database.
You will need to start with creating an email layout. The layouts screen is found within the Career Site Builder as shown in the screenshot below:

The layout consists of a header, footer, and the main content area where you will compose your email. In creating the layout, you would not add any content to the “Configurable Text Area” – this is simply a placeholder for the content you will create later for a specific campaign. Typically, you would just create the header and footer content within the layout. You can add rich text and images from your Career Site Builder image library within the header and footer. Brands and multi-language are also supported.

Once you have your layout complete, you can begin to create your first email campaign! The email campaign screen can be found by navigating to Recruiting -> Marketing -> Email Campaigns. Just click on the “New Email Campaign” link in the upper right to get started.

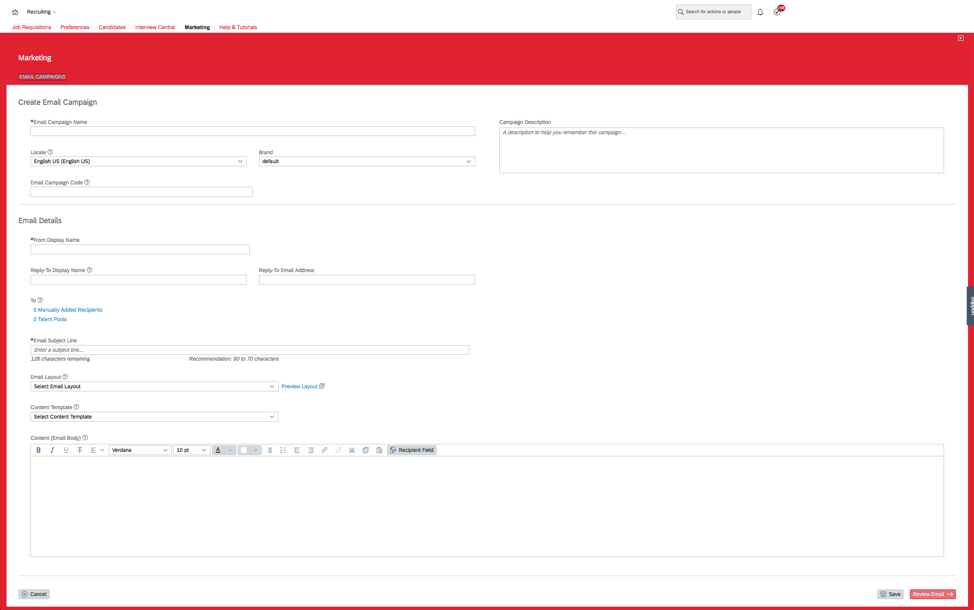
The “Create Email Campaign” screen is shown below. From here you can choose basic info like the name of the campaign and a description as well as the brand and language. You can alo fill in the details of what the email will look like to individuals receiving it including the title, “Reply-To” the layout, and the content of the email. There are also a limited number of tokens you can use by clicking on the “Recipient Field” link. You can pick and choose individual candidates to send the email to or send to entire talent pools. You can combine multiple talent pools and individual picks all in one campaign as well.
Congratulations! You have now captured new talent, organized them, and engaged them for new opportunities! J
How Do I Activate These Features?
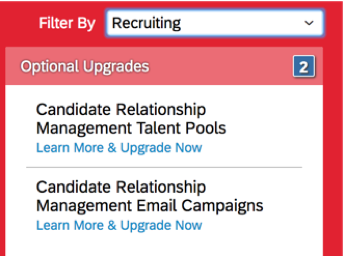
SAP SuccessFactors customer administrators can easily turn on the Talent Pools and Email Campaigns via the Upgrade Center. You will find the Upgrade Center in your “Admin Center” as show in the screenshot below:

You can filter by “Recruiting” and see the items show up in the options below. Click the “Learn More & Upgrade Now” link and follow the instructions to turn these on.
Please note that once you activate each of these options, you will receive a screen indicating next steps to take such as assigning specific role-based permissions. Please make sure you follow these instructions or you will not be able to get to the needed screens.
To activate Data Capture forms and email campaigns, you need to make sure you are using the Career Site Builder (CSB) first. As shown in the preceding instructions, all of the forms you will create have to be designed in the CSB and surfaced through landing pages in the CSB. You can either request a partner turn on the data capture forms feature for you in Command Center, or open a support ticket with SAP to have them turn it on for you.
Where Can I Find Out More?
To find out more, visit the SuccessFactors Community Quarterly Release Page for Q2 2018 here (SAP login required):
https://community.successfactors.com/t5/Product-Updates-Blog/Q2-2018/ba-p/202735
