As of October 9, 2020, SAP has released their documentation for the H2 2020 release. You can view the full set of documentation in the What’s New Viewer here. As a reminder, preview release will be October 16 and production will be released November 20th. For full details on the release cycle, check out the SAP SuccessFactors official product updates blog here. For tips on how to manage a release, check out or blog here. For your convenience, we’ve summarized the highlights of what’s new for 2020 within Succession and Development below!
Writing Assistant and Coaching Advisor for Job Profile Builder
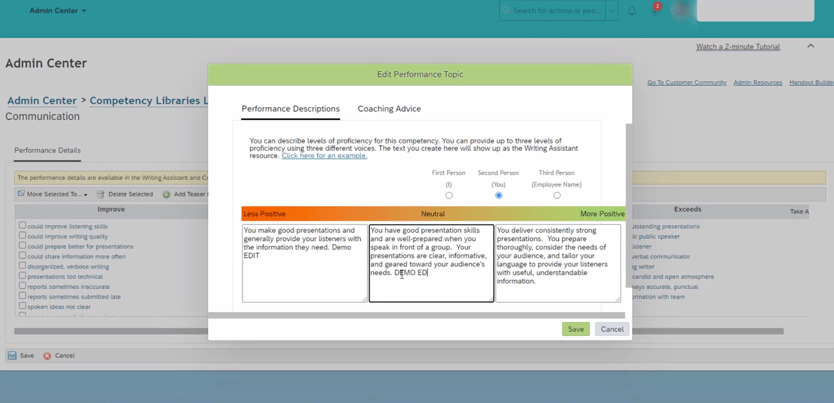
The biggest news for these modules we’ve seen is that the Job Profile builder now supports the Writing Assistant and Coaching Advisor (see below). This was a big gap that is finally being closed. We had some customers who wanted to use both the Job profile builder and the Writing Assistant and Coaching Advisor. This required creating all of the content for the Coaching Advisor and Writing Assistant in the legacy competency library config screens and then switching on the Job Profile builder and hoping everything got converted OK. If there was a mistake somewhere or something you wanted to add to the Coaching Advisor or Writing assistant…well then there wasn’t a way to fix it without turning off the Job Profile builder. Now this gap is closed and a profile job profile builder compatible maintenance screen for the Writing Assistant and Coaching Advisor exists. Woohoo!
Writing Assistant
Talent Search
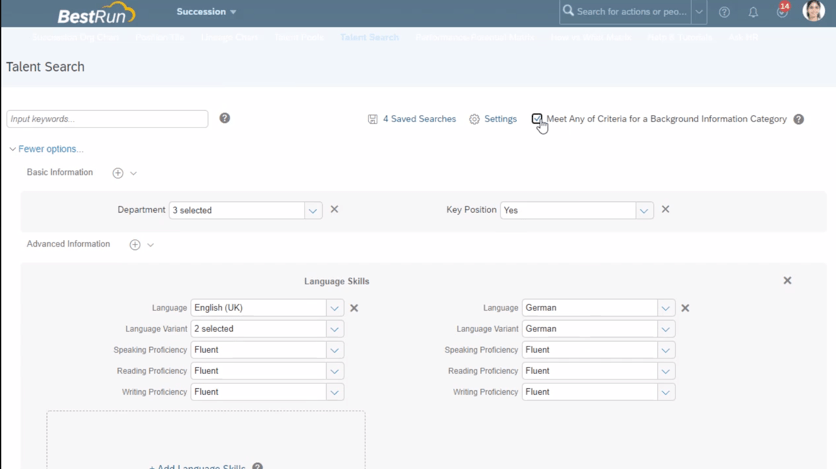
Another significant enhancement we’ve seen is to the talent search. Now at the top of the screen there’s a checkbox to toggle between AND/OR logic when searching for background information (see below). We are wondering how this compliments / replaces the “Make All Criteria Optional” button that already existed under the settings menu. You can also add up to 6 criteria within each background element. There’s also a new competency picker in the talent search. The export feature was also enhanced to allow you to reorder and choose which fields can be exported. More fields can also be exported now under Advanced Information and Ratings & Competencies.
Talent Search Showing New Check Box for Before and After
Calibration
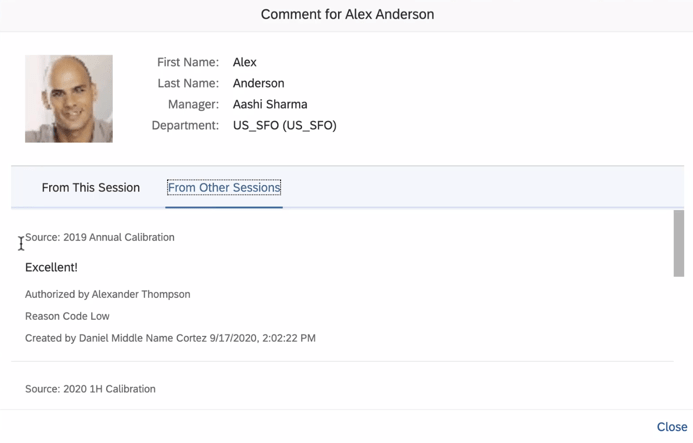
Calibration sessions got a neat enhancement where you can now view comments from other calibration sessions so long as they use the same template (see below)! We can see this becoming very useful to organizations that manage multiple sessions across large organizations. This was also enhanced in the Odata API where a new object, “CaibrationSubjectComment”, is available so that these comments are exposed for interfacing.
Calibration Comments Between Sessions
In addition, you can also use autocomplete when searching for people in calibration. Also, if you are attempting to purge a user who happens to be the only facilitator for a session you can now replace the user with an active user and then continue with the purge.
Career Worksheets and Career Explorer
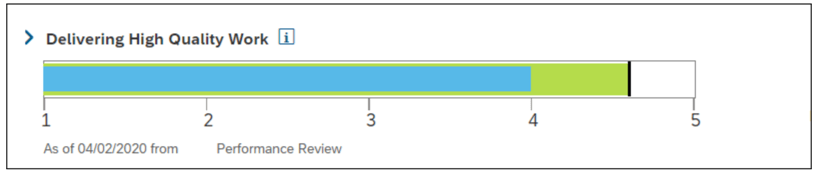
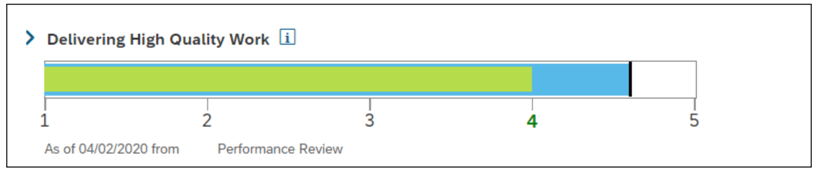
Within Career Worksheets and the Career explorer we’ve seen some nice usability improvements. For example, the ability to remove recommended roles in the career explorer. Users can now remove a recommendation if they no longer wish to see it. This is a nice feature that can help encourage employees to keep looking for other roles instead of just constantly throwing something irrelevant at them. Aside from this, the career worksheet also got a security enhancement where the worksheet is only viewable if the employee is in the user’s target population. The progress bar also swapped colors as shown below. The bars will also show up now for not applicable / too new to rate competencies (they were hidden before).
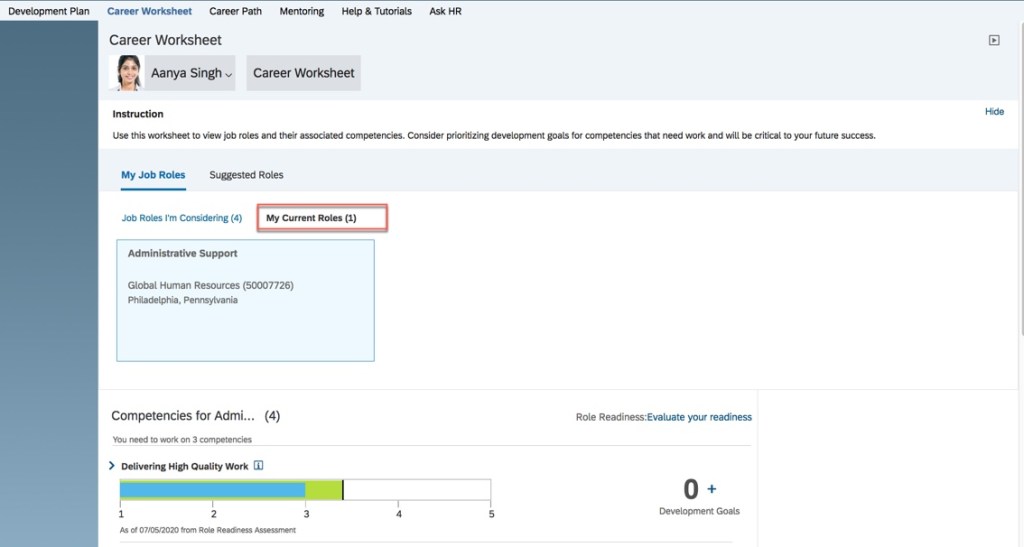
Before:
After:
But that’s not all!
Development templates and Continuous Performance Management also got another integration point. Now when a user
Matrix views (9-box) also got visual /usability updates. For example, you can now remove the “Too New to Rate” option. You can also view the people cards for employees even when you are zoomed out of their box. You can also select reporting levels in the Matrix Grid Report.
You can now also hide contingent workers in the Succession Org Chart. The “Add Successor” icon also appears now even when there is no successor exists.
Talent pool nominations can also now be approved or rejected. Nomination history for talent pools is also available via the Odata API and People Analytics Stories.
All in all, there’s over 25 items being changed/enhanced in this release and we didn’t cover every detail here. For more information, check out the What’s New Viewer here.
Want to know what’s changed from the first Half (1H) 2020 SAP SuccessFactors release for Career Development? Let’s take a look!
There are two new universal features within Career Development and three universal enhancements in Mentoring. We will wrap up by seeing the new Career Explorer tool that is only available in an Early Adopter Care (EAC) program at this time.
We will begin with the new universal feature in Career Worksheet.
Creating a Deep Link to “My Current Roles” in Career Worksheet
It is now possible for an employee to use a deep link to go directly to the “My Current Roles” tab in Career Worksheet.
So what exactly is a deep link? For our purposes, it is a hyperlink that links to a specific page in the SAP SuccessFactors application. For example, a custom tile on the home page may contain a deep link. This acts as a shortcut to reduce the number of clicks to move to another page in SuccessFactors.
In prior releases, it would take several clicks for an employee to get to their current role on Career Worksheet. From the home page the path would be Development>Career Worksheet>My Current Roles tab.
With the latest release, an employee can open a deep link to go directly the Career Worksheet “My Current Roles” tab by using the new URL “sf/careerworksheet?currentrole=true“.
In order to take advantage of this new feature, a little set up is needed. For our example, we will add a link to the “Quick Links” tile on the Home page.
First let’s set up the URL so it will be ready when we need to reference it. To use the deep link, add it to the base URL of your SuccessFactors instance. To find your base URL, look at the URL for your login page. An example is shown below.
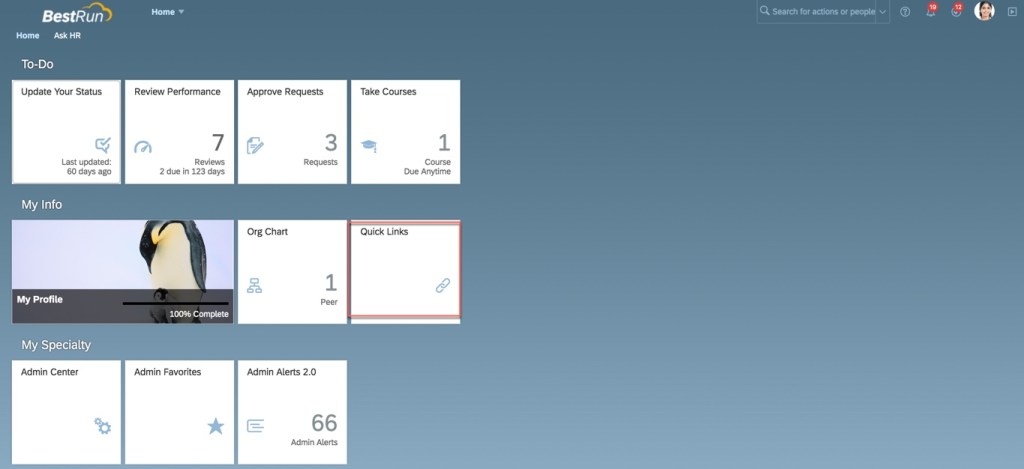
Now we can set up our deep link. Go to “Manage Home Page” and find the “Quick Links” tile as seen below.
Manage Links
Click on “Manage Links” in order to add the URL. Click the plus sign seen in the top right corner of the page. You will then be able to add a new entry. Provide a name for the link label, turn the link on by default, enter the newly created URL and save. An example is seen below.
Create Deep Link
Now go to your home page. The new deep link will now be available in the “Quick Links” tile as seen in the example below.
Quick Links Tile
Clicking on this tile, the user will see all of the quick links available to them. In the example seen below, the user has added this link to their favorites.
Link to Current Role
Clinking the link will take the user to the “My Current Role” tab on Career Worksheet as seen below.
My Current Role Tab of Career Worksheet
That wraps up what is new for Career Worksheet. Next we will move on to the Development Plan.
Development Plan
The final “what’s new” for Career Development Planning is the availability of the Buddhist calendar in Development Plans. This enhancement is specific to customers in Thailand. The Buddhist calendar will now display in:
Development Plan – add and edit learning activity
Development Plan – add and edit goals
Learning Activity within Development Plan – create and edit new learning activity
Learning Activity Group within Development Plan – group definition, edit assigned learning activities for groups
We have now seen the new features for Career Worksheet and Development Plan. Now let’s see the enhancements for Mentoring.
Mentoring
There are no new features in Mentoring but there are a few universal updates to existing functionality:
Enhanced Matching Rules
Reduced number of recommended mentors
Email notifications for changes in mentor availability
We will look at each one.
Enhanced Matching Rules
When an admin creates a mentoring program, the program signup form is configured. The admin creates a series of questions that mentors and mentees must answer when joining a mentoring program. Now matching rules are defined for each question. The system determines the best match for a mentor and mentee based on the responses and the matching rules for each question.
When creating the signup form in prior releases, there were only four columns to complete as seen below.
Prior Version of Signup Form
The fields to complete were: “Answer Type“, “Selection Values“, “Questions to Mentor” and “Questions to Mentee“.
The admin would create questions for the mentors and mentees. Each question would need to have the answer type defined: free text or a picklist. If the answer would come from a picklist, the picklist would be identified in the “Selection Values” column.
The latest version of Mentoring has a much more robust method for matching program participants.
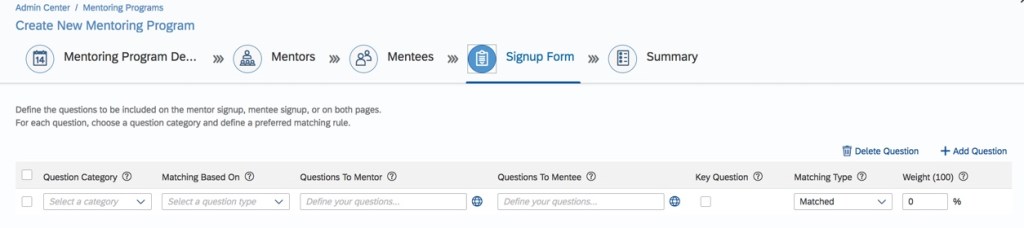
The new signup form is displayed below.
New Signup Form
Like the previous releases, a matching rule is created for each question that appears on the signup sheet. Now there are additional criteria defined in order to find the best match:
Question Category
Matching Based On
Key Question
Matching Type
Weight
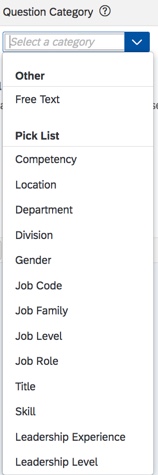
The “Answer Type” and “Selection Values” columns from previous releases have been combined into the “Question Category”. An example of the selections for this field is shown below.
Question Category
If the question may be answered by a picklist, the picklist is identified in this field otherwise the question category value would be “Free Text”.
In order for mentors to be matched to mentees, all of the questions cannot be free text.
Just a few things to keep in mind about picklists.
The picklists that may be used for each question are: competency, department, division, location, gender, job family, job role, job code, job level, job title and skill. You may also use custom picklists. The picklists need to be defined in the data model and permissions must be granted.
The same picklist (standard and custom) may be used in multiple questions.
Custom picklists may only be used when matching is based on preference, not with mentee or mentor preference or profiles.
New is the “Matching Based On” column. For each question, matching may be based on:
Preferences. Mentors and mentees are matched based on their answer to the question.
Mentee’s Preference. Using this match type, there is only a question for the mentee. The mentor will not get the question on their signup form. Matching is based on the mentee’s answers and the mentor’s employee profile.
Mentor’s Preference. Using this match type, the question is only for the mentor. The mentee will not get the question on their signup form. Matching is based on the mentor’s answers and the mentee’s employee profile.
Profiles. This match type does not use a question. Matching is done based on the picklist value for the question on the mentor and mentee employee profiles.
Also new is “Key Question”. When a question is identified as “key”, and the mentee and mentor don’t satisfy the matching criteria for the question, they won’t match. Key questions cannot be weighted.
Matching type. Options are “Matched” or “Not Matched“. Matching depends on the answers or the profile to determine if they are a match on each question. If the answer is defined as “Not Matched”, the answer to the question by the mentor and mentee cannot be the same in order to match on the question.
Weight. If used, the sum of the weights must equal 100. If this column is left blank, equal weight will be given to each question. If you wish to omit a question from matching, you may leave its weight blank but have the weight for the remaining questions to add up to 100. Responses to key questions and free text questions cannot be weighted.
The table shown below identifies which fields are available for each “question category”/”matching based on” combinations. The fields that the admin will be able to enter for each question on the signup form will differ based on the matching options.
Question Category
Matching Based On
Question to Mentor
Question to Mentee
Key question
Matching Type
Weight
Free text
N/A
X
X
N/A
N/A
N/A
Picklist
Preferences
X
X
X
X
N/A
Picklist
Preferences
X
X
X
X
Picklist
Profiles
N/A
N/A
X
X
N/A
Picklist
Profiles
N/A
N/A
X
X
Picklist
Mentee’s Preference
N/A
X
X
X
N/A
Picklist
Mentee’s Preference
N/A
X
X
X
Picklist
Mentor’s Preference
X
N/A
X
X
N/A
Picklist
Mentor’s Preference
X
N/A
X
X
Field Availability Based on Question Category/Matching Based On
For example, if you are using employee profile as the matching type, there will be no questions for the mentee or mentor because matching is based on the picklist value on the mentor and mentee employee profiles. For all cases where a question is identified as “key”, the weight field will not be active.
Matching Rules
The matching between mentors and mentees is based on the rules set up for the signup form questions. Matching rules determine the recommended matches. The system compares data from the mentee to the mentor.
The matching program looks at the key questions first. If the matching rule is not satisfied for any of the questions, the mentor/mentee are not considered a match. If there is a match based on the rule of a key question, the system keeps matching based on additional question matching rules. For non-key questions, preferences or employee profiles are compared to calculate the mentor’s match score.
Skill and competency questions calculate a match score based (0 to 100) on the number of picklist values matched for a question. The number of mentor’s competencies/skills that match with the mentee is divided by the total number of competencies/skills that the mentee selected in their signup form. This number is then multiplied by 100 to arrive at the match score for this question. So the more competencies/skills that match, the higher the matching score. The match score for any other standard or custom picklist will be 0 or 100. If a question does not have at least one picklist value in common between mentor and mentor, the match score is zero.
After the system calculates the mentor’s match score for each question, the scores are summed. Weights used on a question are also used in the calculation of the final match score. Based on the results, the top ten matches become the recommended mentors for a mentee.
Matching Program for Supervised Mentoring Programs
Supervised mentoring programs use a backend matching program to calculate match scores. This program uses a star system with four matching levels.
Preferred (four stars) match based on preferred mentor selected during sign up
Excellent match (three stars) based on 75% or higher match score
Good match (two stars) based on 50 – 74.99% match score
Average match (one star) based on 49.99% or lower match score
Recommended Mentors Cap
Another enhancement involves reducing the number of recommended mentors. In prior releases, when a mentee completed the questions on their signup form and then saw the recommended mentors, up to 100 recommended matches would display. Now the mentee will only see ten recommended mentors. This limits the mentee’s time scrolling though all matched mentors to make a selection and instead can focus on the ten with the best fit.
Recommended Successors
We will now look at the final enhancement for Mentoring.
Email Notifications for Unavailable Mentors
The final enhancement involves email notifications for mentor availability status changes.
When the availability status of a mentor changes, their mentees and their pending mentees will receive an email notification. This is very helpful information for mentees to be made aware of so they may select another mentor. In prior releases, only the mentor received notification when their availability status changed.
Going forward, the mentor will only receive a notification if the admin changed their availability. In other words, if the mentor changed his own availability status, he would not be notified. In either case, the mentee will receive the availiabilty change notification.
Let’s look at what happens when the admin goes into a mentoring program and makes a mentor unavailable as seen in the example below.
Admin Makes Mentor Unavailable
The mentor will not be available until July 24, 2020 so both the mentor and the mentee will receive an email notification.
The mentor notification is seen below. The email contains the date the mentor will be available again. It also explains that the mentor cannot be selected by a mentee when in this unavailable status.
Unavailable Notification to Mentor
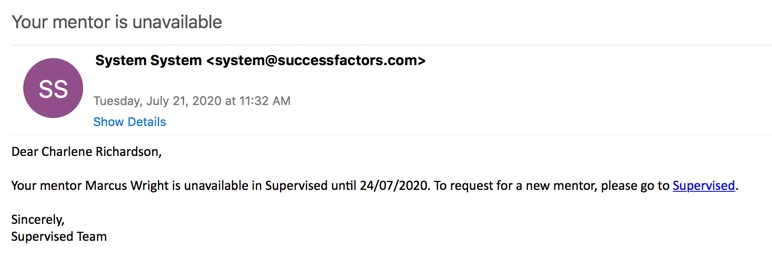
When the mentor is no longer available, the mentee receives an email notification as well. Any mentee that has a pending mentor request with this person will also get the email. A sample email is shown below.
Unavailable Mentor Notification to Mentee
In the email, the mentor’s availability date is supplied. The mentee also is prompted to select a new mentor.
Now we will see what happens when mentor makes himself unavailable as seen below. The mentor changed his availability and entered the date when their availability date.
Mentor Makes Himself Unavailable
In this case, only the mentee will receive the availability notification.
Next, if the admin goes into the program and makes the mentor available again, both the mentee and mentor will be notified.
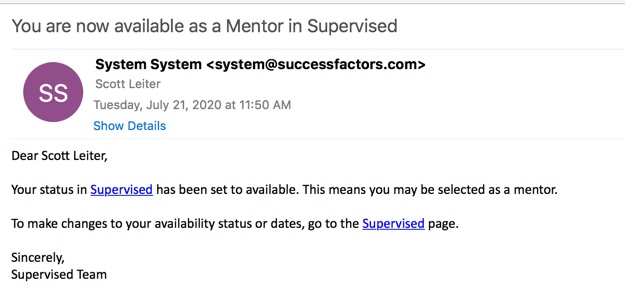
Here is a sample email notification received by the mentor.
Mentor Notification of Availability
The mentor is made aware that they are available again so the mentor may expect to see some mentoring requests coming his way again. The email also explains that they may go into the program to change the availability or status.
The mentee is notified of the mentor’s availability as well. Shown below is a sample notification.
Mentee Receives Mentor Available Notification
If mentor makes himself available again, only the mentee receives notification.
We have now seen what’s new and enhanced for Career Development. Now we will take a brief look at the limited release for a new feature.
Career Explorer
A new component of Career Development is Career Explorer. It uses a machine learning algorithm to make recommendations for future job roles based on users “like me”. Career Explorer recommends career opportunities based on the career paths of people who are similar to the user in the organization. An employee can see the career path taken by others that used to have the same job role or who have similar skills, previous roles or education. This give the employee some additional future job roles to consider that may not be within their regular career path. This tool provides personalized guidance over the predefined career paths to determine the possible next role.
Career Explorer helps an employee find possible future roles outside of traditional career paths or even discover an unexpected fit for a role. These roles may be set as targets for career development. Based on the recommended roles, the user can also see a future career path in a lineage chart.
A sample view of Career Explorer is shown below.
Career Explorer
Competencies, skills and other job profile details may be viewed for each role. The employee may see how well they meet the job role requirements. If the role is added to their Career Worksheet, the employee may identify competency deficiencies and then create development goals and learning activities to help fill those gaps.
Prerequisites
Career Explorer is currently available only to those in the Early Adapters Care program (EAC). In order to apply, you must be have a minimum of 1000 employees all associated with job roles. Additional requirement include using:
Employee Central
Job Profile Builder using job code, job classifications and competencies
Succession Management
Career Development Planning, preferably with Career Worksheet enabled
Registration ends November 1, 2020.
Wrap Up
We have now seen what’s new and improved within the Career Development module. And we have seen what is coming with the new Career Explorer. Check out my blog on what’s new for SAP SuccessFactors Succession for 1H 2020 as well.
This guide is to help system administrators with Provisioning access to understand and configure the Career Worksheet template.
Career Worksheet
Enabling the Career Worksheet In Provisioning
To get started, let’s handle the settings needed in Provisioning. You should already have enabled Goal Management Suite (Total Goal Management) and Development Plan V12. In order for the Career Worksheet to be used in the Career Development module, My Goals Tab and Career Worksheet V12 must be enabled in Company Settings.
Company Settings to enable to use Career Worksheet and Career Paths
To use these features, Version 12 UI framework (Revolution), Enable Generic Manager and Enable the Attachment Manager should be enabled as well.
Configuring the Career Worksheet
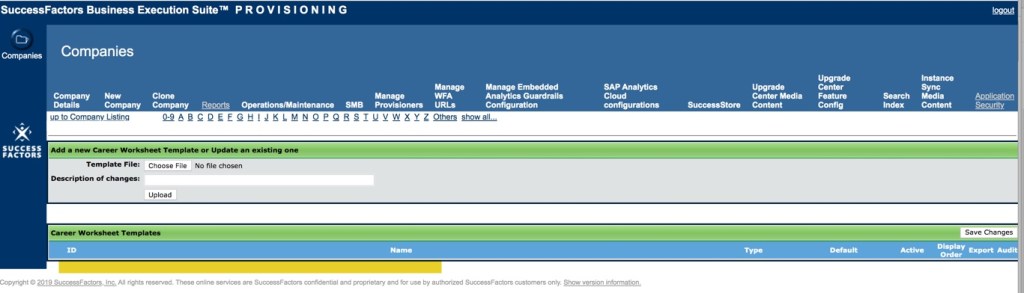
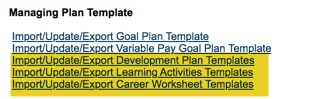
The Career Worksheet is based on a template found in Provisioning. The Career Worksheet template is found under the Managing Plan Template section and may be seen by clicking on the Import/Update/Export Career Worksheet Templates link.
Templates within Managing Plan Template
If the Career Worksheet Template is not found, you may download the Career Worksheet XML from a sales demo and then import into your company.
Company without Career Worksheet XML
Once you see the Career Worksheet template, export it to tailor the features to your organization’s needs. The Career Worksheet XML may be updated to change field labels, define the rating scale, choose which features to switch on and set permissions.
Career Worksheet Template
Career Worksheet Template Elements
Let’s explore the Career Worksheet XML to get an understanding of the elements and their purpose.
Career Worksheet XML
Look for the first field-definition tag. It will follow tags for text replacement, behaviors, and self-assessment.
Field Definition Ids follow self-assessment tag
The standard field-definition ids are:
Competency name
Last rated form
Last rated date
Last rating
Development goals
Readiness Meter
The field definitions within the Career Worksheet XML are highlighted below:
Field definitions within the Career Worksheet
No custom fields are allowed in the Career Worksheet XML.
All of the field elements are required with the exception of the readiness meter. It is recommended to use the readiness meter, without it, the target roles will not display the percentage of how ready an employee is for a role.
Field definitions and the Career Worksheet
The fields defined in the Career Worksheet XML are related to the competencies for a role.
The first field definition id: competency_name. The name of the competency required for the targeted role.
View of competency_name field definition id
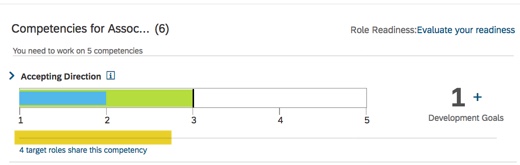
Each competency that is required for the targeted role is displayed on the Career Worksheet.
Required competencies for the targeted role
Field definition id: last_rated_form. The name of the form where the competency rating was pulled from.
View of last_rated_form field definition id within the Career Worksheet XML
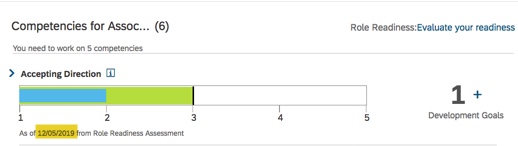
The name of the form where the rating comes from is displayed beneath the competency gap graph.
Name of form where competency rating comes from
Field definition id: last_rated_date. The date on which the competency was last rated.
View of last_rated_date field definition id within the Career Worksheet XML
Used in conjunction with last_rating_form, it displays the date that the form was completed.
Date of form completion where competency rating comes from
Field definition id: gap_graph. Image that shows the gap between the expected rating for a competency compared to the employee’s actual competency rating.
View of gap_graph field definition id within the Career Worksheet XML
Gap graph for each competency on Career Worksheet
Field definition id: last_rating. The user’s latest competency rating.
View of last_rating field definition id within the Career Worksheet XML
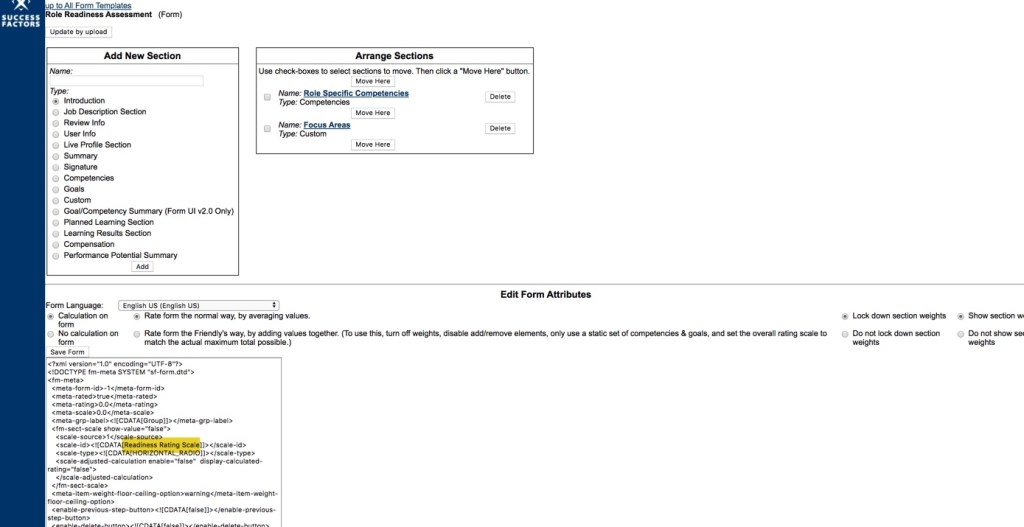
The system uses the latest rating information in the system as the default. You can also specify a specific form or a couple of forms as the source of the existing ratings. We are concentrating of the use of the role readiness form as the source.
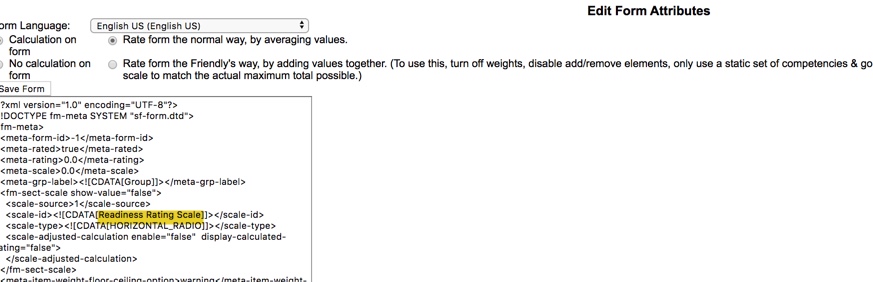
Be sure to reference the same rating scale that is used in the Role Readiness template. Otherwise the Career Worksheet will not have the readiness meter populate after an evaluation is completed.
Rating scale should match scale used in Role Readiness template
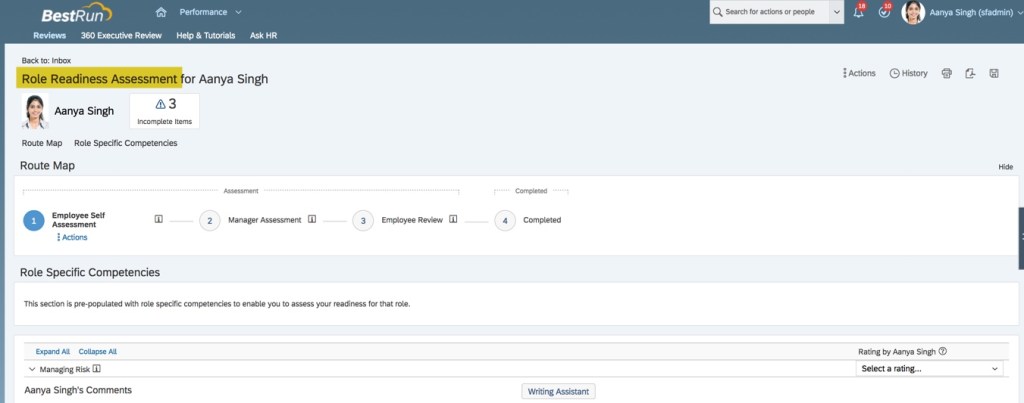
The rating is pulled from the form that is identified in the Role Readiness Assessment Template as the source.
Rating scale referenced in Role Readiness Template XML
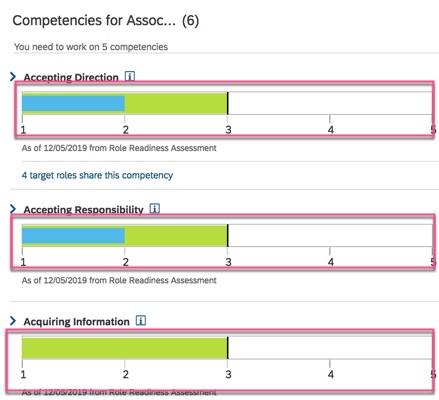
The competency rating is represented in the gap graph for each competency.
Gap graph shows actual rating and expected rating rating for each competency
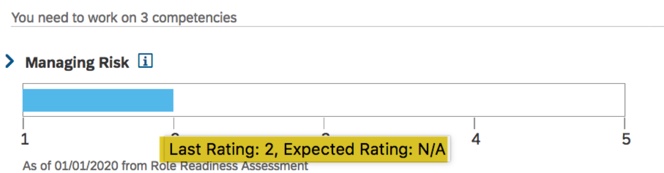
When hovering over the graph, the actual employee numeric competency rating will display along with the expected competency rating. The graph is based on the competency rating scale used in the form.
Hover to see the last rating and the expected rating for each competency
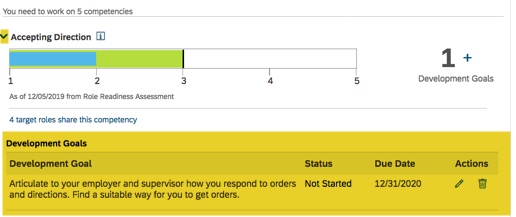
Field definition id: development_goals. This field is used to show the number of existing development goals for each competency along with a button to create a new development goal. Use of this field requires that a development plan template with competencies is loaded. The worksheet will use the default development plan.
View of development_goals field definition id within the Career Worksheet XMLExisting development goals count display with ability to add new development goal
In order to use this, there must be an active development plan template with a competency field defined.
Competency used on development plan
On the Career Worksheet, you may expand a competency to see any development goals the employee has already associated with the competency. If configured in the development plan, the employee may edit or delete the competency.
Development goal associated with a competency
Field definition id: readiness_meter. The percentage rate of readiness for the target roles based on calculation of actual competency rating and expected competency rating.
View of readiness_meter field definition id within the Career Worksheet XML
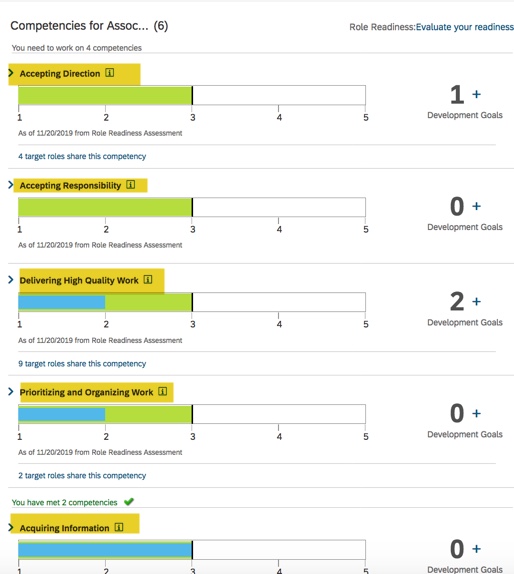
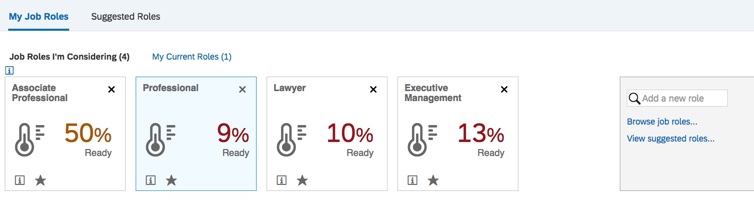
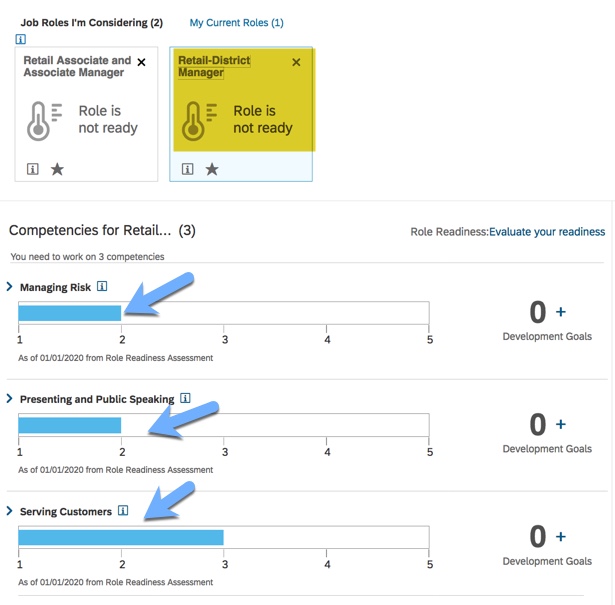
Until a role readiness assessment form is completed, the target roles’ meters will show that the role is not ready.
View of readiness meters for targeted roles prior to initial role assessment completed
Once the initial role assessment is completed, all of the targeted roles will have the readiness meter show the percentage of how ready the employee is for the role based on the competencies needed for the role.
Role Readiness Meters for targeted roles
Career Worksheet Permissions
The ability to view the content of the Career Worksheet and the actions that a role may perform are set in the Career Worksheet template.
Now that the Career Worksheet fields have been reviewed, let’s move on the permissions for these fields.
Career Worksheet Field Permissions
The visibility of the fields on the Career Worksheet are influenced by the Read permissions in the template.
Write permissions for any fields on the template are ignored because the template does not support write permissions for the fields.
The competency_namepermission allows the user to see the name of the role’s competencies. If read access is not granted to competency_name but is granted for the last_rated_date and last_rated_form fields, the competency name will show on worksheet as “undefined”.
Example of no read permission for competency_name field:
Read permission without competency field
View of worksheet without read permission for competency_name field.
Names of competencies will be undefined without competency_name field read permission
Competencies required for a role are shown as undefined rather than by the name of the competencies.
The development_goals permission allows user to see the development goals associated with each competency. The read and write permissions for development goals come from the development plan template.
The last_rating read permission is needed to view the gap graph for each competency.
The last_rated_date permission displays date of the most recent rating for each competency.
The last_rated_form permission displays form name for the most recent rating for each competency.
A role must have permission for both last_rated_date and last_rated_form in order to see the source and date of the rating.
Example of read permission without last_rate_date
Without read permission for both fields, date and form name do not display.
View of competency without read permission for date and form name
The readiness_meter read permission allows the “Readiness” percentage to display for each of the targeted job roles.
Readiness percentage displays because of readiness_meter read permission
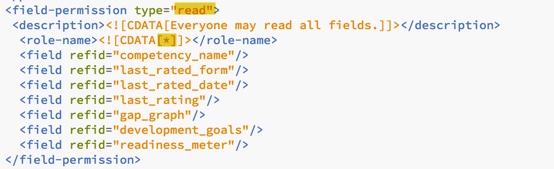
Example of read permission for all fields for employee, manager hierarchy and HR roles.
All roles should be able to read the readiness meter. Without the read permission for role set to “*”, the readiness meter will not populate after the role assessment is completed.
Read permission for Readiness Meter
Switches
There is a section within the XML to add switches that will control some of the features. The switches tag should be inserted prior to the text-replacement tag.
Switches in Career Worksheet XMLSwitch for Proportional Calculation
Switch for Job Profile Builder Profile
When Job Profile Builder is used and job profiles are defined, turn on the sync switch in Career Worksheet template xml.
This is done by setting the disable-jpb-profile-in-csw switch to “off”.
Switch to sync future role details with job profile from JPB
When the sync is on (value on switch is set to “off”), the future role details in the career worksheet come from Job Profile Builder Job Profile shows for future role when you hover mouse on i icon, as below:
Job role details
Switch for Position Count per Role
For each targeted role, it is possible to see the number of openings using the “hide-position-count” switch set to “off”.
Count of number of openings for target role
The default value is “off”, however, this position count only works for Legacy Position Nomination Method for Succession so the switch should be set to “on” to hide the count.
Switch to hide position count
Switch for Development Goals
When competencies are included in the worksheet, a switch may be set to allow the competency descriptions to display.
Switch to show competency descriptionInformation icon for competencyCompetency description
Switch for Competency Rating Calculation
To use the role readiness meter, you need to define how role readiness is calculated. There are two calculation types: averaging competency readiness or summing up the number of ready competencies.
Either calculation type requires the employee’s current competency ratings which can come from the latest rating from the performance review, average rating from 360 form or role readiness form. The default rating is the latest rating in the system
The default rating calculation switch is “off” which calculates role readiness using a score of either 1, for those competencies where a user met the expected rating, or 0, for those competencies where a user did not meet the expected rating.
For a proportional calculation for role readiness, add the switch for new_role_readiness_calculation with value “on”.
When the switch is set to “on”, each competency rating is weighted as a percentage of the expected rating. The average of each of the competencies rating those percentages determines role readiness.
The system calculates readiness for each required competency for a role, and then calculates an average of the competency readiness.
Switch for proportional calculation
If no switch is included, the default calculation is summing up the number of ready competencies.
Switch to launch form for current role
The Career Worksheet XML can be configured to allow employees to launch the Role Readiness Assessment form for their current role. This is accomplished with the following switch added to the Career Worksheet XML.
Will also need to identify the form to use when creating a current-self-assessment tag.
Tag to identify form to open
Once the Career Worksheet XML is imported in Provisioning with these updates, the Current Roles tab will contain a link to evaluate readiness.
Current roles tab with evaluate readiness
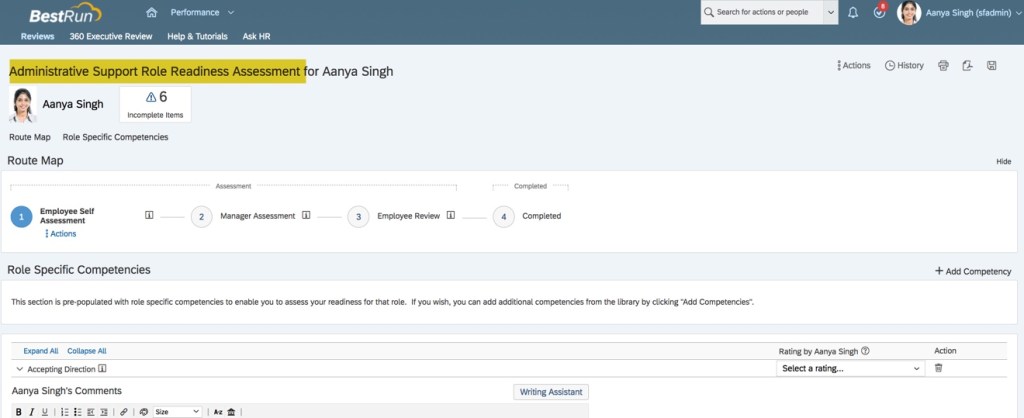
Click the link to open the form for the current role.
Current role Role Readiness Assessment form
Identify source of ratings
The default rating is the latest rating in the system. It is possible to identify a specific form or forms as the existing ratings source. First find the form ids in Provisioning>Form Template Administration.
Form ids for rating sources
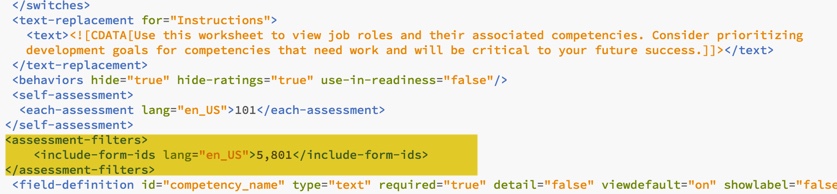
Next add <assessment-filters> tag to the Career Worksheet XML to identify the form to be used as the rating source.
Tag to identify form as the source of ratings
Action Permissions in the Template
The action permissions for create, delete and private access need to be defined.
The ability to view the content of the Career Worksheet and the actions that a role may perform are set in the Career Worksheet template.
Create permission allows users to add Job Roles to the Job Roles I’m Considering section of the Career Worksheet. This permission is also necessary for the Suggested Roles tab to be visible.
At the minimum, the employee role should be able to add targeted roles to the Career Worksheet. Based on your organization, you may decide that the manager or HR may add roles to the worksheet.
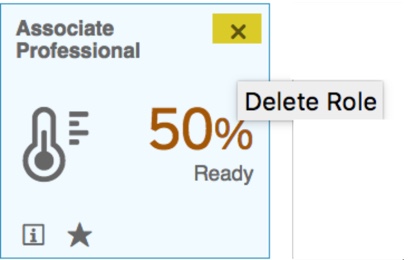
Delete permission allows a user to remove a targeted role from the job roles that they are considering.
At the very least, the employee role should be able to delete targeted roles from their Career Worksheet.
“X” allows employee to remove a target role from Career Worksheet
Private-access permission allows users to see the content in the “Job Roles I’m Considering” section of the Career Worksheet.
In addition, the Career Worksheet template will need to have the Share permission enabled. At the least, the employee role should be permissioned to allow sharing of a role in their plan.
Share permission for employee role
Additional Settings
For each targeted role and current role, there is an count of the number of employees for each targeted role and current role.
Count of employees in a roleTo see employee count
When this feature is on, and the Employee Directory to be enabled in Provisioning, there will be a link to see the list of employees in this role.
Indicator that shows number and listing of employees in a role
If the directory is not enabled, you will see the number of employees but there will be no link to the list.
If you don’t wish to see the employee count for the number of employees in a targeted role, the Career Worksheet XML will need to be updated to change cws-people-role from “true” to “false”.
Additional Configuration in Career Worksheet XML for Role Readiness Form
A link to the role readiness form within the Career Worksheet enables an employee to launch the form and rate the needed competencies for a future role. To enable linking to the correct form, the role readiness form id must be identified within the Career Worksheet XML.
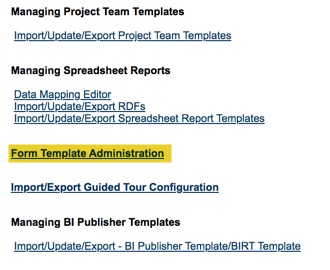
The Role Readiness Assessment form id may be found in Provisioning within the Form Template Administration section.
Form Template Administration section in Provisioning
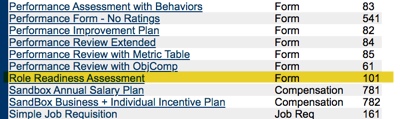
Go into Form Template Administration to see all of the form templates. Find the form id associated with the form that will be used to identify readiness for a role.
Templates within Form Template Administration
Using the form id associated with the Role Readiness Assessment template, add the self-assessment tag which includes the role assessment form id to the Career Worksheet XML.
The tag which includes the form id is inserted before the first field definition tag.
Self-assessment tag follows text replacement and behavior tags
If the form is used for multiple languages, include an entry for each locale with the Role Readiness Assessment form ID. You may have multiple entries using the same form id ut only but only one self-assessment form may be specified.
Multiple locales for Role Readiness Assessment form in Career Worksheet XML
Without the self-assessment tag in the Career Worksheet XML, the “Evaluate your Readiness” link will not appear in Career Worksheet.
View of Career Worksheet without “Evaluate Your Readiness” link
Career Worksheet access also allows a user to the “User Search” permission and to make the details of the Career Worksheet publicly available. The content will be restricted based on the Career Worksheet template permissions, so do not give all roles (*) read access to all Career Worksheet fields as shown below.
Read permission for all roles will enable users to search and view any Career Worksheets
To prevent users from seeing the details of any other user’s Career Worksheet, the permissions should be restricted in the Career Worksheet template. Limit the read permission for these fields to just the employee, manager and HR roles.
Read permission limited to employee, manager hierarchy and HR roles
Once the updates have been made to the Career Worksheet XML, import the template in order for the updates to be reflected in the Career Worksheet.
Succession Data Model Updates
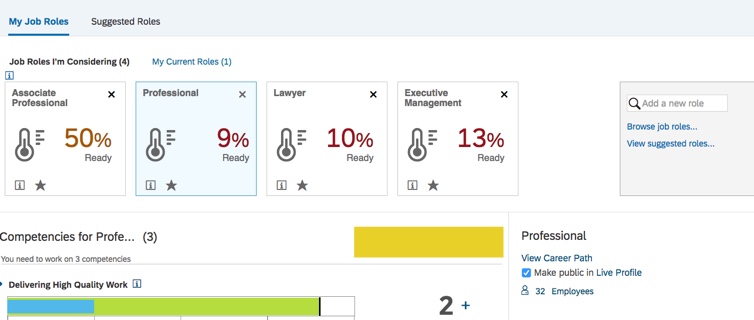
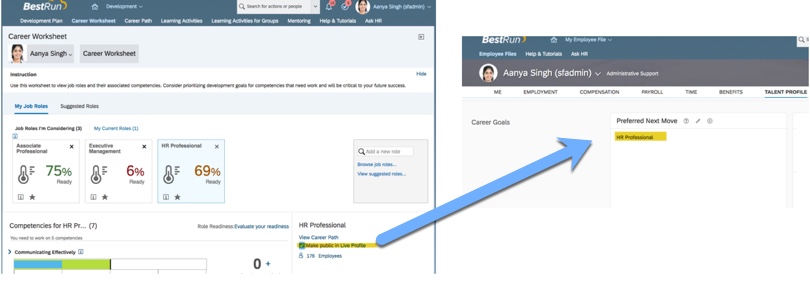
There is an indicator on the Career Worksheet which enables the employee to display any future role on their profile as a potential career move. On the Job Roles I’m Considering sub-tab, there would be a checkbox to make the future role public in their profile. This may be selected for each of the roles under consideration.
View of Career Worksheet with “Make public in Live Profile” option
When the indicator is set for any of the target roles, the role will be visible on the employee’s profile is the background element is set up in the Succession Data Model, configured in People Profile and role based permissions granted.
Target role displaying on profile
Any or all of the future roles can be set to display on their profile.
Indicator for each target role to appear on the profile
Select each targeted role and set the indicator in order for the role to appear on the profile.
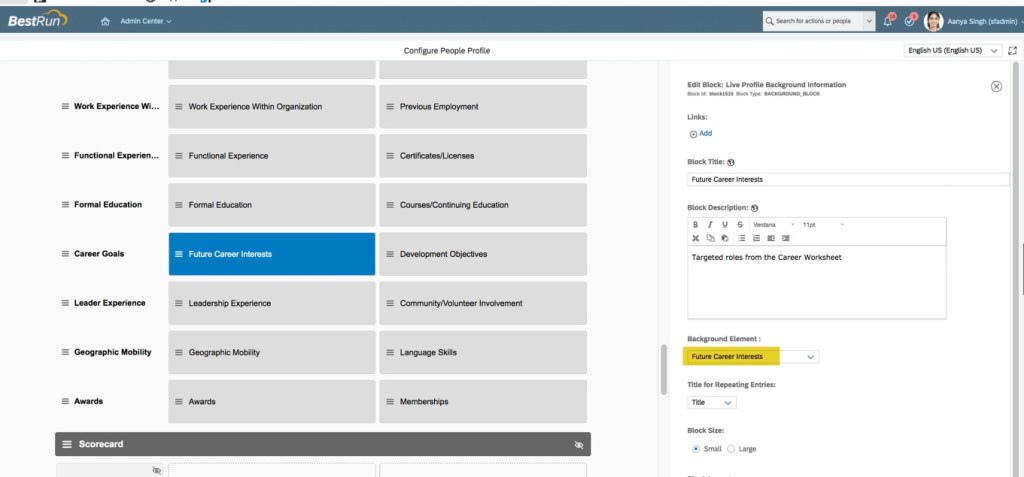
In order to enable this feature, the Succession Data Model must be exported from Provisioning in order to have the “preferredNextMove” background element added. The future job role on the Career Worksheet is used in the title field on the background element and is what will display in the profile.
Preferred Next Move background element
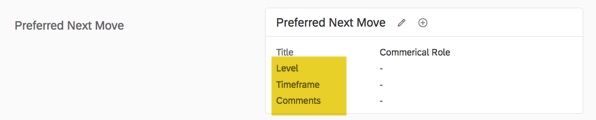
The background element’s Title field is required. Any additional fields that you wish to include on the background element should not be required. These additional fields are not displayed on the Career Worksheet. When the targeted role is selected on the Career Worksheet, it will then appear on the employee’s profile in the Preferred Next Move block. But any additional fields would be blank until the employee enters information. However these fields would not be seen on the Career Worksheet. It is probably best then to use only the Title field on the background element for Career Worksheet purposes and use another background element for Career Goals fields.
You may also relabel the background element; Future Roles, Career Goals, or any other name that is meaningful to your organization.
Here is an example of the background element that contains additional fields that are not required.
Preferred Next Move Background Element with Optional Fields
Any additional fields would appear on the block in the profile where they could be updated but would not reflect in the Career Worksheet.
Additional fields in Preferred Next Move block on Profile
Once the data element is added and the data model re-imported, the profile within the instance needs to include this element. Go to Configure People Profile to include this block.
Add block to Profile
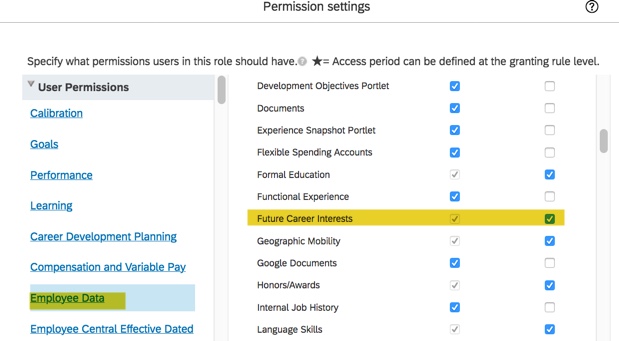
Add background element permission to any role that may edit or view this block on the profile.
Employee role permission to edit Future Career Interests
Role Based Permissions for Employee
In addition to the field permission granted to users within the template, the user will also need access to the Career Worksheet and access to the content of the Career Worksheet in the Development module.
Career Development Plan Access Permission allows access to Development.
Career Worksheet Access Permission allows access to the Career Worksheet.
Career Worksheet Suggested Roles Access Permission allows access to the Career Worksheet Suggested Roles tab.
Grant the required role-based permission so that the permitted roles can access Career Worksheet under Development.
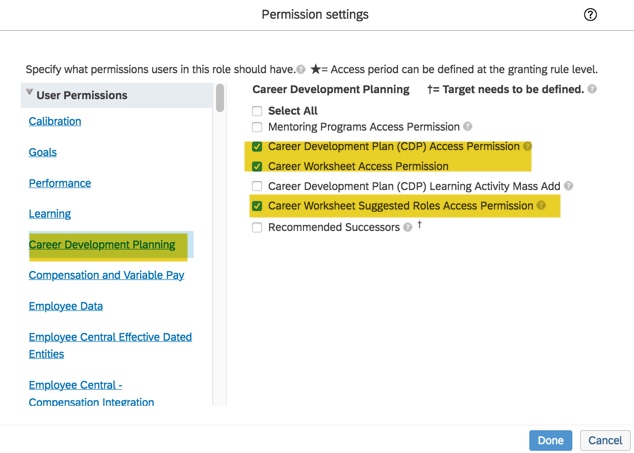
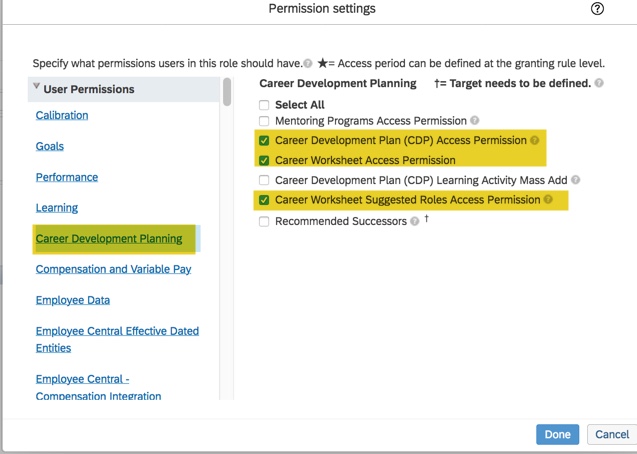
The employee role will need access to Career Development. Under the Career Development Planning User Permission, enable Career Development Plan Access Permission, Career Worksheet Access Permission, and Career Worksheet Suggested Roles Access Permission.
The employee role will need access to Career Development. Under the Career Development Planning User Permission section, enable Career Development Plan Access Permission, Career Worksheet Access Permission, and Career Worksheet Suggested Roles Access Permission.
Employee role CDP permissions
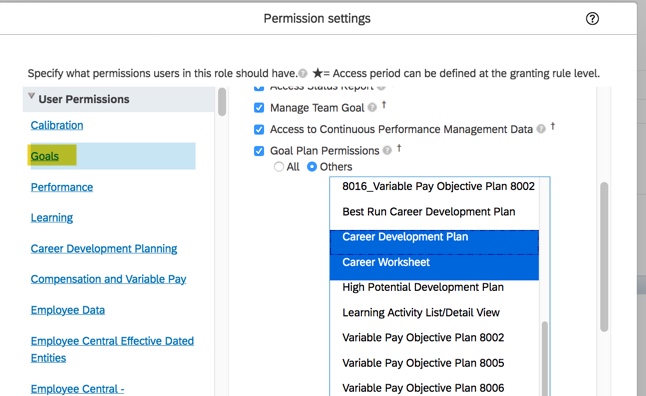
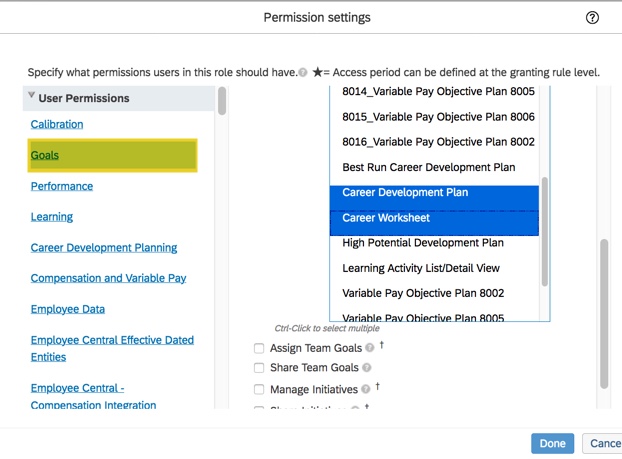
In addition to the Career Development Plan permissions, the employee will need access to the Career Worksheet. When the employee opens the Career Worksheet tab, they are not authorized to view the career worksheet plan without it. Under Goals, select the Goal Plan Permissions for the Career Worksheet.
Permission for Employee role to access the Career Worksheet
The target population of the “Goal Plan Permissions” is ignored when viewing the Career Worksheet.
Target population for a role
Career Worksheet access also allows a user to the “User Search” permission but the content will be restricted based on the Career Worksheet template permissions. To prevent users from seeing the details of any other user’s Career Worksheet, the permissions should be restricted in the Career Worksheet template.
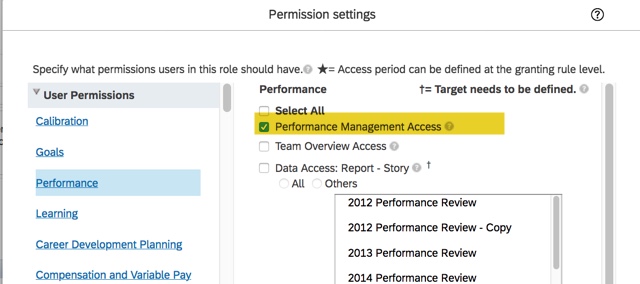
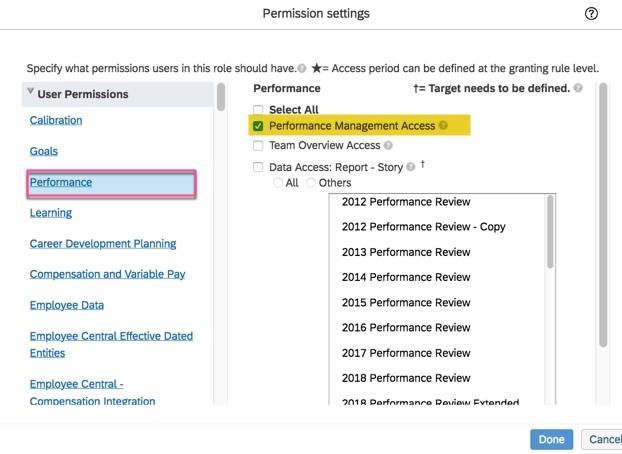
Performance Management Access permission is needed as well. Without it, “Evaluate your readiness” link will not appear on Career Worksheet when targeted roles exist.
Performance Permission for Employee Role
Now that the Career Worksheet is configured and permissioned, you are ready to create a Role Readiness Assessment form to be used within the worksheet. Check out the guide to set up the Role Readiness Assessment for more details.
For more information about the Career Worksheet and other talent management modules in SAP SuccessFactors, check out our book here!
Do you need help with your career worksheet or SuccessFactors Development implementation? Contact us at: info@worklogix.com
An employee is empowered to manage their career through the use of the SuccessFactors Career Worksheet. The Career Worksheet, a component of the Career Development module, allows an employee to view details about job roles that interest them, see the role’s associated competencies and select a targeted or future role. Once selected, a role readiness assessment form can be initiated to measure how ready an employee is for the potential future role.
The Role Readiness Assessment form, accessed from the Career Worksheet will identify competency gaps for the target role and help an employee plan development steps to prepare for the role. The employee’s proficiency for each of the role’s competencies is rated and an overall role readiness rating is calculated based on the employee’s actual competency ratings against the expected competency ratings for the role.
Before we look what is required to set up the Role Readiness Assessment form, let’s confirm that you are using development goals with competencies, Job Profile Builder (JPB), and the Career Worksheet. The remainder of this post is based on these assumptions.
Career Development Planning Settings in Provisioning
Before outlining the permissions needed for the Role Readiness Assessment form, let’s review the settings that are required for Career Development Planning.
To get started, you will need Provisioning access. Within Company Settings in the Goal Frameworks section, Goal Management Suite (Total Goal Management) and My Goals Tab should be enabled.
Goal permissions
Under Career & Development Planning in the Goal Frameworks section, enable CDP Full (Development Plan) which also enables Development Plan V12. Enable Career Worksheet which also enables Career Worksheet V12. Enable Career Path V2 as well so that Career Paths may be created and used by employees with the Career Worksheet.
CDP settings to enable
After enabling the Goal Frameworks settings, make sure Verions 12 UI framework (Revolution), Enable Generic Objects, and Enable the Attachment Manager are set as well.
Provisioning Settings for Job Profile Builder
The Role Readiness Assessment form relies on competencies linked to job roles. Competencies should be mapped to job roles using Job Profile Builder. There are some additional settings needed in Company Settings in order to use Job Profile Builder in the instance.
JDM v2.0 /Skills Management should be enabled.
JDM V.2-0 enabled in Provisioning
In order to use Job Profile Builder, the Competency Library Management Suite should not be enabled.
Competency Library Management Suite not enabled
A competency library which contains all of the competencies used for your organization is required. This is critical for the Role Readiness Assessment form to work. The form rates competencies linked to a role, therefore job roles must be linked to competencies in a competency library. Make sure there is a competency library in use. The SuccessFactors Competency Library 2.1 has the expanded list of competencies or you may create a custom competency library.
Competency Library
Career Development Templates in Provisioning
Three of the four templates used within the Career Development module may be found in Provisioning under Managing Plan Template: Development Plan, Learning Activities, and Career Worksheet.
Templates within Managing Plan Template in Company Settings
The fourth template, used for the Role Readiness Assessment form is found under Form Template Administration.
PM forms are found within Form Template Administration
Click on the link to see all of the existing templates. Scroll through the listing of form templates to find the standard Role Readiness Assessment template.
Role Readiness Assessment template within Form Template Administration
Career Worksheet V12 must be enabled and there should be a Career Worksheet template in order to see the standard Role Readiness Assessment template.
Career Worksheet Template in Provisioning must be present
Role Based Permissions for the Admin Role
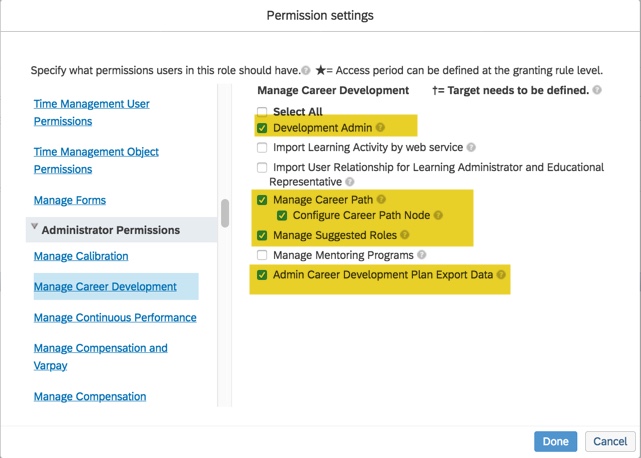
There are some role based permissions in the instance that must be set up for the system or HR administrator and employee roles. The admin role will need to manage and configure various features for Career Development Planning. In the instance, go to Manage Permission Roles. For the admin role, select Manage Career Development under the Administrator Permissions section.
CDP Permissions for Admin Role
To manage the Career Worksheet, Development Admin and Manage Career Path permissions are needed. Admin Career Development Plan Export Data permission is optional.
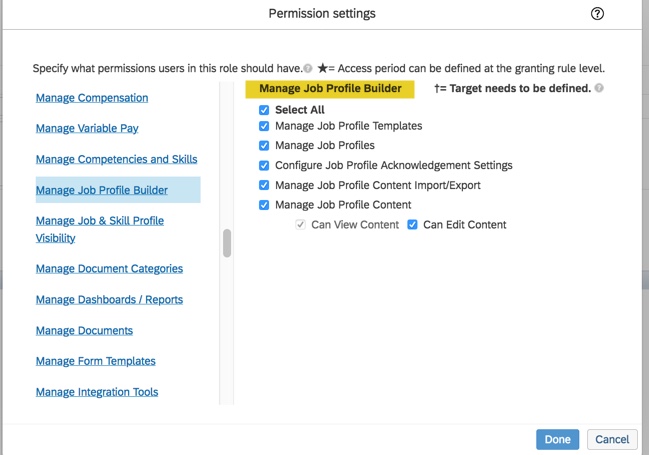
The admin role requires Job Profile Builder access in order to configure job profiles and map job roles and competencies to the profiles.
JPB Permissions
Access is also needed for components of Career Development Planning: development plan, Career Worksheet and suggested roles for the worksheet.
CDP permissions for the admin role
Under User Permissions>Goals, the admin role will also need access to the Career Development Plan and the Career Worksheet.
Goal Plan Permissions
Role Based Permissions for the Employee Role
The employee role needs to have permissions set up to be able to access the Role Readiness Assessment form. A link within the Career Worksheet will open the role readiness assessment form, bypassing the usual form creation steps.
Link to the Role Readiness Assessment Form
There are some role based permissions that need to be set up for the employee role for this link to work.
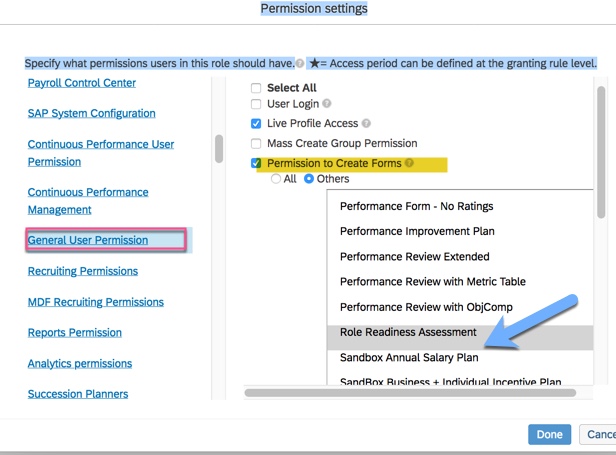
Grant “Permission to Create Forms” for the Role Readiness Assessment template
The employee role will need Performance Management Access under Performance User Permissions.
Permission needed for Performance Management Access
The employee role will also need Permission to Create Forms which is found in the General User Permission section. Select the Others radio button and select the Role Readiness Assessment form.
Employee role will need permission to create the Role Readiness Assessment form
This permission is in addition to CDP permissions that should be set for access to development plans, the Career Worksheet and Career Paths.
CDP Permissions
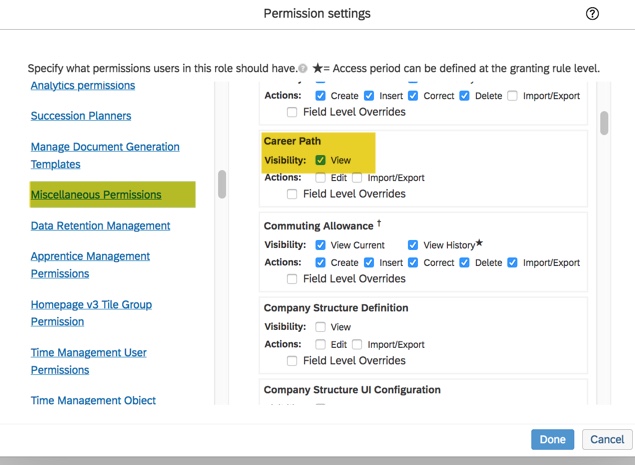
The employee role will need access to view the Career Path. This permission will allow the user to browse career paths from the Career Worksheet.
Permission to view Career Path
Under User Permissions>Goals, the employee role will also need access to the Career Development Plan and the Career Worksheet.
Goals Permissions
Competency Expected Ratings Set Up
Now that the employee role permissions are set, we will look at the competencies for a job role and how they are rated on the form. The goal of the Role Readiness Assessment form is to rate the employee’s mastery of the competencies needed for the targeted role.
It is within Job Profile Content where roles should be linked to competencies from the competency library.
Mapping competencies to a role
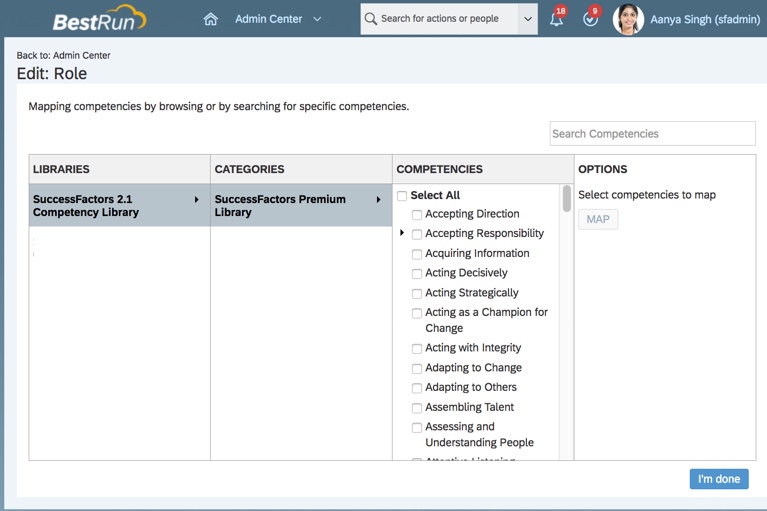
When mapping the competencies to a role, you will see the competency library to select from.
Select competencies in library to map to role
The system uses a calculation to compute a competency score which will demonstrate how ready an employee is for the targeted role. The role readiness calculation relies on an expected rating for each competency for a role. The readiness score is based on a comparison between the employee’s actual competency rating with the expected competency rating. Rating the roles’ competencies also identify areas of development that are needed in order to succeed in a future role.
The expected rating is configured within Job Profile Builder on the job role’s mapped competencies. The admin defines the expected competency ratings for each job role.
Assigning Expected Ratings to Role Competencies
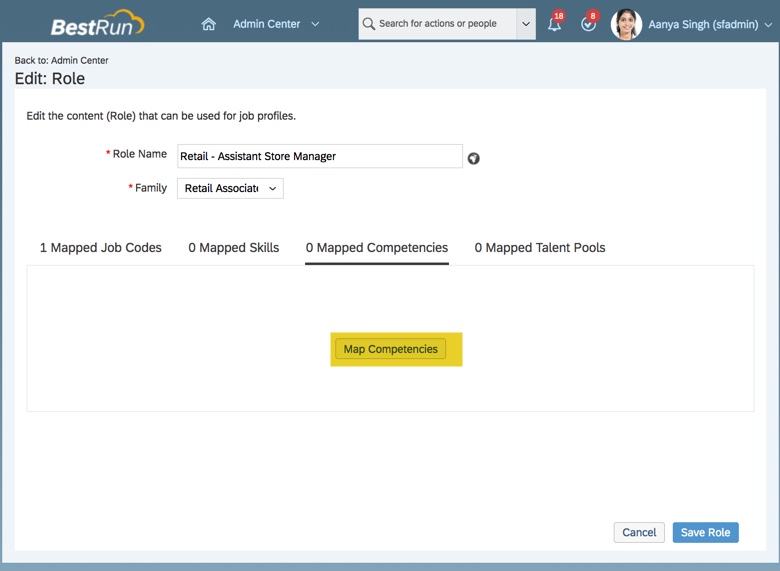
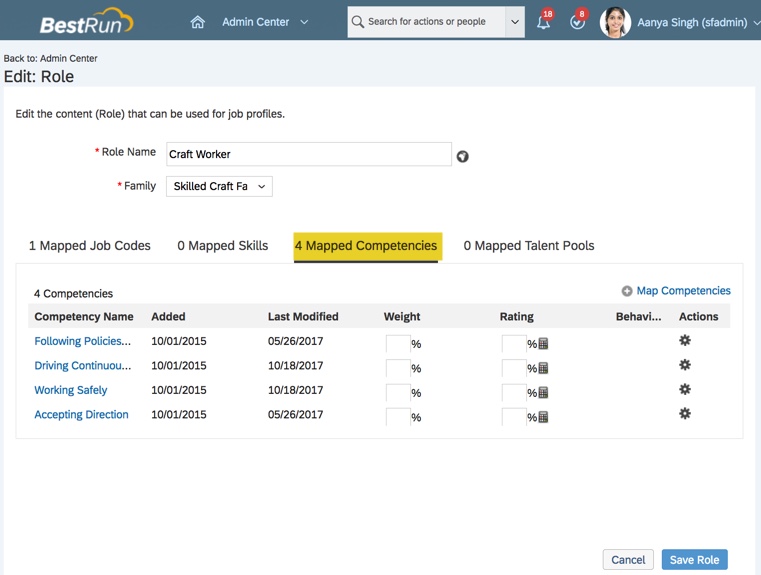
In order to set the expected ratings for each competency on a job profile (a job role is attached to a profile), go to Manage Job Profile Content>Set Up Families and Roles.
A job role is associated with a job profile. Select a role to update by clicking on the role name. The content of the role will now be editable.
Role in Edit mode
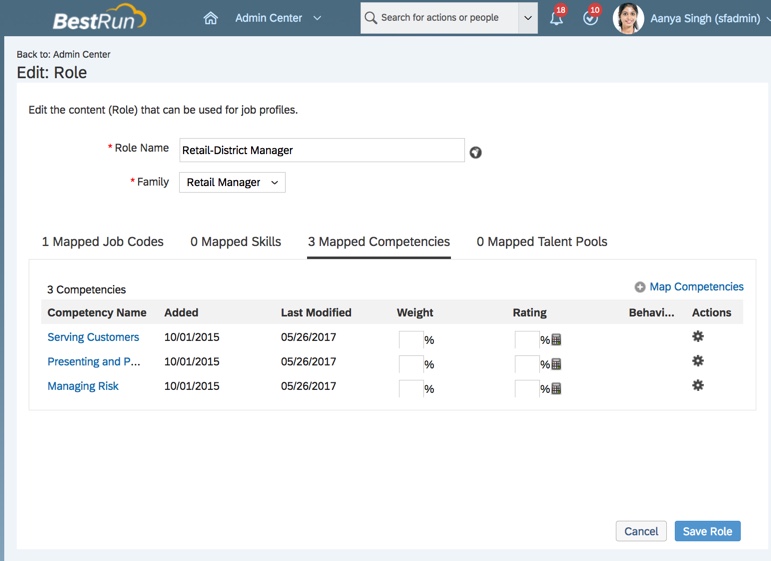
The screen will have tabs for mapped job codes, mapped skills, mapped competencies and mapped talent pools. Each tab will include a count for the mappings.
Go to the Mapped Competencies tab. Any competencies that are mapped to the job role will display. Competencies must be mapped to a role in order for the Role Readiness Assessment to work. If a role does not have competencies and it is selected as a target role, the Role Readiness Assessment form will not have any competencies to rate. So be sure to map competencies to each role.
Mapped Competencies for Role
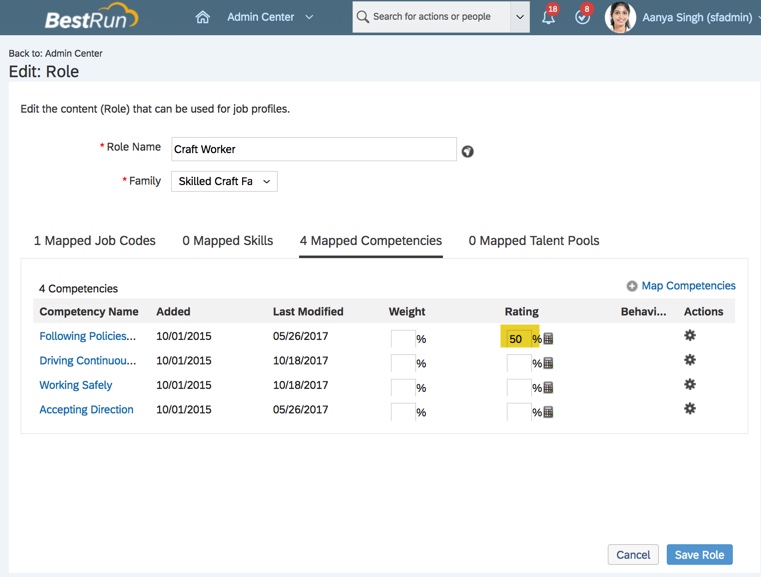
The Rating column that is needs populated for each competency mapped to a role. The rating column is used to add the expected ratings and % weight for each competency. To create the expecting rating for a competency, click on the calculator icon in the Rating column.
Select icon to set rating
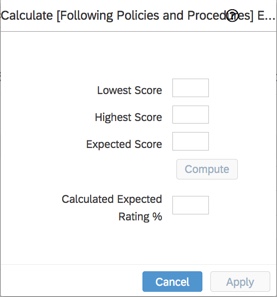
Scores are entered on the pop up to determine the expected rating % for the competency.
Enter lowest, highest and expected scores for a competency
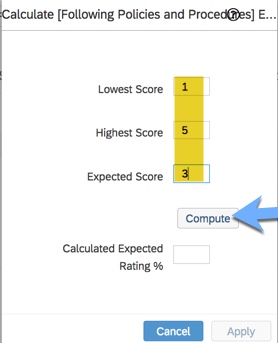
Based on the rating scale used on the Role Readiness Assessment form, enter the lowest and highest scores in the rating range along with the expected proficiency rating. In this example, the readiness scale has scores 1 to 5 with 1 being the lowest score and 5 being the highest score.
Compute becomes active once the scores are entered
Assign an expected score. This would represent proficiency needed to succeed in this competency. The Compute button becomes active once the 3 scores are populated. Click on the Compute button and the calculated expected rating % is computed. Click the Apply button to finalize the calculation.
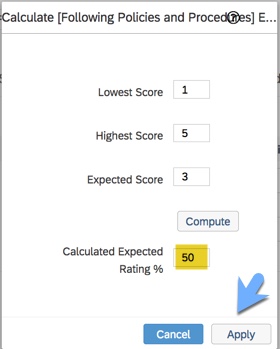
Click Apply button to confirm rating
After computing, the calculated expected rating % is populated for the competency. In this example, using a rating scale of 1-5, the expected rating is 50% of the highest score.
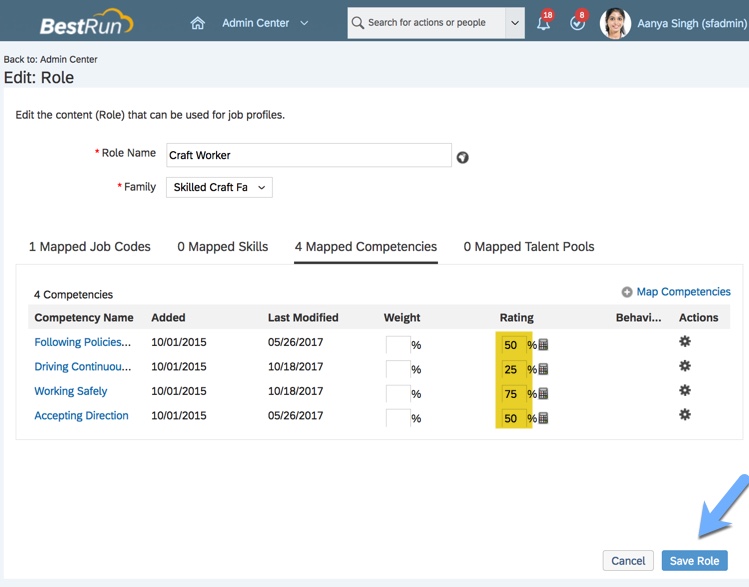
After applying the calculation, back on the Edit: Role screen, the rating % is populated.
Expected rating set for a competency
Continue to create the expected rating for each competency for the role. Once all of the ratings are populated, save the role.
Save Role to apply expected ratings for each competency
You may also fill in the weight column to identify how much weight each competency holds. If left blank, the competencies are weighted equally in the overall readiness calculation.
You will need to identify the competencies mapped to every role and setting the expected rating for each.
Targeted Job Roles without Mapped Competencies
As mentioned earlier, Job profiles (with associated role) need to have mapped competencies in order for the Role Readiness Assessment form to work properly.
To better explain why this is critical, here are 2 examples.
Example #1: Role without competencies.
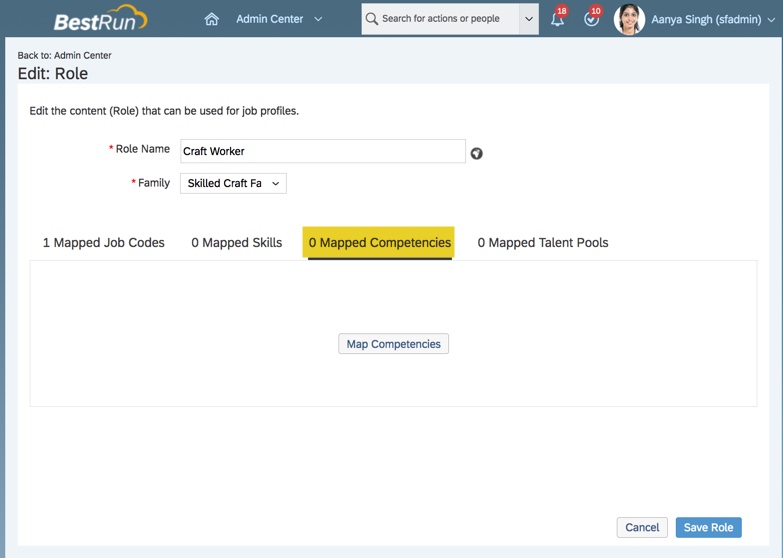
Within Manage Job Profile Content>Set Up Families and Roles, here is a job role that has no mapped competencies.
Role with no competencies
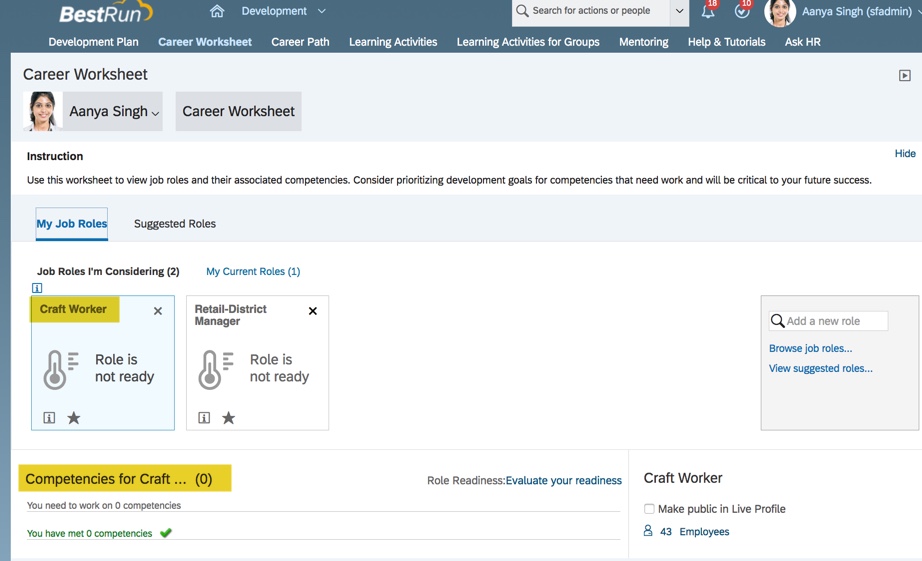
When this role is selected in the Career Worksheet, there are no competencies listed.
Targeted role without competencies on Career Worksheet
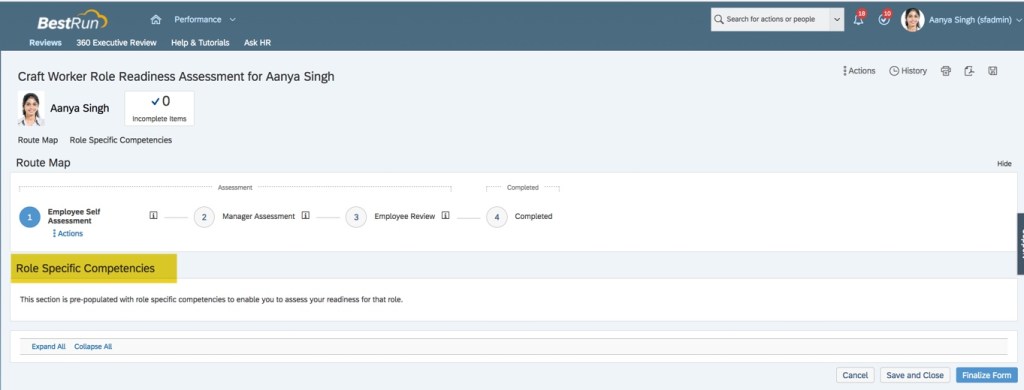
And when the employee selects the target role to evaluate their readiness, the form will have no competencies to rate.
Role Readiness Assessment form without mapped competencies
If the role does not have competencies, it is impossible to evaluate an employee’s readiness for the role. The readiness meter will not calculate readiness for the role and there will be no gap graphs since there are no competencies.
Targeted Roles with Mapped Competencies but no Expected Ratings
Example #2: Job role has mapped competencies but no expected ratings
If a job role does have mapped competencies but the expected ratings are not set, there will be issues as well.
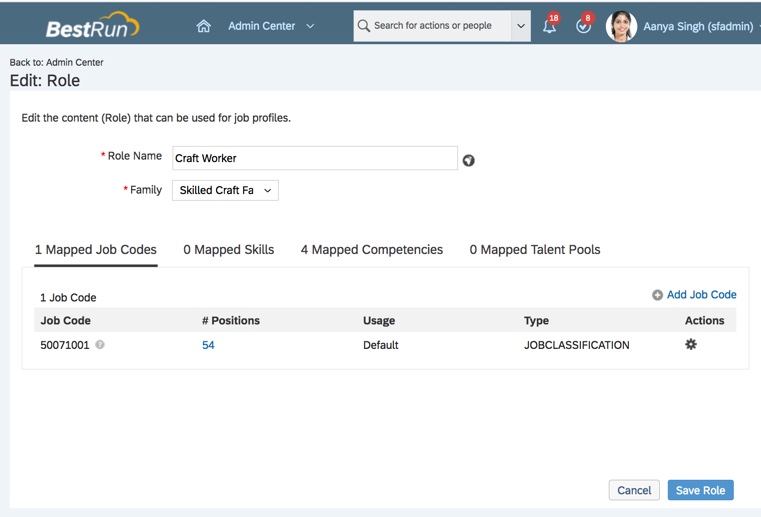
Here is a job role with mapped competencies. However, the role does not have any expected ratings set for the competencies; the rating column for each competency is blank.
Roles has mapped competencies but no ratings
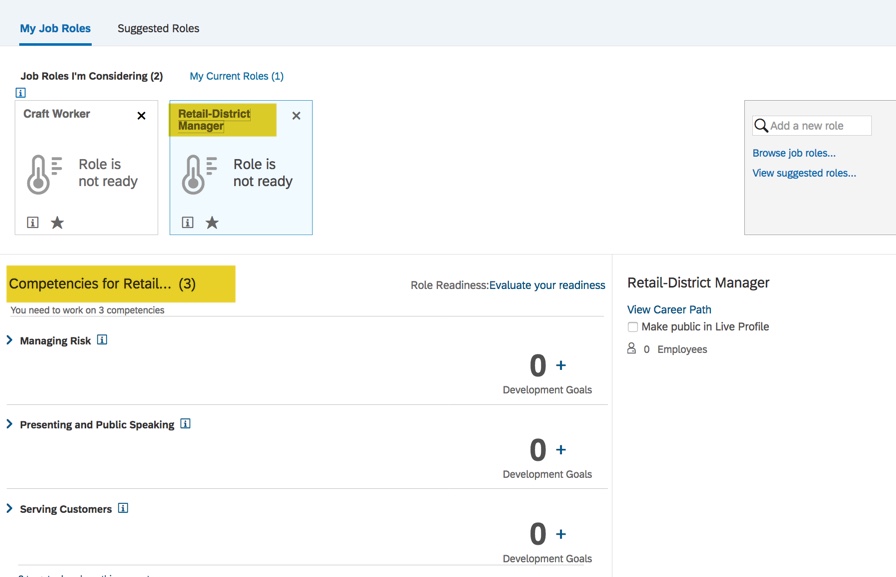
If an employee selects this role to evaluate in the Career Worksheet, the three competencies are listed for the role.
Targeted role with competencies
So this part works correctly; the competencies display for the target role.
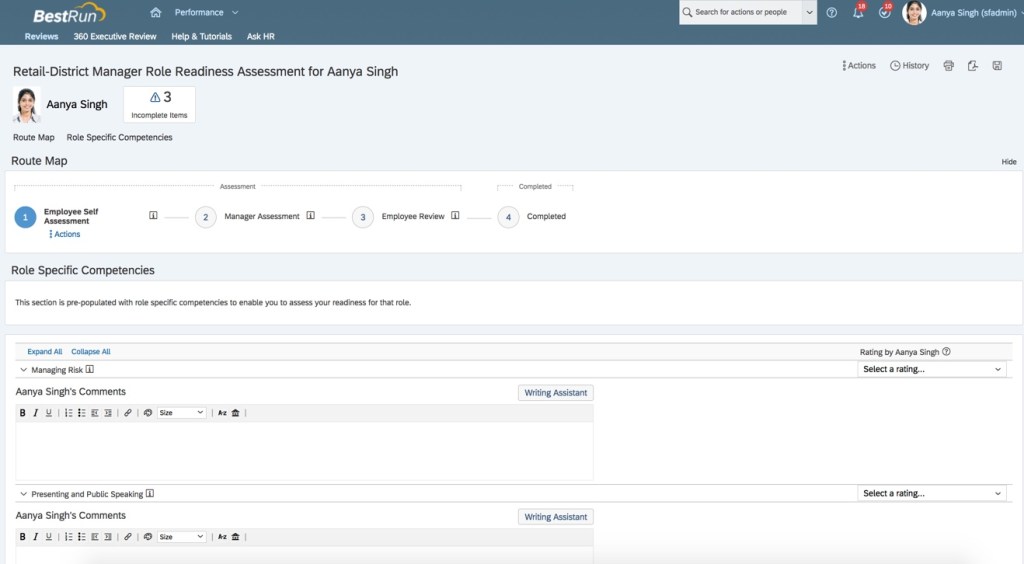
And the employee can go into the Role Readiness Assessment form and is able to rate on each of the competencies.
Role Readiness Assessment form with competencies
The issue occurs back on the Career Worksheet upon form completion. The Readiness Meter for the role has not calculated the readiness percentage. The calculation needs expected ratings and without them there is no readiness. So “Role is not ready” will display instead of a readiness percentage.
Readiness Meter does not show readiness %
In addition, the gap graph for each competency only shows the actual rating and not the expected rating.
No expected rating on gap graph
Without expected ratings for each competency, the gap graph will only display the actual competency rating.
Hopefully these examples point out the pitfalls of not having mapped competencies for roles as well as roles having mapped competencies but no expected competency ratings.
Other things to consider
If any of the roles being considered have mutual competencies, the readiness meter will populate for all of them after a role assessment is completed. In other words, if an employee has selected a few targeted roles that share a competency, when a role readiness assessment form is completed for one of the roles, the readiness meter will calculate readiness for any other targeted role that has the competency. Since expected ratings can vary by role, the same competency might display different gap values for different roles.
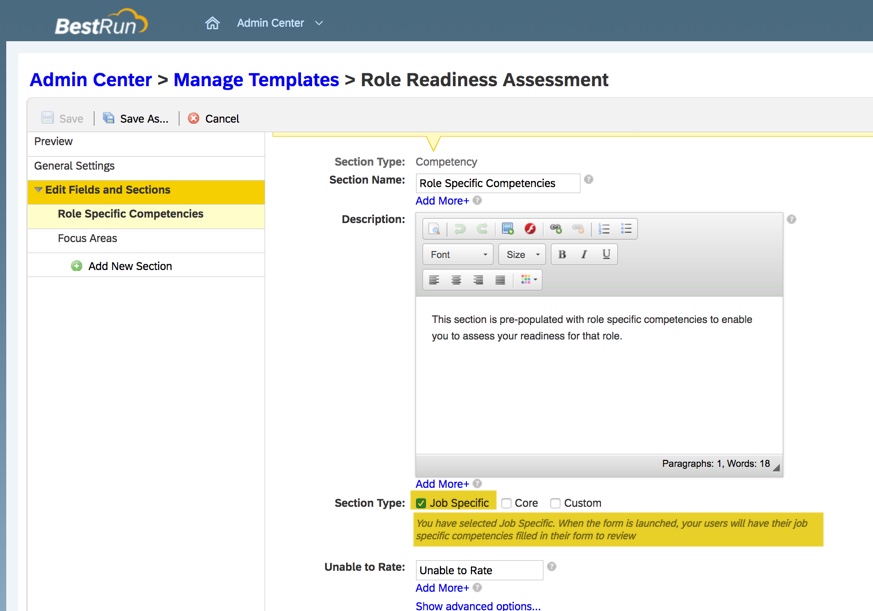
The form should be configured to auto-populate all of the competencies for the role. The form template should show that the competencies are job specific.
To use job specific competencies in form
This can be set in the template in the instance by selecting Job Specific.
Selecting Job Specific Competencies to appear on the form
Ratings Calculation
Role readiness may be calculated in one of two ways:
Summing up the number of competencies for the role
Averaging out the competency readiness
Summing
Role readiness can be calculated as the percentage ratio between employees’ ready competencies and the total of required competencies for the role. Each expected rating met is worth a full point and each rating not met is worth zero.
The calculation would look like this:
(number of competencies the employee is ready for)/(total number of required competencies) * 100%.
To be “ready” for a competency, the system checks the employee’s current rating and the expected rating. If the current rating is equal to or greater than the expected rating, the employee is considered ready for this competency. The competency is then assigned a value of 1.
The system will then count up all the “ready” competencies to use in the calculation.
Here is an example. The targeted role has 5 competencies, each with an expected rating of 4. The employee has competency ratings below the expected ratings for 3 of the 5 competencies. The equation would be: (2/5) * 100%. The readiness for the role would be 40%. This percentage would appear on the readiness meter for the role on the Career Worksheet once the form is completed.
Averaging
A new option introduced in 2018 is a proportional calculation in which each competency rating is weighted as a percentage of the expected rating. A readiness score calculated proportionally may be more accurate in showing how close an employee is to full role readiness.
In this method, the readiness for each competency is determined and then an average is calculated for the role readiness percentage.
The system identifies readiness for each competency:
100% for any current rating that meets or exceeds the expected rating.
0% for no current rating for competency
0 for no expected competency rating
when current rating is less than the expected rating, readiness is determined by calculation: (current rating – lowest rating in scale)/(expected rating – lowest rating in scale) * 100%
Once a percent readiness is determined for the role, the percentages are tallied. The sum is then divided by the total of competencies for the role.
To use the average calculation method, the Career Worksheet XML must contain the following switch:
If no switch configuration is added, the default calculation for role readiness is summing.
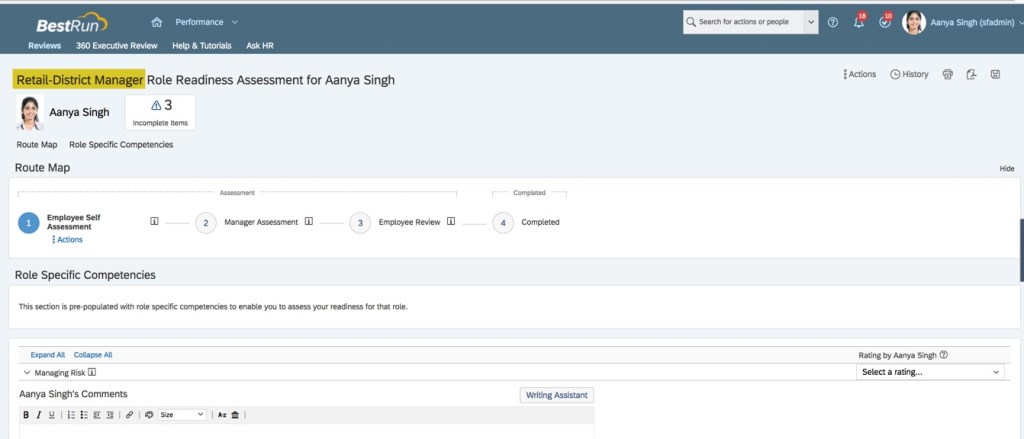
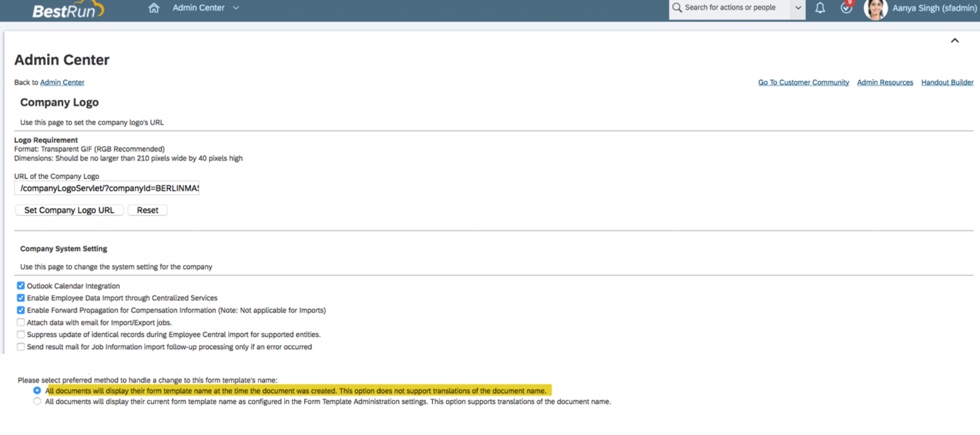
Display Targeted Role Name in Title of Role Readiness Assessment form
The title of the self-assessment form contains the targeted role name.
Form with targeted role name in title
This occurs when the Company System and Logo Settings have “All documents will display their form template name at the time the document was created.” enabled. This option does not support translations of the document name.
Setting for role name on form
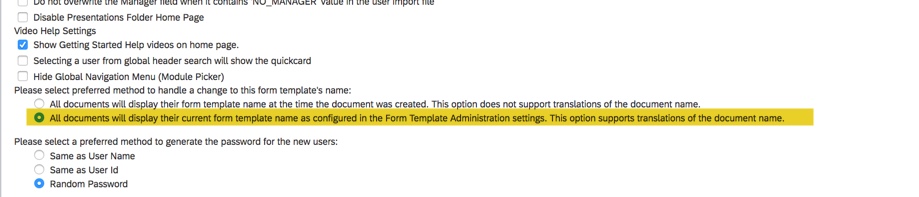
If “All documents will display their current form template name as configured in the Form Administration settings. This option supports translations of the document name.” is enabled, the form will not contain the target role name.
Setting to omit role name on form
When form is run with this setting, the targeted title is omitted.
Form without role name displayed in title
Troubleshooting: Evaluate your readiness link not appearing on Career Worksheet
After setting up the Role Readiness Assessment template the Evaluate your readiness link is not visible on the Career Worksheet. Here are some possible reasons for not seeing the link:
The Role Readiness Assessment form has not been configured in the Career Worksheet template (it needs to be configured for each locale). In order for the link from the Career Worksheet to the Role Readiness Assessment to work, the readiness form template ID must be identified in the Career Worksheet XML.
Employee role does not have the “Performance Management Access” permission in RBP and/or does not have “Permission to Create Forms” for the assessment template that was configured.
Proxying as the employee and trying to launch the Role Readiness Assessment form. This is a self-assessment function and the action is not supported by proxy feature. So, the “Evaluate your Readiness” link will only appear to the logged-in user directly (it will not appear if you are proxying as the user).
Tag for Role Readiness Assessment template
When the form is used in multiple languages, there needs to be one entry for each.
Troubleshooting: Role Readiness Percentages Not Appearing on Career Worksheet
Once the Role Readiness Assessment is complete, the role readiness percentages should appear for each targeted role. If the percentages do not appear, make sure the same rating scale is used for the Role Readiness Assessment and the Career Worksheet.
Readiness Scale referenced in Career Worksheet XML
Make sure the rating scale referenced in the career worksheet XML is the same as the role readiness template rating scale. Otherwise, once role readiness form is done, the percentages will not display.
Readiness Scale referenced in Role Readiness Assessment XML
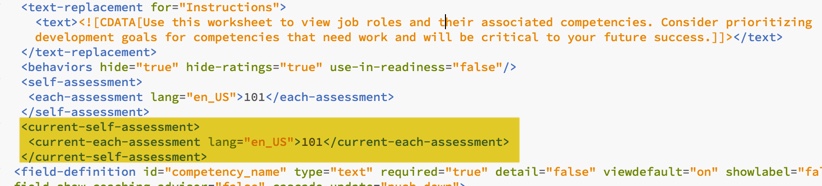
Launching Role Readiness Assessment for Current Role
The Career Worksheet XML can be configured to allow employees to launch the Role Readiness Assessment form for their current role. This is accomplished with the following switch added to the Career Worksheet XML.
Create a current-self-assessment tag making sure to identify the form to use.
Tag to identify form to open
After the updated Career Worksheet XML is imported in Provisioning, the Current Roles tab will contain a link to evaluate readiness.
Current Roles tab now has link to evaluate readiness
Click the link to open the form for the current role.
Role Readiness Assessment for Current Role
Some final reminders
Competency ratings are not differentiated by role; if current and targeted role share a competency, rating will apply to both.
Do not calculate an overall performance rating with the form.
If a competency is defined in a specific language but the employee signs into the system in a different language, that competency will not appear in the form.
Competency ratings are not differentiated by role; if current and targeted role share a competency, rating will apply to both roles.
When employees open the Career Worksheet, the role readiness shown in the worksheet is always calculated based on the latest ratings.
Route the form to the manager for a final rating, do not have the employee enter the rating of record.
Only ratings from completed forms are displayed in the Career Worksheet.
Do you need help setting up the Role Readiness form or your SuccessFactors Career Development Implementation? Contact us at: info@worklogix.com