The SuccessFactors performance form has an audit trail on the Form Information page which shows the chronological log of actions, users, and comments as a form moves through the workflow steps.
The audit trail provides benefits to the organization, the manager and the employee. It provides transparency by showing history of actions taken on the form, acts as legal evidence in disputes and grievance, is useful in error tracking and facilitates internal and external audits by providing traceable documentation.
Let’s look at what the audit trail delivers.
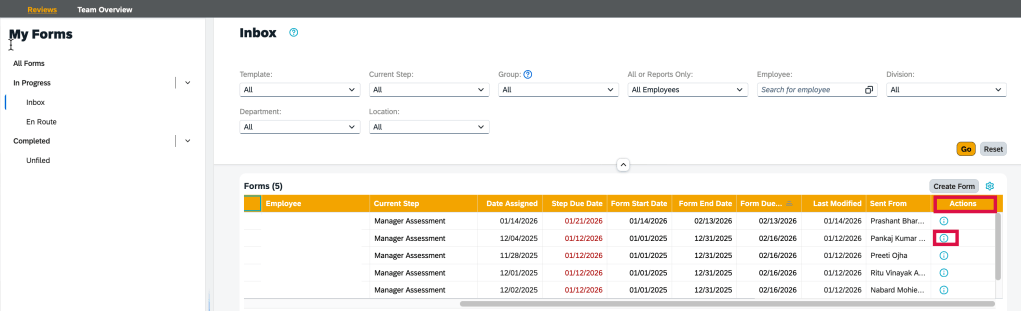
There are 2 ways to see the audit trail.
The Blue Information icon displays in a user’s inbox in the Actions column.
Info icon to access the audit trail for a form
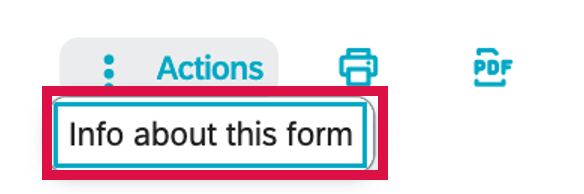
Within the form, go to Actions at the top of the page and select “Info about this form”.
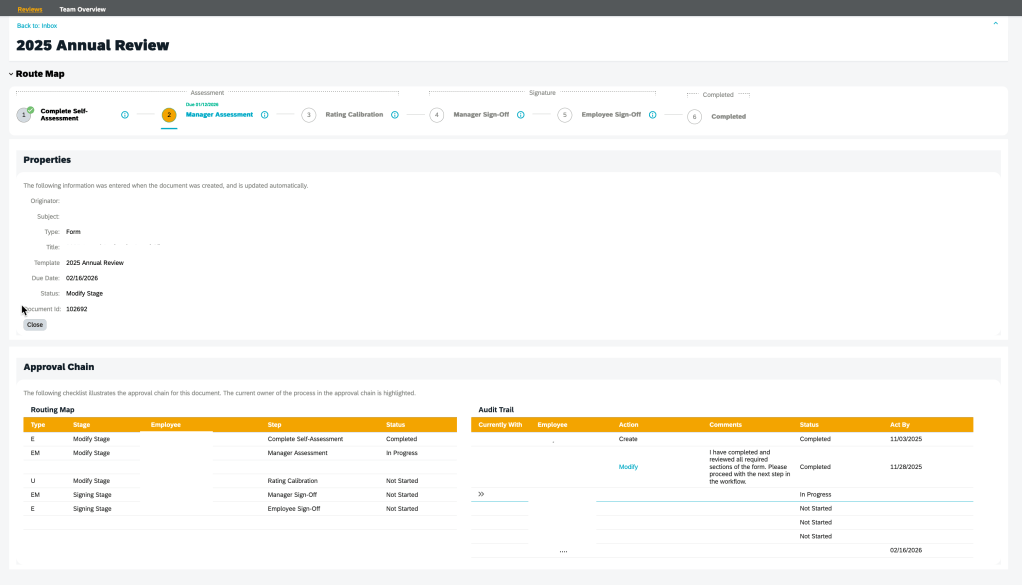
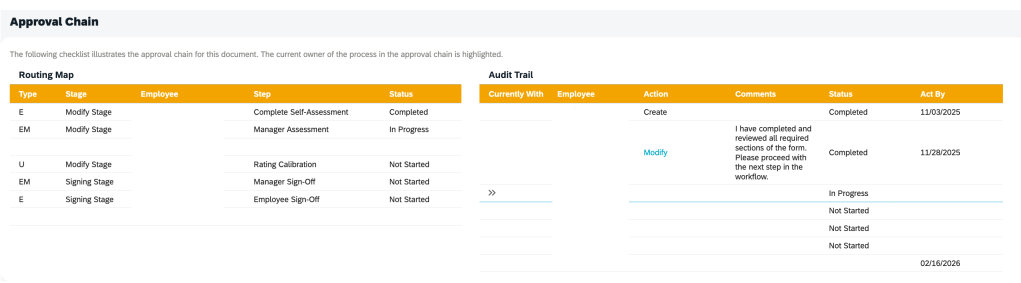
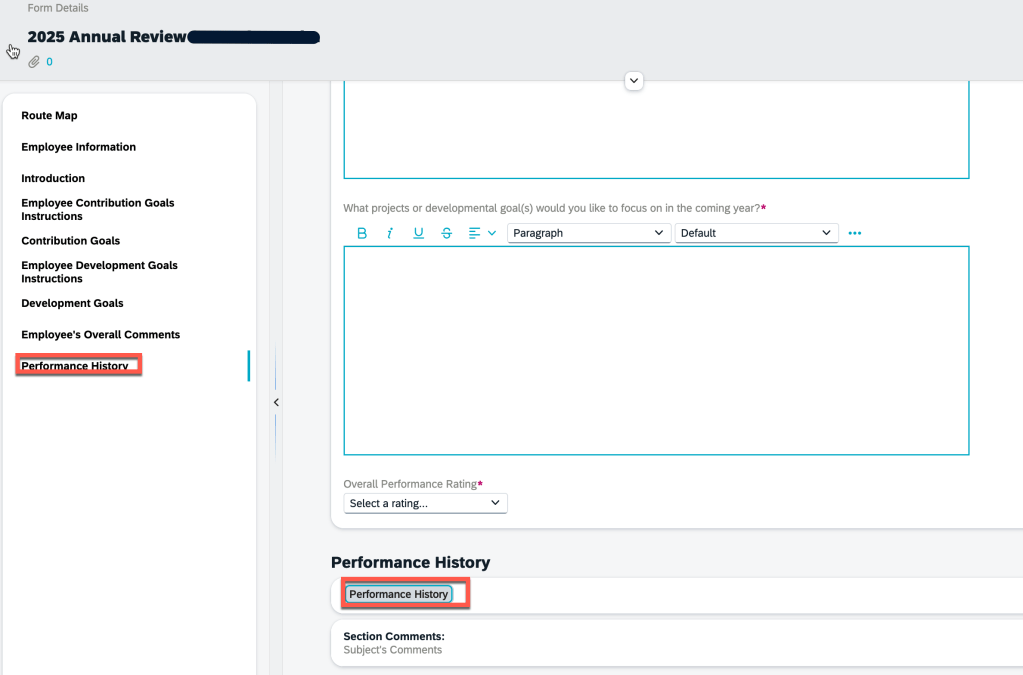
View Audit Trail of Form
The Form Information view displays. The Route Map, Properties and Approval sections display.
Form Information Page
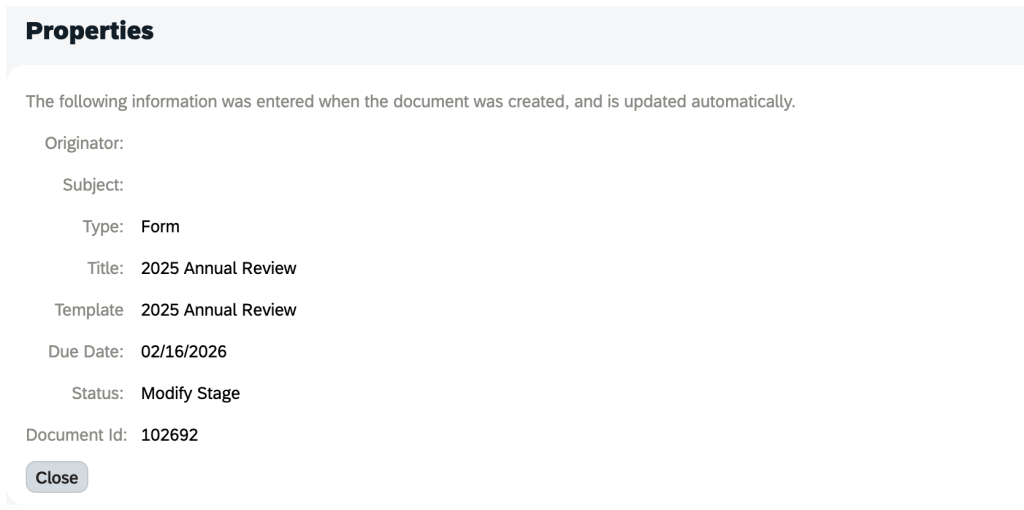
The Properties section shows the information present at the time the form was created and includes the user who generated the form, the form subject, type, form title and template and status.
Form Properties
The Approval Chain section is comprised of the Routing Map and Audit Trail information for the form.
Audit Trail for Performance Form
The Routing Map section displays the Step Type, Stage, Employee, Step, Status for the form.
The Audit Trail shows a chronological log of users within the workflow and the actions taken.
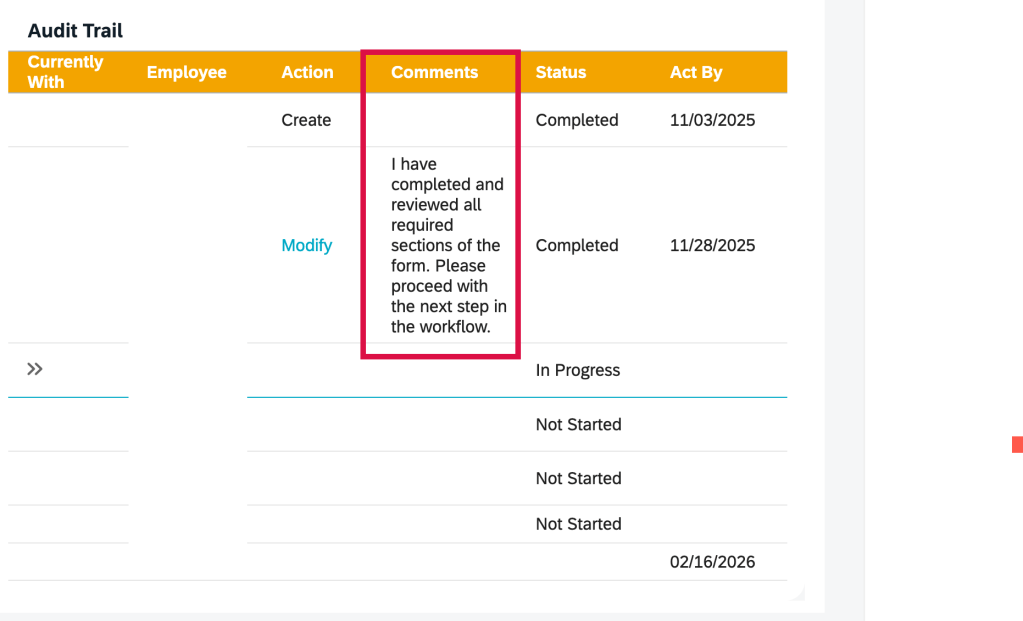
The Audit Trail section entries are created when a form moves from one step to the next and will show you the following information: Currently With, Employee, Action, Comments, Status, Act By.
Iterative and Collaborative steps are not shown.
Entries in the audit trail are only created when a form moves from one step and shows the routing history of the form.
In the Action column, you can find the changes employees made to a form. Click the link in a step to open a form and view what the form at that step. Employees cannot drill into steps which they do not have permission to.
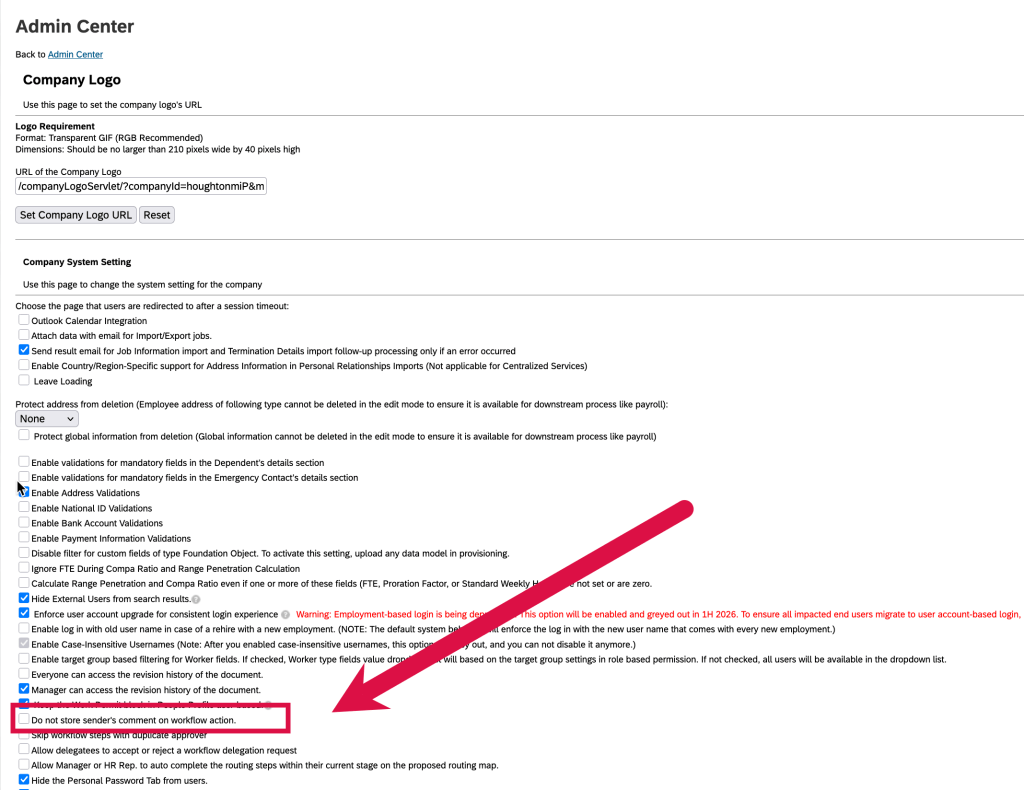
Access to the step link is affected by the following two options from Admin Center > Company System and Logo Settings:
Everyone can access the revision history of the document. Allows users to access the revision history of each document for which they were on the approval chain. When you select this option, your users can go to the Documents Information page and view a read-only snapshot of the document as it was in each stage of the workflow.
Manager can access the revision history of the document. When you select this option, the manager can go to the Documents Information page and view a read-only snapshot of the document as it was in each stage of the workflow.
However, there is no option to determine whether users have opened the form.
The Comment column includes the system comments and the e-mail notification comments entered by the sender when sending the form to the next step.
Email notification and system comments
If you do not want the sender’s comments to be stored and displayed in the Audit Trail section, go to Admin Center > Company System and Logo Settings, and select “Do not store sender’s comment on workflow action”.
Advanced Settings of Performance Template
Reporting
Reporting can be done on the audit trail records of the form completed steps by using the Audit Trail table in the Performance Management schema in Story reports.
Reportable fields include step owner, step action, date time when a step was completed, and system and user comments.
You can also join the Audit Trail table with the Next Route Step and Previous Route Step tables in the Route Entry schema to report on step information.
In Closing
The most successful SuccessFactors implementations aren’t defined by how much functionality is turned on—but by how intentionally it’s designed.
At Worklogix, we help organizations make these decisions with adoption, scalability, and business impact in mind—so talent processes don’t just exist in the system, but actually work in practice. Do you need help implementing or supporting your SAP SuccessFactors system? Contact info@worklogix.com for assistance.
Having forms automatically route to the next step can be a efficient method to keep the performance process moving along but there is a wrinkle that can cause lots of manual intervention and even trap you in time loop.
It all starts with the route map
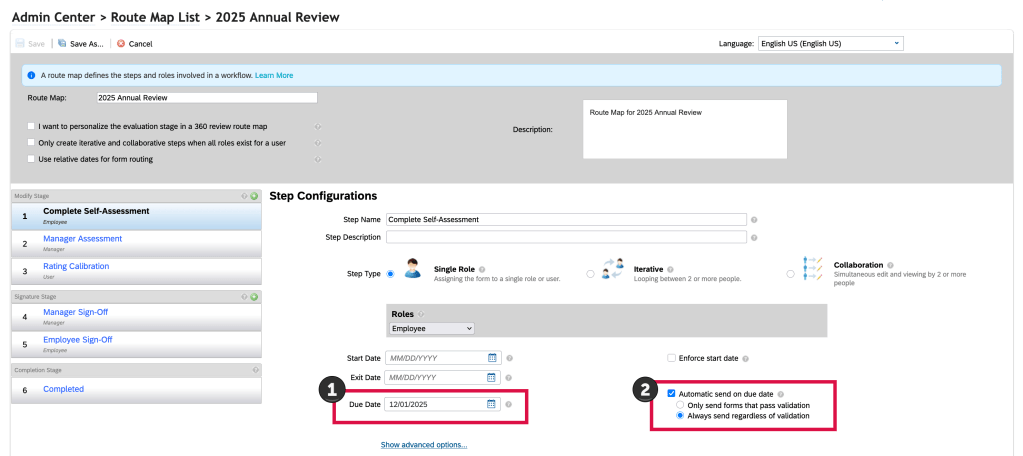
First let’s look at the route map associated with a performance template.
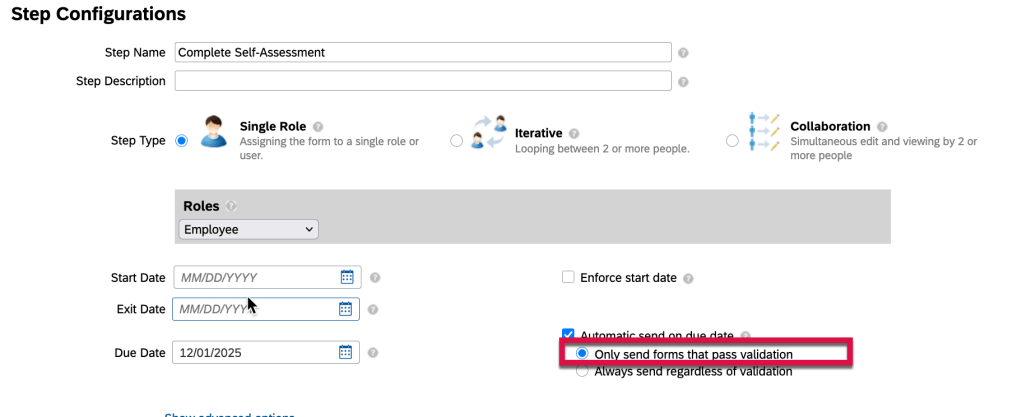
Route maps can be set up to have forms auto route on a designated step due date. Any or all steps can have the forms move based on when you decide the step is due. This means any forms sitting in this step on the step due date will automatically route to the next step the following day.
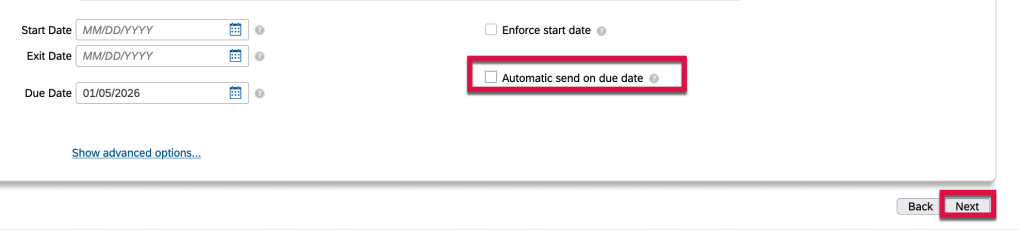
The settings for this auto routing are shown below.
Route Map Auto Route Form on Step Due Date
First, identify a due date for the step (1) and then enable the “Automatic send on due date” box (2).
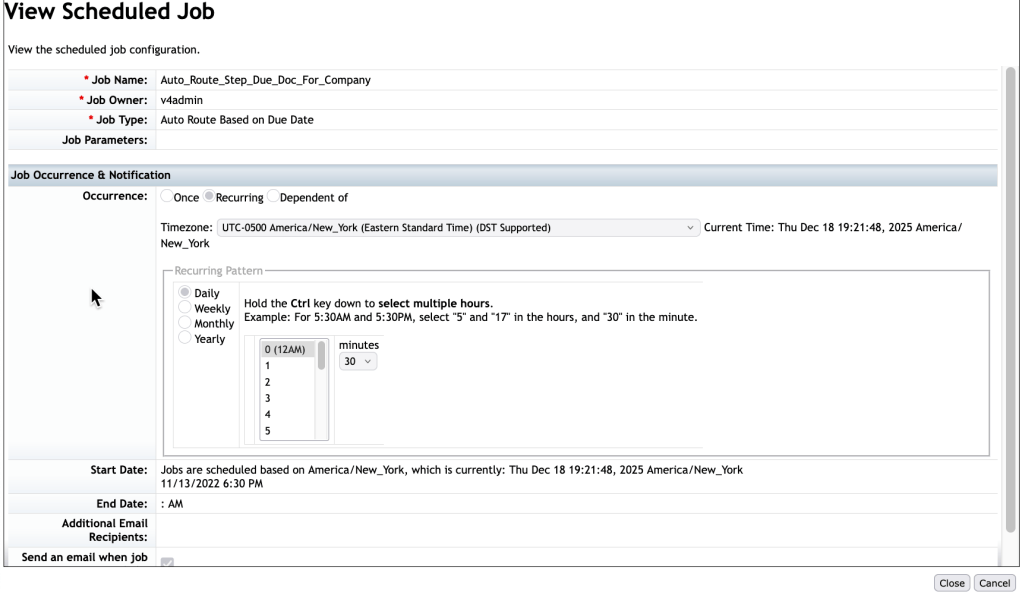
In order for this auto routing to work, a background job needs to be set up in Provisioning. In Provisioning, go to Manage Scheduled Jobs . Here the Auto Route Based on Due Date job needs to be set up and should be configured as a recurring job running nightly.
“Auto Route Based on Due Date “Job
An example of the job details are shown below.
Details of “Auto Route Based on Due Date” Job
In the example, the job is scheduled to run daily, 30 minutes after midnight.
It is best to have the job scheduled to run after midnight so the forms will route immediately at the end of the step due day.
Now the route map is set up with the auto route step due date(s), the background job is set up and the forms are launched.
Once the performance review process is in flight, forms will progress through the workflow. With the scheduled background job running nightly, any form still in a step on the auto route due date will automatically route to the next step at the end of day.
Potential Gotcha
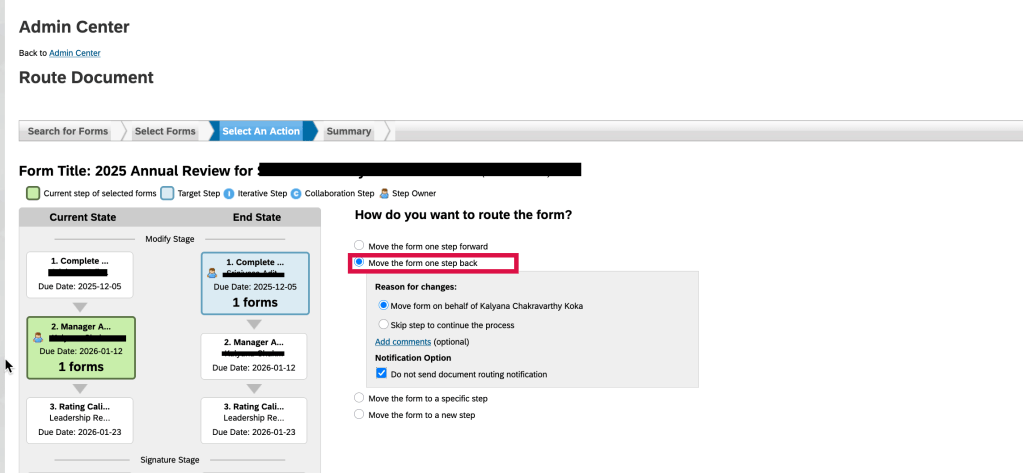
This is where a gotcha may lie. The admin can manually send a form back or a user in the current step can send to the form to the previous step. A hiccup can occur after the step due date when a form is returned to this step.
In this example, a user may ask that a form be routed back a step. The admin would have to route the document back.
“Route Form” action to move a form back a step
Another way to have a form move back a step is to have the template configured to allow the form to go back a step.
Button to send form back one step
In either case, the form had auto routed to the next step, but was then routed back to the prior step. If the employee does not make updates to the form that day, that evening the form will route forward again to the next step.
This bears repeating. If a form is routed back to an auto route step, if no action is taken on that day, the form will auto route forward again at the end of the day.
Even though the step due date has passed, if a form resides in that step, it will auto route again the next time the background job runs. This can cause a lot of manual rerouting of forms if the form is not actioned upon the day that the form is routed back.
Workaround
There are a few ways to handle this time loop.
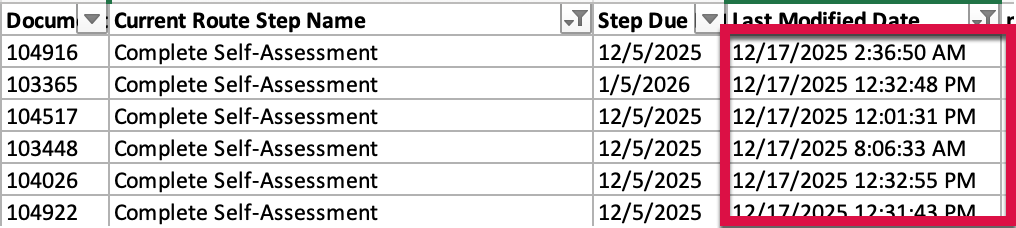
Updating Just a Few Forms
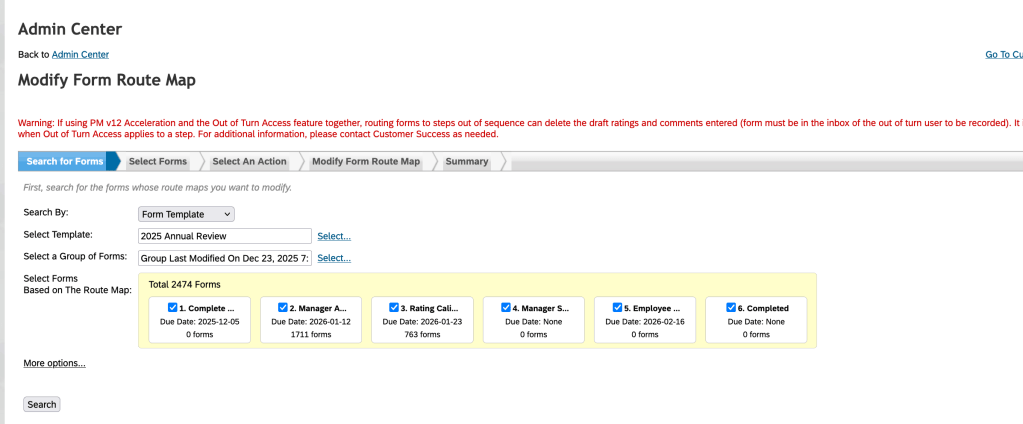
When dealing with just a handful of forms that were impacted, run an ad hoc query to find any forms that are in that prior step based on a recent modify date.
Forms recently moved back a step
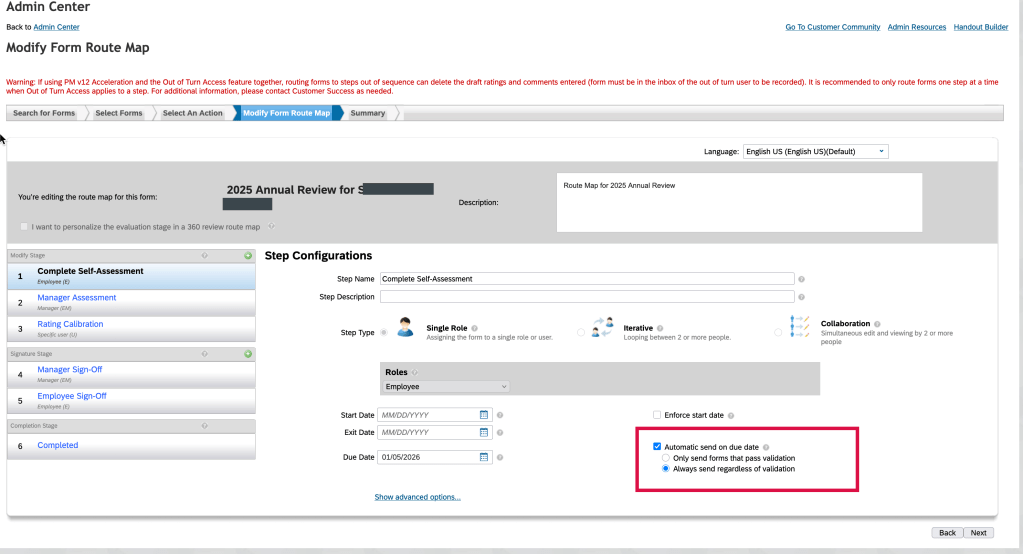
The admin would use this information to go to Modify Form Route Map to update the route map for each of the impacted forms.
Modify Form Route Map Action
Enter the Doc ID from the ad hoc report and click “Search”. The form route map steps display.
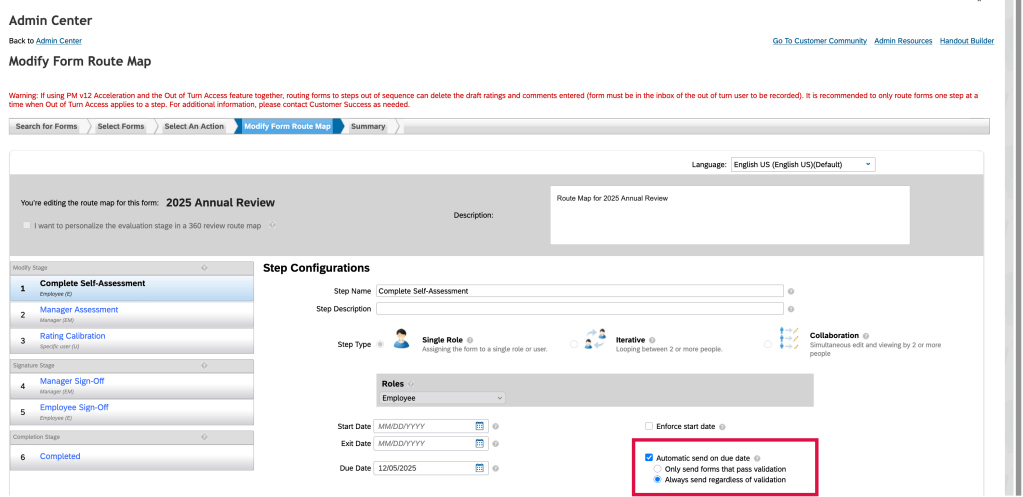
Click on the route map step that you wish to update. This will expand the step configuration section and show the step details.
Modify Form Route Map Step 1 Expanded View
In order to stop this form’s auto routing to the next step, uncheck the “Automatic send on the due date” checkbox and then click on “Next” as shown below.
Remove “Automatic send on due date” for the step
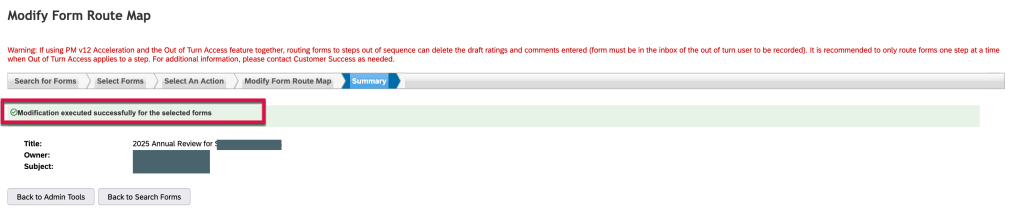
The form has been updated and the the automatic routing for this step has been removed, for this form only.
Form route map step has been updated
Repeat this process for each individual form that needs to have the automatic routing for this step removed. Click on “Back to Search Forms” to update the next form.
To Remedy Auto Route for All Generated Forms
To completely remove the auto route so that it will not continue to occur each time a form is routed back to an auto route step, the admin may modify the route map via Modify Form Route Map.
Modify Form Route Map
Once the forms are selected, remove the automatic send of due date for the step.
Remove “Automatic send on due date”
This means all of the forms generated will now auto route if any forms are returned to this step later in the process.
If this manual intervention seems too cumbersome, you may decide to limit the use of the auto-route feature going forward with other templates.
Other Gotchas
Auto Route Only if Validation Passes
If you find that a form did not auto route on the step due date, check the route map to see if Only Send Forms that Pass Validation is enabled for the step. If a form had required fields that needed to be populated during the current step and they were left blank, the form would not route to the next step.
“Only route forms that pass validation” setting in the Route Map
In this case, the admin would have to auto route the form to get it to the next step.
Cannot Auto Route Due to Missing User in Step Role
Another issue that can arise is when a form is set to auto route to a manager step and the manager role is not populated for an employee’s form. The manager step will be skipped. The form cannot route to a step with any empty role.
To resolve this, the admin route would have to route the form back to the first step and once the manager role is populated, the form will route correctly. This causes the system to re-evaluate employee data, new managers, route steps, and roles.
One more thing
The most successful SuccessFactors implementations aren’t defined by how much functionality is turned on—but by how intentionally it’s designed.
At Worklogix, we help organizations make these decisions with adoption, scalability, and business impact in mind—so talent processes don’t just exist in the system, but actually work in practice. Do you need help implementing or supporting your SAP SuccessFactors system? Contact info@worklogix.com for assistance.
Performance, Talent, and Skills: Designing a Smarter SAP SuccessFactors Experience
When organizations implement SAP SuccessFactors, the technology is rarely the hard part. The real challenge is making thoughtful design decisions that balance structure, adoption, and long-term value.
Below are some of the most important considerations we guide clients through when designing Performance & Goal Management, Dynamic Teams, Talent Development, and Talent Intelligence Hub (Skills/Competencies)—based on real-world implementations and leading practices.
Performance & Goal Management: Structure with Purpose
One of the earliest decisions organizations face is whether performance reviews will include ratings.
Leading practice is yes—most organizations use a 5-point scale. While SuccessFactors allows flexibility (3-point, 5-point, or even custom scales), odd-numbered scales tend to drive clearer differentiation. Rating labels can be fully text-based for managers and employees, while numeric values still operate behind the scenes to support analytics and downstream processes.
If an organization chooses to go ratingless, it’s important to pause and ask: How will performance inform compensation, succession, and talent decisions? Ratingless models require stronger narrative rigor and often more mature processes to remain effective.
Continuous Performance Management
SuccessFactors offers two complementary capabilities:
Continuous Feedback – A leading-practice recommendation to enable from day one. It encourages real-time recognition and coaching without adding administrative burden.
Continuous Performance (Activities & Achievements) – Best positioned as a longer-term goal (in our opinion). While powerful, many organizations find it overwhelming at launch when layered on top of formal goal-setting and year-end reviews.
The key is adoption: more functionality doesn’t always mean better outcomes.
AI in Performance & Goals
AI-assisted capabilities can enhance goal writing, feedback quality, and review consistency. While additional licensing may be required, these tools are increasingly part of forward-looking performance strategies and worth evaluating early.
Dynamic Teams & OKRs: Flexibility for Modern Work
Dynamic Teams enable organizations to form teams outside traditional hierarchies and manage work using Objectives and Key Results (OKRs).
This functionality can be incredibly valuable for project-based or matrixed organizations—but it’s also newer within SuccessFactors. For some clients, it makes sense to adopt immediately; for others, it’s a strong candidate for a future phase, as SAP continues to expand its capabilities.
The guiding question we recommend asking is simple: Will this add clarity and alignment—or complexity?
Typically, this is not a Day 1 feature turned on at our customers.
Career & Talent Development: Turning Data into Decisions
The 9-Box Grid
The standard 9-box within Succession Management remains a cornerstone of talent reviews. Leading practice uses:
3 sustained performance ratings
3 potential ratings
If performance ratings are based on a 5-point scale, organizations must define how those ratings translate into the 3-point performance dimension of the 9-box (hence, our key addition of “sustained” performance).
Ownership matters too. Mature organizations typically empower managers to place employees into the grid, while others may rely on executives or HR Business Partners until readiness increases.
Talent Reviews & Presentations
The most effective talent reviews integrate the 9-box directly into structured discussions, often using SuccessFactors Presentations to support consistency and executive visibility.
Successor Readiness
Leading practice readiness definitions include:
Ready now
Ready in 1–2 years
Ready in 3–5 years
SuccessFactors also supports Emergency Replacement, identifying immediate successors in the event of an unexpected vacancy—an increasingly important capability for critical roles.
Learning & Development Integration
Day-one value comes from allowing employees to link learning activities directly to development goals. More advanced organizations later expand this by associating competencies with learning, enabling targeted searches and more personalized development paths.
Calibration: Aligning Decisions Across the Organization
Calibration ensures fairness and consistency. Leading practice is to use both:
Performance Calibration – Focused on performance ratings
Succession Calibration – Focused on 9-box placement
When used, calibration steps should be intentionally embedded in the route map, not treated as an afterthought.
Opportunity Marketplace: Making Talent More Visible
Opportunity Marketplace connects employees to:
Learning activities
Mentoring
Projects
Internal job opportunities
When integrated with Learning, Talent Development, and Recruiting, it becomes a powerful tool for mobility and engagement. AI-driven opportunity recommendations can further enhance adoption, though licensing considerations may apply.
Talent Intelligence Hub: Building the Skills Foundation
Skills & Competencies
A successful Talent Intelligence Hub implementation starts with clarity:
What skills matter?
What competencies define success?
Are there existing catalogs—or do they need to be rationalized?
Leading practice is to focus initially on skills and competencies only, deferring additional attributes (traits, behaviors) until integration maturity improves across the suite.
Job Profile Builder
If possible, jobs in Employee Central should map 1:1 to job roles in Talent. Skills and competencies are mapped at the job level (within Job Profile Builder)—not the job level hierarchy itself—an important distinction for accurate modeling.
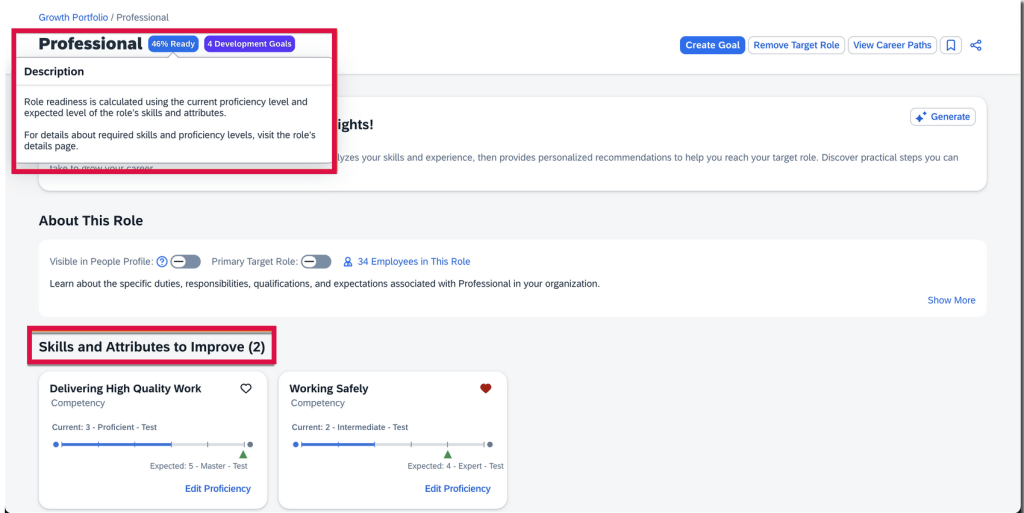
Growth Portfolio
Growth Portfolio defines how skills live at the employee level. For initial releases, leading practice is:
View-only access for employees and managers
No self-selection of skills without approval workflows
More advanced edit and approval models can be introduced later, once governance and definitions are well established.
Final Thought
The most successful SuccessFactors implementations aren’t defined by how much functionality is turned on—but by how intentionally it’s designed.
At Worklogix, we help organizations make these decisions with adoption, scalability, and business impact in mind—so talent processes don’t just exist in the system, but actually work in practice. Do you need help implementing or supporting your SAP SuccessFactors system? Contact info@worklogix.com for assistance
Find out ways for an admin to prepare for the launch of yearly performance forms to make it a more meaningful experience for everyone.
The biggest piece of advice; advanced planning is key! Make sure you include the right people in the decision making process early on to improve your performance review process.
You will need to understand the specific performance management needs of your organization. It is imperative to align with the business processes in order to have a successful performance evaluation cycle.
Preparation for the New Plan Year
Set the timeline for the Performance Cycle
Decide on the date range that performance is being evaluated on. Is it based on calendar year, fiscal year, hire date anniversary, or role-based schedule?
Who gets a form? All employees, new hires before a certain date, specific groups of employees?
Include prep time to review last year’s form and make adjustments based on employee and manager feedback
Determine the form launch date
Is there an annual launch for all forms or is launch based on the individual?
Based on the launch date, determined how much time is allotted for each step in the form
Configure the performance template, making sure the form aligns with your organization’s performance cycle, timelines, and evaluation criteria
Start by identifying rules for the form
Can forms be routed back to the prior step?
Do the route map steps have due dates? if so, are forms auto routed to the next step based on step due date?
Can forms be sent to others for feedback?
Can completed forms be sent to others?
Are the instructions clear on the form? Do certain sections need introductory text to guide the employee so they understand what they need to do?
Are there any changes to what is being rated, the rating scale?
Are there new sections to be added to the form?
Any changes to the workflow, any changes to the permissions on which roles can do what and in which step?
Data Tracking and Reporting: Make sure the performance forms are set up to collect data for future reporting and analytics. Use the data for insights into employee performance trends, team dynamics, and organizational development.
Update/Prep the System
Make sure your data is current
Update any reporting relationships so that the forms will flow to the correct employees’ managers. If any managers are on leave, make sure their direct reports have a new reporting relationship.
Make sure any job changes and pending actions are completed so the forms will reflect current titles and reporting relationships.
Test your form in a controlled environment to ensure it works as expected.
Communicate, Communicate, Communicate
Provide communication on the process to managers and employees. Use multiple means of communication. Make sure they are aware of the time frame and what is expected of them each step of the way.
Training
Create training guides for employees and managers alike. Tip sheets, quick reference guides or more detailed references are helpful, especially if you are rolling out a new review process
Conduct manager training sessions. Include how to navigate the system and level set expectations for how to rate employees. Also stress the need to track notes throughout the year in order to be prepared to provide detailed feedback during the process.
Ready for Launch
Review the performance review template one final time and make sure everything is ready to go.
If the template is copied from the prior year, ensure that the correct goal plan is linked to the template and any references to the prior plan year are updated to the new plan year
Make sure the correct route map and rating scale are linked
Make sure the route map has any prior year dates and verbiage updated
Verify step due dates on route map are correct, if using
Make sure the advanced settings reflect the current year
Verify launch date and group of employees that the forms are being launched for
Verify email notifications are enabled and the text contained in the emails is correct and instructional
If forms will auto route to the next step based on the step due date, ensure that the nightly auto route job is set up to run
During the Review Process
Track timely completion of reviews. You can create an ad hoc report to check what steps forms are in. If a step due date is approaching and forms are not moving, it can be a signal to send out communication to remind users to work on their forms.
Provide guidance. Questions will arise and in order to make the process run more smoothly, be prepared to answer questions, route forms and troubleshoot as needed.
Post-Review Follow-up
Once the review cycle is completed, it is time to reflect and prepare for the next cycle.
Gather Analytics on the Review Process
You can track completion rates, ratings distribution, and other key metrics. Use these insights to monitor the success of the performance management process.
Set up custom reports to analyze performance trends across the organization. SuccessFactors provides pre-built reports for evaluating employee performance, ratings, and competencies. This enables you to summarize key findings to leadership.
Customize dashboards and analytics to review performance ratings, goal progress, and development plans at a department or company level.
Collect Feedback on the Review Process
Ask around, what worked and what didn’t? Discover what employees and managers felt bout the form’s usability and effectiveness. Use this feedback to refine your configuration for future cycles.
Prepare for Next Review Cycle
Note updates to make for next year’s template using feedback and changes in the business, employee development needs, or industry best practices.
Regularly assess whether the PM form and process are meeting organizational needs. Be prepared to make adjustments or add new sections based on feedback from users.
Plan for new business needs: As your company evolves, the form may need to adapt, such as adding new competencies, revising goals, or adding new development sections.
By following this checklist, admins can ensure that the year-end performance review process is thorough, efficient, and effective, benefiting both employees and the organization.
Learn the pitfalls to avoid in order to create a performance form that is impactful and provides clarity, evidence, balance, and has a future focus.
Here are some of the ways forms measure the wrong things and here are some tips to improve the performance review process.
What Not to Do #1
Measure behavior not results. Typically attendance, compliance, and soft competencies are scored. Responses are vague and do not provide guidance on what to continue to do and what to work on to improve.
What to Do Instead #1
Connect measures to business outcomes. Do not rate just easily observable behaviors. Include rating for strategic impact, customer value deliverance, growth in role.
What Not to Do #2
Use vague ratings.
Ratings of Does Not Meet Expectations,Meets Expectations and Exceeds Expectations are vague and subjective at best. Two managers could rate an employee completely different using this rating scale.
What to Do Instead #2
Create a scoring system that is well defined with examples for each score. Also provide calibration rules. Tie ratings to business impact and not on personal opinion.
What Not to Do #3
One Size Fits All Form
An organization with sales, marketing, research, and manufacturing cannot rate the varied roles using the same form. Each drives values in a different way. Customize role-specific scorecards based on the work that produces value.
What to Do Instead #3
Use a shared framework that stresses company-wide values, and standards. Have one form style but use different measures per job family.
What Not to Do #4
Make form too long and have too many steps
Some forms ask too many questions and have crazy workflows. This causes employees and managers to feel pressure to complete the forms under tight deadlines which leads to rushed and low quality responses.
What to Do Instead #4
Ask fewer and better questions. Use evidence-based assessment using metrics and outcomes, anything to remove ambiguity. If a question adds no decision making value, it doesn’t belong on the form.
What Not to Do #5
Use of Generic Competency Frameworks
While competencies such as “embraces change”, or “drives innovation” are aspirational, they are hard to rate objectively.
What to Do Instead #5
Competencies should be observable, job-relevant, linked to business outcomes and have defined behaviors for each level.
What Not to Do #6
Have Forms Built for HR
Forms that allow box checking, reporting, and legal defense are great for HR but are not tailored to the manager and employee.
What to Do Instead #6
Optimize form with clear feedback, meaningful coaching conversation and have to have better performance in the next go round with no surprises.
What Not to Do #7
Have Unusable Output
Weak performance forms don’t tie into development plans, pay decisions, drive staffing decisions or shape promotion paths. Don’t heavily lean towards rating subjective skills.
What to Do Instead #7
A well-designed form is operational, in that leaders use the output to allocate talent, managers use it to coach and employees use it to grow.
Overall Tips for a Better From
Make the form operational:
Provide clear, concise feedback
Have a balanced discussion: talk about strengths, but don’t neglect areas that are opportunities for growth
Create a path forward which identifies clear expectations, of view of what success looks like and how it is measured
Be fair and consistent in the assessment; avoid bias, assumptions, and judgments
Have a two way dialog with opportunity to ask questions, discuss challenges, invite reflection
You should now be on your way to crafting a well created performance form. Just remember that it should be comprehensive in that it assess an employee’s performance, encourages their growth, and support the organization’s mission.
For tips on how to manage a release, check out our blog here.
Check out what’s new for Career Development.
Enhancements to the Employee View in the latest Career Worksheet
Employees will see more information on the Role Details page when using the latest Career Worksheet.
Highlights include:
The titles for the Skills and Attributes to Improve and Skills and Attributes You Have sections now include counts
The explanation of how role readiness is calculated displays when selecting the role readiness of a target role
Employee View of Role Readiness
Enhancements to Manager View in Latest Career Worksheet
Managers can also enjoy an enhanced experience when using the latest Career Worksheet.
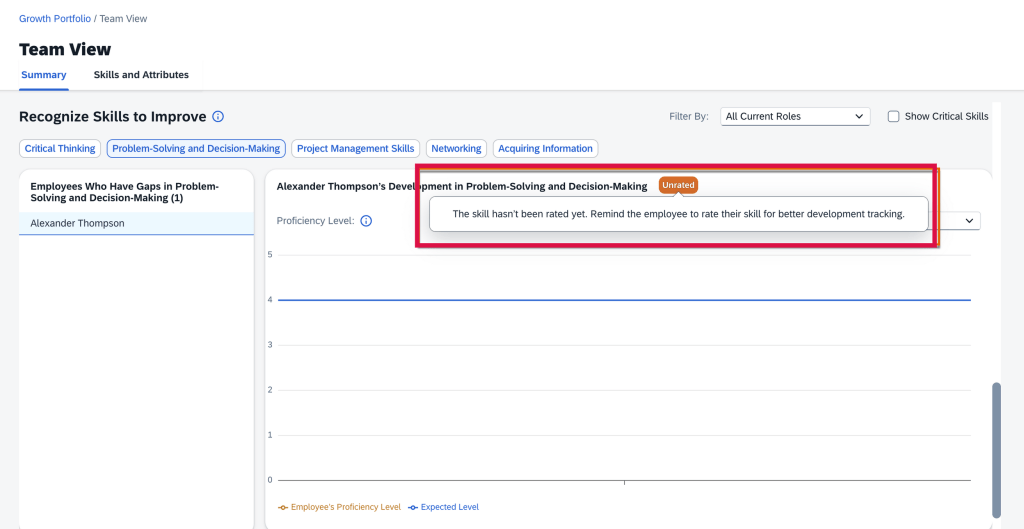
On the Summary tab of the Team View page in Growth Portfolio, managers have better visibility into employees’ career development, including:
View employees’ unrated skills and attributes
Unrated Skills and Attributes
View employees’ development activities linked to specific skills and attributes
Development Activities linked to Skills and Attributes
View their team’s target roles when granted the private-access permission in the Career Worksheet template.
Option to Disable Legacy Career Worksheet
Once the latest Career Worksheet is enabled, the legacy version may be disabled. Please note, when the legacy version is disabled, the Career Worksheet tab isn’t available in the Development module. If you aren’t using Career Path, Career Explorer or Mentoring, the Development module will not be available in the main navigation menu.
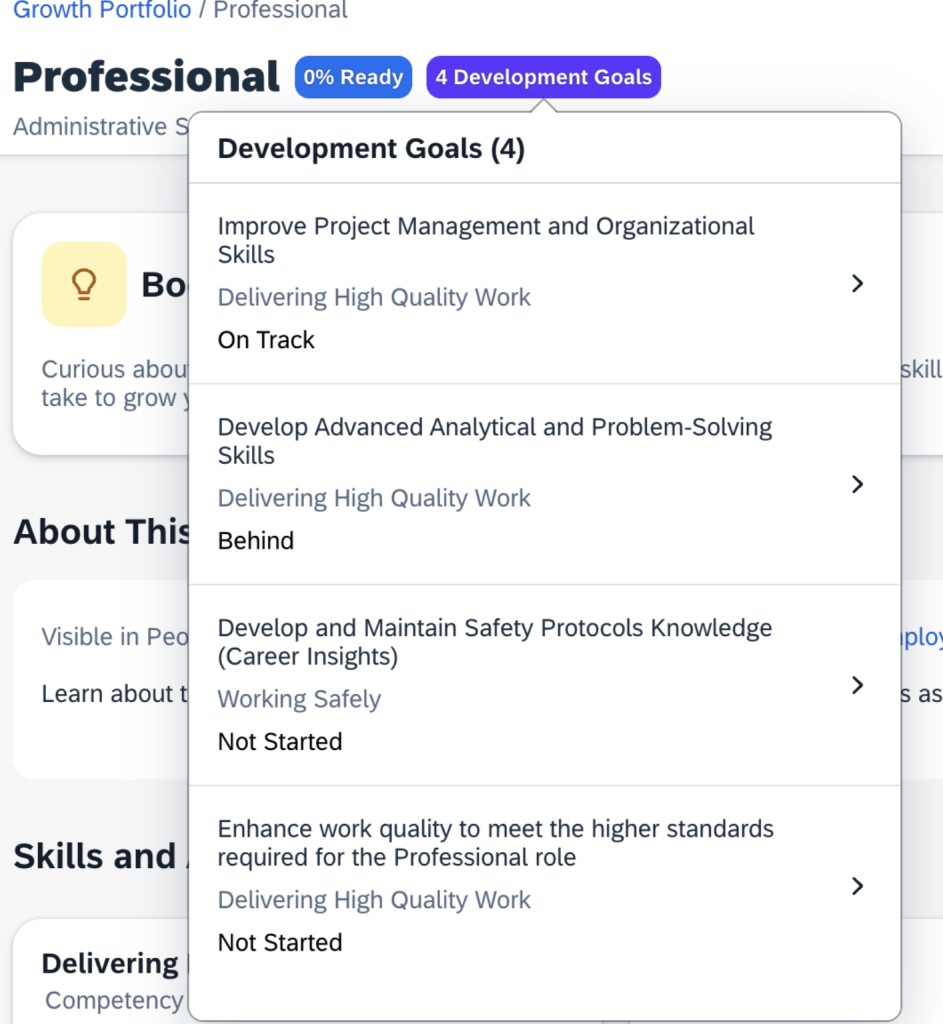
View Development Goals in Latest Career Worksheet
Development goals now appear on a role’s details page in the latest Career Worksheet. However, only development goals from the default development goal plan that have skills or attributes associated with the selected role will be displayed.
The Goal name, associated skills or attributes, and status for each development goal display.
Development Goals on Role Details page
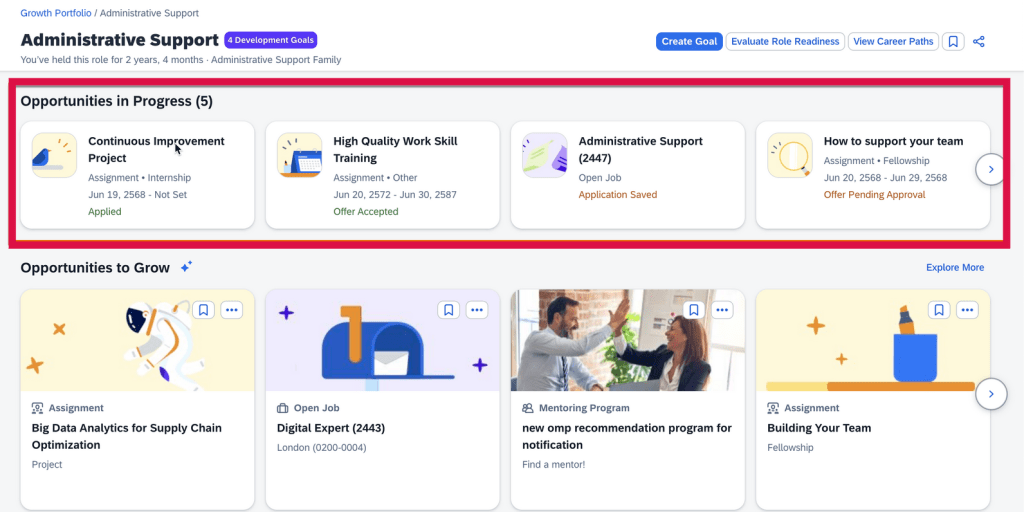
View In-Progress Opportunities in Latest Career Worksheet
Actions and progress that users have made in developing their current or target roles will be viewable.
These in-progress opportunities with skills or attributes associated with the selected role appear in the Opportunities in Progress section. Once an opportunity card is selected, the user is directed to its details page.
In-progress opportunities on role detail page
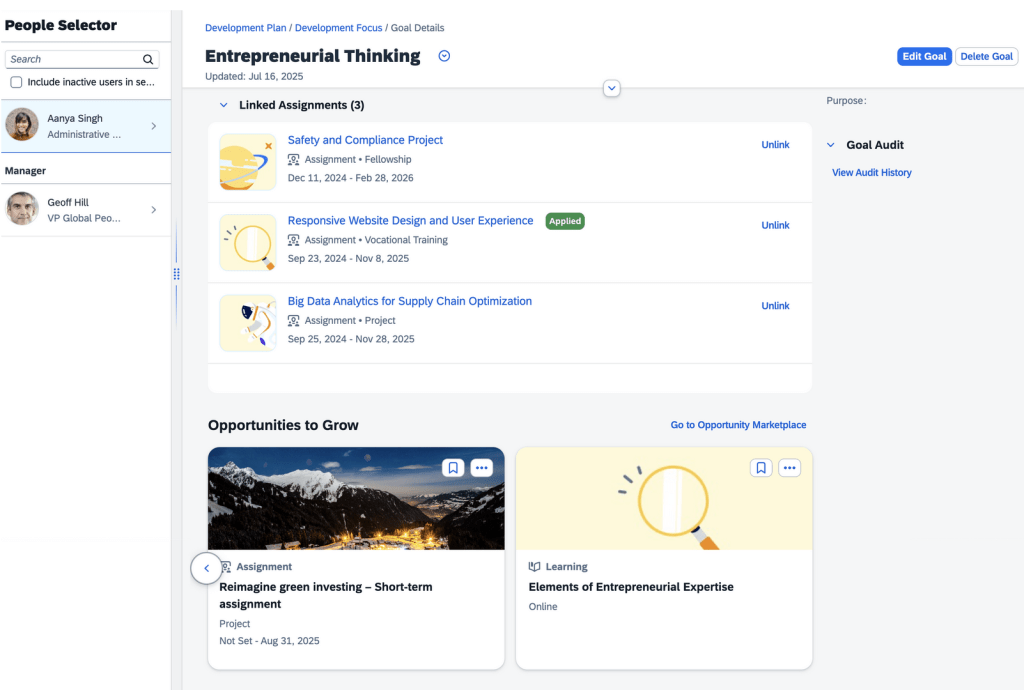
View Recommended Assignments and Learning Opportunities for Development Goals
The assignments and learning opportunities that match skills and attributes selected for a user’s development goals are now viewable. Users can also link assignments of interest to their development goals.
This feature is available on a user’s own goal details page.
Users can view learning activities not linked to development goals. These activities and learning opportunities can be be added/linked through the Linked Learning section on the goal details page. Assignments then appear in the Linked Assignments section.
Users can bookmark recommended assignments and learning opportunities.
Linked Assignments
Features Now Available with AI units license
With the purchase of the AI units license, there are some additional features available.
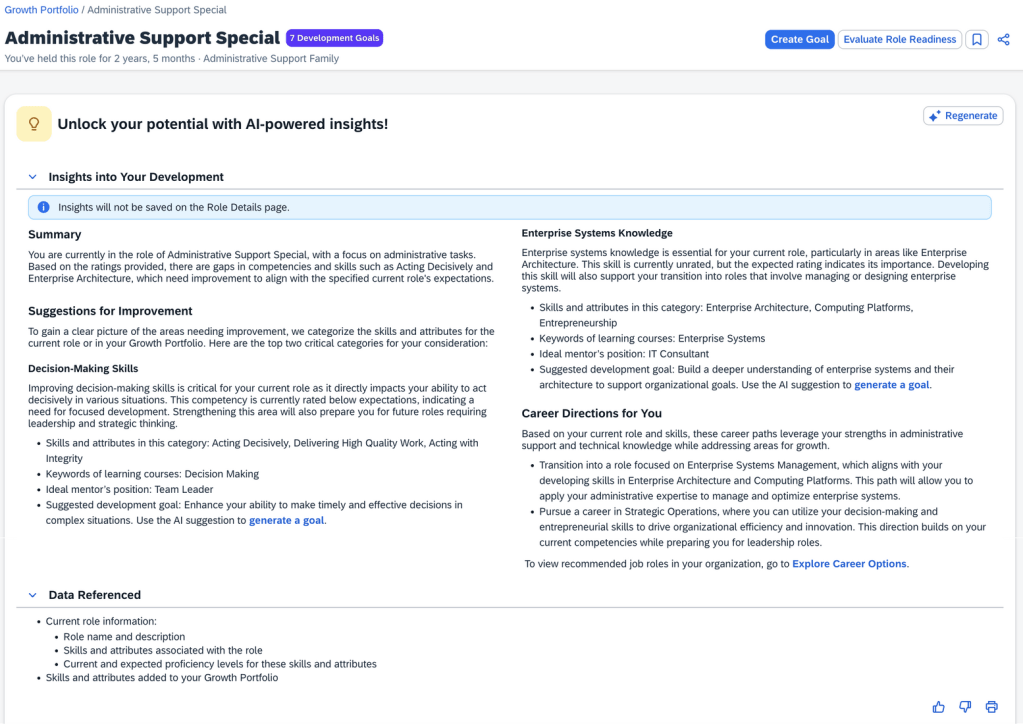
AI-Assisted Career Insights for Current Role
Previously available for target roles only, now employees can gain insights into development actions that help them progress in their current role.
There is a new Unlock your potential with AI-powered insights! section on a current role’s details page which includes:
Role name and description
Skills and attributes associated with the role
Current and expected proficiency levels for these skills and attributes
Skills and attributes added to the employee’s Growth Portfolio
AI Career Insights
The insights are grouped into sections:
Summary which is a high-level overview of the employee’s current role
Suggestions for Improvement which identifies two growth areas for upskilling and career development with achievable suggestions for skills and attributes in the category, learning courses keywords, ideal mentor’s position, suggested development goal
Career Directions which are tailored career paths with a link to view recommended job roles
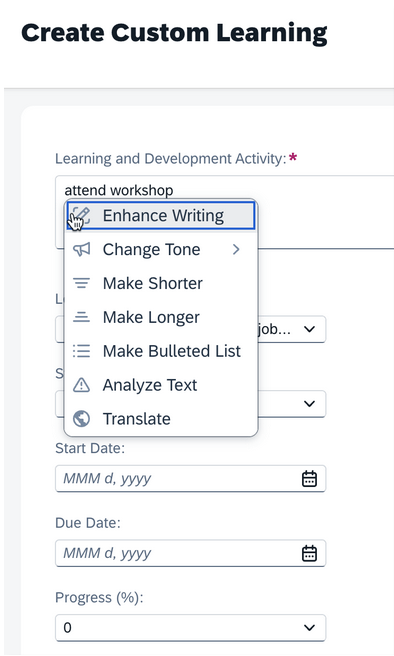
AI-Assisted Writing Available in Custom Learning Activities
Text and Textarea fields for custom learning activities now have AI-assisted writing available.
AI-Assisted Writing
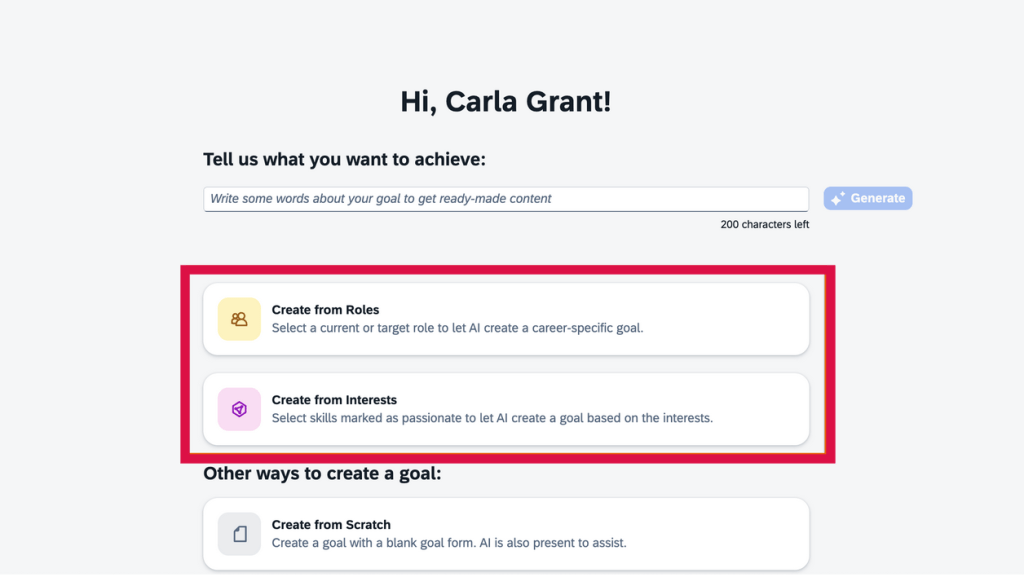
Create Development Goals with AI Based on Roles and Interests
Using AI, users can create personalized goals aligning with specific career roles or skill interests. With the AI-assisted goal creation feature enabled, AI can be used to create development goals based on a current role, target role, or skills and attributes.
Create goals from roles
Create goals from interests
New personalized goal creation options using AI
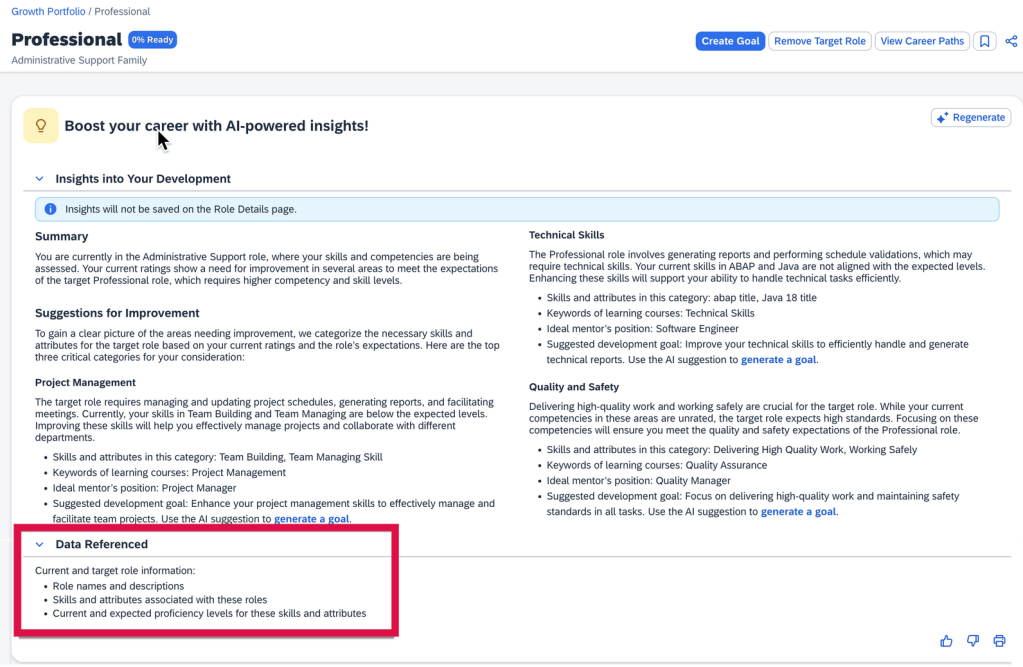
Data Referenced Section Available in AI-Assisted Career Insights
Using AI, can view information being considered on the Data Referenced section on a target role’s details page in the latest Career Worksheet.
Data Referenced section of target role’s detail page
To learn more and get more details, see the full set of documentation in the What’s New Viewer here.
For tips on how to manage a release, check out our blog here.
Calibration
Auto Activate Calibration Sessions
You may now create job requests to automatically activate Calibration sessions. There is a new setting to enable in Admin Center>>Manage Calibration Templates on the Advanced tab.
A new setting, “Enforce session activation“, has been added under “Auto-activate sessions”. When enabled, if validation errors are found for certain subjects, those subjects will be removed from the corresponding session, allowing the sessions to be activated.
Previously, sessions could not be activated if errors were found for subjects during validation.
Once the Auto-activate sessions option for a template is enabled, set your desired activation date. Next, create the job request at Admin Center>Scheduled Job Manager to auto-activate sessions that use this template. A new job type, Auto-Activate Calibration Sessions on Planned Date, is now available.
Sessions can be auto-activated at the template or session level. If you set an activation date only in the template and do not specify a different date for individual sessions, the sessions will be auto-activated on the date defined in the template.
If you assign a different activation date to individual sessions, that date will take priority. If no activation date is set for either the template or the sessions, the sessions based on the template will not be auto-activated, even if the option is enabled.
When the auto-activation job is completed, you will receive email notifications detailing the results of the activation process. However, if the job runs but finds no sessions to activate, no email notifications will be sent.
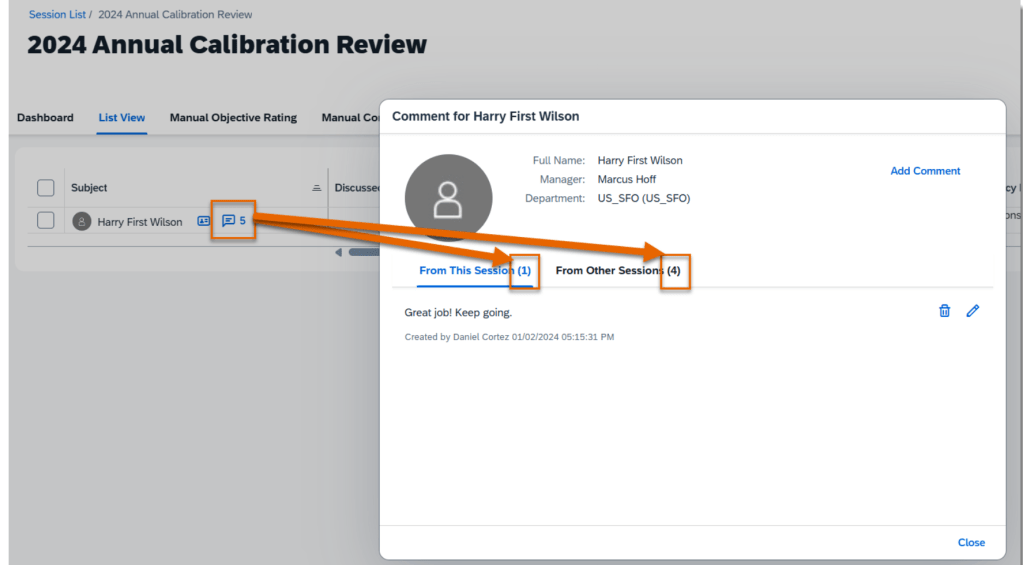
Comments from Other Calibration Sessions
In the subject list of a calibration session, the comment icon next to each subject now shows a total count of comments from the current session and other sessions that are based on the same template. When you viewing the comment dialog box,there are separate counts and comments on the From This Session and From Other Sessions tabs.
The counts update automatically when comments are added or deleted from any session.
Comments from this session and other sessions
In order to see this, using Manage Calibration Templates, go the to Advanced tab and select “Enable Roll up comments from the other sessions based on the same template“.
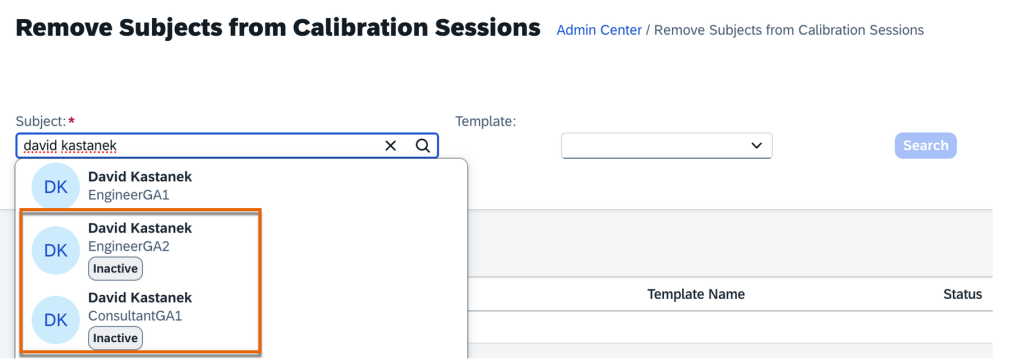
Remove Inactive Subjects from Calibration Sessions
Inactive subjects may now be removed from all calibration sessions using the Remove Subjects from Calibration Sessionsadmin tool. Previously, only active users could be searched for and removed.
Inactive Subjects Removal from Calibration Session
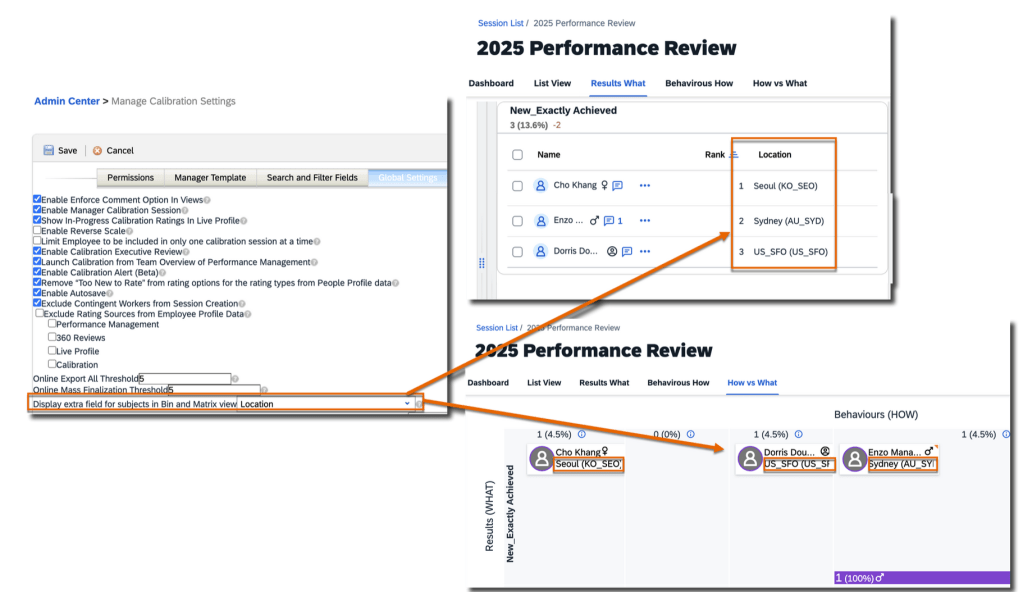
Display Extra Fields in Bin and Matrix Views
The setting “Add an extra field to people card shown in 9-box view” has been updated to “Display extra field for subjects in Bin and Matrix view“. Found under Admin Center>>Manage Calibration Settings >>Global Settings, you can now enable this option and select an extra field to display for subjects in both Bin and Matrix views. Any field that was previously selected for display in the Matrix view will now automatically be visible in the Bin view.
Impact of Using Extra Fields for Views
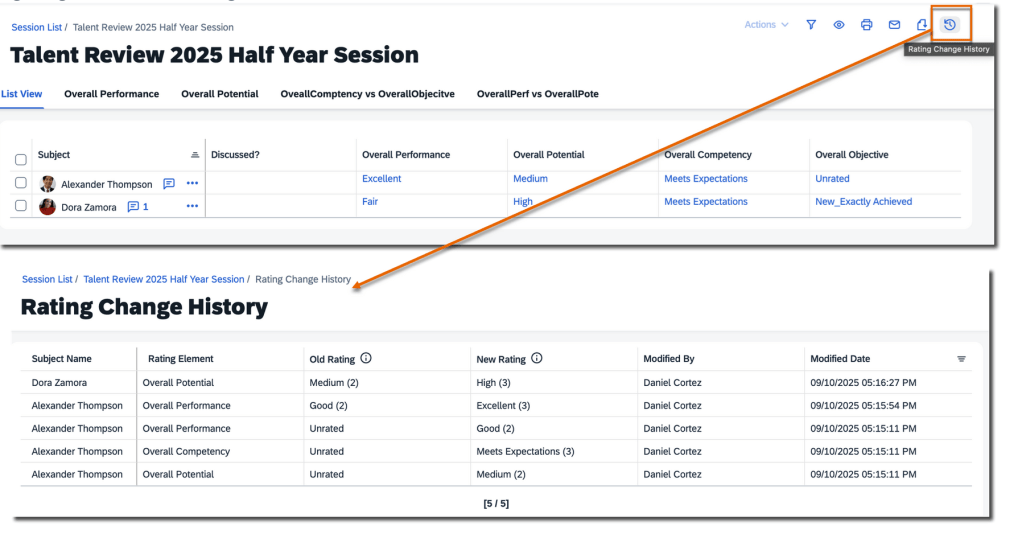
Track Rating Changes in Calibration Sessions
Rating changes can now be tracked within a calibration session. The update makes it easier to track the rating changes and maintain a record of all adjustments made.
There is a new Rating Change History icon in the upper-right corner of a calibration session. Clicking the icon opens a Rating Change History page.
Here all rating modifications made to subjects within that session are listed. The Old Rating and New Rating columns display the rating label and also includes the corresponding rating value. The user who made the change as well as the modify date/time are noted as well.
View Rating Change History
Bin width adjustments automatically saved
In the Bin view of a calibration session, any adjustments made to the width of each bin are now saved automatically. When accessing the Bin view the next time, the saved widths will be applied. In the past, bin width changes were not saved, and each bin would revert to its default width upon reopening the view.
Changes Auto Saved
Exclude Contingent Workers when Creating Calibration Sessions
Contingent workers can now be automatically removed when you create calibration sessions.
A new setting, Exclude Contingent Workers from Session Creation, is available under Admin Center>Manage Calibration Settings>Global Settings.
Once enabled, contingent workers are automatically removed from the list of participants and subjects when you create sessions using:
Manage Calibration Sessions tool. After searching for users through the org chart or advanced search and then adding the selected users as participants and subjects, a warning message will appear if any contingent workers are included. Message will include which contingent workers been removed
Manager created sessions on the Calibration landing page
Sessions created via a CSV file
For learn more, you can view the full set of documentation in the What’s New Viewer here.
For tips on how to manage a release, check out our blog here.
Continuous Performance Management
There are no major updates for Continuous Performance Management, they are generally available and require no additional updates. Here are a few notable updates.
All Responses shown on Feedback Given tab
The Feedback Given tab for Continuous Feedback page now shows all feedback given, both unsolicited feedback and responses to feedback requests, not just feedback response for the target population for their permission role.
Search for an activity and link to feedback
The word count for Continuous Performance fields is now based on characters instead of bytes.
In addition, several field lengths have been extended:
Users can request and review feedback on their activities in any channels where they are the participant
When a user is the participant in a channel, they can request and view feedback on all their activities. Previously, the feedback functionality was only available for activities recorded in channels between managers and direct reports.
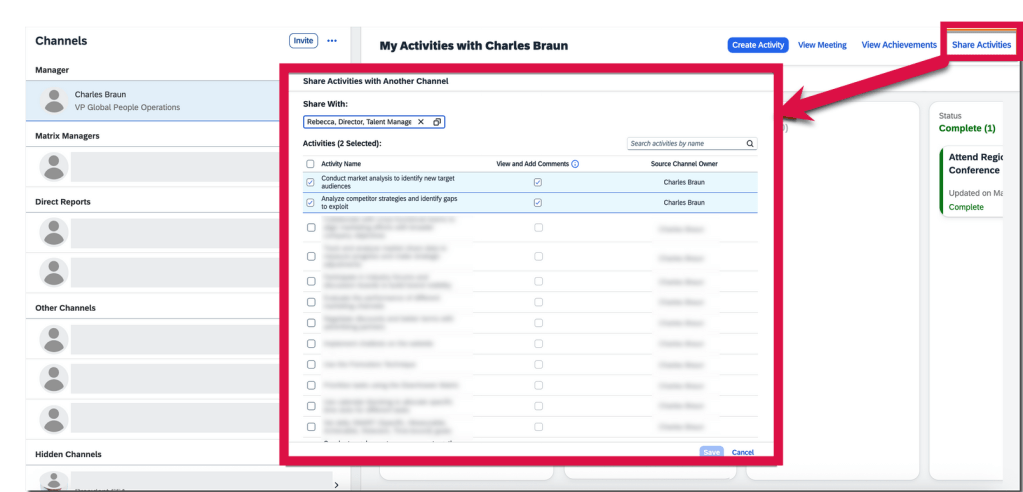
Share Activities Across Channels on Continuous Performance Page
Users are now able to share their activities across channels where they participate, giving relevant users the ability to view and edit these activities for seamless collaboration. These activity sharing records are reportable with Story reports.
Only the channel participant, who is responsible for completing the activities within a channel, can share them with other channels in two ways. They can also control whether the target channel owners can view and add comments on each activity. This setting is pre-selected as the default.
On My Activities with <channel owner’s name> page, select Share Activities button and choose activities that they want to share with another channel in the pop-up dialog.
Share Activity with Another Channel
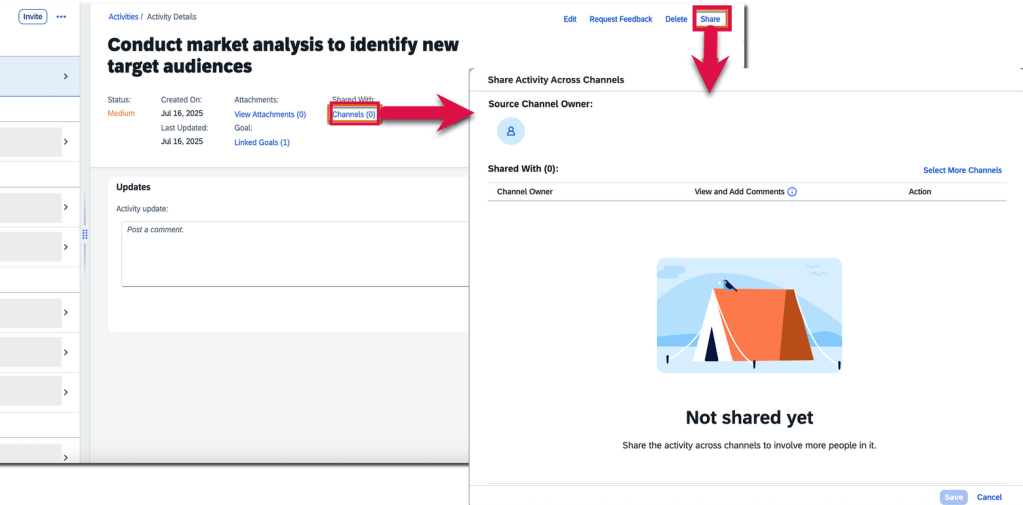
On the Activity Details page, users may choose channels that they want to share an activity with.
Share Activity within Activity Details
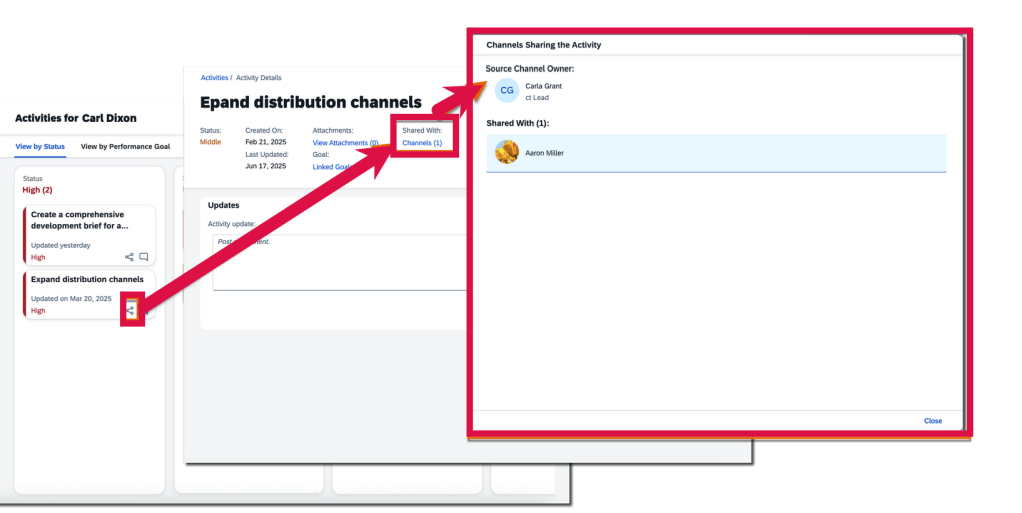
Channel owners can track the source and destination channels of a shared activity through the Channels link in the Shared With: field on the Activity Details page. However, the field and link are only available for activities shared across channels. On the activities overview page, channel owners and participants can see the “shared across channels” icon on the card of activities that have been shared, to distinguish them from those haven’t.
Share Icon Visible for Shared Activities
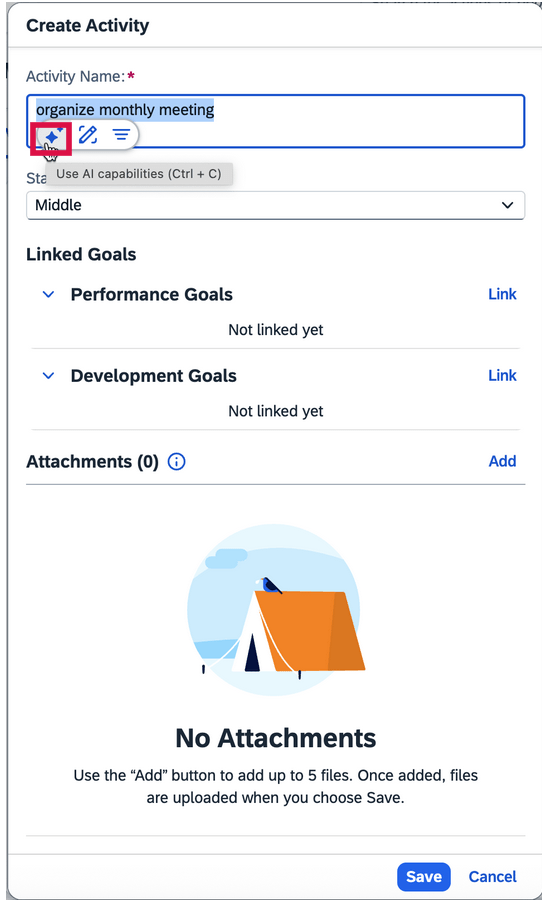
AI-assisted writing is now available in more text areas on Continuous Performance and Continuous Feedback pages
When the AI units license has been purchased, AI-assisted writing now includes feedback topics and feedback questions for Continuous Performance. All free text areas now support AI assistance. Text areas also include activity names, activity updates, achievement names, meeting notes, discussion topics, and channel invitation notes.
AI Assistance for Writing Tasks
To learn more and get more details, see the full set of documentation in the What’s New Viewer here.
For tips on how to manage a release, check out our blog here.
The SAP SuccessFactors 2H 2025 release focuses on enhancing the user experience and leveraging AI. For your convenience, we’ve summarized the highlights of what’s new for the second half of 2025 release for Performance Management below.
Performance Management
Replacement of Legacy Performance Management Form Experience with Latest Experience
The latest experience of Performance Management forms is replacing the legacy one, which will reach end of development on November 14, 2025 and will be deleted on November 20, 2026.
The latest experience was automatically enabled in the Preview environment for customers using the latest Goal Management in the 1H 2025 release. This is not the case in the Production environment, the latest experience wasn’t enabled by default.
The latest experience has the key features in the legacy version with an enhanced user experience, a more flexible layout, more business rule scenarios, and generative AI features if the AI user license is purchased.
Enhancements to Latest Experience of Performance Management Forms
Some of the new features now available:
EZ rater
Goal comments and learning activities available when printing form
Forms can be printed in custom layout
“Print” button available for form snapshot
Additional fields are available on side panel: unofficial rating, expected rating, rating gap
Goal status colors display in form (if configured)
Help text added for rating field for competency with behaviors
Warning message to appear if proxy user does not have access to missing form content
Read only forms will not show action buttons
Mass Route Ungrouped Forms to a Specific Step
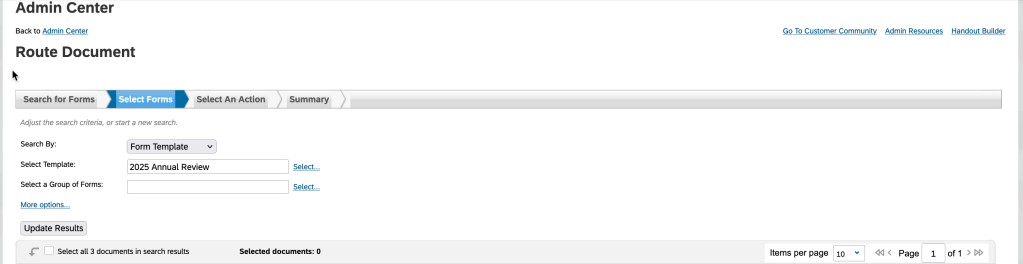
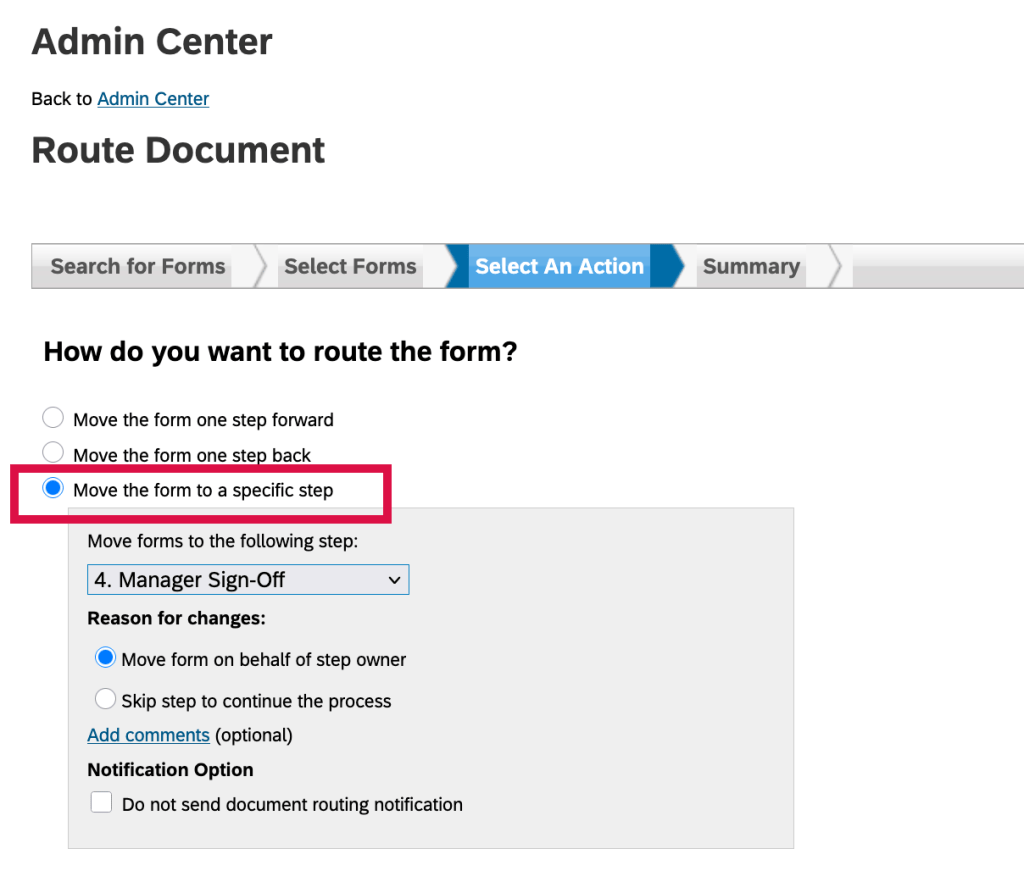
Using the “Route Form” action, forms may be mass routed to a specific step when they are using the same template and route map. In the past, only a group of forms from the same launch could be mass routed, not forms across launches for the same template.
Within the “Route Form” action, search for the forms by specifying the template or uploading form IDs. In the search results, select the forms you wish to move
“Route Forms” action
Once the forms are selected, they can be mass routed using the Move the form to a specific step option in the “Select An Action” step of the routing process.
Move ungrouped forms to a specific step
Enhanced AI-Assisted Writing in Performance Management
With the purchase of the AI units license, the AI-assisted writing actions, Generate Comments and Improve My Feedback are now available for goals, as well as skills, competencies, and behaviors.
When a goal is assigned a rating, users can access the two actions in the comment box for that goal, from the context menu of the AI-assisted writing tool.
New Business Rules
There are some new business rules that may be configured when using the latest experience for Performance Management:
Conditional Field Visibility, Editability, Required/Optional
Create business rules to set specific form fields to visible or hidden, editable or read-only, and required or optional, when certain conditions are met
Creating conditional rules provide flexibility to show form fields differently based on user input. For example, a manager giving a certain rating would require a comment
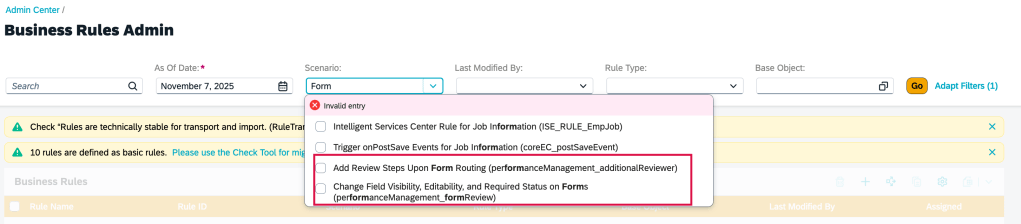
Add Review Steps upon Form Routing
Business rules may be configured to add steps to the Modify stage of the form based on meeting certain conditions. For example, a certain rating by a manager can trigger an additional step to add another reviewer to the process.
These steps are pre-configured in route maps and marked as Hidden Until Rule Execution. When the conditions defined in the rule are met, and the form with a hidden step is being routed forward, the rule is executed, making the step visible on the form.
All step types are supported
New Business Rules
Add link to People Profile Card View from Performance form
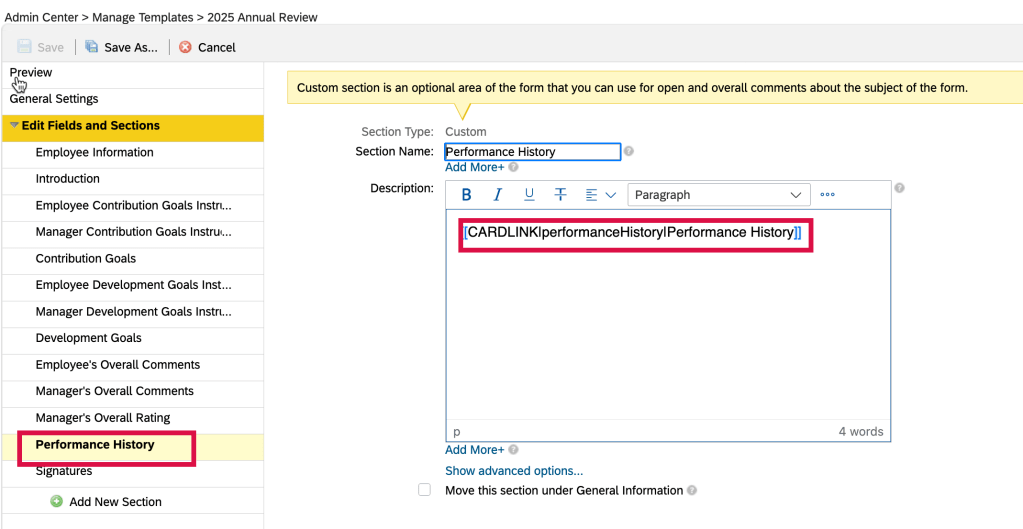
Links can be configured to the latest People Profile cards in the form template when the full profile of the latest People Profile is enabled.
In the Manage Templates admin tool, you can use the new configuration “[[CARDLINK|<cardId>|<displayName>]]” in the description section of a field to a add card link to a form template.
Add card link to a section within the performance template
This allows the ability to link to a card in the latest People Profile when working within an employee’s form where they can view and edit the profile.
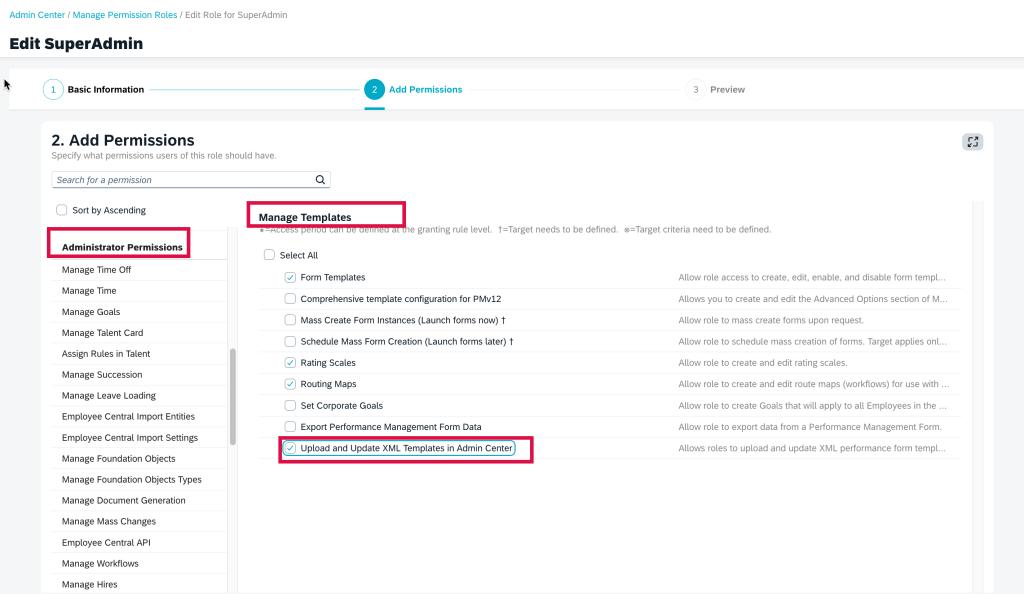
Access to Manage Templates to update, download and edit XML templates
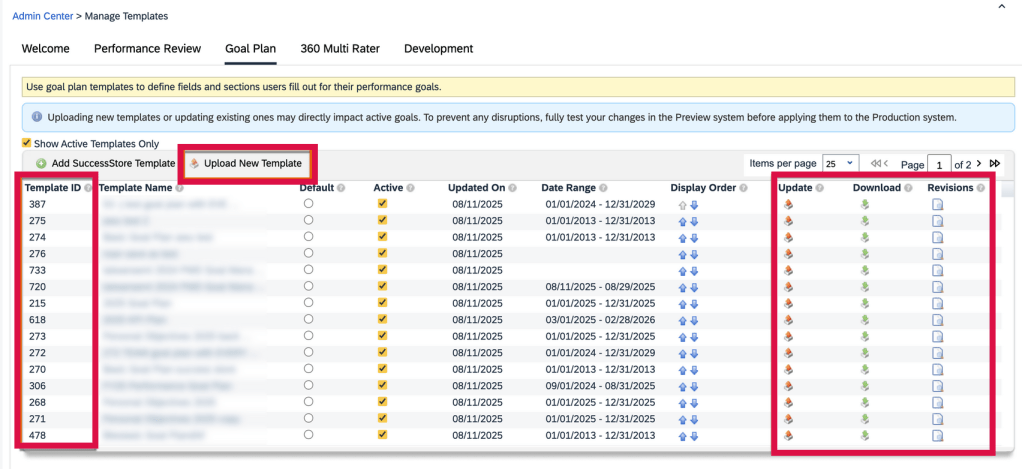
A great new feature allows templates to be downloaded, viewed, edited and added via “Manage Templates”. This removes the need to use Provisioning to update the form template XML.
This permission is applicable to performance form templates, 360 form templates, goal plan templates, and development goal plan templates. You can download templates and view template revisions without any configurations.
This does require an update to a role’s role-based permission to a upload new templates and update existing ones. Care should be given to users that will receive this access.
Manage Templates Role Based Permission for Upload and Update XML Templates
Once the role has permission to upload and update XML templates, the user can upload new templates, update existing templates, view historical XML and download the templates via Manage Templates.
Upload and Update Templates in Manage Templates
Goal Management
Here are some of the highlights of updates for Goal Management.
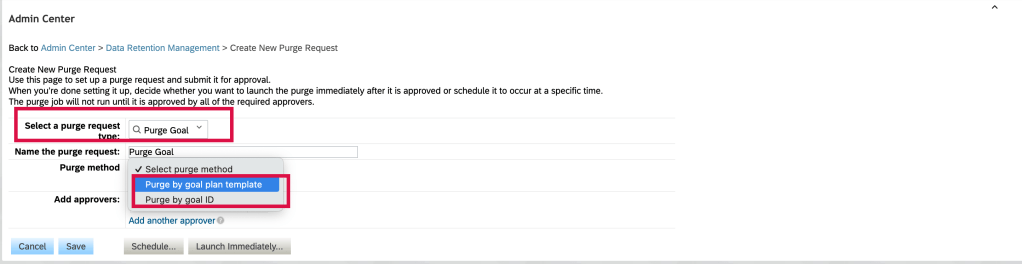
Purge Goals by Goal ID
The admin tool, Data Retention Management, has been used for data purge requests. For goal management, it has been used to purge performance and development goals by selecting the goal plan template in the purge request. This meant the process purged goal data for a specific user’s goal plan, and not just purging a single goal on the plan.
Create Purge Request
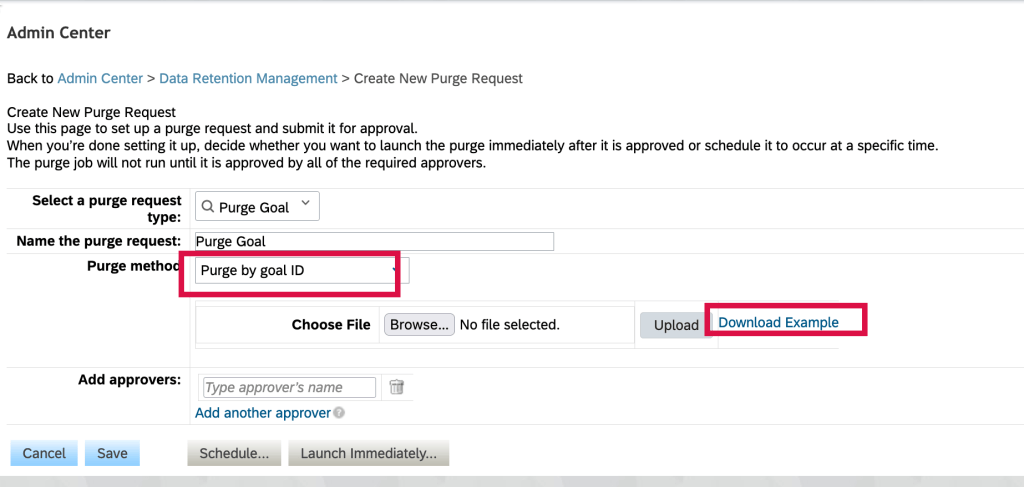
Now there is greater flexibility in purging user performance and development goals. In the latest version, the “Purge method” lists two options for purging goals: Purge by goal plan template and the new Purge by goal ID.
Purge by Goal ID or Goal Template
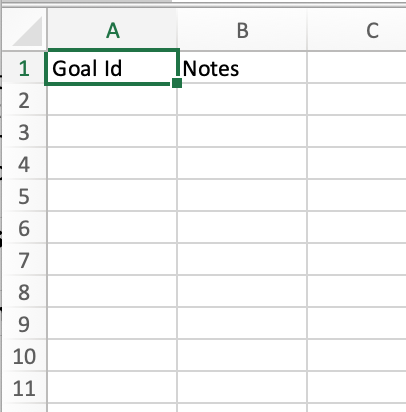
To purge specific goals, use the “Purge by goal ID” purge method. You can download the sample CSV file to get the proper file columns.
Purge by goal ID
You will need to populate a CSV file with the goal ids. Goal IDs can be found by creating a goal management ad hoc report that lists the goal plan template goal name, goal owner and the goal ID.
Sample Purge file by Goal ID
Once the goals to be purged are identified, add the goal IDs to the CSV file and upload to the purge request.
The existing method, to purge by goal plan template will purge all data associated with the template.
Import Goals for Target Population
Within a role based permission role, in the Administrator Permissions section>Manage Goals, there is now an option to specify a target population to import goals for.
Import Goal by Target Population
Previously, a role having permission to import goals would be able to import goals for any active users.
Now if attempting to import goals for users outside their target population, there would be an error message in the goal import email notification.
Minor Goal Management Enhancements
There are some minor goal management enhancements in this release which streamline the goal management experience for users.
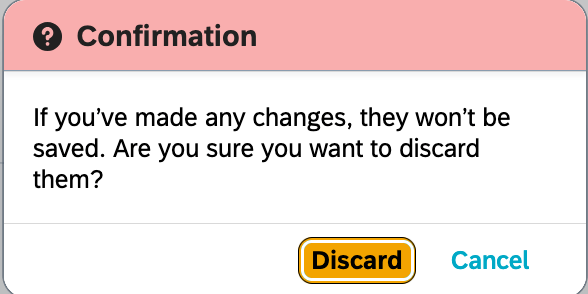
For the confirmation message and button label in the confirmation dialog for Edit Performance Goal, Create Performance Goal, Edit Team Goal, Create Team Goal, Edit Development Goal, and Create Development Goal pages. the confirmation dialog was “Are you sure you want to discard the changes?”, and the corresponding button label was “Keep Going”.
This has now changed to “If you’ve made any changes, they won’t be saved. Are you sure you want to discard them?” and the “Keep Going” label is changed to “Cancel”.
Updated Cancellation Confirmation Message
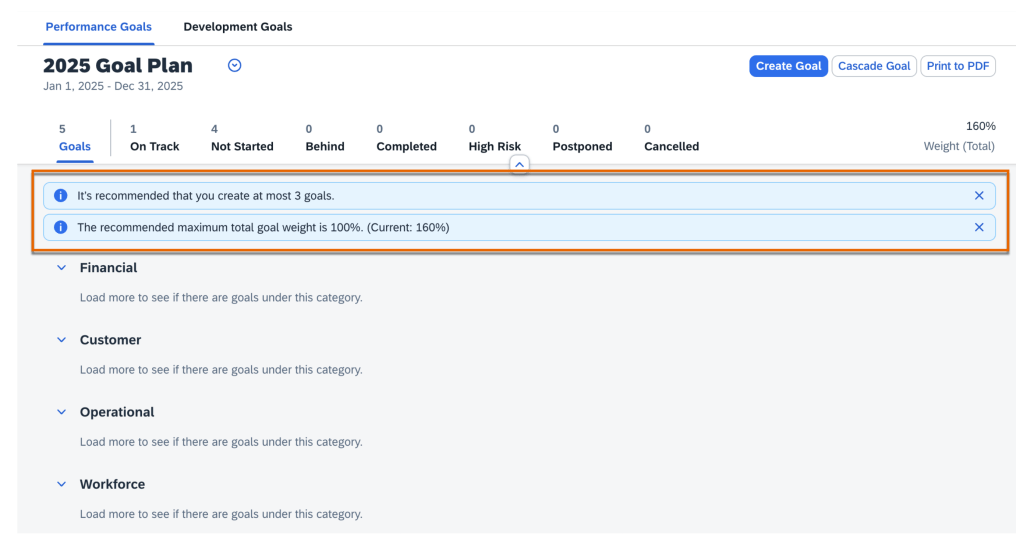
On the Goals landing page, the warning messages for goal number and weight limits are now displayed as message strips. This highlights to users the defined limits of goal number and total goal weight.
Goal Warning Messages
On the Goalslanding page, the goal filter component no longer uses status colors
Goal Status Without Colors
Assigning Team Goals – users can select all loaded goals during the goal selection step in the Assign Team Goal and Cascade Goal dialogs. The number of goals is now increased to 100 from 20, and the checkbox is renamed “Select All Loaded Goals”
Update to Sharing, Unsharing Team Goals – users with the Share Team Goals permission can now share and unshare team goals with anyone in the organization
A more user friendly error message displays when saving goal plan template, it shows the cause of the error and provides a solution
Goal Plan Save Error
Consistency in use of “More”: on the Goals landing page and Manage Team Goals page, the button label “More” is changed to “Show More “
“Show More” replaces “More”
360 Reviews
Here are some notable updates for 360 Reviews.
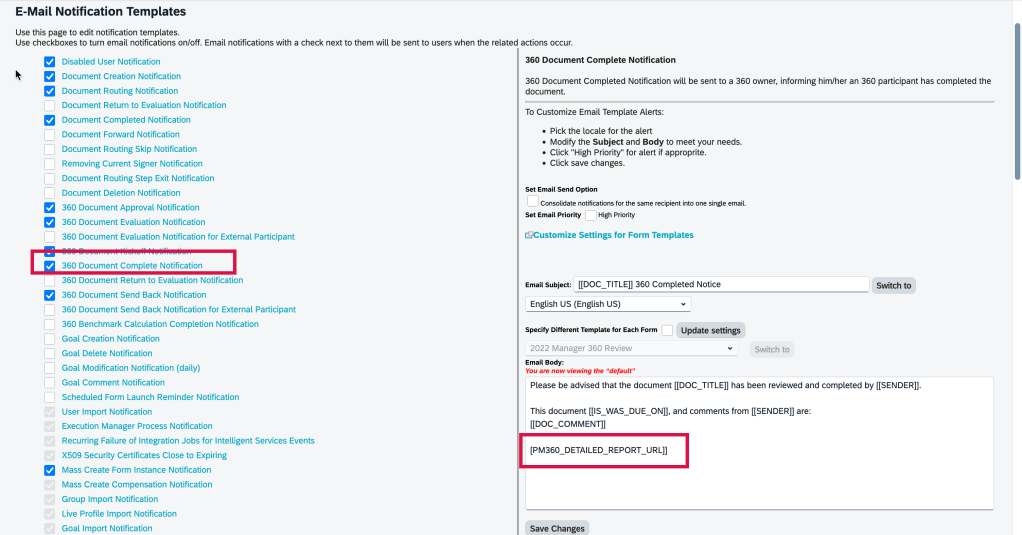
Add Link to Detailed 360 Report in Email Notifications
A link can be added to the Detailed 360 Report in the “360 Document Complete Notification” email template by using a new tag [[PM360_DETAILED_REPORT_URL]].
When this tag is added to the 360 Document Complete Notification email template, users have immediate access to Detailed 360 Reports from their email.
New Token for 360 Document Complete Notification
How the tag is rendered depends on whether the option Enable HTML email notifications is selected in Company System and Logo Settings:
If selected, the tag appears as a clickable phrase: Detailed 360 Report for {subject user’s full name}.
If not selected, it’s resolved as a clickable URL, preceded by an introductory text: For an overview of raters’ feedback, view {URL}.
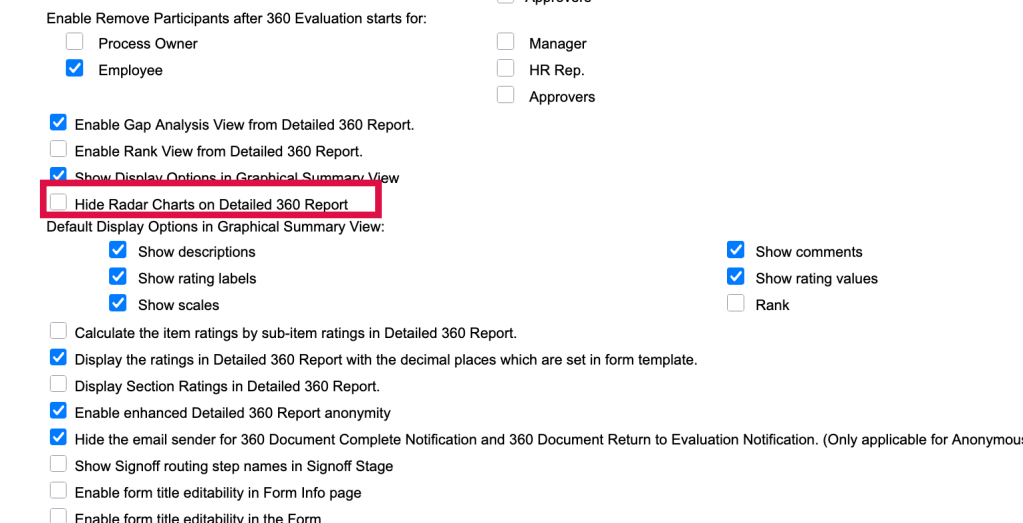
New switch to hide Radar Charts on 360 Detailed Reports
In the Advanced Settings for a 360 template in Manage Templates, there is a new option to hide radar charts on the Detailed 360 Report. The switch “Hide Radar Charts on Detailed 360 Report” is turned off by default.
Advanced Settings – Option to Hide Radar Charts on Detailed 360 Report
Minor 360 Review Enhancements
There are new visual and functional enhancements in this release.
The spacing of Competency and Objective sections have been improved
When adding back deleted participants during the Evaluation stage, participant’s original category information is retained and pre-filled in the Add Participants dialog
The Suggestions for Improvement section in Assisted 360 Reviews Insights now includes links to generate development goals
Error messages now explain the issue and provide troubleshooting.when users open, send, save, or perform other actions on a form
Information about behaviors (names, descriptions, ratings) is now used as input for generating comments
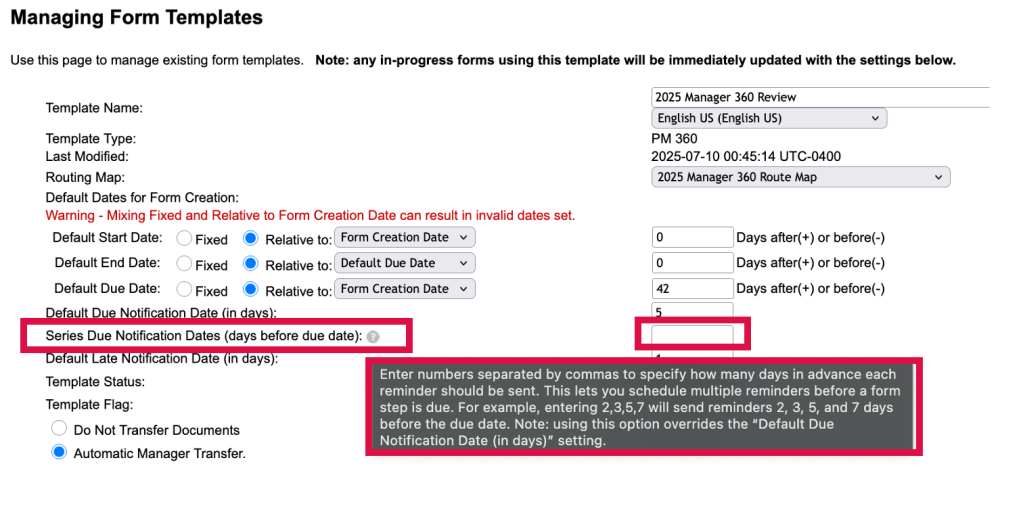
Multiple Review Reminders for Upcoming 360 Review Steps
You can now schedule several reminder notifications to prompt participants before a 360 review step is due.
In Manage Templates, in the Advanced Settings for a 360 template, there is a new option, “Series Due Notification Dates (days before due date)“. Using this option enables you to schedule multiple reminders when using step due notifications for the template.
You may set a series of reminders before a step due date. Simply enter the number of days prior to the step due date to define how many days in advance reminders are sent. Separate each number of days with a comma.
New Series Due Notification Dates
Using this option overrides any settings for the existing option Default Due Notification Date (in days), which supports only a single reminder.
To learn more, see the full set of documentation in the What’s New Viewer here.
Performance review periods can extend over several months, and during this time, organizational changes such as reassignments or department shifts may occur. One common scenario involves a manager transition: a situation where an employee’s manager moves to a different department or role. This raises an important question: What happens to the employee’s in-progress performance form? Should the form remain with the original manager, or should it transfer to the new manager?
This article explores the impact of manager changes on performance forms and the system settings that determine which manager will have access to these forms. We will first outline the various trigger events that can cause a manager change, and then discuss the settings within the Performance Management (PM) form template that govern the transfer process.
Manager changes can be triggered by several actions, each of which can prompt a document transfer based on predefined rules. These trigger events include:
Manual Change: Executed via Admin tools under Manage Users > Documents Transfer.
Automated FTP Employee File Import: Transfers are configured during the initial setup of the FTP process and remain unchanged unless manually adjusted.
Manual Employee File Import: This option allows for different settings with each import, potentially leading to varied results.
Employee Change Engine: Beyond standard manager changes, this engine can trigger document transfers based on other criteria such as job code or location changes.
We will examine these trigger events in greater detail later. For now, we turn to the advanced settings within the PM form template that control the outcomes of such changes.
PM Form Template Advanced Settings
The advanced settings within a performance form template provide several options to manage what occurs when a manager change takes place during the review process.
Automatic Manager Transfer Options
These settings are designed to ensure a seamless transition and appropriate document handling. The following are key settings available:
Automatic Insertion of new manager as next document recipient if not already: This option automatically inserts the new manager as the next document recipient, ensuring continuity in the review process. The original manager is removed from future steps.
Automatic Inbox Document Transfer to New Manager: If the form is in the original manager’s inbox at the time of the change, it will be transferred to the new manager’s inbox. The original manager retains a copy, which will not be updated with new information.
Automatic En Route Document Transfer to New Manager: Similar to the inbox transfer, this setting moves the form from the original manager’s En Route folder to the new manager’s folder, again leaving a static copy with the original manager.
Automatic Completed Document Copy to New Manager: This option ensures that all completed documents are copied to the new manager’s Completed folder, providing them with a comprehensive view of the employee’s review history.
Hide Visibility After Manager Transfer: When enabled, this setting removes the original manager’s visibility of the form once it has been transferred, thereby restricting access to only the new manager.
Do Not Transfer Documents
Also found in the form template advanced settings, selecting this option means forms will not transfer when the manager changes regardless of any other settings configured elsewhere.
Document Transfer Tools
Once the appropriate settings have been enabled within the form template, several tools are available to trigger the document transfer upon a manager change. These include:
Employee Import: The employee import function allows for manager updates and works in conjunction with the automatic transfer settings to ensure smooth transitions.
HRIS Sync: This tool updates the manager on the effective date of the Job Info record and synchronizes the change to the appropriate user data.
Manage User: For one-off situations, this tool enables the manual update of an individual employee’s data, prompting a document transfer as needed.
Best Practices and Considerations
Handling manager changes during performance reviews requires careful consideration to maintain the integrity of the review process. It is crucial to align the system settings and transfer tools with your organization’s specific needs and workflows. For instance, the Employee Change Engine can be used to ensure that forms remain with the original manager until the review is completed, avoiding disruptions during critical evaluation periods.
Additionally, enabling the Automatic Fixing of Document Transfer and Change Engine Issues feature can help mitigate risks associated with RBP refresh failures, ensuring that document transfers are not blocked due to system errors.
Conclusion
Manager changes during performance reviews can present challenges, but with the appropriate settings and tools, organizations can effectively manage these transitions. By ensuring that performance forms are properly transferred and that review processes are uninterrupted, businesses can maintain consistency and fairness in employee evaluations.
For assistance in implementing or supporting your SAP SuccessFactors system, please contact us at info@worklogix.com. You can also download our support services brochure or visit our implementation page for more information.