As year-end approaches, it is common for many companies to take a second look at their employee performance and goal setting processes. In the past few weeks, I’ve been helping multiple companies revamp their employee performance processes. While some are just tweaking current forms and processes, others are considering including a new and often enlightening process – 360 evaluations.
What is a 360 evaluation?
The idea behind a 360 evaluation is to get a picture of how others view your performance from all angles. This means that in addition to getting feedback from your manager (top down), you also get feedback from your own direct reports (bottom-up), peers (side), and even external sources (vendors, business partners, customers, etc.).
Why do companies implement 360 evaluations?
Receiving feedback from a variety of sources helps create a more complete picture of how an employee is performing and/or perceived to be performing from different angles. 360 evaluations can help uncover trends and gaps in these different angles. For example, a manager may consider an employee a top performer, but when feedback is asked from peers or external sources on an anonymous basis, the employee might get different feedback (“He’s always on top of his own tasks, but sometimes at the expense of the team as a whole when we need his support”). Similarly, an employee may not be considered a top performer by a manager, but feedback from others could reveal a lot of solid performance feedback into which the manager never previously had sight (E.g. “She’s been so helpful in getting my career on the right path and helping me with work tasks at the expense of her own!”). Allowing this feedback to come to light can help employees and managers work to truly improve employee performance. We’ll take a look in a moment at how SAP SuccessFactors 360 evaluations aid in attaining this kind of feedback.
Walk-through of a 360 form in SAP SuccessFactors
360 forms are launched just like performance forms are. However, it is important to note that 360 forms use a separate screen for launching (don’t worry, this screen pretty much works the same as the other launch forms screen you are used to. After picking a target population, the admin can launch just like a normal performance form.
Search bar showing separate launch screen for 360 forms
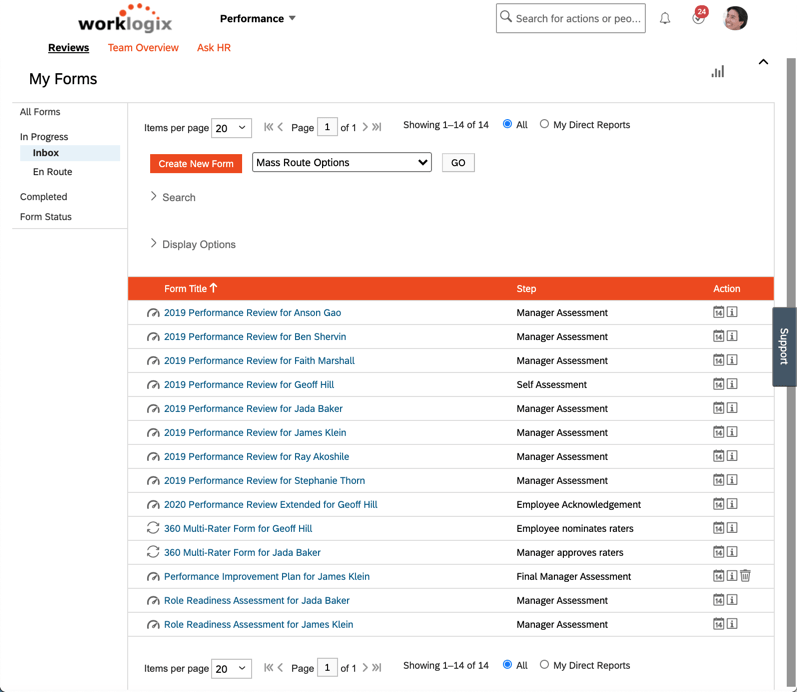
360 forms will also show up in the performance inbox like other performance forms, but with a different icon. It is important to recognize that 360 forms use a template type than regular performance forms and get treated slightly differently in these respects.
View of Performance Inbox with both 360 and regular performance reviews
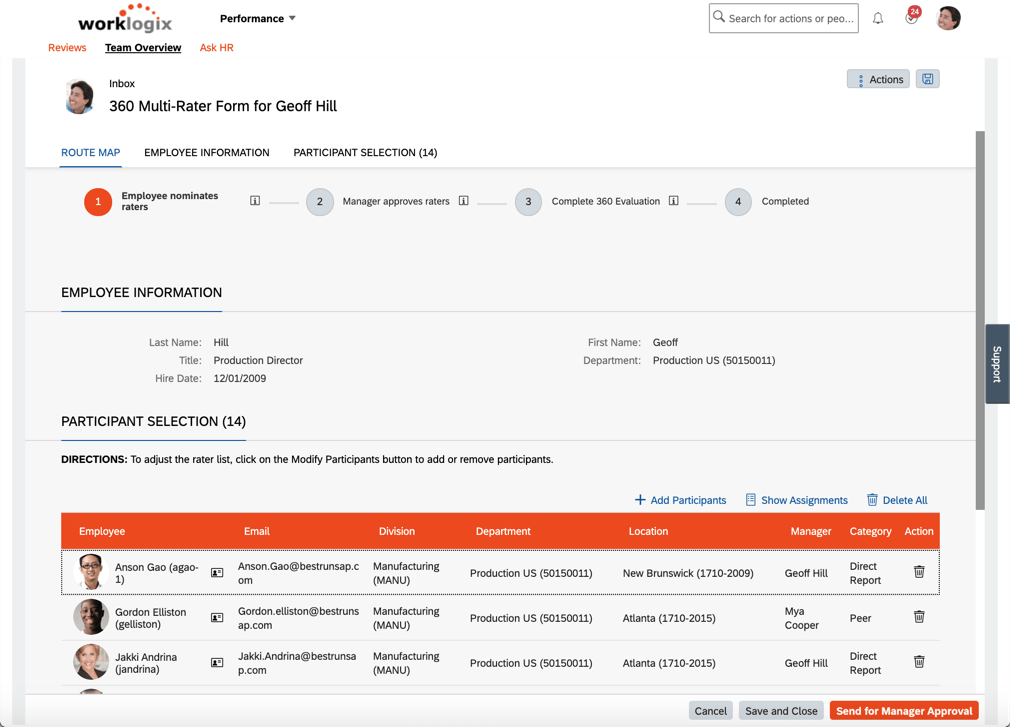
Once the first person in the route map gets the form (in this case the employee), they need to choose who will be involved in the evaluation. The system can be configured to default in people for categories like direct reports, manager, and peers.
Employee nominates raters step of 360 review
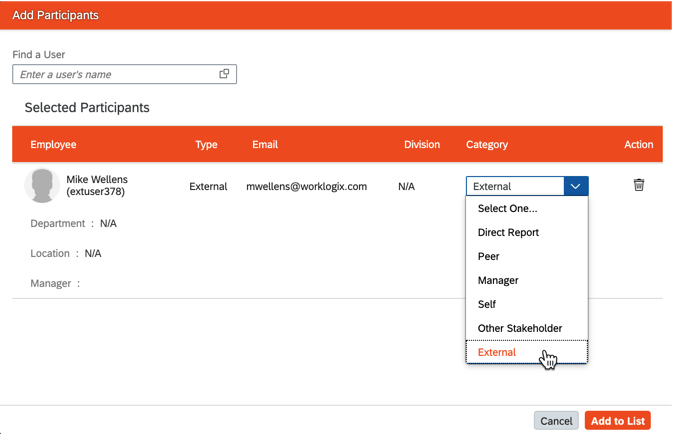
Users also have the option to add external participants as shown below by simply providing a first name, last name, and email and then choosing in what category the person should be included.
Adding an external participant
Once the user is finished adding participants, there is usually an approval step prior to the evaluations being sent out. Evaluations can be designed using sections similar to those you are used to seeing in a standard performance review form. There are sections for objectives, competencies, as well as an introduction and a section for the subject’s information. Unlike regular performance forms that can be configured heavily on the online editor in “Manage Templates”, 360 forms can only be fully setup by partners or SAP (though much of the config is done in the online editor).
For internal participants, the evaluation is sent to the user’s performance inbox like the typical performance reviews where they can then open the form as shown below.
360 Review Form Sent to Evaluator
In the case of external participants, after approval of the evaluators, an email is sent with a link that allows external users to access the form. This can be a security consideration for some organizations since the link is only as secure as the receiving email system.
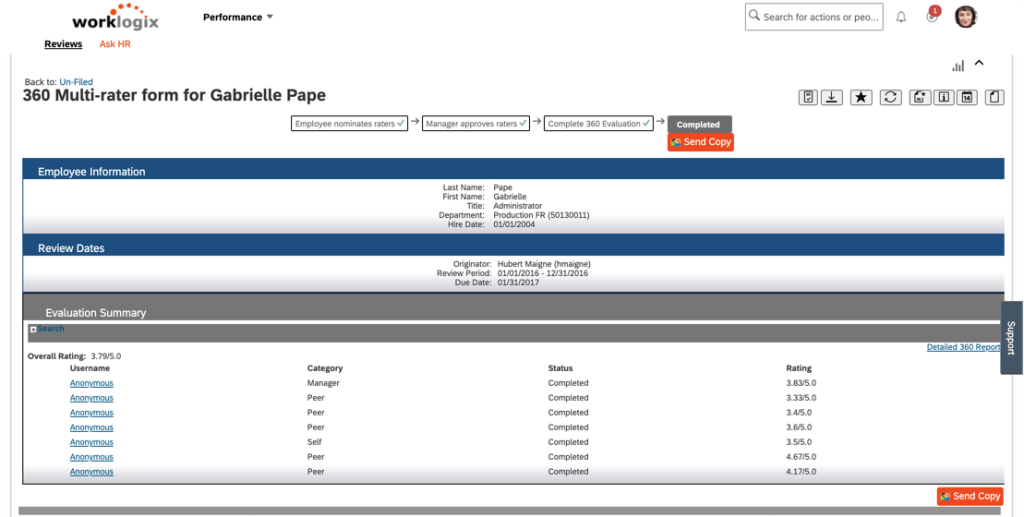
After all evaluations have been completed, the form is put in the completed status and the employee / manger / etc can view the results depending on permission settings. You can see an example completed performance form below.
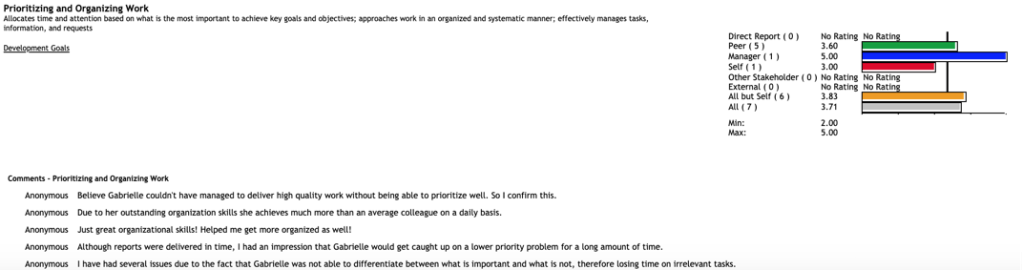
Completed Review showing Anonymous ratings
One key advantage of the 360 form in SuccessFactors over the typical annual performance review is that the 360 feedback comments and ratings can be made anonymous. Obviously the user would know who their manager is, or they might be able to derive who the other evaluators are based on category if there are only one or two – so the forms allow you to configure minimum counts in each category as well as rollups to combine categories to help keep anonymity. The user can click on the link for each reviewer to see the details of each review and create an HTML or PDF printout of the details as shown below.
Printed Detail of Individual Review Feedback
The form also has a nice detailed report showing the combined feedback comments and overall ratings by category. This can help the employee and manager understand where any gaps between self and manager evaluation ratings may exist along with other types of ratings from other categories. For examplem we can see below there is a large gap between the manager’s perception and the employee and other’s perception of “Prioritizing and Organizing Work”. Perhaps the manager is getting too much priority and the employee needs to focus on the work the team as a whole needs completed!
Wrap Up
After this quick walkthrough, hopefully you can now see the advantage of 360 forms as an insightful tool to get employee performance feedback from a variety of sources and understand what a typical end-to-end 360 process looks like.
For more information about 360 forms and other talent management modules in SAP SuccessFactors, check out our book here!
Do you need help implementing or changing your 360 form or other performance and goals processes? Contact us at info@worklogix.com.
Companies are hiring! A recent LinkedIn article shows that individual companies are now hiring 10,000s of new employees. This is great news for the economy. We at Worklogix have also seen customers gearing up their recruiting systems. But all this renewed activity in the “New Normal” raises the question “How do we keep everyone safe during the process without sacrificing the candidate experience?” In this blog we share how we’ve helped customers expand their recruiting capabilities with SAP SuccessFactors technology to keep candidates and current employees safe.
Engagement
Just because there are more people looking for jobs doesn’t mean engagement needs to go down. Quite the opposite–it means now is your chance to engage the most people to get the best talent! If your company isn’t hiring yet, it makes the challenge even more important because without any postings, you’ll need to come up with creative ways to keep people checking back in with your career site. We’ve helped companies integrate with tools like chatbots that interact with candidates to document their interests and create talent profiles that can be used to trigger email updates. If you are wondering how to create talent pools and target them with email campaigns within SAP SuccessFactors, checkout our other blog article “Actively Engage Prospective Candidates with SAP SuccessFactors Recruiting CRM Features“. Email campaign content can range from virtual career fair announcements and updates on postings, to videos featuring real managers describing why they like working for the company and what they are looking for in a good candidate.
Automated Assessments
Assessment Status and Scores showing within Candidate Overview Screen in SuccessFactors
Even prior to COVID-19, we’ve been helping customers sift through 1,000s of candidates with automated assessments. With more unemployed people seeking jobs, there is increasing pressure to comb through even more candidates per posting. Automated assessments can take the form of surveys or even Artificial Intelligence. For example, we’ve help customers automatically send out 3rd party survey assessments immediately upon applying or at other stages in the recruiting process. From there, the candidate can either be automatically disqualified or be sorted into different statuses and/or given a rating to easily compare against others. Assessment status and scores can also be integrated directly into the SuccessFactors user interfac as shown in the screenshot above and even sorted in descending order for maximum visual efficiency for recruiters. We’ve also worked with cutting edge vendors to give candidate similar ratings based on resume and candidate profile content using AI technology.
One-Way Interviewing / Virtual Interviewing
As in-person interviewing takes on new risk, many are turning to one-way interviewing and/or virtual interviewing. We’ve helped customers setup their SAP SuccessFactors systems to automatically trigger 3rd party video interviewing systems when placed in an interview status. Typically, after the status trigger, the candidate gets an email with instructions, perhaps to download an app on their phone. In a one-way interview scenario, candidates are prompted with specific questions and are allowed to record an audio or audio/video segment answering each question. The recruiter then receives the segments in the vendor system and can even get automated system feedback on how the candidate answered. The advantage here in addition to not having to meet in person is there’s no need to work out scheduling issues and the candidate can often re-record until they are satisfied with the answer they have provided. Two-way interview automations often take the form of automated scheduling systems ending in a virtual conference call.
Will I have to work on site once I get the Job?
Depending on the position, this is probably a question on many candidates’ minds when applying to a new position, and one that recruiters should be prepared to answer with confidence. At Worklogix, we’ve helped companies flagging their positions to denote how critical being “in-person” is to the role and even denote what kind of proximity to other people or exposure risk the role may require. By expanding position objects in the SuccessFactors MDF and linking the field to the requisition, recruiters can post positions and communicate with candidates clearly about the on-site expectations of the role are.
Automated Drug Screening and Background Checks
While some companies may choose to forego drug screenings, others like those subject to DOT regulations have no choice. A recent SHRM article talks about the pros and cons and realities of drug testing during COVID. The question seems to be, are we doing more harm by not conducting screenings designed to provide a safe work environment for employees? Giving candidates options might help here. We’ve helped many customers setup automations with a variety of background check & drug screening vendors. Some of these vendors allow candidates to choose from a variety of facilities that may have different safety options candidates can choose from and feel more comfortable. In a typical automation scenario, the candidate is moved to a background screening status in SuccessFactors which triggers a call to the vendor, which in turn sends an email to the candidate to provide needed information and choose a drug screening facility. Results can also be shown directly in the SuccessFactors UI similar to assessment results.
Delaying I-9 Verification
Once a candidate is ready to hire, companies can also delay unneeded on-site attendance by delaying I-9 verification. As you may be aware, the Department of Homeland Security has delayed the need to verify employee work authorization documents. You can read the updates from DHS here. To comply for this, SAP has made updates to the existing Onboarding 1.0 process. You can read the full SAP note on the COVID-19 onboarding process here. For Onboarding 2.0, the US forms will be out as part of the H2 2020 release.
Wrapping up
Online engagement using chatbots and email campaigns, automated assessments, virtual interviewing, flagging positions for work conditions, automated background checks, and I-9 updates are just a few examples of how company recruiting initiatives are working to make the recruiting and onboarding process both safe and efficient during COVID-19.
In the past few days, SAP SuccessFactors has completed moving the H1 2020 release into production. For some well-prepared customers, users are excited about new features they are starting to enjoy. Others might be feeling some pain with critical issues that have arisen unexpectedly. Still others might not have done much preparation at all and are wondering if they missed something. In my experience consulting and providing production support services, I’ve seen all 3 types. Hopefully after reading this quick article you’ll always fall into the first category!
Note: you will need an SAP S-ID to access all of the links in this document
The preview dates and production dates are posted in the upper-right-hand corner of the blog. Preview date refers to the date the release will be put into the preview environments. You know your environment is in a preview datacenter if the url has preview in it. For example:
Historically SAP SuccessFactors and SuccessFactors prior to the merger conducted quarterly releases. However starting in 2020 SAP reduced the release time to every 6 months. While I haven’t conducted a survey, my guess is most customers and SAP are pretty happy about this as it gives much more time to properly prepare. With a quarterly release, by the time you finished your regression testing it was already time to start prepping for the next release and keeping dedicated resources onboard to only conduct regression tests was impractical. I’m sure it was a similar story on the SAP side of the house.
Step 2: Read the Documentation
SAP changed how the documentation works a bit this year. The first document you should read is the Road to Release document which is also available on the SuccessFactors Community Product Updates blog. The latest road to release document tells you how to sign up for newsletters to keep you updated and also outlines some steps similar to the ones in this blog I’m writing. The document is informative and a must read, but realistically I treat is as a pamphlet on when documentation will be released because in my opinion it focuses only on new features glosses over any regression testing and misses a few key things customers should do and know that I’ll point out in this blog.
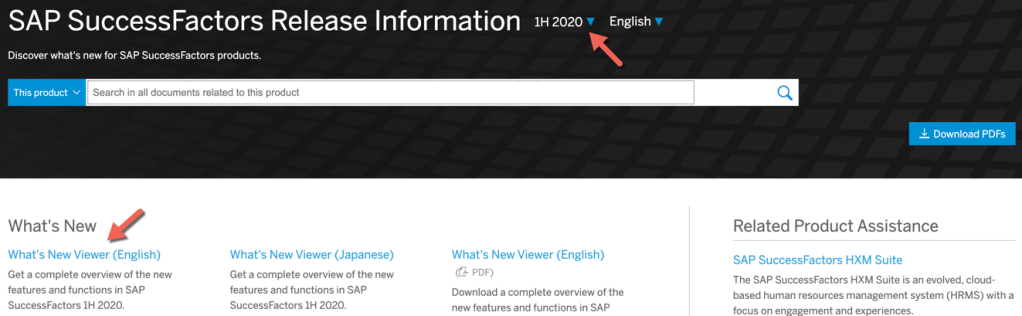
Next, given that it’s a week or so prior to the preview release (which is when SAP releases the detailed documentation), take a look at the documentation here:
The above link lets you search the documentation for every new feature – so if you choose to turn on a new feature, this will let you know what administrator steps to take as well as some basic end user testing scenarios. You can also choose prior releases as well from the drop down above the search bar.
However, before you start searching for features to turn on, you’ll want a god’s eye view of what’s available to you. Click the link to the “What’s New Viewer” on that same page. This tool will allow you to filter by specific modules to find what’s relevant to you, providing a brief summary of each feature.
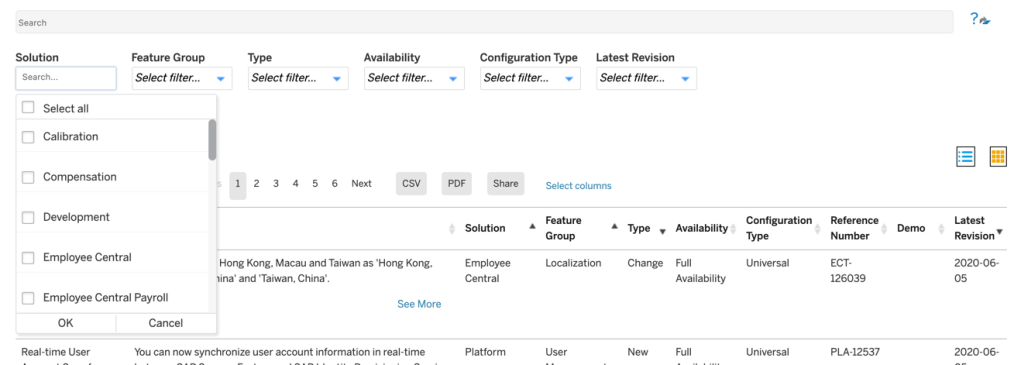
What’s New Viewer
The key concept to understand when exploring this tool is the configuration type. “Universal” means that all customers will receive the feature on preview and production release dates without taking any action. “Admin Opt-In” means customers can opt to receive the feature by taking the steps outlined in the detailed documentation (search for the name of the feature in the big search bar in the first screenshot and you’ll find these steps). “Admin Opt-Out” means you’ll need to follow similar steps to not receive the feature. “Provisioning Opt-In” means you will need a partner and/or SAP to follow the steps in the detailed documentation to turn the feature on because only they have access to provisioning to do so.
There’s links to other documents on the SuccessFactors Community Product Release Blog, however if you like to jump straight to the facts and avoid the fluff, the ones I mention above will get you on your way.
Step 3: Analyze and Plan
Now that you know the dates and the scale of what’s being impacted by the release, you can setup a calendar plan and resources to execute the plan. A sample plan might roughly look like the below:
Preview Release minus 1 week – IT Team reviews release documentation
IT Team Meets with Stakeholders with abridged list of key features that may interest the business and discusses regression testing resources
Preview Release Date – Regression testing commences
IT Team reports any found defects to SAP via customer ticket
Preview Release plus 1 week – IT Team and/or stakeholders attend Q&A sessions with SAP to clarify any feature questions
Stakeholders report which opt-in features they would like to explore in preview
Once Regression testing is complete, IT turns on opt-in features and/or engages SAP/Partners to turn on any provisioning opt-in features
Stakeholders explore and test functionality in preview environment and finalize which features will be turned on in production
Communications and training are drafted as needed on any new features
Production Release
Stakeholders report any production regression Issues to IT who reaches out to SAP as needed to open customer tickets
IT Team and/or Partner/SAP turn on opt-in features
Stakeholders report any production new feature Issues to IT who reaches out to SAP as needed to open customer tickets
Step 4: Regression Test
Being a cloud product, there’s a pretty high level of confidence that the system will continue to function as normal after release since both SAP and numerous customers are all collectively testing the same set of code. However, if you want to err on the side of caution, you may wish to regression test your key business processes in your preview environment prior to turning on any new features. In particular, you may also want to focus on business processes impacted by universal changes. The key advantage here is being able to report issues to SAP ahead of production release so there’s a solution before it becomes a problem! Often customers will reference their test scripts from their initial implementation and update them for any universal features.
Step 5: Explore New Features
Once you’ve explored the documentation on new features and have agreement with business stakeholders on what should be explored, it is time to start playing!
If you’ve chosen to regression test, I’d recommend executing that prior to turning on any new opt-in features to keep troubleshooting issues less confusing. For example, if you’ve turned on a feature you later decide you don’t want and later find a regression test issue, it may not be clear if that issue will occur in production or not. In fact, some customers who only have 1 preview and 1 production environment wait until after production release before exploring new features in their preview environment so that there is clarity on what production will look like and what issues might arise prior to sandboxing a bit with new features. If you have 2 preview environments at your disposal, then these activities can be done in parallel more confidently.
Step 6: Release Friday – Stay Away!
Typically, a release starts on a Friday evening up-until early Saturday morning. While you might try to access the system and be able to get in, I don’t recommend it. SAP will be loading code and restarting services. There’s no guarantee any data you save or changes you make will be there the next day. Have a nice weekend and come back on Monday and be glad you invested in a cloud product that handles this for you!
Step 6: Release Monday – Be on the Alert!
I don’t think I’ve ever turned on a new feature in the first week of a production release unless it has been a business-critical function/feature. SAP is wise enough to start production releases on Friday evening so that if things go wrong, they’ve maximized the time available to them before customers will come back Monday morning. However, just because the system is up does not mean everything is perfect. Often, SAP is very busy handling new tickets related to the release. If you are experiencing an issue, report it ASAP, but also be realistic. If it is a critical issue that lots of customers are experiencing, it will get fixed very quickly. If it is an issue unique to your organization and not business-critical, you may be waiting a couple weeks or more for resolution.
Step 7: Turn on Your Production Opt-Ins
Once you are comfortable your system is stable, it is time to turn on your opt-ins in production! You can follow the steps outlined in the detailed documentation that you followed in preview again or use instance sync depending on the particular configuration.
Step 8: Rinse and Repeat
Congratulations! You’ve made it through your release! Time to check back on the dates for the next release!
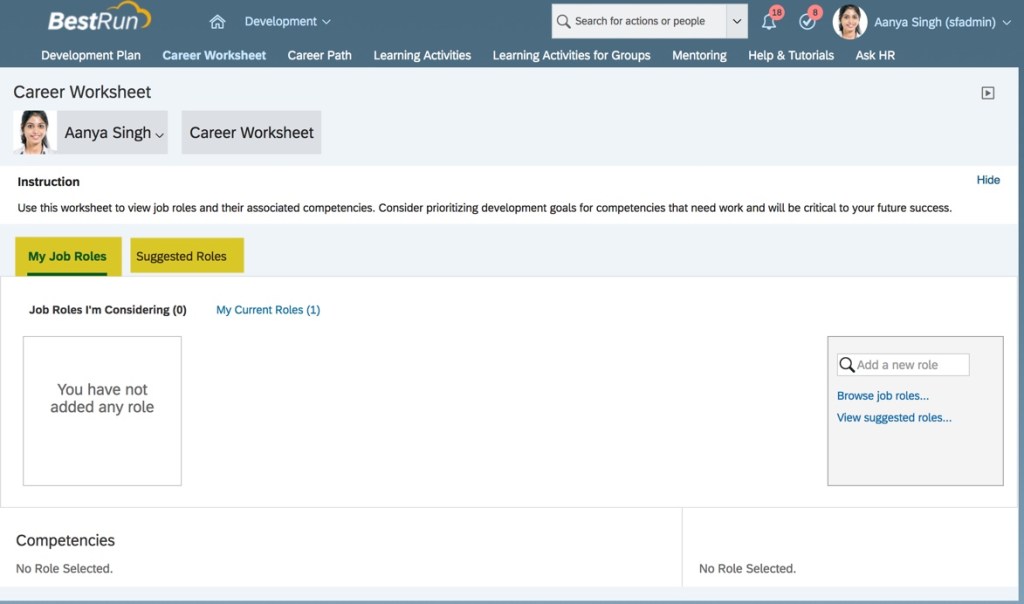
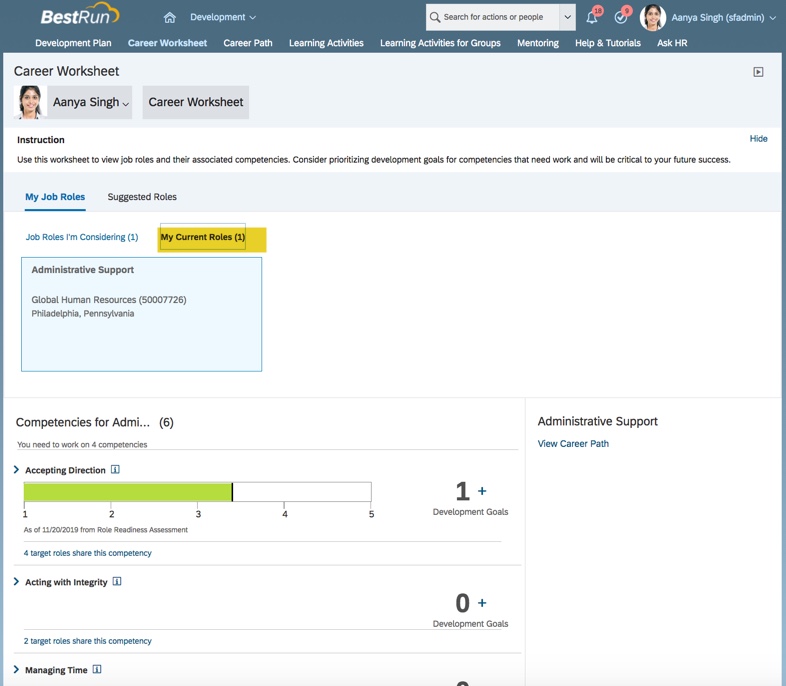
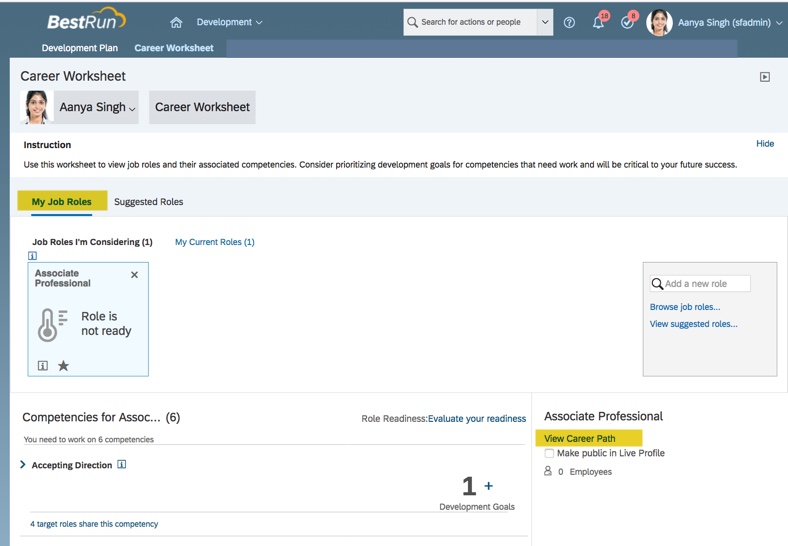
Employees are empowered to manage their career through the use of the SuccessFactors Career Worksheet. The Career Worksheet is a component of the Career Development module which allows employees to view details about job roles that interest them, see the role’s associated competencies and select any as targeted or future roles.
Career Worksheet prior to selecting targeted roles
When Job Profile Builder (JPB) is enabled and job profiles are defined, a switch may be set so that the Career Worksheet syncs with JPB. The sync enables role details from JPB to be used in the Career Worksheet.
How does the Career Worksheet work?
Employees may identify roles or career paths they may be interested in. They may the view details about job roles, including the associated competencies. This will enable the employee to gain an understanding of the development effort required to move into these roles.
After the employee selects a job role that they are interested in, there is link on the Career Worksheet to a form that evaluates their readiness for the role. The form measures the readiness by the rating the competencies associated with the target role, not the competencies of the employee’s current role.
The results of the role readiness form help employees plan their career development. By adding roles they are considering to Career Worksheet, they can track and measure their development to prepare themselves for the future roles and responsibilities.
The Career Worksheet also provides a competency gap analysis so the employee can see areas they need to work on in order to be ready to move into the role. This enables them to create development goals to help them attain the needed competencies to progress.
The Career Worksheet may also include a readiness meter based on a readiness calculation which computes a competency match score which compares the employee’s competency rating with the expected ratings for the role. This percentage shows how ready an employee is for a targeted role.
Components of the Career Worksheet
Worksheet tabs
The Career Worksheet contains two tabs: My Job Roles and Suggested Roles.
My Job Roles tab
My Job Roles tab contains two sub-tabs: Job Roles I’m Considering and My Current Roles.
Each sub-tab label includes a job role count.
The Job Roles I’m Considering tab displays a job role count of zero until job roles are selected. This sub-tab will not contain any data or competencies until the employee selects any future targeted role(s).
Job Roles I’m Considering sub-tab contains no roles or competencies prior to selecting targeted roles
The My Current Roles sub-tab displays the employee’s current role and the competencies and any development goals associated with each competency.
Competencies associated with current role
Job Roles I’m Considering sub-tab
The employee may browse all job roles or the system generated suggested roles.
Employee may search for job roles
Click on Browse job roles… to see roles organized by job family. The employee may select multiple roles as target roles.
Select roles
To select targeted roles from the My Job Roles tab, click on View suggested roles…
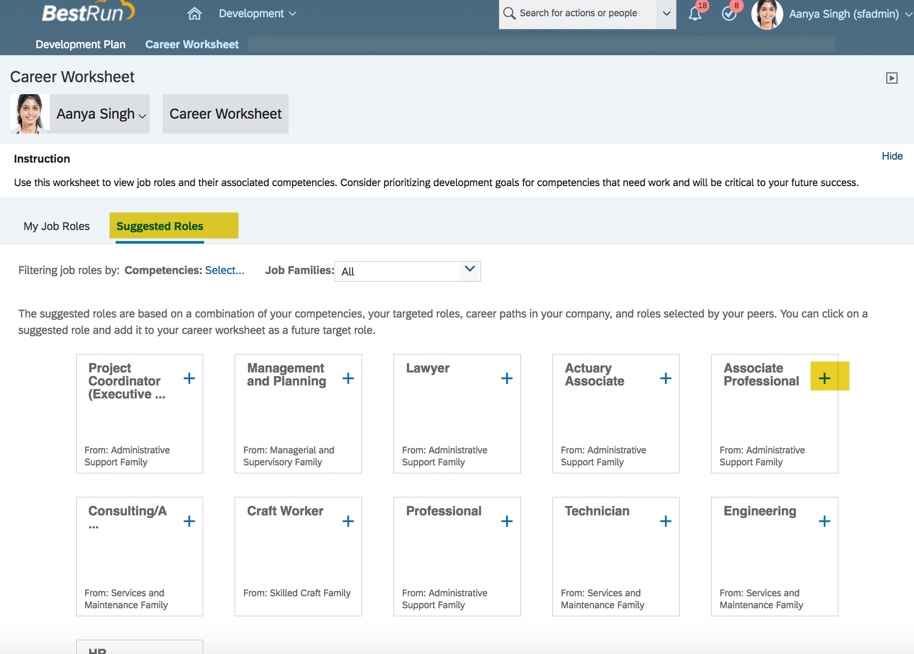
The Suggested Roles tab will display.
All suggested roles for an employee
If filtering is enabled, the employee may select the job family or specific competencies to find roles for.
Selection of competencies to filter by
This filter will cause the suggested roles to display only the roles that contain the selected competency.
Suggested roles based on selected competency
The other method to see the suggested roles is to go directly to the Suggested Roles tab on the Career Worksheet. This tab will be discussed later in detail.
My Current Roles sub-tab
The My Current Roles sub-tab displays the employee’s current role and the competencies and any development goals associated with each competency.
The competencies mapped to roles are the only sources of competencies used on the Career Worksheet. This is where the job profile builder comes into play. The components of the job role from Job Profile Builder are pulled into the Career Worksheet. The roles seen on the worksheet are linked to a job code (job classification) where the competencies are mapped.
Competencies for a role come from the mapped competencies of a role in JPB
Any existing development goals linked to the competency are included along with the development goal count. There is also an option to add development goals to the role’s competency.
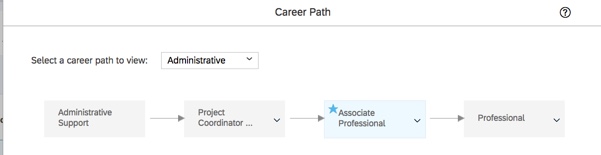
If the current role has a career path, it may be viewed on the My Current Roles tab. This is a graphical representation of the progressive roles an employee may hold as they grow within the organization.
Career Path for current role may be viewed from My Current Roles sub-tab
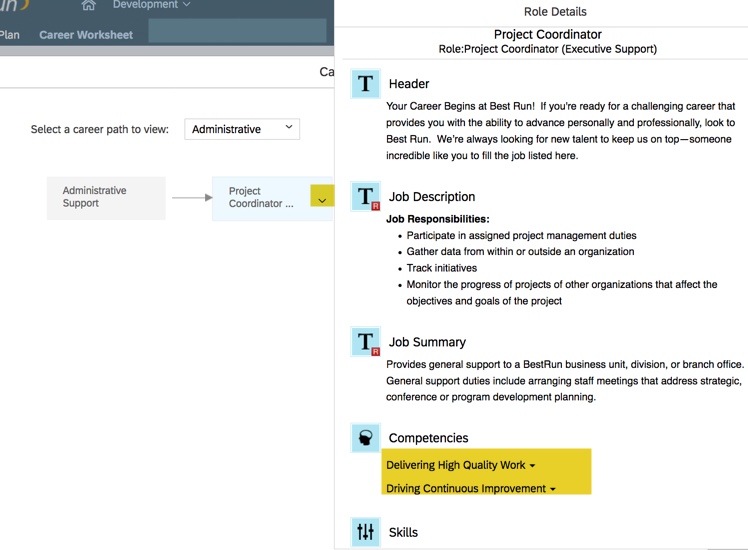
Any role within the career path may be viewed to see the job profile which contains the role description and competencies for the role.
My Current Roles sub-tab displays all competencies associated with the roleJob profile for a role with all of its components
Suggested Roles tab
The suggested roles are based on configured criteria. The system utilizes an algorithm to produce the list of suggested roles and calculates a score for the role based on proximity in Career Path, Competency, Job Family, Open Positions and Popularity within team.
View of Suggested Roles tab
Add a Targeted Role
Employees may click on a suggested role and add it to their career worksheet as a future targeted role.
Within the Suggested Roles tab, clicking on the plus sign for a role to add it as a target role.
Clicking plus sign for a role will add it as a targeted role
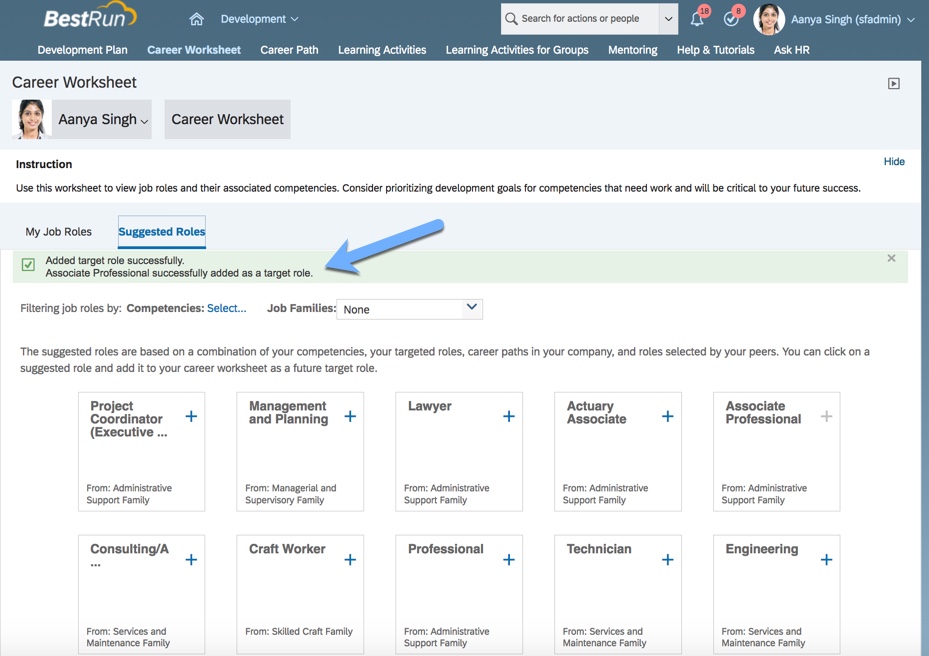
Once selected, a message displays that the role has successfully added as a target role.
Role has been added as a target role
A targeted or future role will be seen on the My Job Roles tab, Job Roles I’m Considering sub-tab. The competencies associated with the role are listed as well. If the employee’s current role contains any of the same competencies and they have a development goal linked to a competency the development count will also be listed.
Roles under consideration
It is also possible to view the career path for any roles under consideration. Within the career path, a role may be selected to add as targeted role.
May view career path for a role under consideration
The career path for the job role displays. The job role in the career path is highlighted and starred.
Entire career path of targeted role displays
Any role within the path may be selected as a targeted role.
Once selected, the targeted role appears on the Career Worksheet as a Role I’m Considering sub-tab within the My Job Roles tab.
Targeted Roles Icons
Once a target role in selected, on the Job Roles I’m Considering sub-tab, an Information icon will be visible and will provide instruction on how to navigate through the selected roles and add or delete roles.
Contents of Information icon
Each targeted role will have a Readiness meter along with up to 3 icons: Role Details, Make this the default target role and Add New Learning Activity.
Note: if LMS is not used or not linked to the development module, the learning activity icon will not be present.
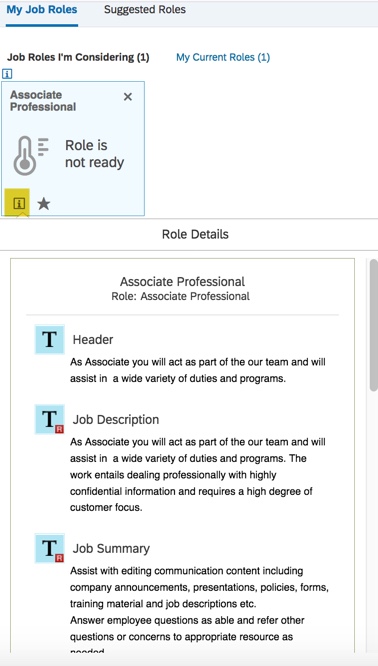
Click the Role Details icon to see the job profile associated with the role. The contents of the job profile may include the role description, competencies, minimum requirements, education, certifications, and job responsibilities.
Role details will display
Clicking the star icon will make this the default target role.
Click star icon to make the targeted role the default
After choosing any additional job roles, selected targeted roles will display on the Job Roles I’m Considering sub-tab. Until a role readiness form is completed, the readiness meter will show that the role is not ready.
Readiness Meters for targeted roles prior to evaluating readiness
Role Readiness
An important component of the Career Worksheet is the Role Readiness Assessment form. The form creates metrics that help employees plan their career development. When the employee adds roles they are considering to the Career Worksheet, they can launch the form. The form enables employees to review the targeted role’s competencies and rate their proficiency to determine their readiness for the role. This allows them to identify the competency gaps for the target position or future role so that know what areas they need to work on. They can track and measure their development to prepare themselves for the future roles and responsibilities.
A few notes about the Role Readiness Assessment form
Only employees can launch the assessment form for their targeted role.
It is not possible to launch the form when proxied as another user.
There is a link within the worksheet that opens the role readiness self-assessment form, bypassing the usual form creation steps.
The form will auto-populate all of the competencies for the role.
The system uses the Career Worksheet readiness calculation to compute a competency match score which compares the employee’s competency rating with the expected rating for the role.
Any other targeted roles that contain the same competencies will have the Readiness Meter updated after the form is completed.
Once the form is complete, the updated ratings are used in the Career Worksheet to show the role readiness.
The employee may relaunch the form as many times as they like and each time the readiness will be recalculated.
Launching the form
The form is launched when the employee selects a targeted role from the Job Roles I’m Considering sub-tab on the My Job Roles tab and then clicks on Evaluate your readiness.
The employee will rate themselves on the competencies needed for the future role. These are the competencies that are mapped to the targeted role.
Ratings for each competency will be required with optional comments for each. Upon completion, form goes to their manager for their assessment of the employee’s mastery of the needed competencies.
Form as seen in the Manager Assessment step.
The Manager will get form in their inbox and will need to rate each competency, add optional comments for each competency and provide comments for areas to focus on. The ratings and comments from the employee will be visible.
After the manager step is complete, the form may go back to the employee to view and submit to completion. NOTE: this is based on the steps from the standard Role Readiness form template.
The completed form will appear in the employee and manager’s completed folder.
Both manager and employee will have copy of completed form in their performance forms folder
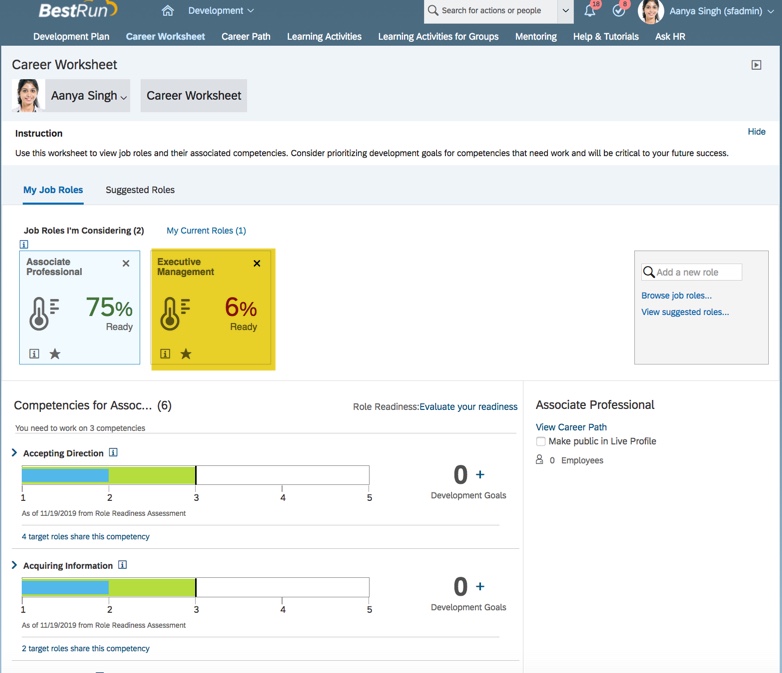
When the employee goes back into the Career Worksheet, the readiness meter for the role that the employee is considering will now contain a percentage. This percentage represents how ready they are for the role based on their competency ratings against the expected ratings for the role.
Readiness meter once Role Readiness form is completed
Readiness Meter
The Career Worksheet calculates employee readiness for a
role by evaluating the employee’s rated competencies for the future role.
The competencies for a role are configured to determine the expected rating. An employee’s readiness for the role depends on the form’s rating of the competencies against the expected ratings.
By default, the system uses the latest rating information in the system. The admin may also configure to specify a form or a couple of forms as the source of the existing ratings.
Readiness Meter for Targeted Role
Role Competency Expected Ratings
Competency mappings to roles are the sole source of competencies listed on the career worksheet. And only ratings from completed forms are displayed in the career worksheet.
Gaps are calculated using the expected rating from Families and Roles. Since expected ratings can vary by role, the same competency might display different gap values for different roles. The admin may define default weights and/or the ratings expected based on the job role.
The form can be generated again whenever Evaluate your readiness displays on the Career Worksheet. It may be relaunched again and again for the same targeted or any other roles under consideration.
Any additional forms that are completed will then recalculate the readiness meter based on the new ratings. It is also possible to add more roles to consider and run the form for the new roles. There will be a date that shows when the role assessment form was last run so you know when the readiness was calculated. The meter always uses the most recent role readiness ratings.
If any of the roles being considered have mutual competencies, the readiness meter will populate for all of them.
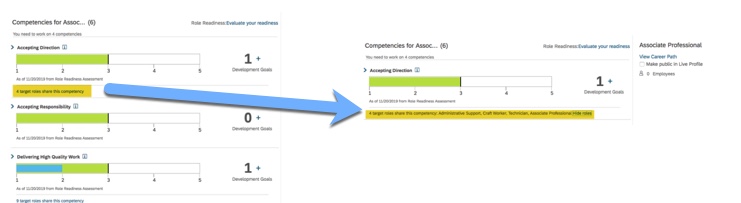
Role Readiness form completed for Associate Professional role but any other roles under consideration have readiness calculated as well.
Gap Graph
On the Career Worksheet, the gap graph shows the rating for each competency based on the form ratings and what the expected rating is. There is a gap analysis for each competency, comparing the last rating of record specified for the employee with the expected rating for that role.
The blue line in the graph represents the form rating score and the green line represents the expected rating. If the form rating matches the expected rating, the competency is considered “met”.
For each of the role’s competencies, there will be a count of the roles that also have this competency linked to it. This can be expanded to see the other roles.
The targeted role competencies that do not meet the expected rating will display first. These are the competencies that that the employee needs to develop in order to be ready for the role. These will have the green line visible in the graph because the form rating is lower than the expected rating.
Competencies that have not been met
These are the competency the employee may wish to add development goal to in order to help them prepare for this role.
The targeted role competencies that the employee has met will be displayed after the competency that need work. There will be no gap for these competencies because the form rating matches the expected rating.
Additional Features of the Career Worksheet
The Career Worksheet has a count of the employees in the targeted role. The list of employees in the role may be displayed.
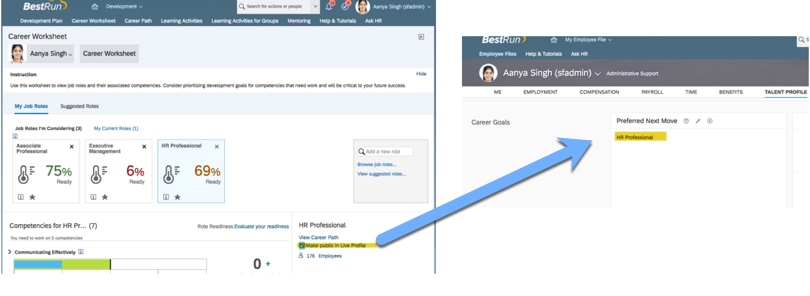
There is an indicator to set so the preferred next role appears on the profile under Preferred Next Move. Enable checkbox to make the targeted role visible in the employee’s profile. There is a link to go to People Profile. The targeted role will display as the preferred next move.
Wrap up
The Career Worksheet puts power into the hands of the employees so they can take charge of their careers and plan for the future. When Job Profile Builder is enabled, the employee has visibility to roles that will enhance their ability to drive their development and guide their career.
More to come…
Look for the next installment to discuss how to set up the Career Worksheet and Role Readiness Assessment form.
For more information about Role Readiness and other talent management modules in SAP SuccessFactors, check out our book here!
Worklogix partners with clients to plan, configure, develop and integrate HR products and custom applications. We have assembled a global team with years of experience implementing HCM solutions. Our team is dedicated to understanding your business challenges, helping you leverage your technology and implement solutions that deliver results.
SAP SuccessFactors Recruiting has a robust Employee Referral program which is easy to implement by your business partner. Current employees can quickly make referrals through the SF career site and also track the referrals and their progress. A good employee referral program helps keep employees engaged and offers a chance to make all your employees cheerleaders for the company and bring in candidates to your job openings.
With the ER program in place, employees can keep track of their referrals and the progress. If you implement monetary prizes for hires of referrals, that is also tracked. Talk about having incentive for employees to RAH RAH the company!
Work with your Business Partner to set up the appropriate settings on how you want to use ER. You can control ownership by requisition or by entire candidate and by number of days. If you use money as the incentive, you can also choose to show/hide how much money the employee is eligible to receive.
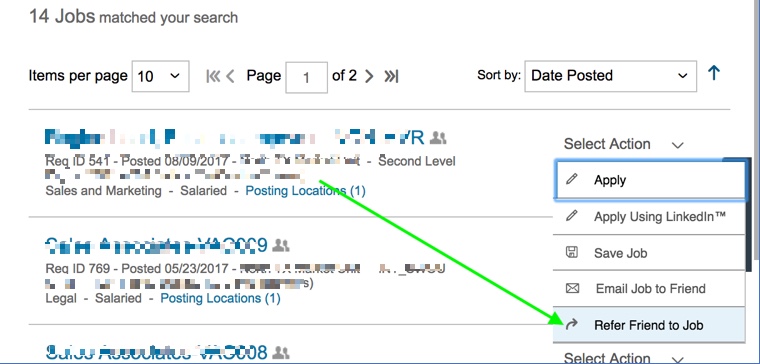
Employees can easily refer a friend through two options from the career page:
Within the search, SELECT ACTION will have REFER FRIEND TO JOB option.Within the job detail, the REFER FRIEND TO JOB option is available on top.The employee will enter the candidate’s email address to send the referral link to apply.
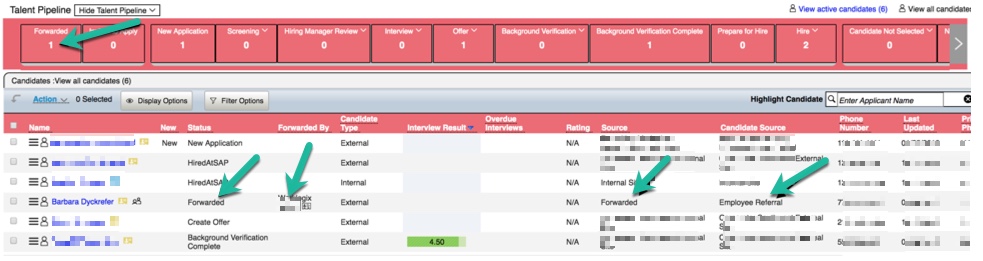
When a candidate goes through the Employee Referral link sent from the program, they will automatically come into SuccessFactors Recruiting as a referral in the FORWARD status and the referring employee’s name will be captured.
Candidate in Forward status and the Candidate Source will state EMPLOYEE REFERRALAn employee referral will have a small picture of two people by the name – if you hover over the name, the referring employee information will appear.
Since the candidate is in the Forwarded status, the recruiter can advance the candidate to INVITE TO APPLY and send a reminder email to please apply to the position. Or the recruiter can ADD TO REQUISITION and the candidate can be moved through the requisition without formally applying, if necessary.
ACTION to Invite to Apply or to Add to Requisition
And the referring employee can go to their SuccessFactors Career page and track their referrals!
But what about casual acquaintances who your employees mention openings available at your company? It would be nice to capture the referral information even if the employee and the candidate don’t go through the proper employee referral procedures. This may take a little work but it is worth it if it helps recruiting efforts and keeps employees active in the referral process. Your Business Partner can make the changes necessary to capture the data and make it reportable.
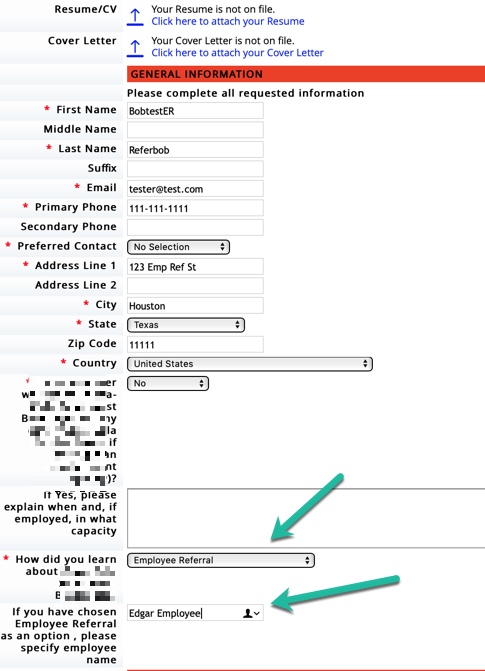
In the candidate application, most companies ask for SOURCE or how the candidate found out about the job. Usually it is a pick-list drop down list of career sites or job boards – Indeed, LinkedIn, etc. Add “Employee Referral” to the list, then add a text field following stating “If Employee Referral, put in name of employee” and you now have another way of capturing the information. If you already have “Other” as a source with a field asking for information on “Other” source, you can update it to also ask for the referring employee’s name: “If Other or Employee Referral, please state source or referring employee.” Use whatever works best to capture the information.
Candidate Application with source field
This information will not show up on the referring employee’s career page so it will be up to the recruiting team or administration to keep track of this information. But that can easily be done through Ad-hoc reporting. You may already have a report to capture candidate source. If that is the case, just add the field that contains the referring employee’s name to the report.
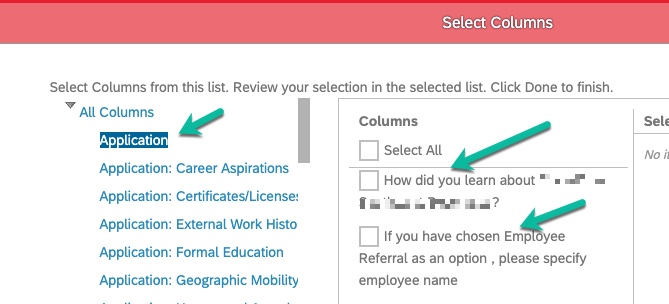
Note: Using SAP Employee Referral adds new fields to reporting to capture the information from the ER program if the candidate applies with an ER link. But for candidates who apply through normal channels and answer the “How did you learn about…” questions, you want to just use the source fields from the candidate application for reporting. Do not combine into one report or you will get duplicates and inaccurate data. Create two different reports.
Employee Referral Reporting Fields for Candidates Using the ER Link to ApplySource Fields for Candidates who choose “Employee Referral” as the Source on their Application
You can even add a filter to the report field to only pull applications that have “Employee Referral” as the source:
Having employees actively engaged in a robust Employee Referral program is a great way to bring in candidates and provide a way for employees to “sell” the company.
If you are a SuccessFactors customer (or soon to be one), here are our top five healthy behaviors to maximize the use of your SAP SuccessFactors system:
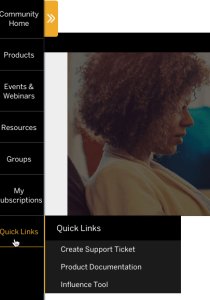
Use the community site, which is located here: SuccessFactors Community Site You’ll need an S-User ID to log in (If you don’t have an S-User ID, you’ll want to contact your SAP and/or SuccessFactors administrator at your company). You’ll want to make yourself comfortable with this site, especially the sites available under “Quick Links” on the lower left of the screen. From here, you can create a support ticket, review product documentation, and participate in SAP’s customer influence program where you can create and vote on ideas for future product enhancements.
Work in partnership with your SAP team. SAP assigns an AE (Account Executive), a CEE (Customer Engagement Executive), and a CSM (Customer Success Manager) to each customer. Some customers have additional resources depending on their support level. It’s important to establish the right relationship with these folks as they are your main communication back to SAP.
Find the right implementation partner. Most partners are not good at all things. You may want to search for partners here (Partner Certification Search, which is part of the Community Site above, rather than the Partner Finder on the SAP site. For example, Worklogix is a Recognized Expertise Partner in Onboarding/Recruiting as well as Talent Solutions (Performance/Goals, Compensation, Succession/Development), but we are not yet listed on that site.
Be realistic with software expectations. No software will be everything to everyone. Not SuccessFactors, not Workday, and not the point solutions that some business folks are scheming to buy.
Don’t forget the training. Yes, these cloud solutions are (in general) more intuitive to use, but don’t underestimate the need for training. Visit the SAP SuccessFactors HCM Global Training site in the Community site, under Resources. All too often, we see failed rollouts (or deployments that need to be reset) due to lack of training with the tool. Like all software, it’s got its quirky parts.
Worklogix partners with clients to plan, configure, develop and integrate HR products and custom applications. We have assembled a global team with years of experience implementing HCM solutions. Our team is dedicated to understanding your business challenges, helping you leverage your technology and implement solutions that deliver results.